


BRP-Rotax
INSTALLATION MANUAL
FILLING AND VENTILATION OF THE OIL SYSTEM
Introduction
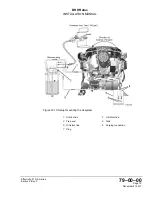
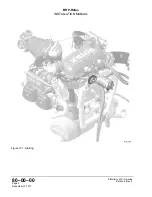
Ensure that oil lines are connected correctly and secured. Also ensure that the oil cooler
(if fitted) is in the suction line between the oil tank and the oil pump, see following figure.
Verify that the oil tank is filled up to the maximum level (to the top of the flat portion of the
dipstick). The capacity of the oil system without oil cooler and connection lines is approx.
3l (0.66 gal.). Additional oil (up to 0.5 litres (0.13 gal)) may be added to the tank for the
purpose of this procedure.
Instruction
The following work procedures must be carried out for venting the oil system:
1.
Disconnect oil return lines from the oil tank.
2.
Place the free end of the return line into a suitable container (4) below the engine.
3.
Plug open connection on oil tank with suitable air tight cap.
4.
Remove the spark plug connectors.
5.
For easier rotation of engine remove one spark plug from each cylinder.
N
NO
OT
TE
E
Prevent any foreign objects entering the spark plug hole.
6.
Using a compressed air line, pressurize the oil tank through its purging connection (6) (on
the neck of the tank). Adjust the compressor outlet regulator so that the air line pressure is
between 0.4 bar (5.8 psi) and 1 bar (14.5 psi). Do not exceed 1 bar (14.5 psi).
N
NO
OT
TE
E
The oil tank cover is not pressure-tight, some air can escape.
7.
Turn the engine by hand in direction of normal rotation until the first pressure indication ap-
pears on the oil pressure gauge. Normally this will take approx. 20 turns. Depending on in-
stallation it may take up to 60 turns.
N
NO
OT
TE
E
Do not use the starter for this purpose. Fit propeller and use it to turn the engine.
N
NO
OT
TE
E
The oil tank may empty and as a result introduce air into the oil system. Pay atten-
tion to the oil level and fill tank as required.
8.
Stop the pressurization.
9.
Open the cap for the oil return line on the oil tank and reconnect the engine oil return line to
the tank. Ensure that the suction oil line and oil return lines are connected to the proper fit-
tings on the oil tank. Note: If the oil lines from the engine to the oil tank are incorrectly con-
nected, severe engine damage may result.
10. Re-fit the spark plug. Restore aircraft to original operating condition.
11. Residual oil may have accumulated in the crankcase. Return it to the oil tank by following
the oil level check procedure in the relevant Operators Manual.
12. Fill the oil in the tank up to the full mark on the dipstick.
Effectivity: 915 i A Series
Edition 0/Rev. 0
Page 13
December 01 2017
Содержание 915 iS 3 A
Страница 10: ...Notes Page 4 December 01 2017 Effectivity 915 i A Series Edition 0 Rev 0 NOTES BRP Rotax INSTALLATION MANUAL ...
Страница 30: ...Notes Page 18 December 01 2017 Effectivity 915 i A Series Edition 0 Rev 0 NOTES BRP Rotax INSTALLATION MANUAL ...
Страница 38: ...Notes Page 8 December 01 2017 Effectivity 915 i A Series Edition 0 Rev 0 NOTES BRP Rotax INSTALLATION MANUAL ...
Страница 82: ...Notes Page 10 December 01 2017 Effectivity 915 i A Series Edition 0 Rev 0 NOTES BRP Rotax INSTALLATION MANUAL ...
Страница 108: ...Notes Page 14 December 01 2017 Effectivity 915 i A Series Edition 0 Rev 0 NOTES BRP Rotax INSTALLATION MANUAL ...
Страница 138: ...Notes Page 6 December 01 2017 Effectivity 915 i A Series Edition 0 Rev 0 NOTES BRP Rotax INSTALLATION MANUAL ...
Страница 162: ...Notes Page 8 December 01 2017 Effectivity 915 i A Series Edition 0 Rev 0 NOTES BRP Rotax INSTALLATION MANUAL ...
Страница 165: ......