background image

C

M

Y

CM

MY

CY CMY

K

www.SeaDooManuals.net

Содержание 2005 717 RFI

Страница 1: ...C M Y CM MY CY CMY K www SeaDooManuals net...

Страница 2: ...2005 Engine Shop Manual ROTAX 717 and 787 RFI ENGINES www SeaDooManuals net...

Страница 3: ...er Recreational Products Inc BRP Valcourt Qu bec Canada Printed in Canada Registered trademarks of Bombardier Recreational Products Inc BRP or its affiliates Trademark of Bombardier Inc used under lic...

Страница 4: ...OOVE CLEARANCE 4 RING END GAP 5 CRANKSHAFT ASSEMBLED ENGINE 5 CRANKSHAFT DISASSEMBLED ENGINE 6 ROTARY VALVE 8 02 717 ENGINE 01 LEAK TEST 11 GENERAL 11 PREPARATION 11 TESTING PROCEDURE 11 ENGINE LEAKAG...

Страница 5: ...SEMBLY 69 03 TOP END 71 GENERAL 73 DISASSEMBLY 74 CLEANING 79 INSPECTION 80 ASSEMBLY 80 ADJUSTMENT 86 04 BOTTOM END 87 GENERAL 89 DISASSEMBLY 89 CLEANING 93 INSPECTION 94 ASSEMBLY 94 05 ROTARY VALVE 1...

Страница 6: ...mended when considering replacement of any component Dealer and or distributor assistance should be sought in case of doubt The engines identified in this document should not be utilized on product s...

Страница 7: ...arts Catalogs When ordering parts always refer to the specific model Parts Catalogs ENGINE IDENTIFICATION NUMBER E I N 717 Engines The Engine Identification Number is located on the upper side of the...

Страница 8: ...arts which have the same or a similar function CAUTION These engines are designed with parts dimensioned mostly in the metric sys tem However some components may be from the imperial system When repla...

Страница 9: ...positions TYPICAL PAGE F01A0CT Illustration number for publishing process Subsection title indicates beginning of the subsection Dotted box contains parts of a particular model or an exploded view Pa...

Страница 10: ...her wise it must be timed Remove carburetors from intake manifold Disconnect fuel bypass line between carburetors twin carburetors Remove carburetor s from rotary valve cover DISASSEMBLY AND INSPECTIO...

Страница 11: ...ed specification cylinder should be rebored and honed or replaced A F01D8AA 1 2 TYPICAL 1 Measuring perpendicularly 90 to piston pin axis 2 Auxiliary transfer port A 16 mm 5 8 in CYLINDER OUT OF ROUND...

Страница 12: ...for a few seconds after filling If so there is a leak between piston and cylinder The recorded volume would be false Let burette stand upward for about 10 minutes until liquid level is stabilized Rea...

Страница 13: ...wise use a new piston and measure piston cylinder wall clearance following method with a new piston If piston is within specifications adjust and lock the micrometer to the obtained piston dimension F...

Страница 14: ...re gauge 2 Dial bore gauge F00B0AA 1 1 Indicator set to zero Position the dial bore gauge at 16 mm 5 8 in be low cylinder top edge F01D0KA 1 A 1 Measuring perpendicularly 90 to piston pin axis A 16 mm...

Страница 15: ...haft Alignment at Center Main Journal Since it is an assembled crankshaft it can become misaligned or deflected Crankshaft can be twist ed on center main journal changing timing of one cylinder in rel...

Страница 16: ...F01D1NB 1 1 Connecting rod journal alignment here Such misalignment may make it difficult to manu ally turn the crankshaft Verification can be done by measuring deflection each end of crankshaft If d...

Страница 17: ...01D1TA 1 1 Measuring MAG side deflection in crankcase Remove crankshaft bearings and check deflection again on V shaped blocks as illustrated 1 F01D97A 1 Measuring MAG side deflection on V shaped bloc...

Страница 18: ...Feeler gauge blade thickness according to specifi cations should fit between rotary valve and cover F01D53A 1 1 45 feeler gauge If rotary valve cover clearance is out of specifica tions machine rotar...

Страница 19: ...the edges of the seating surface and O ring groove 1 A F01D3OA SAME AMOUNT REMOVED FROM COVER SEATING SURFACE AND O RING GROOVE BASE 1 Cover seating surface A O ring groove depth must be 1 00 0 03 mm...

Страница 20: ...h a common intake manifold When installing hoses of the leak test kit use the collars provided in the kit to ensure a proper seal ing When pressurizing the engine first confirm that the components of...

Страница 21: ...ts are not leaking and pressure drops verify all external jointed surfaces tem perature sensor and the O ring between the spark plug area and the cylinder head cover If none of these components are le...

Страница 22: ...ck valve If the above mentioned components are not leak ing block both oil hoses of the rotary valve shaft using small hose pincher P N 295 000 076 on each side NOTE If leakage stops at this point pro...

Страница 23: ...pressure drops it indicates a defective MAG side crankshaft inner seal or crankcase is not sealed correctly If the above mentioned components are not leak ing and there is a pressure drops remove the...

Страница 24: ...SEAL OF ROTARY VALVE SHAFT IS SEAL LEAKING CAREFULLY INSPECT ENGINE CASTINGS PARTICULARLY THE THREADED HOLE AREAS YES YES NO PRESSURIZE ENGINE COOLING SYSTEM IS SYSTEM LEAKING CHECK TESTING KIT REPLAC...

Страница 25: ...ntering tool 420 876 922 22 magneto puller 529 035 547 19 puller plate 420 876 081 19 sleeves 420 847 220 19 SERVICE PRODUCTS Description Part Number Page anticorrosion spray 219 700 304 22 Loctite 24...

Страница 26: ...12 14 Loctite 243 15 5 5 N m 49 lbf in 13 Loctite 243 5 9 Loctite 243 7 6 145 N m 107 lbf ft Loctite 648 17 3 2 1 9 N m 80 lbf in Anti seize lubricant 9 N m 80 lbf in 1 9 N m 80 lbf in 1 2 6 N m 23 l...

Страница 27: ...against ring gear no 5 F01D47A 2 3 4 1 1 Screw 2 Extension handle 3 Puller plate 4 Sleeve Install extension handle on end of puller plate F01D48A 1 TYPICAL 1 Sleeves on opposite side Using a suitable...

Страница 28: ...ure is to find a common ref erence point on both crankcases old and new to position armature plate Proceed as follows Before removing the armature plate find a crankcase locating lug the top one in th...

Страница 29: ...C 200 F around the screw holes to break the threadlocker bond F00D09A 1 1 Heat the armature plate CAUTION Protect harness from flame Remove screws no 15 Uncrimp and unsolder YELLOW and YEL LOW BLACK w...

Страница 30: ...hat it fits around armature plate before tightening screws no 15 F00D0AA 1 1 Magneto coil centering tool Magneto Flywheel and Ring Gear Apply Loctite 648 green P N 413 711 400 to magneto flywheel mati...

Страница 31: ...unch a mark on crankcase lug aligned with plate mark The new mark on crankcase will be used for fur ther assembly positioning as a pre timing position F01D4GA 1 TYPICAL 1 For further assembly use thes...

Страница 32: ...ip installer 529 035 562 32 piston pin puller 529 035 503 28 30 piston ring compressor 420 876 979 33 rubber pad 295 000 101 27 sleeves 529 035 542 28 30 SERVICE PRODUCTS Description Part Number Page...

Страница 33: ...bf ft Loctite 243 Molykote 111 2 15 14 3 14 7 24 N m 17 lbf ft Loctite 243 Molykote 111 7 24 N m 17 lbf ft Loctite 243 Molykote 111 6 13 16 5 4 24 N m 17 lbf ft Molykote 111 9 10 8 12 11 12 11 9 10 8...

Страница 34: ...ing cylinders no 6 make sure connecting rods do not hit crankcase edge Engine in Watercraft If engine is left in watercraft refer to the appro priate VEHICLE SHOP MANUAL to remove the tuned pipe Proce...

Страница 35: ...the piston pin puller P N 529 035 503 with the sleeves P N 529 035 542 F00B0IA 2 3 1 TYPICAL 1 Puller 2 Shoulder sleeve 3 Sleeve Fully thread on puller handle Insert extractor spindle into the piston...

Страница 36: ...ton F00B0MA 1 TYPICAL 1 Remove shoulder sleeve Carefully remove the piston no 8 The needles no 11 thrust washers no 12 and the sleeve remain in the connecting rod bore and may be used again 1 2 F00B0N...

Страница 37: ...in N A NOT APPLICABLE NOTE Replacement cylinder sleeves are available if necessary Also oversize pistons of 0 25 mm 010 in and 0 5 mm 020 in are available ASSEMBLY Assembly is essentially the reverse...

Страница 38: ...e tool is available Replacement roller bearings are delivered in a con venient plastic mounting device For installation proceed as follows Align replacement roller bearing with connect ing rod bore Ca...

Страница 39: ...sleeve half Circlip Always use new circlips no 9 WARNING Always wear safety glasses when installing piston circlips CAUTION Always use new circlips At instal lation take care not to deform them Circl...

Страница 40: ...t of the same thickness However if you do not know the gasket thickness that was installed or if a crank repair has involved replacement of connecting rods refer to COMBUSTION CHAM BER VOLUME MEASUREM...

Страница 41: ...roperly aligned so that exhaust flanges properly match up with exhaust manifold no 5 The aligning tool P N 420 876 904 or the exhaust manifold can be used to align cylinders F01D44A 1 1 Exhaust flange...

Страница 42: ...of screws no 1 Apply also Molykote 111 P N 413 707 000 on threads of screws no 1 Torque cylinder head screws no 1 to 12 N m 106 lbf in as per following illustrated sequence Repeat the procedure retig...

Страница 43: ...00 001 39 PTO side ring halves 420 977 475 41 Puller 420 877 635 41 Ring 420 977 490 41 Screw M8 x 40 420 840 681 41 Screw M8 x 70 420 841 201 41 temperature indicator stick 529 035 970 44 SERVICE PRO...

Страница 44: ...lubricant 12 3 110 N m 81 lbf ft 1 6 5 6 Anti seize lubricant Loctite 642 12 4 Anti seize lubricant Loctite 243 6 6 4 5 Loctite 5910 2 11 7 24 N m 17 lbf ft 10 10 N m 89 lbf in Loctite 518 Loctite 518...

Страница 45: ...eel splines F01D1AA 1 TYPICAL 1 PTO flywheel remover Using a suitable wrench or socket with a break er bar unscrew PTO flywheel COUNTERCLOCK WISE when facing it and hold extension handle locking the m...

Страница 46: ...ck on a support Insert a pry bar between crankcase lugs to separate halves CAUTION Be careful to precision machined surfaces F01D1KA 1 TYPICAL 1 Separate halves by prying at provided lugs F01D1LA 1 TY...

Страница 47: ...g installa tion lubricate their inside diameters F01D1OA 1 TYPICAL 1 Removing crankshaft bearing As an alternate method use a bearing extractor such as Proto no 4332 and a press to remove two bearings...

Страница 48: ...TION Never use a sharp object to scrape away old sealant as score marks incurred are detrimental to crankcase sealing F00D2BA F00D2CA FIRST PASS F00D2DA SECOND PASS Finish the cleaning with acetone CA...

Страница 49: ...sem bly procedures However pay particular attention to the following NOTE It is recommended to spray injection oil on all moving parts when reassembling the engine Crankshaft End Bearings Heat up the...

Страница 50: ...end position Install the retaining disk To properly position the outer bearing s the dis tance gauge P N 529 034 800 must be temporar ily installed against the inner bearing Slide the outer bearing u...

Страница 51: ...leave incompatible microscopic particles Use a plexiglass plate and apply some sealant on it Use a soft rubber roller 50 75 mm 2 3 in available in arts products suppliers and roll the sealant to get a...

Страница 52: ...40 N m 30 lbf ft Oil Fittings If inlet and outlet oil fittings no 11 of rotary valve shaft have been removed from crankcase rein stall them with their end pointing toward ignition housing Apply Loctit...

Страница 53: ...degree wheel 529 035 607 55 puller 420 876 488 49 pusher 420 876 501 51 pusher 420 876 605 52 TDC gauge 295 000 143 55 SERVICE PRODUCTS Description Part Number Page Loctite 243 blue 293 800 060 56 Mo...

Страница 54: ...INE Subsection 05 ROTARY VALVE 8 2 20 N m 15 lbf ft 7 10 6 9 5 11 3 4 14 15 13 12 1 XP S Injection oil Loctite 243 8 Molykote 111 7 10 6 9 5 11 3 4 14 15 13 12 1 smr2005 079 001_aen 48 smr2005 079 www...

Страница 55: ...ugs rotary valve cover and valve Manually feel backlash at one position then turn crankshaft about 1 8 turn and recheck Continue this way to complete one revolution Backlash must be even at all positi...

Страница 56: ...il lustrated Slide off distance sleeve no 14 re move snap ring no 7 and washer no 15 then press shaft out F01D4NA 1 2 1 Bearing 2 Bearing extractor Snap on CJ 950 CAUTION Ensure that rotary valve sha...

Страница 57: ...part against oiled sand paper Rotary Valve Shaft Refer to table below to find dimension specifica tions For measurement procedures refer to EN GINE MEASUREMENT section TOLERANCES ENGINE MEASUREMENT N...

Страница 58: ...l 2 Ball bearing 3 Bearing extractor Snap on CJ 950 Install washer no 15 snap ring no 7 and slide distance sleeve no 14 on shaft no 3 1 2 3 4 6 5 F01D2FA 1 Seal 2 Ball bearing 3 Snap ring 4 Distance s...

Страница 59: ...Valve The rotary valve no 13 controls the opening and closing of the inlet ports Therefore its efficiency will depend on the precision of its installation IDENTIFICATION OF THE ROTARY VALVE ENGINE ROT...

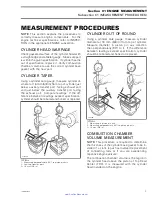
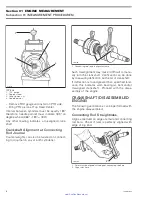
Страница 60: ...Section 02 717 ENGINE Subsection 05 ROTARY VALVE F01D73W 159 54 smr2005 079 www SeaDooManuals net...

Страница 61: ...must be set so that timing occurs as follows TIMING ENGINE OPENING BTDC CLOSING ATDC 717 147 5 65 5 5 Timing Procedure The following timing procedure example uses these specifications OPENING 147 BTDC...

Страница 62: ...G piston at TDC NOTE Rotary valve is asymmetrical Therefore try flipping it over then reinstall on splines to obtain best installation position Apply XP S mineral injection oil P N 413 802 900 on rota...

Страница 63: ...d warpage maximum 0 05 mm 002 in Piston ring type and quantity 1 semi trapez 1 rectangular New 0 25 0 40 mm 010 016 in Ring end gap Wear limit 1 00 mm 039 in New 0 025 0 070 mm 001 003 in Ring piston...

Страница 64: ...fective way to conduct a leakage test Inboard testing does not allow complete access to and observation of all engine surfaces and should be avoided whenever possible When installing hoses of the engi...

Страница 65: ...ng components If kit components are not leaking and pressure drops verify all external jointed surfaces tem perature sensor and the O ring between the spark plug area and the engine cylinder head cove...

Страница 66: ...ntioned components are not leak ing block both oil hoses of the rotary valve shaft using a small hose pincher P N 295 000 076 on each NOTE If leakage stops at this point proceed with ROTARY VALVE SHAF...

Страница 67: ...seal or crankcase is not sealed correctly If the above mentioned components are not leak ing and there is a pressure drops remove the ro tary valve cover Check the seal of the rotary valve shaft If t...

Страница 68: ...K SEAL OF ROTARY VALVE SHAFT IS SEAL LEAKING CAREFULLY INSPECT ENGINE CASTINGS PARTICULARLY THE THREADED HOLE AREAS YES YES NO PRESSURIZE ENGINE COOLING SYSTEM IS SYSTEM LEAKING CHECK TESTING KIT REPL...

Страница 69: ...650 69 magneto puller 420 976 235 67 oil seal pusher 420 877 740 69 ring gear locking tool 529 035 846 67 SERVICE PRODUCTS Description Part Number Page dielectric grease 293 550 004 70 Loctite 243 bl...

Страница 70: ...N m 89 lbf ft Loctite 243 Loctite 243 15 4 4 N m 35 lbf in 12 9 N m 80 lbf in 11 Dielectric grease 16 2 Molykote 111 1 Ground cable Dielectric grease 6 N m 53 lbf in Anti seize lubricant 9 Anti seize...

Страница 71: ...l pump shaft Rotor and Ring Gear NOTE Crankshaft can also be locked by using the PTO flywheel extractor tool For procedure refer to BOTTOM END Remove crankshaft position sensor no 3 Lock ring gear no...

Страница 72: ...be removed Refer to STARTING SYSTEM Unscrew retaining screws no 8 then withdraw housing F07D0LA 1 REMOVE SCREWS 1 Magneto housing Stator Assembly Remove holding plate no 9 and withdraw plug from cover...

Страница 73: ...t Magneto Housing To install oil seal no 13 of magneto housing no 7 use the oil seal pusher P N 420 877 740 and the installer handle P N 420 877 650 F01B2NA 1 2 1 Oil seal pusher 2 Installer handle F0...

Страница 74: ...ankshaft position sensor is not ad justable Cover Before installing cover make sure oil pump shaft is properly positioned Apply Loctite 767 anti seize lubricant P N 293 800 070 to the end of shaft Bef...

Страница 75: ...035 562 83 piston pin puller 529 035 503 78 81 piston ring compressor 420 876 979 84 rubber pad 295 000 101 77 set of sleeves 529 035 542 78 81 SERVICE PRODUCTS Description Part Number Page Loctite 2...

Страница 76: ...lers Loctite 243 Molykote 111 14 1 11 12 12 2 13 Loctite 518 Molykote 111 40 N m 30 lbf ft 9 10 30 Molykote 111 10 N m 89 lbf in 15 16 17 19 18 20 Molykote 111 3 N m 27 lbf in 21 29 27 28 26 25 24 23...

Страница 77: ...to the valves 2 F06D3BA 1 3 TYPICAL 1 Solenoid 2 Pressure hose from crankcase 3 To atmospheric pressure NOTE A check valve on the pressure line elimi nates the negative pressure from the crankcase To...

Страница 78: ...r line of the cylinder This is the minimum production clearance There is only a first oversize piston available for the 787 RFI engine That piston is 0 25 mm 010 in larger in diameter than the stock p...

Страница 79: ...no 20 F06D0SA 1 1 Spring Free bellows no 21 from valve piston no 20 F06D0TA 1 1 Bellows removed from piston Unscrew valve piston no 20 from sliding valve no 22 NOTE Hold the sliding valve to prevent i...

Страница 80: ...D26A 1 1 Remove spring Remove supporting ring no 28 F06D27A 1 1 Remove supporting ring Remove O ring no 23 F06D28A 1 1 Remove O ring Remove sliding valve no 22 F06D0UA 1 1 Remove sliding valve Remove...

Страница 81: ...edge Engine in Watercraft Remove air intake silencer and support refer to the appropriate VEHICLE SHOP MANUAL Remove tuned pipe refer to the appropriate VE HICLE SHOP MANUAL Proceed with ENGINE ON BEN...

Страница 82: ...e piston pin puller P N 529 035 503 with the set of sleeves P N 529 035 542 F00B0IA 2 3 1 TYPICAL 1 Puller 2 Shoulder sleeve 3 Sleeve Fully thread on puller handle Insert extractor spindle into the pi...

Страница 83: ...m piston F00B0MA 1 TYPICAL 1 Remove shoulder sleeve Carefully remove the piston no 3 The needles thrust washers and the sleeve re main in the connecting rod bore and may be used again 1 2 F00B0NA 1 Ne...

Страница 84: ...ce 0 13 mm 005 in N A 0 24 mm 009 in Ring piston groove clearance 0 025 mm 001 in 0 070 mm 0027 in 0 24 mm 009 in Ring end gap 0 40 mm 016 in 0 55 mm 022 in 1 0 mm 039 in N A NOT APPLICABLE NOTE Repla...

Страница 85: ...8 mm 031 in 8 Piston At assembly place the pistons no 3 with the let ters AUS over an arrow on the piston dome fac ing in direction of the exhaust port A01C01A AUS 1 1 Exhaust side NOTE The exhaust p...

Страница 86: ...ston Plastic Mounting Device Method This is an alternate method when no service tool is available Replacement roller bearings are delivered in a con venient plastic mounting device For installation pr...

Страница 87: ...nner sleeve half Circlip Always use new circlips WARNING Always wear safety glasses when installing piston circlips CAUTION Always use new circlips At instal lation take care not to deform them Circli...

Страница 88: ...tap tool with a hammer to insert circlip into its groove F00B0RA CAUTION The hand retaining the piston should absorb the energy to protect the con necting rod Cylinder To easily slide cylinder no 9 o...

Страница 89: ...4 3 2 4 smr2005 082 002_a 1 M10 x 73 5 2 M10 x 105 3 Loctite 518 4 Molykote 111 Torque screws in a criss cross sequence for each cylinder to 20 N m 15 lbf ft Repeat the proce dure retightening all cy...

Страница 90: ...installation Apply Loctite 518 P N 293 800 038 on 2 screws On the other screws apply Molykote 111 P N 413 707 000 on threads Install screws Refer to the following illustration for proper position of s...

Страница 91: ...0 156 89 Puller 420 877 635 91 92 Ring 420 977 480 92 Ring 420 977 490 91 Ring halves 420 876 330 92 Ring halves 420 977 475 91 Screw M8 x 40 420 840 681 91 92 Screw M8 x 70 420 841 201 91 temperature...

Страница 92: ...42 Anti seize lubricant Loctite 5910 Loctite 518 40 N m 30 lbf ft Loctite 518 Loctite 518 24 N m 17 lbf ft 30 mL 1 oz SAE 30 motor oil 5 6 12 6 15 16 6 4 6 2 7 11 12 18 11 4 3 4 19 15 14 F07D0VS 9 N m...

Страница 93: ...00 156 295000156 Install special tool F06I02A 1 1 PTO flywheel extractor Install the extension handle P N 295 000 125 on the PTO flywheel extractor 295000125 Loosen PTO flywheel COUNTERCLOCKWISE when...

Страница 94: ...precision machined surfaces F01D1KA 1 TYPICAL 1 Separate halves by prying at provided lugs F01D1LA 1 TYPICAL 1 Separate halves by prying at provided lugs Remove crankshaft and counterbalance shaft Cr...

Страница 95: ...ft bearing PTO End Crankshaft Bearing As an alternate method the outer PTO bearing and crankshaft gear can be removed in one step using another puller See CRANKSHAFT GEAR no 18 below MAG End Crankshaf...

Страница 96: ...emoved by using the following tools F00B0CA 1 2 3 4 5 1 Puller P N 420 877 635 2 Protective cap P N 420 876 557 3 Ring P N 420 977 480 4 Ring halves P N 420 876 330 5 Screw M8 x 40 P N 420 840 681 F00...

Страница 97: ...with sand paper no 180 and remove all residue using pulley flange cleaner P N 413 711 809 A32CB5A TYPICAL Crankcase Crankcase mating surfaces are best cleaned us ing a combination of the chisel gaske...

Страница 98: ...8 max 0 617 024 1 2 047 Crankcase Inspect plane surfaces for warpage Small defor mation can be corrected by grinding surface with a fine sandpaper Install sandpaper on a surface plate and rub part aga...

Страница 99: ...ac ing bearing it s recommended to start the bearing heating process prior to removal operation Two bearings can be heated at the same time on one bearing heater A32CB8A 1 TYPICAL 1 Bearings Touch the...

Страница 100: ...the crankshaft Also make sure to align the gear keyway with the Woodruff key on the crankshaft F00D0LA 1 1 Woodruff key on the crankshaft F00D0MA 1 2 1 Keyway 2 Long flange toward the crankshaft coun...

Страница 101: ...and to save time NOTE It is recommended to apply this specific sealant as described here to get an uniform appli cation without lumps If you do not use the roller method you may use your finger to uni...

Страница 102: ...s CAUTION Marks on the crankshaft and coun terbalance shaft must be aligned otherwise en gine will vibrate and premature wear will occur F00D0PA 1 1 Marks must be aligned Turn by hand the crankshaft a...

Страница 103: ...al step torque only M10 screws no 8 of crankcase to 40 N m 30 lbf ft as per following sequence F15D05C 11 7 1 3 5 9 8 12 4 6 10 2 Counterbalance Shaft Gear Oil When crankcase assembly is completed add...

Страница 104: ...4 BOTTOM END F01D84A 1 1 O ring Apply Loctite 767 anti seize lubricant P N 293 800 070 to crankshaft threads Using the same tools as for disassembly proce dure torque PTO flywheel to 110 N m 81 lbf ft...

Страница 105: ...Part Number Page Degree wheel 529 035 607 109 handle 420 877 650 106 puller 290 876 488 103 pusher 290 876 609 106 pusher 420 876 501 105 TDC gauge short 295 000 143 109 SERVICE PRODUCTS Description...

Страница 106: ...I ENGINE Subsection 05 ROTARY VALVE 787 RFI Engines 20 N m 15 lbf ft 9 N m 80 lbf in 2 1 12 Anti seize 13 Injection oil Molykote 111 11 4 3 15 8 7 14 10 6 5 9 smr2005 084 001_aen 102 smr2005 084 www S...

Страница 107: ...ve spark plugs rotary valve cover and valve Manually feel backlash at one position then turn crankshaft about 1 8 turn and recheck Continue this way to complete one revolution Backlash must be even at...

Страница 108: ...valent as il lustrated Slide off distance sleeve no 14 re move snap ring no 7 and washer no 15 then press shaft out F01D4NA 1 2 1 Bearing 2 Bearing extractor CAUTION Ensure that rotary valve shaft is...

Страница 109: ...Surface part against oiled sand paper Rotary Valve Shaft Refer to table below to find dimension specifica tions For measurement procedures refer to EN GINE MEASUREMENT section TOLERANCES ENGINE MEASU...

Страница 110: ...FB 1 Seal 2 Ball bearing 3 Bearing extractor Snap on CJ 950 Install washer no 15 snap ring no 7 and slide distance sleeve no 14 on shaft 1 2 3 4 6 5 F01D2FA 1 Seal 2 Ball bearing 3 Snap ring 4 Distanc...

Страница 111: ...snap ring no 4 so that its sharp edge faces outwards Rotary Valve The rotary valve no 13 controls the opening and closing of the inlet ports Therefore its efficiency will depend on the precision of it...

Страница 112: ...05 ROTARY VALVE There is no identification code on the valve To find out the duration place an angle finder on the valve and measure the valve cut out angle or use the following template F01D73W 159 1...

Страница 113: ...e must be set so that timing occurs as follows TIMING ENGINE OPENING BTDC CLOSING ATDC 787 RFI 147 5 63 5 5 Timing Procedure The following timing procedure example uses these specifications OPENING 14...

Страница 114: ...edges as close as possible to these marks with the MAG piston at TDC NOTE Rotary valve is asymmetrical Therefore try flipping it over then reinstall on splines to obtain best installation position Ap...

Страница 115: ...der head warpage maximum 0 05 mm 002 in Piston ring type and quantity 1 semi trapez 1 rectangular New 0 40 0 55 mm 016 022 in Ring end gap Wear limit 1 00 mm 039 in New 0 025 0 070 mm 001 003 in Ring...

Страница 116: ...rpage maximum 0 05 mm 002 in Piston ring type and quantity 1 semi trapez 1 rectangular New 0 40 0 55 mm 016 022 in Ring end gap Wear limit 1 00 mm 039 in New 0 025 0 070 mm 001 003 in Ring piston groo...

Страница 117: ...C M Y CM MY CY CMY K www SeaDooManuals net...

Отзывы: