background image

This product was manufactured for performance and durability but is not impervious to damage. 

Jumping or other aggressive riding can over-stress and damage the product and the rider assumes all 

risks associated with high-stress activity.

Be careful and know your limitations. Risk of injury increases as the degree of riding difficulty

increases, the rider assumes all risk associated with aggressive riding activities.

Maintain a hold on the handlebars at all times.

Never carry passengers or allow more than one person at a time to ride the electric ATV.

Never use near steps or swimming pools.

Keep your fingers and other body parts away from the drive chain, steering system, wheels and all

other moving components.

Never use headphones or a cell phone when riding.

Never hitch on to another product.

Do not ride the Rosso Motors on wet or icy weather and never immerse the electric ATV in water, as 

the electrical and drive components could be damaged by water or create other possible unsafe

conditions.

Wet, slick, bumpy, uneven or rough surfaces may increase risks of use. Do not ride your electric ATV in 

mud, ice, puddles or water. Avoid excessive speeds that can be associated with downhill rides. Never 

risk damaging surfaces such as carpet or flooring by use of an electric four wheeler indoors.

Do not ride at night or when visibility is limited.

PROPER RIDING GEAR

Always wear proper protective equipment such as an approved safety helmet, elbow pads and

kneepads.

A helmet may be legally required by your local laws or regulation in your area.

A long-sleeved shirt, long pants and gloves are recommended.

Always wear athletic shoes (lace-up shoes with rubber soles), never ride barefooted or in sandals, and 

keep shoelaces tied and out of the way of the wheels, motor and drive system.

4

Содержание Kids ATV

Страница 1: ...ROSSO MOTORS ELECTRIC ATV OWNERS MANUAL Read and understand this manual Prior to Riding DO NOT RETURN TO STORE Illustrations may not be exact appearance of actual product...

Страница 2: ...Table of Contents General information 3 Assembly 5 Components definition 11 Maintenance and adjustments 14 Troubleshooting 16 Wiring diagram 17 Warranty 18 2...

Страница 3: ...t s decision to allow his or her child to ride this product should be based on the child s maturity skill and ability to follow rules Keep this product away from children under the recommended rider a...

Страница 4: ...product Do not ride the Rosso Motors on wet or icy weather and never immerse the electric ATV in water as the electrical and drive components could be damaged by water or create other possible unsafe...

Страница 5: ...rly The Rosso Motor s ATV comes in 2 boxes one contains the ATV and hardware and the other one contains battery 1 Hardware box contents 2 Uncrate the ATV and remove it from the metal frame 5 Reflector...

Страница 6: ...llation repeat steps below for right and left wheels Remove self locking nut and Insert front wheel into the axle and tighten the nut 5 Inflate tires Inflate tires to the correct PSI before first time...

Страница 7: ...aliper and make sure the disc brake is located in between the brake pads Step 2 Attach caliper to the mount using brake caliper mounting bolts and tighten them Step 3 Adjust caliper by tighten or unti...

Страница 8: ...he ATV Step 2 Install shock absorber into the bottom mount and tighten the bolt 8 Battery installation Step 1 Open battery bag and pull out connector plug Step 2 Remove battery security plate and plac...

Страница 9: ...9 Step 3 Connect plugs insert the wire until you hear CLICK Step 4 Close battery bag secure security plate and tighten the bolts...

Страница 10: ...10 9 THIS SECTION LEFT EMPTY INTENTIONALLY 10 Install reflectors RED reflectors at the back of the ATV and ORANGE at the front Rear Left Right Front Left Right Rear Center...

Страница 11: ...tor When gear shifter is in N neutral position N green light is on When gear shifter is in R reverse position R red light is on When gear shifter is in F forward position both N and R lights are off C...

Страница 12: ...n the right side of the handle bar MAX green battery capacity is full MID yellow battery capacity is half full MIN red battery capacity is battery needs to be charged 5 Headlight switch Located on the...

Страница 13: ...gage squeeze brake lever until the know pops up 7 Fuse Located at the front left side of the ATV Fuse specs 250V 30A 8 Speed switch Located at the left center side of the ATV The switch intended to li...

Страница 14: ...orn brake pads can reduce braking performance and cause an accident Check and adjust brakes before each ride To adjust cable play on the left rear brake lever tight untighten adjuster To adjust cable...

Страница 15: ...arging port located underneath the fuse Step 3 Plug charger into a wall if the light on the charger do not lights up check power to the outlet 3 Chain adjustment Riding an ATV with chain in poor condi...

Страница 16: ...16 Step 2 Adjust tight untighten chain adjuster bolts as necessary make sure both bolts are adjusted equally Step 3 Tighten mount nuts...

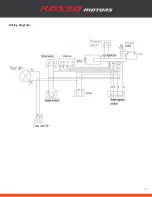
Страница 17: ...17 Wiring diagram...

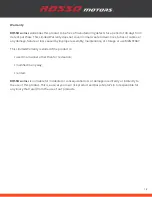
Страница 18: ...used by improper assembly maintenance or storage or use MANTERAY This Limited Warranty is voided if the product is used in a manner other than for recreation modified in any way rented ROSSO MOTORS is...

Отзывы: