background image

22 • Physical Installation

MUX-8258 Series User Guide (v9.0)

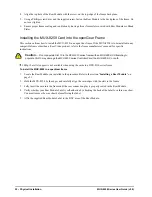
4. Align the top hole of the Rear Module with the screw on the top-edge of the frame back plane.

5. Using a Phillips screwdriver and the supplied screw, fasten the Rear Module to the back plane of the frame. Do 

not over tighten.

6. Ensure proper frame cooling and ventilation by having all rear frame slots covered with Rear Modules or Blank 

Plates.

Installing the MUX-8258 Card into the openGear Frame

This section outlines how to install the MUX-8258 in an openGear frame. If the MUX-8258 is to be installed in any 
compatible frame other than a Ross Video product, refer to the frame manufacturer’s manual for specific 
instructions. 


1080p (Level A) support is not available when using the cards in a DFR-8310 series frame.

To install the MUX-8258 in a openGear frame

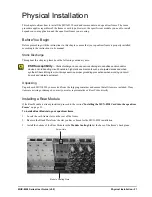
1. Locate the Rear Module you installed in the procedure Refer to the section “

Installing a Rear Module

” on 

page 21.


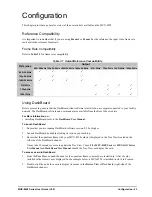
2. Hold the MUX-8258 by the edges and carefully align the card-edges with the slots in the frame.

3. Fully insert the card into the frame until the rear connection plus is properly seated in the Rear Module.

4. Verify whether your Rear Module Label is self-adhesive by checking the back of the label for a thin wax sheet. 

You must remove the wax sheet before affixing the label.

5. Affix the supplied Rear Module Label to the BNC area of the Rear Module.

Caution

 — Do not populate Slot 10 in the DFR-8310 series frame with an MUX-8258-C. Attempting to 

populate Slot 10 may damage the MFC-8300 series Controller Card, the MUX-8258-C, or both.

Содержание MUX-8258 Series

Страница 1: ...MUX 8258 Series User Guide...

Страница 2: ...eople that make things happen At Ross our employees are a special group Our employees truly care about doing a great job and delivering a high quality customer experience every day This code of ethics...

Страница 3: ...is manual is furnished for informational use only It is subject to change without notice and should not be construed as commitment by Ross Video Limited Ross Video Limited assumes no responsibility or...

Страница 4: ...intended for use in areas outside home International This equipment has been tested under the requirements of CISPR 22 2008 or CISPR 32 2015 and found to comply with the limits for a Class A Digital...

Страница 5: ...vironmentally friendly and health conscious manner The crossed out wheeled bin symbol invites you to use these systems If you need more information on the collection reuse and recycling systems please...

Страница 6: ......

Страница 7: ...Overview 15 Card Overview 15 Control and Monitoring Features 15 Status and Selection LEDs on the MUX 8258 16 Cabling for the MUX 8258 A 17 Cabling for the MUX 8258 B 18 Cabling for the MUX 8258 4C 18...

Страница 8: ...7 VANC Processing Tab 38 Alarm Enables Tab 39 Card edge Menus 41 Navigating the Card edge Menus 41 Card edge Menus 41 Menu Descriptions 43 Specifications 47 MUX 8258 A Technical Specifications 47 MUX...

Страница 9: ...ides technical specification details on the MUX 8258 Service Information provides information on the warranty and repair policy for your card Glossary provides a list of terms used throughout this gui...

Страница 10: ...ducts but if problems occur help is as close as the nearest telephone Our 24 hour Hot Line service ensures you have access to technical expertise around the clock After sales service and technical sup...

Страница 11: ...B offers eight 110ohm balanced AES connections MUX 8258 C Overview The MUX 8258 C includes one multi rate SDI input which supports up to 16 channels of embedded audio and four or eight channels of an...

Страница 12: ...sholds Ability to strip VANC data from specific or all lines of a video output Reports status and configuration remotely via the DashBoard Control System Fits openGear frames 5 year transferable warra...

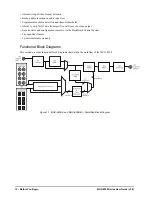
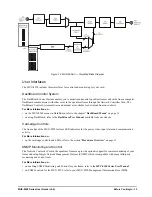
Страница 13: ...us on page 31 on using DashBoard refer to the DashBoard User Manual available from our website Card edge Controls The front edge of the MUX 8258 features LED indicators for the power video input statu...

Страница 14: ...14 Before You Begin MUX 8258 Series User Guide v9 0...

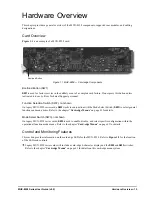
Страница 15: ...in conjunction with the Mode Select Switch SW3 to select general functions and menu items Refer to the chapter Card edge Menus on page 41 for details Mode Select Switch SW3 not shown On legacy MUX 825...

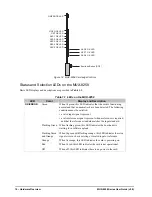
Страница 16: ...when a reference is required and that the reference standard matches the input standard Flashing Green When flashing green this LED indicates the bootloader is waiting for a software upload Flashing...

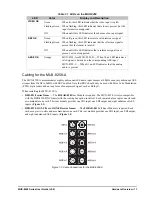
Страница 17: ...equired Each card occupies two slots and accommodates one card This rear module provides one SDI input one SDI output and eight unbalanced AES inputs Figure 1 3 VIDEO OK Green When lit this LED indica...

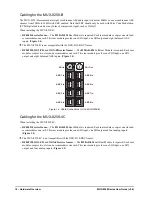
Страница 18: ...s The 8320AR 034 Full Rear Module is required Each rear module occupies two slots and accommodates one card This rear module provides one SDI input one SDI output and eight balanced AES inputs Figure...

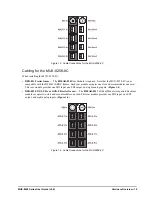
Страница 19: ...cupies one slot and accommodates one card This rear module provides one SDI input one SDI output and eight analog inputs Figure 1 6 DFR 8320 OG3 FR and OGX FR series frames The 8320AR 034 Full Rear Mo...

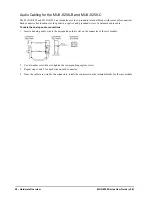
Страница 20: ...he positive negative and grounded wires of a balanced audio cable To cable the analog audio connections 1 Insert an analog audio wire to the designated polarity slot on the connector of the rear modul...

Страница 21: ...ms are included If any items are missing or damaged contact your sales representative or Ross Video directly Installing a Rear Module If the Rear Module is already installed proceed to the section Ins...

Страница 22: ...ions 1080p Level A support is not available when using the cards in a DFR 8310 series frame To install the MUX 8258 in a openGear frame 1 Locate the Rear Module you installed in the procedure Refer to...

Страница 23: ...or higher 2 Launch DashBoard by double clicking its icon on your desktop 3 Ensure that the openGear frame with your MUX 8258 card s is displayed in the Tree View located on the left side of the DashBo...

Страница 24: ...or one channel automatically changes the value for the other channel 3 Gain This option provides a 20dB gain range in 1dB increments If you have enabled the Gain Lock feature changing the gain value f...

Страница 25: ...he non PCM signal the A and B channels of the input signal must be embedded on Channels 1 and 2 or Channels 3 and 4 of a given group For example you would embed AES1A in G1Ch1 and AES1B in G1Ch2 To em...

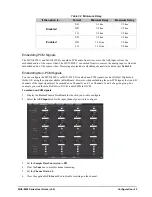
Страница 26: ...1 up to the third line after the VI for the current video format For interlaced formats the lines in the two fields are separately configured Table 3 3 lists the allowable line selections based on for...

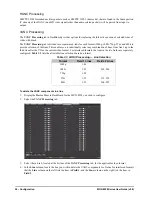
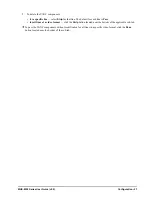
Страница 27: ...trip for that line The default for each line is Pass for all lines of a video format click the Strip button located near the bottom of the applicable sub tab To pass the VANC components without modifi...

Страница 28: ...28 Configuration MUX 8258 Series User Guide v9 0...

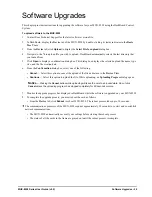
Страница 29: ...og box select one of the following Cancel Select this option to cancel the upload of the file and return to the Device View Continue Select this option to upload the file While uploading an Uploading...

Страница 30: ...30 Software Upgrades MUX 8258 Series User Guide v9 0...

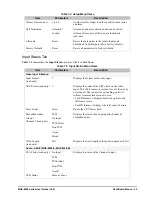
Страница 31: ...green valid yellow caution to red alarm DashBoard reports the most severe alarm for a single field Signal Tab Table 1 1 summarizes the read only information displayed in the Signal tab Table 1 1 Sign...

Страница 32: ...reference format Input video is missing or invalid Card has switched to Free Run Mode Input Format Indicates the input video format Reference Format Indicates the reference video format Output Format...

Страница 33: ...le in the slot Board S N Indicates the board serial number Software Rev Indicates the software version Firmware Rev Indicates the firmware version Daughter Card Typea a This field is not available whe...

Страница 34: ...s the luminance component of the Loss of Input and or Test Pattern Custom signal Cr slider Sets the Cr component of the Loss of Input and or Test Pattern Custom signal Cb slider Sets the Cb component...

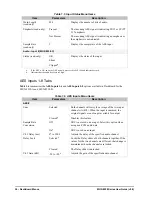
Страница 35: ...e format of the video input CRC Errors read only Displays the count of the CRC errors on the video input This 14bit counter is reset on loss of video or by user request The counter is non latching and...

Страница 36: ...d indicated as such b Indicates that the audio levels are too high Table 1 6 AES Inputs Menu Items Item Parameters Description AES Sum Selected Both channels will carry the average of the two input ch...

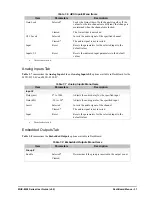
Страница 37: ...inverted Input Reset Resets the parameters for the selected input to the default values Inputs Reset Resets the indicated input parameters to the default values a The default value is 0 Table 1 7 Ana...

Страница 38: ...tings with the original group as the Primary Source and AES inputs as the Backup Source Overwrite Configures the group source settings with AES inputs as the Primary Source and embed as the Backup Sou...

Страница 39: ...s when the input video is a format that is not accepted Cleared Disables the alarm Incompatible Input Selected Input Format field reports when the frame rate is not the same as the reference input Cle...

Страница 40: ...d Disables the alarm Source Async Selected Embedded Audio Status field reports when the source is asynchronous to the input video or not a 48kHz rate Cleared Disables the alarm Backup Source Missing S...

Страница 41: ...SW3 to select the required parameter Do not power down the card before ensuring that all edited parameters are saved Saving edited parameters can take up to 10 seconds Card edge Menus Table 2 1 lists...

Страница 42: ...Grp Enbl Group Enabled Grp Dsbl Group Disabled 7 Ch1 Src Channel 1 Source Mute T4k 4kHz Tone T2k 2kHz Tone T1k 1kHz Tone T 5k 500Hz Tone A1A A8B AES 1A to AES 8B MUX 8258 A MUX 8258 B Alg1 Alg4 Analo...

Страница 43: ...eference 2 Fr 2 and Video Vid Refer to the section Reference Compatibility on page 23 for a list of supported formats 3 Loss of Input Use this menu to select what type of video displays at the system...

Страница 44: ...Menus B to E to configure the Backup Source that is inserted when the Primary Source is unavailable This menu is used in conjunction with Menu 5 Group Select The following are the MUX 8258 A and MUX 8...

Страница 45: ...The following are the MUX 8258 8C default values based on the group selected Table 2 5 MUX 8258 8C Backup Source Default Values SW1 5 SW1 B SW1 C SW1 D SW1 E G1 Alg1 Alg2 Alg3 Alg4 G2 Alg5 Alg6 Alg7...

Страница 46: ...46 Card edge Menus MUX 8258 Series User Guide v9 0...

Страница 47: ...s 1 HD SDI SDI Data Rates and SMPTE Standards Accommodated SMPTE 292M SMPTE 259M SMPTE 424Ma Impedance 75ohm Return Loss 15dB to 1 5GHz 15dB to 3 00GHz Equalization Belden 1694A cable SD 450m 1476ft H...

Страница 48: ...SRC on Equalization up to 800m 2 400ft 48kHz up to 500m 1 500ft 96kHz Connector Type BNC Environmental Operating Range 5 C to 40 C ambient Power Total Power Consumption 8 5W a Not supported when usin...

Страница 49: ...10 Minimum Video Delay SD 7us HD 2 2us 3G 1 1us Connector Type BNC AES Inputs Number of Inputs 8 connections SDI Data Rates and SMPTE Standards Accommodated AES 3id 2001 Impedance 110ohm Minimum Input...

Страница 50: ...8ft Connector Type BNC SDI Output Number of Outputs 1 SDI Data Rates and SMPTE Standards Accommodated SMPTE 292M SMPTE 259M SMPTE 424Ma Impedance 75ohm Return Loss 15dB to 1 5GHz 10dB to 3GHz Signal L...

Страница 51: ...Professional or Consumer use of Channel Status Block Professional 1 1 Normal Audio or Non Audio Mode Normal Audio 0 2 4 Emphasis No Emphasis 100 5 Lock Indication Locked 0 6 7 Sampling Rate 48kHz 01 1...

Страница 52: ...to pass AES inputs must be 48kHz synchronous SRC is set to OFF Data Word Length in the Channel Status Bytes must match what is embedded 10 13 ASCII Destination ID Unused 0 14 17 Local Sample Address U...

Страница 53: ...izing problems to individual units Bootload Button In the unlikely event of a complete card failure you may be instructed by a Ross Technical Support specialist to perform a complete software reload o...

Страница 54: ...of Problems Should any problem arise with your MUX 8258 please contact the Ross Video Technical Support Department Contact information is supplied at the end of this publication A Return Material Auth...

Страница 55: ...noted DTVCC captions CEA 708 captions Frame the openGear frame that houses the MUX 8258 unless otherwise noted MIB management information base Network Controller Card the MFC OG3 N and any available o...

Страница 56: ...56 Glossary MUX 8258 Series User Guide v9 0...

Отзывы: