


ACO-2200 User Guide (v5.0)
Functional Check Procedures • 19
Using DashBoard
Before proceeding, ensure that the DashBoard Control System™ is installed on a PC connected to your facility
network. The DashBoard software and user manual area available from the Ross Video website.
For More Information on...
• installing DashBoard, refer to the
DashBoard User Manual
.
To launch DashBoard
1. Ensure that you are running DashBoard software version 8.0.0 or higher.
2. Launch DashBoard by double-clicking its icon on your desktop.
To manually add the ACO-2200 to the Basic Tree View in DashBoard
1. From the DashBoard main toolbar, select
File
>
New
>
TCP/IP DashBoard Connect or openGear Device
.
The
New TCP openGear Frame Connection
dialog opens.
2. Type the IP address of the ACO-2200 in the
IP Address
field.
3. Type a unique name for the ACO-2200 in the
Display Name
field. This name makes the ACO-2200 easily
identifiable in the Tree View.
4. Click
Finish
.
5. Ensure that the ACO-2200 is displayed in the Tree View located on the left-side of the DashBoard window.
Consult the
DashBoard User Manual
should the Tree View not display the ACO-2200.
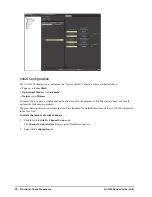
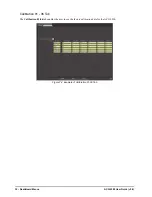
To access the ACO-2200 interfaces in DashBoard
1. From the
Tree View
, expand the node for the ACO-2200 you wish to configure.
2. Double-click a node to display its interface in the right-side of the DashBoard window.
In the example below, the
Slot 0: ACO-2200
interface is displayed in the window.
Содержание ACO-2200
Страница 1: ...ACO 2200 User Guide...
Страница 36: ...36 Technical Specifications ACO 2200 User Guide v5 0...
Страница 42: ...42 Glossary ACO 2200 User Guide v5 0...