background image

Galaxy A16F-R2431 Installation and Hardware Reference Manual


5-20


Replacing

 a Failed Hard Drive 

 WARNING! 

Hard drives are fragile; therefore, always handle them with extreme 

care.  

ƒ


Do not drop a hard drive. 

ƒ


Always be slow, gentle, and careful when handling a hard drive.  

ƒ


Handle a hard drive only by the edges of its metal cover, and 

avoid touching its circuits part and interface connectors. 


 Step 1. 

Identify the location of the drive tray

 that contains a hard 

drive indicated as faulty. You may use firmware utility or 

RAIDWatch software to locate a faulty drive. The drive tray 

LED should also light red.  

 Step 2. 

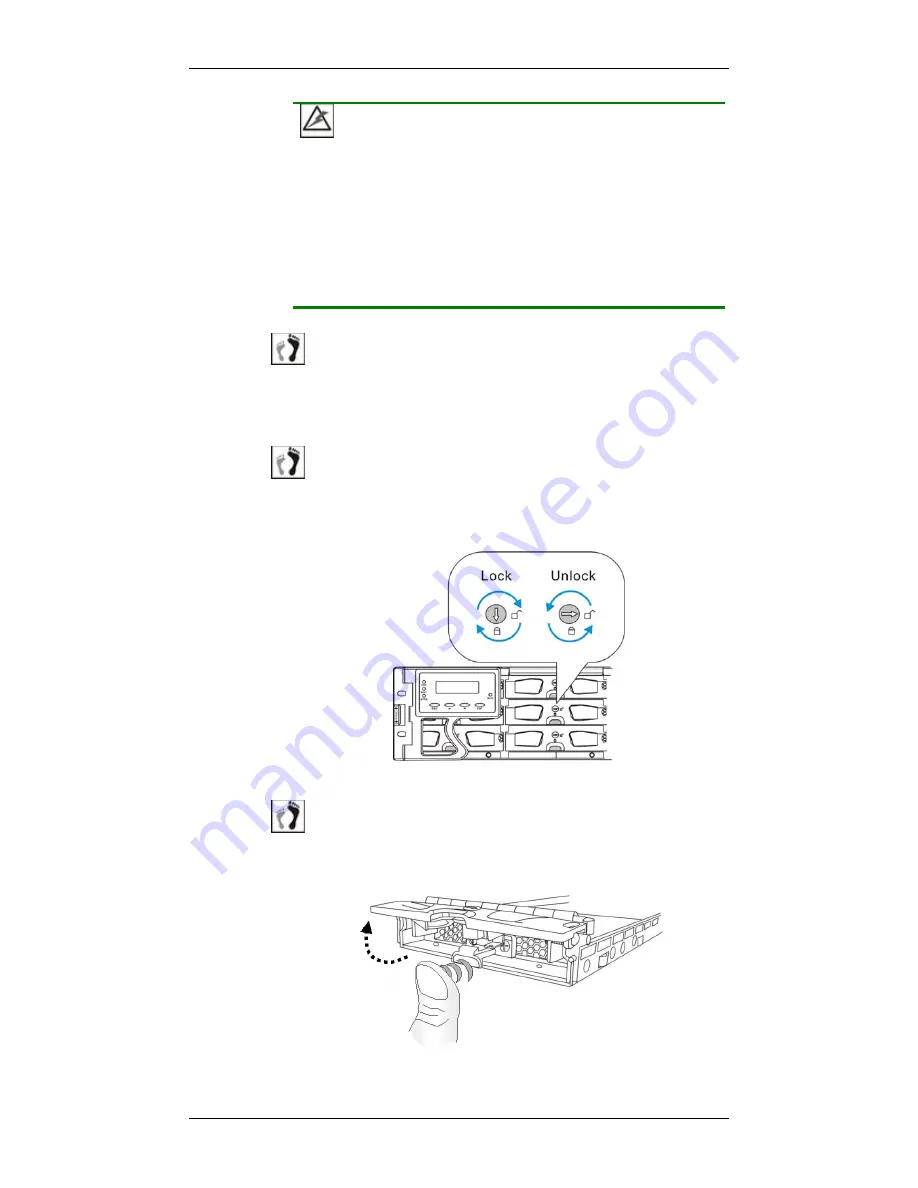
Make sure the rotary bezel lock is turned to the unlocked 

position, 

(See

 Figure 5-18

) i.e., the groove on its face is in a 

horizontal orientation. Use a flathead screwdriver to turn the 

rotary lock to the unlocked orientation.  


Figure 5-18: Drive Tray Key-lock Rotation 

 Step 3. 

Open the front flap

 by pushing the release button at the front 

of the drive tray. (See 

Figure 5-19

) The front flap will 

automatically swings up into position.  


Figure 5-19: Opening the Front Flap 

Содержание A16F-R2431 Galaxy Raid

Страница 1: ...Galaxy Raid Model A16F R2431 Dual Redundant Controller 4Gb FC to SATA II RAID Subsystem Installation and Hardware Reference Manual Version 0107 Version 1 0 08 2005 ...

Страница 2: ...ion and Hardware Reference Manual ii Contact Information Americas Rorke Data Inc 7626 Golden Triangle Drive Eden Prairie MN 55344 USA Tel 1 800 328 8147 Fax 1 952 829 0988 sales rorke com techsupport rorke com http www rorke com ...

Страница 3: ...hereof and specifically disclaims any implied warranties of merchantability or fitness for any particular purpose Furthermore Rorke Data reserves the right to revise this publication and to make changes from time to time in the content hereof without obligation to notify any person of such revisions or changes Product specifications are also subject to change without prior notice Trademarks Galaxy...

Страница 4: ...ept any interference received including interference that may cause undesired operation NOTE This equipment has been tested and found to comply with the limits for a Class A digital device pursuant to Part 15 of the FCC Rules These limits are designed to provide reasonable protection against harmful interference when the equipment is operated in a commercial environment This equipment generates us...

Страница 5: ... device and for the area surrounding the apparatus This standard covers only safety aspects of the above apparatus it does not cover other matters such as style or performance CCC for Power Supplies compatibility to China Compulsory Certification This device is in conformity with UL standards for safety ITE BSMI Class A CNS 13438 for Taiwan This device is in conformity with UL standards for safety...

Страница 6: ...3 2 Drive Tray 1 5 1 3 3 MUX Kit 1 6 1 3 4 The RAID Controller Module 1 7 1 3 5 Controller Module Interfaces 1 8 1 3 5 1 DIMM Module 1 10 1 3 6 BBU 1 11 1 3 7 PSUs 1 12 1 3 8 Cooling Modules 1 13 1 4 SUBSYSTEM MONITORING 1 14 1 4 1 I2C bus 1 14 1 4 2 LED Indicators 1 14 1 4 3 Firmware FW and RAIDWatch GUI 1 15 1 4 4 Audible Alarms 1 15 1 5 HOT SWAPPABLE COMPONENTS 1 15 1 5 1 Hot swap Capabilities ...

Страница 7: ... 6 3 2 7 ID LUN Mapping 3 6 3 3 DIP SWITCH 3 6 DIP Switch Mode Setting 3 8 3 4 SAMPLE TOPOLOGIES 3 8 3 4 1 Multiple RAID Fault tolerant Connection 3 8 3 4 2 Switched Fault Tolerant Connection 3 11 3 4 3 DAS Fault Tolerant Connection w Onboard Hub 3 13 CHAPTER 4 SYSTEM OPERATION AND MONITORING 4 1 POWER ON 4 1 4 1 1 Check List 4 1 4 1 2 Power On Procedure 4 2 4 1 3 Power On Status Check 4 3 4 1 4 L...

Страница 8: ... Drive 5 19 5 8 REPLACING A MUX KIT 5 21 APPENDIX A SPECIFICATIONS A 1 TECHNICAL SPECIFICATIONS A 1 Environmental Specifications A 1 Power Requirements A 1 Certifications A 2 Warning Alarms A 2 A 2 FUNCTIONAL SPECIFICATIONS A 2 Configuration Specifications A 2 Architectural Specifications A 2 A 3 DRIVE TRAY SPECIFICATIONS A 3 A 4 POWER SUPPLY SPECIFICATIONS A 3 A 5 COOLING MODULE SPECIFICATIONS A ...

Страница 9: ...ON CABLE D 1 D 4 CONNECTING THE UPS TO THE SUBSYSTEM D 2 D 4 1 Connect the PSU Module Power Cords D 2 D 4 2 Set the Baud Rate D 2 D 4 3 Connect COM2 D 2 D 5 POWER ON D 2 D 6 UPS STATUS MONITORING D 3 D 6 1 Normal Operational Status D 3 D 6 2 UPS Messages D 3 D 6 3 UPS Message Summary D 5 ...

Страница 10: ...laceable modules should be removed Make sure that during operation all enclosure modules and covers are securely in place Be sure that the rack cabinet into which the subsystem chassis will be installed provides sufficient ventilation channels and airflow circulation around the subsystem Provide a soft clean surface to place your subsystem on before working on it Servicing on a rough surface may d...

Страница 11: ...e not user serviceable Describe the configuration options of firmware using terminal emulation programs or the RAIDWatch GUI software that came with your subsystem Give a detailed description of the RAID controllers embedded within the subsystem Revision History Initial release Who should read this manual This manual assumes that its readers are experienced with computer hardware installation and ...

Страница 12: ...u should follow in order Important information that users should be aware of is indicated with the following icons NOTE These messages inform the reader of essential but non critical information These messages should be read carefully as any directions or instructions contained therein can help you avoid making mistakes CAUTION Cautionary messages should also be heeded to help you reduce the chanc...

Страница 13: ...ause unrecoverable errors and system down time Always consult technical personnel before proceeding with any firmware upgrade NOTE The firmware version installed on your system should provide the complete functionality listed in the specification sheet user s manual We provide special revisions for various application purposes Therefore DO NOT upgrade your firmware unless you fully understand what...

Страница 14: ...onding FC channels on partner controllers together to facilitate fault tolerant connections A common backplane provides fault tolerant data paths between the controller pair and other components such as disk drives power supplies etc The subsystem is ideal for high performance and high availability storage applications and is highly flexible via the additional FC 4G host ports Data cached in memor...

Страница 15: ...ls are available for installation into 19 standard racks or cabinets Please acquaint yourself with the locations of individual components before proceeding with hardware installation NOTE Components accessed through the front panel are referred to as Front Panel Components and components accessed through the rear panel are referred to as Rear Panel Components 1 2 1 Front Panel Overview The front s...

Страница 16: ...ontroller modules Each controller module contains a main circuit board with a DDR RAM DIMM module mounted on it as cache buffer See Section 1 3 3 About the dual redundant RAID controllers in A16F R2431 For the subsystem featuring redundant RAID controllers the upper controller module is identified as Controller A while the lower controller module is identified as Controller B By factory default ma...

Страница 17: ...ection 1 3 8 1 2 3 Integrated Backplane An integrated backplane board separates the front and rear sections of the chassis This circuit board provides logic level signals and low voltage power paths Thermal sensors and I2C devices are implemented to detect system temperature and PSU cooling module presence signals This board contains no user serviceable components 1 2 4 Physical Dimensions The A16...

Страница 18: ...ee Figure 1 4 designed to accommodate separately purchased standard 1 inch pitch 3 5 inch SATA disk drives Two 2 LEDs on the drive tray s front bezel indicate drive status A rotary lock on each drive tray prevents unintentional ejection and a convenient release button releases the drive tray from chassis WARNING Be careful not to warp twist or contort the drive tray in any way e g by dropping it o...

Страница 19: ... drives in the dual controller subsystems The subsystem comes with MUX enabled drive trays as standard parts Separately purchased and independently installed SATA MUX kits or MUX enabled drive trays are also available as spare parts When installing disk drives into drive trays the connectors at the back of disk drives must be properly mated to the SATA connectors of the MUX kit When installed into...

Страница 20: ...r board is mounted on top of the main circuit board and is not user serviceable The DDR RAM DIMM socket is strategically placed on an easily accessible location See Figure 1 7 A BBU slot on the top center of the controller module receives a BBU module The controller module contains no user serviceable components Except when installing upgrading the cache memory inside or replacing a failed control...

Страница 21: ...AID Controller Faceplate FC 4G host ports Each controller module features four 4 LC type FC ports with onboard hub functionality two 2 host ports for each Fibre channel Each host port comes with two 2 LEDs to indicate link and speed statuses Two 2 FC 4G host channels connect the subsystem to the host computers equipped with FC 4G Fiber optic compatible transceivers and HBAs The Fibre Channel host ...

Страница 22: ...efer to Chapter 4 for information on the LED definitions Restore Default Button LED Pressing the restore default button while powering on the subsystem will restore firmware default settings CAUTION The Restore NVRAM Default push button is a function that carries some risks Firmware restoration will not destroy the existing logical drive configurations however if the existing logical drives cannot...

Страница 23: ...ove You can access array information even without a password How to use the button After the subsystem is powered down you can use a straighten paper clip to press the button Press and hold the button power on the subsystem and wait for the associated LED and the subsystem Ready LED to light up The Restore Def LED indicates successful restoration of firmware defaults With redundant RAID controller...

Страница 24: ... time clock system administrators will be notified for replacing the BBU In accordance with international transportation regulations the BBU is only charged to between 35 and 45 of its total capacity when shipped After powering on the subsystem see Section 4 1 the BBU will automatically start charging its battery cells It usually requires approximately twelve 12 hours for the battery to be fully c...

Страница 25: ...signed to house both the PSU and a cooling module If a PSU is removed from the chassis the cooling module within is also removed As shown in Figure 1 10 each PSU comes with a single power socket for power cord plug in and a power switch to turn the subsystem on and off A single LED indicates the PSU status For LED definitions please refer to Section 4 4 9 If a PSU fails the LED lights steadily red...

Страница 26: ...s sufficient for maintaining airflow across components Under the following conditions cooling fans raise their rotation speed to increase airflow 1 Component Failure if one cooling fan a PSU or a temperature sensor fails the remaining cooling fans automatically raise its rotation speed 2 Elevated Temperature if the temperature reading breaches the upper threshold set for any of the interior temper...

Страница 27: ...stem comes with a number of different monitoring approaches that provide you with continual updates on the status of the subsystem and individual components The following monitoring features are provided with the subsystem 1 4 1 I2C bus The following subsystem elements are interfaced to the RAID controller over a non user serviceable I2C serial bus PSUs Cooling modules Temperature sensors for the ...

Страница 28: ...ocal remote computer and accessed via LAN WAN The manager communicates with the array via the connection of the existing host interface or Ethernet link to the array s Ethernet port 1 4 4 Audible Alarms The subsystems come with audible alarms that are triggered when certain active components fail or when certain controller or subsystem thresholds are exceeded Whenever you hear an audible alarm fro...

Страница 29: ...nent damage to the subsystem can result 1 5 1 Hot swap Capabilities The subsystem comes with a number of hot swappable components that can be exchanged while the subsystem is still online without affecting the operational integrity of the subsystem These components should only be removed from the subsystem when they are being replaced At no other time should these components be removed from the su...

Страница 30: ...Chapter 1 Introduction Hot swappable Components 1 17 This page is intentionally left blank ...

Страница 31: ...free environment to minimize the possibility of electrostatic discharge ESD damage See Section 2 3 2 Component check Before installing the subsystem check to see that you have received all the required components See Section 2 5 If any items appear damaged or are missing contact your vendor for a replacement 3 Hard drives Up to sixteen 16 SATA II interface hard drives have been installed into driv...

Страница 32: ...et or clothe for cleaning 3 Rack mounting the enclosure The subsystem is intended to be rack mounted the following concerns should be heeded when installing the enclosure into a rack cabinet a The rack cabinet and the associated equipment at the installation site should be able to maintain an ambient temperature around the chassis lower than 40 C and 35 C is battery backup is applied b The opening...

Страница 33: ...ves one upon another can result in erasing the IC programmable contents 10 When replacing components insert them as gently as possible while assuring full engagement Vibration and shock can easily damage hard drives during operation Handle hard drives with extreme care 11 Place the power cords and all cables away from foot traffic Do not place anything over the power cords After all equipment is i...

Страница 34: ...andle the system modules by the retention screws ejection levers or the module s metal frame faceplate only Avoid touching the PCB boards or connector pins 19 Always secure every enclosure module with its retaining screws and make sure it is held in place by its retention mechanisms 20 When working with the subsystem it is important to use tools with care Do not place power tools or other items on...

Страница 35: ...incorrectly 1 Unpack Unpack the subsystem and confirm that all components on the list were included See Section 2 5 2 Rack Cabinet installation If the subsystem is going to be installed in a rack or cabinet it should be installed prior to installing the hard drives Installing the subsystem into a rack or cabinet requires at least two 2 people See Section 2 9 3 Replacement of hard drives Although S...

Страница 36: ...cedure Flowchart Figure 2 1 shows a flowchart of the installation procedure As you complete each step check off the Done box on the right Please use this flowchart in conjunction with the instructions that follow Figure 2 1 Installation Procedure Flowchart 2 5 Unpacking the Subsystem Compare the Unpacking List against the actual package contents to confirm that all required materials have arrived ...

Страница 37: ...mware 2 5 1 Preinstalled Components Following are the pre installed components 1 LCD keypad panel 2 Forearm handles 1 Backplane board 2 Controller modules 2 DDR RAM DIMM module s 2 BBUs Each along with a RAID controller 2 PSUs with cooling modules 2 5 2 Components to be Installed You must install the following components Drive trays with integrated hard drives 2 6 Hard Drive Installation 2 6 1 Har...

Страница 38: ...m will be too heavy to handle and the possible impact during installation may damage your drives WARNING 1 Handle hard drives with extreme care Hard drives are very delicate Dropping a drive onto a hard surface even from a short distance and hitting or touching the circuits on the drives with your tools may damage the drives 2 Observe all ESD prevention methods when installing hard drives 3 Only u...

Страница 39: ...n the drive trays the drive trays are ready to be installed into the subsystem WARNING All drive trays must be installed into the enclosure even if they do not contain a hard drive If any drive slot is not populated the ventilation required for cooling will not be normalized and the subsystem will overheat Step 1 Make sure the rotary bezel lock is in the unlocked position i e the groove on its fac...

Страница 40: ...rive tray with the slot into which you wish to insert it Make sure that it is properly aligned with the drive bay and then gently slide it in This should be done smoothly and gently See Figure 2 5 Figure 2 5 Installing a Drive Tray Step 4 Close the front flap Make sure the front flap is closed properly to ensure that the back end connector is properly mated with the corresponding connector on the ...

Страница 41: ... drive trays are inserted and the subsystem is powered on the subsystem will recognize them and automatically bring them online during the power on procedure 2 8 BBU Installation The BBU can sustain cache memory in the event of a power failure or in the unlikely event of failing both PSUs The BBUs come as standard equipment to safeguard the transient data temporarily held in cache memory PN GAL 92...

Страница 42: ...t smoke burst and or ignite Do not pierce the BBU with a sharp object strike it with a hammer step on it or throw it These actions could damage or deform it and internal short circuiting can occur possibly causing functional defects acid leaks and other hazardous results If a BBU leaks gives off a bad odor generates heat becomes discolored or deformed or in any way appears abnormal during use rech...

Страница 43: ... other devices Two 2 slide rails are available for installing the subsystem into a rack or cabinet The available options are listed above Use two 2 forearm handles on the chassis ear to push or pull the subsystem into out of a rack Secure the subsystem chassis to the rack using the two 2 screw holes on the side of each forearm handle Please see Section 1 3 2 for detailed description To install the...

Страница 44: ...Galaxy A16F R2431 Installation and Hardware Reference Manual 2 14 Rackmounting This page is intentionally left blank ...

Страница 45: ...stances and have been shown to be more reliable Due to the extreme demands of high data transfer rates optical cables are preferred for 4Gbps Fibre connectivity Optical cables are also less susceptible to EMI Fibre cables are expensive components that need to be purchased separately You may order Fibre optical cables GAL 9270CFCCab01 GAL 9270CFCCab02 GAL 9270CFCCab03 of different lengths from Rork...

Страница 46: ... LW 1270nm 1355nm beams Cables using either of these wavelengths can be used It is recommended to use transceiver and cables from Rorke Data Please contact your vendor for compatibility information Laser types Two 2 types of laser devices can be used in FC cables Optical Fibre Control OFC and non OFC lasers The OFC lasers are high powered and can be used over long distances Safety features Due to ...

Страница 47: ...SFP4GA01 from your Galaxy subsystem vendor distributor 3 1 4 FC Port Dust Plugs Each controller module comes with plastic dust plugs that cover the FC ports on the controller module These plugs help keep the interface contacts from contaminants and maintain the internal cooling airflow Until you are ready to insert a SFP transceiver these plastic plugs should be left in place Remove the dust plugs...

Страница 48: ...ute to disk level performance Refer to the documentation that came with your hard drives for performance data Figure 3 1 Drive Mechanical Speed and Logical Drive Speed When cabling follow all Fibre Channel specifications Pay attention to signal quality and avoid electronic noise from adjacent interfaces The disk drives in the same logical array should have the same capacity but it is preferred tha...

Страница 49: ...t interfaces be connected to dual redundant cabling devices e g HBAs It is also preferred to connect the subsystems to host computer s through intelligent Fibre Channel switches that feature zoning and fault recovery algorithms NOTE To create fault tolerant dual redundant data paths on the host side it is necessary for a multipathing software to be installed on the host computers to manage the I O...

Страница 50: ...nual 3 2 7 ID LUN Mapping I O load distribution between the RAID controllers is determined by the host ID LUN mapping Different logical groups of drives can be mapped to the host IDs managed by different RAID controllers For access through different host links e g in a multipathing configuration a logical drive configuration can be associated with different ID LUN combinations on different host ch...

Страница 51: ...undancy while without the costs on expense of FC switches 2 Another drawback is that if host ports are hubbed together the overall host port bandwidth is halved For example the Channel 1 host ports on each controller feature a 4Gb s bandwidth and a total of 8Gb s bandwidth from the host ports on two controllers If host ports are hubbed together all four Channel 1 host ports on bother controllers s...

Страница 52: ...orts marked as CH0 and CH1 on the controller modules to connect to host computer s or to the switched fabric 3 4 1 Multiple RAID Fault tolerant Connection The A16F R2431 readily fits into a Fibre Channel storage environment Shown below is a DAS configuration using cross links among parallel subsystems One major concern for this topology is to avoid ID conflicts on the host channels When cascaded l...

Страница 53: ...Chapter 3 Subsystem Connection Sample Topologies 3 9 Figure 3 4 2 Servers with 3 RAID Subsystems and Dual Redundant Paths ...

Страница 54: ...the host ports on different RAID controllers 2 When connecting to a switched fabric onboard hub should be disabled 3 Host ports on Controller A always connect to the host ports on the Controller A of the next enclosure Controller A is defined as one that is installed in the upper slot location usually the RAID controller managing the whole subsystem 4 If Controller A fails host ID LUNs previously ...

Страница 55: ...e example shown above the host channels are configured in the following way Channel Settings Host CH0 and CH1 Drive Via system bus through the backplane Onboard Hub Disabled Configuration Information RAID controller 2 Host servers 2 or more via FC switches Data path connection Fault tolerant configuration Host channel bandwidth 16 Gb s Max number of drives 16 ...

Страница 56: ...ould be disabled 5 When onboard hub is disabled the host ports on different RAID controllers need to be separately connected to ports redundant FC switches or ports in different zones in order to achieve fault tolerance 6 If Controller A fails host LUNs previously associated with Controller A will be managed by Controller B 7 Depending on I O characteristics each configured array should be properl...

Страница 57: ...witches Figure 3 7 Direct Attached Storage Using Onboard Hub Please note in the example shown in Figure 3 7 the host channels are configured in the following way Channel Settings Host CH0 and CH1 Drive Via system bus through the backplane Onboard Hub Enabled Configuration Information RAID controller 2 Host servers 4 Data path connection Fault tolerant configuration Host channel bandwidth 8 Gb s Ma...

Страница 58: ...can always access a storage array even in the event of cabling component failure 4 The onboard hub should be enabled so that if a controller fails access to the array should continue with the data link to the surviving controller 5 If Controller A fails host LUNs previously associated with Controller A will be managed by Controller B 6 Depending on I O characteristics each configured array should ...

Страница 59: ...he controller boards BBU For dual controller models BBU s are also pre installed Make sure BBU s have been installed correctly MUX Kits Also the pre installed modules Hard drives Hard drives have been correctly installed in the drive trays Drive trays All the drive trays whether or not they contain a hard drive have been installed into the subsystem Cable connections The subsystem has been correct...

Страница 60: ...ns must be made between subsystems before turning on the subsystem If you power on the subsystem before correctly connecting the cables host computers may recognize host ports only after a LIP is issued across FC nodes if host links are configured to operate as arbitrated loops Step 3 Power on the RAID subsystem To power on the subsystem please follow the procedures below Using the included power ...

Страница 61: ...s supplied to the disk drives The Drive Busy LEDs should also start flashing indicating that system is attempting to access hard drives 3 LEDs on LCD keypad panel The blue LED on the LCD keypad panel should illuminate after the system initialization process indicating that system status is ready System initialization may take up to five minutes 4 FC port LEDs The LED underneath each FC port should...

Страница 62: ...rtup sequence is shown and described in the sequence below This screen appears when the PSUs are turned on The subsystem will start a self test The self test has been completed This screen appears while partner controllers are communicating with each other Verifying installed cache memory System is ready You can now start to configure the subsystem Initializing Please Wait A16F R2431 512MB RAM Wai...

Страница 63: ...l cached data This prepares the RAID subsystem to be safely powered down Step 3 Turn off the power Power off the subsystem using the power switch on each PSU Once the subsystem is powered down other devices enclosures that are connected to the subsystem can be sequentially powered down 4 3 System Monitoring Overview The subsystem is equipped with a variety of self monitoring features that help kee...

Страница 64: ...program independent from RAIDWatch and can be installed on different management stations It is used for event notification via email fax LAN broadcast SNMP traps MSN Messenger SMS Short Message Service and the configuration utility screen Configuration Client helps prevent blind time and keeps you constantly aware of system status Instructions on activating Configuration Client functionality are g...

Страница 65: ...Cooling Module 2 4 See Section 4 4 7 Table 4 1 LED Distribution LED definitions are given in the following sections 4 4 2 LCD Keypad Panel The LCD keypad as shown in Figure 4 3 consists of five 5 buttons three 3 LEDs and a 16x2 character LCD screen that provides access to firmware embedded utility Press the ENT button for two 2 seconds on the initial screen to enter the main menu Press the ESC but...

Страница 66: ...tes that there is no activity on the host drive channels ATTEN Attention Red ON indicates that a component failure status event has occurred OFF indicates that the subsystem and all its components are operating correctly Table 4 2 LCD Panel LED Definitions NOTE During the power on process the ATTEN LED will light up steadily Once the subsystem successfully boots up with no faults the ATTEN LED is ...

Страница 67: ...sk drive The drive is busy Flashing LIGHT PURPLE indicates the drive is in a spin up state The drive is not ready OFF indicates that there is no activity on the drive Power Status Green Red GREEN indicates that a drive is installed in the drive tray RED indicates that a drive has failed or is missing Table 4 3 Drive Tray LED Definitions 4 4 4 Controller Module LEDs The controller faceplate is show...

Страница 68: ...es the controller is being initialized or has failed The controller is not ready 2 C_Dirty Amber ON indicates that data is currently cached in memory or is supported by the BBU during a power loss 3 Temp Amber ON indicates that one of the preset temperature thresholds is violated 4 BBU Link Green ON indicates BBU is present 5 Hst Bsy Green FLASHING indicates there is active traffic through the hos...

Страница 69: ...lower right corner of the controller faceplate See Figure 4 5 To restore firmware defaults press and hold the button before turning on the subsystem Once the factory defaults are successfully restored the restore default LED lights green 4 4 4 4 LAN Port LEDs A shielded Ethernet cable is recommended for connecting the RJ 45 Ethernet management port to a local network after you configure an IP addr...

Страница 70: ... failed OFF The BBU is fully charged and is able to sustain cached data Table 4 7 BBU LED Definitions 4 4 6 PSU LEDs Each PSU comes with a single LED see Figure 4 8 located underneath the power switch that turns on the subsystem This LED indicates the operational status of the PSU Please refer to the PSU LED definitions shown in Table 4 8 Figure 4 8 PSU LED Color Status Intermittent Flashing Green...

Страница 71: ...own in Table 4 9 Figure 4 9 Cooling Module LEDs and Cooling Fan Locations Color Status Static Green The cooling fan is operating normally Static Red The cooling fan has failed Table 4 9 Cooling Module LED Definitions The subsystem has a novel approach to stabilizing the temperature within the chassis When temperature sensors detect an elevated temperature reading or the failure of any cooling fan ...

Страница 72: ...site and hears an alarm the manager must read the error message on the LCD keypad panel RAIDWatch session or a PC terminal to determine what has triggered the alarm After determining what has occurred the manager must take appropriate actions to rectify the problem WARNING If an alarm is triggered it is necessary for you to determine the cause of the problem If the audible alarm is ignored and the...

Страница 73: ...ossible WARNING Do not remove a failed component from the subsystem until you have a replacement on hand If you remove a failed component without replacing it the internal airflow will be disrupted and the system will overheat causing damage to the subsystem All of the following components can be replaced in case of failure 1 RAID controller modules Section 5 2 2 Memory modules Section 5 3 3 BBU S...

Страница 74: ... can be quickly installed Removing subsystem components without a replacement can lead to permanent damage When replacing any hot swappable component caution should be taken to ensure that the components are handled in an appropriate manner Rough or improper handling of components can lead to irreparable damage If a controller module in the dual controller configuration A16F R2431 fails the contro...

Страница 75: ...system All previously stipulated safety precautions see Section 2 3 must be strictly adhered to Failure to adhere to these precautions can result in permanent damage to the controller board resulting in lengthy delays Operating in the dual active mode and one 1 controller fails a transparent failover to the partner controller will take place This ensures continuous operation of the RAID subsystem ...

Страница 76: ...nect all cables from the controller module These may include the Ethernet cable Fibre Channel host links and serial cables connected to the COM ports Step 3 Remove the screws underneath the ejection levers See Figure 5 1 Figure 5 1 Removing the Controller Retention Screws Step 4 Remove the controller module by pressing down the two 2 levers The controller module will automatically ease out of the ...

Страница 77: ...ard 5 2 3 Replacing the Controller Module If the controller module itself has failed replace it with a replacement from your vendor Step 1 Remove the failed controller module from the subsystem see Section 5 2 2 It is recommended to obtain a replacement with pre installed memory If the DIMM module is obtained otherwise refer to Section 5 3 for details on handling controller and DIMM module Step 2 ...

Страница 78: ...ew seconds and try again Use the ejection levers on the sides of the controller to secure it in the chassis See Figure 5 4 When the controller is inserted with the levers at its lowest position notches on the levers should properly clinch to the round metal protrusions on the interior walls of the module bay You may then pull the lever upward to secure the controller into chassis Figure 5 4 Liftin...

Страница 79: ...preinstalled module can be replaced Replacement and installation instructions are described fully below 5 3 1 DIMM Module Considerations If the memory module on the controller module is going to be replaced the following issues must be considered when purchasing a replacement module Purchasing considerations Contact your subsystem vendor for an updated list of compatible DIMM modules IMPORTANT The...

Страница 80: ...ure must be repeated 5 3 2 DIMM Module Upgrade Replacement Procedure To replace the DIMM module Step 1 Remove the controller module from the subsystem and place it on a clean static free surface See Section 5 2 2 Step 2 Remove the BBU module if installed Carefully placed the module for it contains Li Ion batteries Do not drop it to the floor or place it near any heat source Step 3 Remove the previ...

Страница 81: ...power outages Each BBU contains battery cells mounted on a metal bracket and connects to an adaptor board within the RAID controller The BBU is secured to the RAID controller at the top center of the faceplate using two 2 retention screws If a BBU fails it should be replaced as soon as possible Please refer to Section 2 8 1 before replacing it Fault Conditions A BBU failure can result from the fol...

Страница 82: ...t authorized battery disposal sites only Do not use nor leave the BBU near a heat source Heat can melt the insulation and damage other safety features of battery cells possibly will cause acid leak and result in flames or explosion Do not immerse the BBU in water nor allow it to get wet Its protective features can be damaged Abnormal chemical reactions may occur possibly will cause functional defe...

Страница 83: ...igure 5 8 Removing the BBU Step 2 Install the new BBU Align the BBU with the slot and then gently push the BBU into the slot When you feel the contact resistance use slightly more force for the back end connector to mate with the backplane Step 3 Secure the BBU to the subsystem by fastening the two 2 retention screws See Figure 5 9 Figure 5 9 Installing the BBU Step 4 The LED should start flashing...

Страница 84: ...ven after a BBU is replaced contact your system vendor for a replacement controller and return the controller module through Rorke s standard RMA procedure 5 5 Replacing a Faulty PSU 5 5 1 PSU Overview Two 2 redundant PSUs The subsystem is preinstalled with two 2 530W fully redundant hot swappable PSUs These modules are located at the rear section of the subsystem PSU bracket PSU is 2U canister th...

Страница 85: ...l a replacement PSU be sure that it has the same warning text on its extraction handle as that shown on the handle of a remaining PSU Double check to avoid mixing a similar yet different PSU of another Galaxy series To replace a PSU please follow these steps Step 1 Turn off the PSU The power switch is located on each PSU s rear facing panel See Figure 5 11 Step 2 Disconnect the power cord that con...

Страница 86: ...should gracefully disconnect the PSU from the backplane connectors Once dislodged gently pull the PSU out of the subsystem If the subsystem is mounted in a rackmount rack use another hand to support its weight while removing the module See Figure 5 13 Figure 5 13 Removing the PSU Module Step 5 Use the handle to gently pull the PSU out of the chassis Step 6 Remove the cooling module from the upper ...

Страница 87: ...p 7 Insert the replacement module Make sure the extraction handle is held at its up most position so that the saddle notches on the sides of the handle can snap onto the metal protrusions along the interior walls of the PSU slot Push the PSU into chassis and when you feel the contact resistance push the handle downward to secure the module See Section 5 6 Figure 5 14 Installing the PSU Step 8 Secu...

Страница 88: ...quipped with four 4 cooling fans two 2 within each cooling module These cooling modules control the internal operating temperature of the subsystem and therefore their working integrity should be maintained at all times Although the cooling modules are fully redundant it is not advisable to run the Galaxy subsystem with fans in a single PSU module for an extended period of time If the cooling fans...

Страница 89: ...ws from the top To replace a cooling module follow the steps below WARNING The fan replacement process should be completed within five 5 minutes If the process takes too long the accumulated heat can damage the subsystem Keep a failed module in its bay until a replacement unit is in hand Step 1 To remove the cooling module remove PSU module first For instructions please refer to Section 5 5 Place ...

Страница 90: ...ng assembly your thumb by the upper edge of the fan guard and your middle finger at the hemispheric indent Step 3 3 Tilt the fan a little bit and remove the fan assembly with a precisely vertical motion Figure 5 17 Removing the Cooling Module Step 4 Install the replacement module by aligning it with the module bay on the PSU module and gently lowering it into The fan outlet should be aligned with ...

Страница 91: ...em after the front flap has been opened may cause data errors Slowly remove a faulty drive When removing a drive tray from the subsystem pull the drive tray out only about one inch and then wait for at least 30 seconds for the hard drive motor to spin down before taking it out completely Any impact to the hard drive while the drive motor is spinning can damage the hard drive There are situations t...

Страница 92: ...that contains a hard drive indicated as faulty You may use firmware utility or RAIDWatch software to locate a faulty drive The drive tray LED should also light red Step 2 Make sure the rotary bezel lock is turned to the unlocked position See Figure 5 18 i e the groove on its face is in a horizontal orientation Use a flathead screwdriver to turn the rotary lock to the unlocked orientation Figure 5 ...

Страница 93: ...ive tray from the chassis Figure 5 20 Removing a Drive Tray Step 5 Remove the four 4 retention screws that secure the hard drive from the sides of the drive tray two on each side See Figure 5 21 Figure 5 21 Removing the Hard Drive Step 6 Install the replacement drive Please refer to the complete hard drive installation procedures in Section 2 6 Step 7 Re install the drive tray back to the subsyste...

Страница 94: ...n removed from the subsystem Step 3 Turn the drive tray over and remove the four 4 retention screws that hold the MUX kit in place Figure 5 22 Replacing a MUX Kit Step 4 Install the new MUX kit using the instructions given in Chapter 2 Step 5 Re install the hard drive once the new MUX kit has been installed on the drive tray Step 6 Re insert the drive tray to the subsystem after the hard drive has...

Страница 95: ... 149º F w BBU 0º to 35ºC 32º F to 95º F Altitude Operating Sea level to 3 658m 12 000 ft Non operating Sea level to 12 192m 40 000 ft Power Requirements Input Voltage 100VAC 9A 240VAC 4 5A with PFC auto switching Frequency 47 63Hz Power Consumption 530W Dimensions Without Forearm Handles Not including rear end protrusions Without Forearm Handles Height 131mm 5 2 inches 130mm 5 1 inches Width 482 6...

Страница 96: ...disk spanning Host O S Compatibility Host O S independent Host Interface FC 4G Host Channels 2 pre configured host channels per controller Drive Interface Supports up to 16 channels of SATA drives Drive Channels SATA channel Cache Mode Write through or write back Cache Memory Default 512MB up to 2GB DDR RAM DIMM modules with ECC Number of LUNs Up to 32 per host ID Multiple Target IDs Host Channel ...

Страница 97: ...Supply Specifications Specifications Nominal Power 530W with active PFC DC Output 12 0V 32A Max 5 0V 32A Max 3 3V 30A Max Input Frequency 47 to 63Hz Input Voltage 100VAC 9A or 240VAC 4 5A with PFC Power Factor Correction Yes Hold up Time At least 20ms at 115 230VAC full load after a loss of AC input I2 C Through backplane to RAID controller s Over temperature Protection Auto shutdown when lost coo...

Страница 98: ...controller model LCD keypad panel The RAIDWatch Manager program using in band or Ethernet connection Performance Monitoring Yes Remote Control and Monitoring Yes Event Broadcast Alert Yes via RAIDWatch sub module the Configuration Client utility NPC or Embedded browser based RAIDWatch Event Notification Yes via RAIDWatch sub module the Configuration Client utility NPC or Embedded browser based RAI...

Страница 99: ...rs and module presence detection through an I2C serial bus Yes Automatic Drive Failure Detection Yes Automatic Rebuild on Spare Drives Yes Regenerate Logical Drive Parity Yes Bad Block Reassignment Yes Automatic Rebuild upon Failed Drive Replacement Yes Manual Clone of Suspected Failed Drive Yes Concurrent Rebuild on Multiple Drives in a RAID 0 1 Logical Drive Yes Salvage the 2nd Temporary Failed ...

Страница 100: ...Galaxy A16F R2431 Installation and Hardware Reference Manual A 6 Fault Tolerance Management This page is intentionally left blank ...

Страница 101: ...ries subsystems LCD panel included GAL 9273CBTE Battery cell pack Li ION 4 cell for Galaxy ASIC400 series GAL 9273ECPSU Power supply module for ES 3U ASIC400 series subsystem 530W capacity GAL 9273ECFanMod Cooling fan module for ES 3U ASIC400 series subsystems GAL 9273CDTray Drive tray Type III bezel and Type II LED lightpipe GAL DDRESCM5 512MB DDR RAM DIMM module GAL DDRESCMA 1GB DDR RAM DIMM mod...

Страница 102: ...tray Type III bezel and Type II LED lightpipe 2 SAS to 1 SATA SATA II MUX conversion embedded active active port selector for dual controller subsystems GAL 9270CUPSYCab UPS Y cable audio jacks to 1 DB 9 GAL 9270CSFP4GA01 Agilent Fibre Channel 4 25 2 125 1 0625 GBd Small Form Pluggable Optical Transceiver LC wave length 850nm multi mode GAL 9270CFCCab01 Optical FC cable LC LC MM 62 5 125 Duplex LS...

Страница 103: ...Appendix B Spare Parts and Accessories Table B 3 Optional Accessories ...

Страница 104: ...Galaxy A16F R2431 Installation and Hardware Reference Manual B 4 Accessories This page is intentionally left blank ...

Страница 105: ... a 20 pin host connector These port sockets receive Small Form Factor SFP fiber optical and copper based transceivers Contact our technical support for an updated list of SFP transceiver modules that have been tested to comply with the sockets The pinouts are shown in Figure C 1 and their definitions are shown in Table C 1 Figure C 1 SFP Connector Pinouts ...

Страница 106: ...indication Logic 0 indicates normal operation 9 VEER Receiver Ground common with Transmitter Ground 10 VEER Receiver Ground common with Transmitter Ground 11 VEER Receiver Ground common with Transmitter Ground 12 RD Receiver Inverted DATA out AC coupled 13 RD Receiver Non inverted DATA out AC coupled 14 VEER Receiver Ground common with Transmitter Ground 15 VCCR Receiver Power Supply 16 VCCT Trans...

Страница 107: ...he redundant RAID controllers for maintenance free terminal emulation connection during controller failover failback GAL 9270AYCab Figure C 2 COM1 Cable CN1 and CN2 Connectors CN1 Pin Number Pin Name 1 Ground 2 TXD 3 RXD CN2 Pin Number Pin Name 1 NC 2 RXD 3 TXD 4 DTR Shorted 5 GND 6 DSR Shorted 7 RTS Shorted 8 CTS Shorted 9 NC Table C 2 COM1 Cable CN1 and CN2 Pinout Definitions ...

Страница 108: ...Cable DB9 and Audio Jack Pinouts COM2 cable is used to connect the COM2 port to a UPS PN GAL 9270CUPSYCab Figure C 3 COM2 Cable CN1 and CN2 Connectors CN1 Pin Number Pin Name 1 Ground 2 TXD 3 RXD CN2 Pin Number Pin Name 1 TXD 2 RXD 3 NA 4 NA 5 NA 6 NA 7 NA 8 NA 9 Ground Table C 3 COM2 Cable CN1 and CN2 Pinout Definitions ...

Страница 109: ...GAL 9011 Null Modem A null modem is used for wire swap and is necessary for connecting COM1 CN2 to a PC serial port PN GAL 9011 Figure C 4 Null Modem Pinouts Swap pin 2 and pin 3 Swap pin 4 and pin 6 Swap pin 7 and pin 8 Table C 4 Null Modem Pinouts ...

Страница 110: ...uts C 6 Power Connectors IEC type receptacle C 7 Connector Type and Other Information C 7 1 Connector Type and Supported Connections The Agilent AFBR 57R5APZ optical transceivers as optional accessories The SFP host ports are compatible with transceivers running at 4 25 2 215 GBd The SFP host ports receive transceivers compliant with LC Duplex optical interface conforming to ANSI TIA EIA 604 10 FO...

Отзывы: