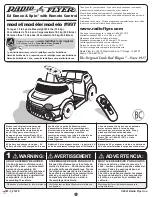
manualshive.com logo in svg
background image

®

Owner’s Manual and Assembly Instructions

Model #: W491-B-WH 

Read and understand the entire manual before assembly and operation. The vehicle must be 
assembled by an adult who has read and understands the instructions. 

Made in China. 

IMPORTANT: 

Save this manual with your sales receipt.
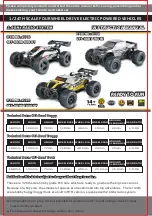
BMW X5 M 6V

25701651 04/21

Styles and colors may vary. Do not return your product to the store, contact Rollplay 
with questions. Email [email protected] for assistance and replacement parts. 

Содержание W491-B-WH

Страница 1: ... must be assembled by an adult who has read and understands the instructions Made in China IMPORTANT Save this manual with your sales receipt BMW X5 M 6V 25701651 04 21 Styles and colors may vary Do not return your product to the store contact Rollplay with questions Email customerservice rollplay com for assistance and replacement parts ...

Страница 2: ...ST Monday Friday Phone Email customerservice rollplay com Thank you for purchasing this Rollplay vehicle We hope the rider enjoys it for miles to come Please read this instruction guide carefully before assembling and operating the vehicle Please contact Rollplay Customer Service with any questions Have your model number and serial number ready before calling Please provide proof of purchase Keep ...

Страница 3: ...ce a month even if the vehicle is not in use E mail Customer Service if you need assistance or replacement parts Please have your model number and serial number ready before calling Please provide proof of purchase Keep your sales receipt and register your product at www rollplay com as we require proof of purchase customerservice rollplay com Read this entire manual prior to assembly to ensure sa...

Страница 4: ...emble the door 12 Assemble the rear spoiler 13 Operating Instructions 19 Door Operation 18 Attach the steering wheel 14 Battery Maintenance 20 General Care 21 Assemble the windshield 15 Assemble the wing mirror 16 Installing batteries in steering wheel 17 Troubleshooting Guide 22 FCC Information 24 Service and Repairs 25 Warranty 26 Product Registration 27 ...

Страница 5: ...s and hair and clothing away from moving parts Moving parts can cause serious injury ALWAYS wear shoes while using the vehicle NEVER operate near roadways or motor vehicles Do not operate near drop offs such as steps steep inclines or hills Operate on relatively level ground Do not operate near water swimming pools or other bodies of water Do not operate near loose dirt mud sand or fine gravel Do n...

Страница 6: ...in flush immediately with cool water for 15 minutes If the chemical is swallowed immediately give the person water or milk Do not give water or milk if the person is vomiting or has decreased alertness Do not induce vomiting explosion It could permanently damage the system Keep the charger housing closed to prevent exposed wiring which may cause electric shock IMPORTANT charged for a full 24 hours...

Страница 7: ...r body 8 Washers 4 9 Front wheels 2 10 Rear wheels 2 11 Battery 12 Charger 13 Blister box 14 Rear wheel orientation rod 15 Door Screw 2 16 Screw 17 Door Connector 18 Manual 12 11 2 4 1 6 5 3 8 8 14 17 9 7 10 18 14 13 8 16 15 NOTE There may be extra hardware included for your convenience ...

Страница 8: ...ry charger D from the outlet 2 Unplug the red battery connector A from the red battery charger connector C 3 Reconnect the red battery connector A to the red engine connector B 4 Replace the seat and tighten lock Note It is not necessary to remove the battery for charging However if the battery does not reach the outlet it can be removed for charging To remove the battery unscrew the black battery...

Страница 9: ...wheels Place the washer 8 on to the front axle and then slide the front wheel 9 into position Push on the center of the wheel and lock into place Check that the wheel is correctly positioned by gently pulling it to ensure that it is secured to the axle ...

Страница 10: ... wheel orientation rod 14 on to the rear left axle Slide the wheel 9 into position ensuring the side with the gear convex is facing inward Push on the center of the wheel and lock into place Check that the wheel is correctly positioned by gently pulling it to ensure that it is secured to the axle ...

Страница 11: ...on the rear right axle ensuring the side with the gear convex is facing inwards Align the gear teeth on the wheel with the grooves on the gear box Push on the center of the wheel and lock into place Check that the wheel is correctly positioned by gently pulling it to ensure that it is secured to the axle ...

Страница 12: ... spoiler Align the clips of the rear spoiler into the slot of car body press down the rear spoiler firmly until you hear the click to complete the assem bly Finally as shown in the figure tighten with two screws on the left and right of the rear spoiler ...

Страница 13: ... door 15 17 5 Assemble the door As shown in the figure place the door 5 on the car body and rotate the door connector to align the holes then tighten with the door screw 15 Install the other side door in the same way ...

Страница 14: ...e steering wheel 2 Assemble the steering wheel Align and insert the hole on the bottom of the steering wheel 2 onto the steering rod A clicking sound will signal that it is locked into place and assembly is complete ...

Страница 15: ...15 Assemble the windshield 1 Assemble the windshield Align the windshield with the slots between the dashboard and the body Push lightly on the windshield 1 until it clicks into place ...

Страница 16: ...6 Assemble the wing mirror 3 Assemble the wing mirror Please note that the left and right mirrors are different Insert the wing mirror 3 into the slot of the door pressing until you hear the click sound ...

Страница 17: ...ering wheel Installing batteries in steering wheel Using a screwdriver not included open the battery cover Install 2 1 5V AA Batteries not included into the openings with correct polarity Replace the battery cover and tighten screw ...

Страница 18: ...18 Door Operation 5 Door Operation Once assembled pull door to open Push to close ...

Страница 19: ... is depressed The car will stop when the accelerator pedal is released To reverse move the gear shift to the reverse position and depress the accelerator pedal Steering Wheel Functions The steering wheel s functions include realistic sound effects Press the buttons located on the left and right sides inside the frame of the steer ing wheel for horn and engine sounds Dashboard light Gear shift Peda...

Страница 20: ...ot attempt to recharge non rechargeable batteries with the original charger Do not replace the battery with any other battery or the warranty will be voided If you need a replacement battery see Page 25 for replacement information Remove damaged batteries from the car immediately Recycle or dispose of the used batteries responsibly Do not short circuit the supply terminals Do not leave the battery...

Страница 21: ...ntact Customer Service for replacement parts See Service and Repairs on Page 21 for more information DO NOT operate the vehicle if there are any damaged parts Carefully clean the vehicle with a damp cloth and mild soap Do not get water in or near any electrical parts Do not wash the vehicle with a hose Store the vehicle indoors or use a tarp to cover it Keep away from stoves heaters or other sourc...

Страница 22: ...otor is damaged Contact Customer Service Vehicle only runs for a short time Undercharged battery Ensure a secure connection when the battery is recharging Recharge for at least 8 12 hours Overcharged battery Never charge the battery for more than 30 hours Battery is old Replace battery Vehicle runs slowly Battery is not fully charged Ensure a secure connection when the battery is recharging Batter...

Страница 23: ...ile vehicle is moving Stop the vehicle before shifting Motor or gear box making grinding noises Motor or gear damage Contact Customer Service Battery will not recharge Charger is not plugged in Plug in the charger to a functional wall outlet Charger is not working Call Customer Service for a replacement Loose connector or loose adapter Check that the connectors are securely plugged in to each othe...

Страница 24: ...nce with the instructions may cause harmful interference to radio communications However there is no guarantee that interference will not occur in a particular installation If this equipment does cause harmful interference to radio or television reception which can be determined by turning the equipment off and on the user is encouraged to try to correct the interference by one or more of the foll...

Страница 25: ...2 9309 Email customerservice rollplay com Web www rollplay com For a list of available replacement parts please visit www rollplay com WE WILL REQUIRE PROOF OF PURCHASE Please save your sales receipt or register your product at www rollplay com Service and Repairs Do not return your product to the store Contact Rollplay with questions ...

Страница 26: ...eturn vehicle to the store Consult the troubleshooting guide in this manual and online at www rollplay com Call Rollplay Customer Service at 1 888 982 9309 may vary from state to state Please save your original sales receipt One year limited warranty vehicle only from the date of purchase with proof of purchase from a Rollplay certified retailer This one year limited warranty covers the ride on veh...

Страница 27: ...t sell rent or share your personal information First Name Last Name Title Address City State Zip Code Email Phone Date of Purchase The following product information is on the cover of the owner s manual Product Name Model Number Serial Number Retailer Place of Purchase Product Registration Questions or comments Contact us at www rollplay com or 1 888 982 9309 27 Product Registration ...

Страница 28: ......

Отзывы: