Roland RP302 Скачать руководство пользователя страница 3

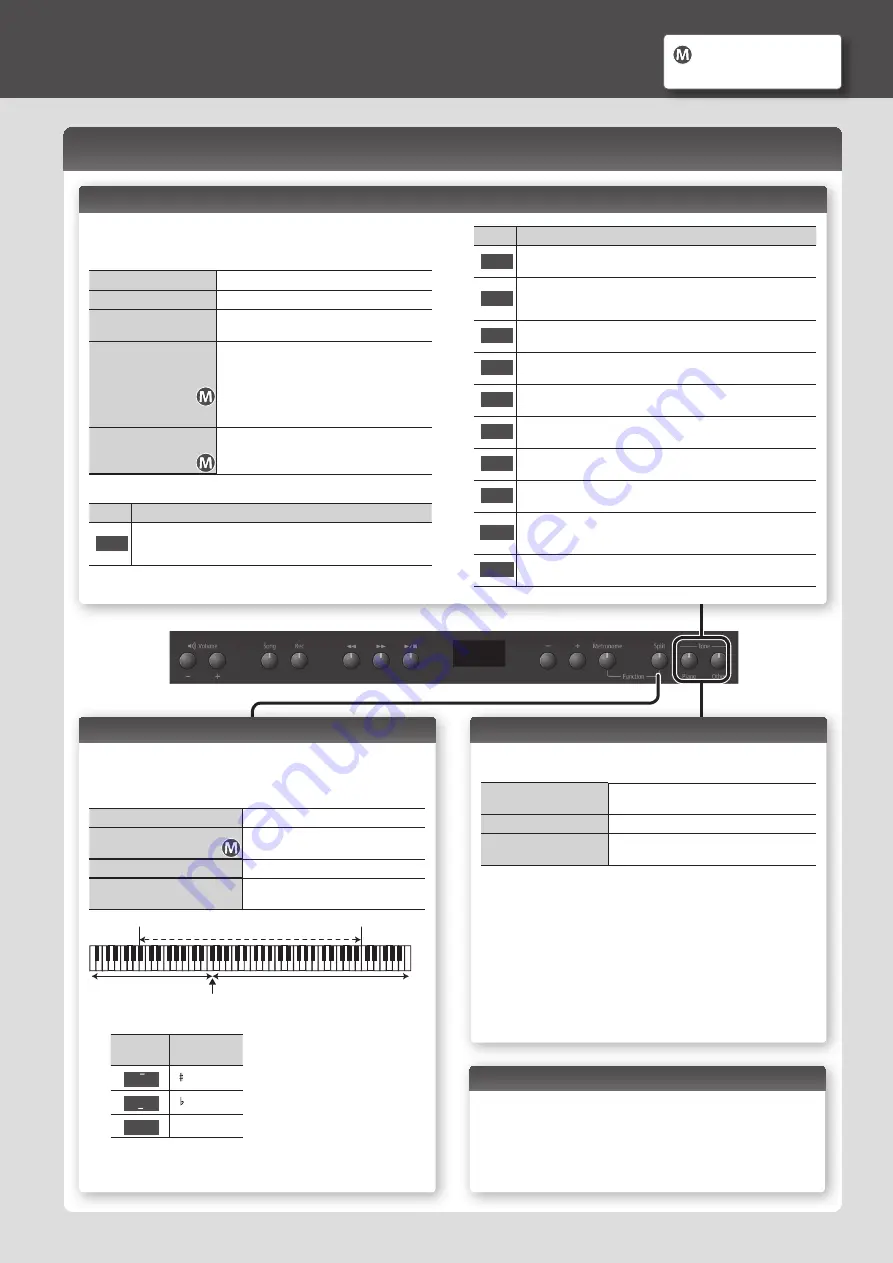
Selecting Tones ([Piano] [Other] Buttons)

Playing Different Tones with the Right and Left Hands ([Split] Button)

You can play different tones in the left and right sides of the keyboard, divided at a 

certain key.
This feature is called “Split Play,“ and the key at which the keyboard is divided is 

called the “Split Point.”

Turning the split feature on

Press the [Split] button so it’s lit.

Changing the keyboard’s 

split point

Hold down the [Split] button and press 

the key at the desired split point.

Changing the Right-Hand Tone

Same as “Selecting Tones.”

Changing the Left-Hand Tone

Hold down the [Split] button and use 

the steps described in “Selecting Tones.”

B1

B6

Left-Hand Tone

Right-Hand Tone

Range in which you can specify the split point

Split point when the power is turned on: F#3

*  The split point is the highest note of the left-hand tone.

Display 

(example)

Pitch

F 3

F 3

A 4

A 4

C 4

C4

Layering Two Tones (Dual Play)

You can play two tones simultaneously from each note of the keyboard. This feature 

is called “Dual Play.”

Turning Dual on

Hold down the [Piano] button and press the 

[Other] button.

Turning Dual off

Press the [Piano] or the [Other] button.

Selecting tones

Select tones for the [Piano] button and [Other] 

button before you turn Dual on.

1  

Press the [Piano] button, and then use the [-] [+] buttons to 

select a tone.

2  

Press the [Other] button, and then use the [-] [+] buttons to 

select a tone.

3  

Hold down the [Piano] button and press the [Other] button to 

turn Dual on.

Tone 1 and tone 2 are heard together.
To turn Dual off, press the [Piano] button or the [Other] button.

Operation Guide

Performing

This digital piano lets you enjoy playing a variety of piano tones (sounds) and other 

types of tones.
You can select a tone and adjust the way that it sounds.

Selecting a piano tone

Press the [Piano] button.

Selecting other tones

Press the [Other] button.

Selecting various tones

Press the [Piano] or [Other] button, and then 

press the [-] [+] buttons.

Adjusting the spaciousness 

of the sound 
(Ambience)

Hold down the [Piano] button and press the [-] 

[+] buttons.
*  If you’re using headphones and the 

Headphones 3D Ambience effect (p. 11) is 

set to “On,“ this lets you adjust the depth of 

the Headphones 3D Ambience effect.

Adjusting the brightness of 

the sound 
(Brilliance)

Hold down the [Other] button and press the [-] 

[+] buttons.

[Piano] button

Display Explanation

  1

Concert Piano

The sound of a splendid concert grand piano. This piano sound has our 

highest recommendation, and can be used for any style of music.

Display Explanation

  2

Ballade Piano

A mellow grand piano sound, recommended for quiet songs.

  3

Bright Piano

A brilliant grand piano sound, recommended when you want the piano to 

stand out in an ensemble.

  4

Magical Piano

A charming sound that layers synth bells with Concert Piano.

  5

Piano+Strings

Strings layered with Concert Piano.

  6

Piano+Pad

A pad layered with Concert Piano.

  7

Piano+Choir

A choir layered with Concert Piano.

  8

Rock Piano

A robust piano sound, recommended for boogie-woogie playing.

  g

Ragtime Piano

A honky-tonk piano sound, recommended for ragtime playing.

 10

Harpsichord

A type of keyboard instrument widely used in Baroque music, producing a 

delicate sound.

 11

Coupled 8+4

The sound of a harpsichord layered with sound an higher octave.

   Settings for items with this 

icon are saved by Memory 

Backup (p. 11).

Changing the Key (Transpose)

The Transpose function lets you shift the pitch of the keyboard in semitone steps.
You can use this to play the song in a different key.
For details, refer to “Transposing the Keyboard or Song (Transpose)” (p. 11).

3

Содержание RP302

Страница 1: ...List 15 Tone List 16 Internal Song List 17 USING THE UNIT SAFELY 18 IMPORTANT NOTES 18 Contents Before using this unit carefully read USING THE UNIT SAFELY and IMPORTANT NOTES the leaflet USING THE UN...

Страница 2: ...ng the terminals in your plug proceed as follows The wire which is coloured BLUE must be connected to the terminal which is marked with the letter N or coloured BLACK The wire which is coloured BROWN...

Страница 3: ...pes of tones You can select a tone and adjust the way that it sounds Selecting a piano tone Press the Piano button Selecting other tones Press the Other button Selecting various tones Press the Piano...

Страница 4: ...C4 C5 C6 C7 C8 C3 C2 C1 C4 C5 C6 C3 C4 C5 C3 C6 The damper pedal for the left area The damper pedal for the right area Conventional keyboard Twin Piano Divide point List of Time Signatures Display Be...

Страница 5: ...on All Song Play Starting Stopping Song Playback Press the s button When the song has finished playing to the end it will stop Fast Forward Press the y button By holding down the y button and pressing...

Страница 6: ...stination at which to save and then press the Metronome button U User U 01 U 10 N USB N 01 N gg v01 A song with no recorded data empty song 5 5 Song number shown with lowercase v User memory 5 5 Song...

Страница 7: ...econd has elapsed Lower the Level of an Audio File s Central Sound This feature lets you reduce the loudness of the central sound of the audio Center Cancel 1 When a song is selected hold down the s b...

Страница 8: ...song Volume of the manual performance Manual performance is louder g 1 Piano is louder 1 g g g Same volume Volume of the piano sound Volume of the other sound Other is louder g 1 Left hand is louder...

Страница 9: ...nnect a USB flash drive here p 7 Use a commercially available USB flash drive or a USB flash drive sold by Roland However we cannot guarantee that all commercially available USB flash drives will work...

Страница 10: ...wrong order you risk causing malfunction or equipment failure Turning the Power On 1 Turn the L switch ON After a brief interval you ll be able to produce sounds by playing the keyboard 2 Use the Vol...

Страница 11: ...off F06 Off On Applying a Headphones 3D Ambience Effect to the Piano Sound Headphones 3D Ambience You can apply a Headphones 3D Ambience effect which produces the sensation that the sound is emanatin...

Страница 12: ...s disconnected from the internal sound generator and playing the keyboard will not produce sound F12 U 01 U 10 USER 01 10 N 01 N gg USB 01 99 Copying a Song Copy Song A song that you recorded on this...

Страница 13: ...utton 2 To execute the Factory Reset press the s button When the Factory Reset has been completed the display will indicate End Never turn off the power before the display indicates End 3 Press the L...

Страница 14: ...d or song is incorrect Could you have made Transpose settings p 11 Is the Master Tune setting appropriate p 10 The notes of a piano are tuned using a unique method stretched tuning which makes upper r...

Страница 15: ...could not be read fast enough during song playback After waiting several seconds you may be able to play back the song by pressing the s button once again E 18 This audio format is not supported Pleas...

Страница 16: ...ineEP g Vibraphone 10 Marimba 11 Celesta No Name 12 Mallet Isle 13 Morning Lite 14 SymphonicStr 15 Rich Strings 16 OrchestraStr 17 DecayStrings 18 Harp 1g PizzicatoStr 20 ChurchOrgan1 21 ChurchOrgan2...

Страница 17: ...zek Chopin a 3g Fr hlingslied Felix Mendelssohn a 40 Pr ludium C Dur BWV846 Johann Sebastian Bach a 41 J gerlied Felix Mendelssohn a 42 Passepied Claude Achille Debussy a 43 F r Elise Ludwig van Beeth...

Страница 18: ...e unremovable Do not affix stickers on the keyboard You may be unable to remove stickers that use strong adhesives and the adhesive may cause discoloration To remove stubborn dirt use a commercially a...

Страница 19: ...ON OF CONFORMITY Compliance Information Statement Model Name Type of Equipment Responsible Party Address Telephone RP302 Digital Piano Roland Corporation U S 5100 S Eastern Avenue Los Angeles CA 90040...

Страница 20: ...5 1 0 0 0 5 3 7 9 5 0 1...

Отзывы: