background image


136

Chapter 7 Creating Music Styles


Chapter 7


Editing the volume and effect settings for 
each Part

Displaying the Part settings screen


1.


At the Style Composer screen, touch <Options>.


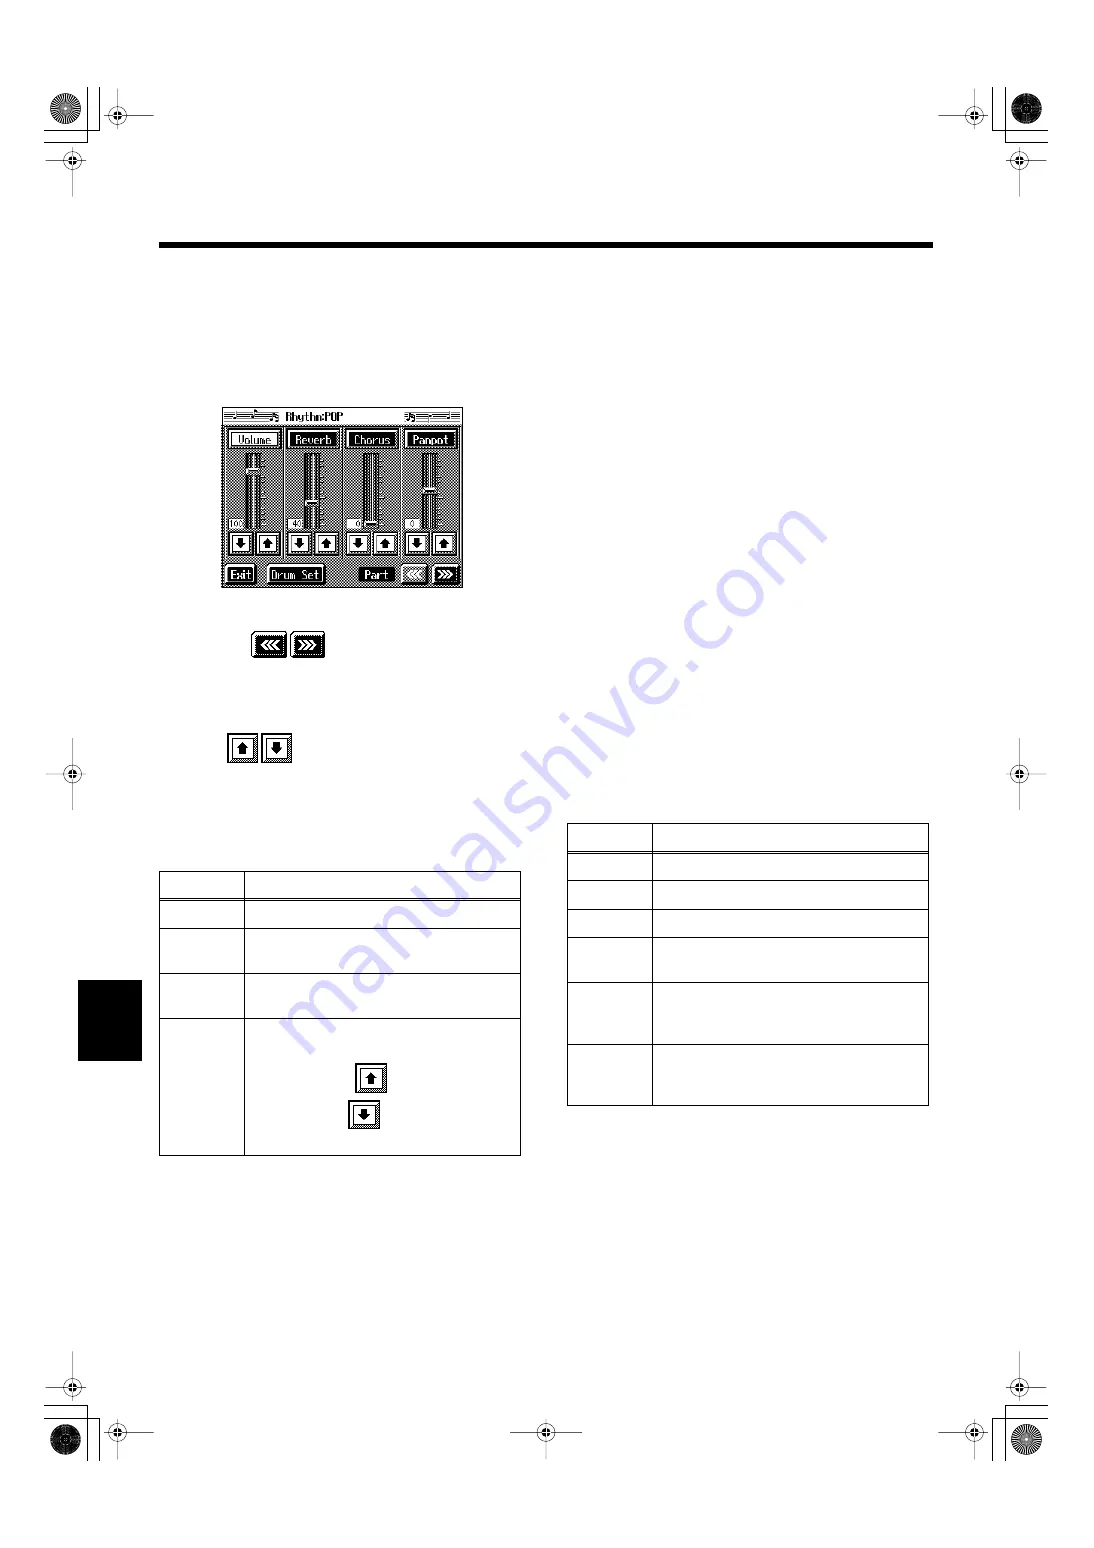
A screen like the one shown below appears.


fig.d-scomp-part.eps_50


Modifying the settings of each part


2.


Touch the 

 to select the part with the 

settings to be changed.


The part name and Tone name are indicated in the upper 
part of the screen.


3.


Touch 

 for each parameter to change the value.


You can also change the values by touching each 
parameter name and then using the [-] [+] buttons and 
the dial. Pressing the [-] [+] buttons simultaneously 
returns the parameter to its original value.

You can change the Tone for the selected Part by 
pressing a Tone button to change the Tone while this 
screen is displayed. When selecting Rhythm Part, you 
can touch <Drum Set> to select the drum set or effect 
sound.


Finishing the settings


4.


Touch <Exit>.


The Style Composer screen appears.


Creating a Style from a Song 
You Composed Yourself 
(Style Converter)


You can take a song you’ve composed yourself and extract 
the portions you need to create your own original Style. 
When you’re composing a song, there’s no need to specify all 
the chords. You can specify some of the chords, and the KR-
7/5 automatically chooses the other chords and arranges the 
style. This function is called the “Style Converter.”

Style Converter features an “Auto mode” that allows you to 
easily create Styles from songs with a single chord, and a 
“Manual mode,” in which you create Styles from songs with 
three kinds of chords–major, minor, and seventh chords.

When creating a song in order to create an music style, it’s 
good practice to consider the arrangement of the music style.


Style Arrangements


A Music Style is made up of five performance parts: 
“Rhythm,” “Bass,” “Accompaniment 1,” “Accompaniment 
2” and “Accompaniment 3.”

A song progresses in predictable a sequence, such as intro, 
melody A, melody B, bridge and ending.

With the KR-7/5, such changes in songs are allocated to the 
following six performance states. We call these six parts of a 
song “Divisions.”

You can make a song more lively or more restrained by 
increasing or reducing played parts by Divisions. You can 
also modify a song by changing the Tone of the parts in the 
Divisions.


Display

Explanation

Volume


Adjusts the volume.


Reverb


Adjusts the amount of reverb effect applied 
to the sound.


Chorus


Adjusts the amount of chorus effect applied 
to the sound.


Panpot


Changes the left-right direction from which 
the sound appears to come. 

When you touch 

, the sound moves to 

the right; touch 

 to move the sound to 

the left.


Division

Performance division

Intro


The intro is played at the start of a song.


Ending


This is played at the end of a song.


Original


This is a basic accompaniment pattern.


Variation


This is a developmental accompaniment 
pattern. It is a variation on an Original.


Fill-In To 
Variation


This is a one-measure phrase inserted at a 
juncture where the mood changes. It is used 
to make a song more lively.


Fill-In To 
Original


This is a one-measure phrase inserted at a 
juncture where the mood changes. It is used 
to make a song more sedate.

KR-7_5_e.book 136 ページ 2004年7月7日 水曜日 午前10時3分

Содержание KR-5

Страница 1: ...oper operation of the unit Additionally in order to feel assured that you have gained a good grasp of every feature provided by your new unit Owner s Manual should be read in its entirety The manual s...

Страница 2: ...within an equilateral triangle is intended to alert the user to the presence of important operating and maintenance servicing instructions in the literature accompanying the product INSTRUCTIONS PERTA...

Страница 3: ...lt an audiologist 011 Do not allow any objects e g flammable material coins pins or liquids of any kind water soft drinks etc to penetrate the unit 013 In households with small children an adult shoul...

Страница 4: ...Selection If you need to move the instrument take note of the precautions listed below At least two persons are required to safely lift and move the unit It should be handled carefully all the while...

Страница 5: ...lights to shine upon the same area of the unit for extended periods of time Excessive heat can deform or discolor the unit 355 To avoid possible breakdown do not use the unit in a wet area such as an...

Страница 6: ...nto the drive Push it in firmly but gently Never use excessive force 608 To avoid the risk of malfunction and or damage insert only floppy disks into the disk drive Never insert any other type of disk...

Страница 7: ...en pressing a key on a grand piano has been faithfully simulated escapement mechanism The pedal is designed for good feeling response and allows subtle performance nuances to be expressed Get Easy Res...

Страница 8: ...cally for young children include Wonderland where kids can enjoy touching a variety of instruments and the Game an ear training feature which helps build their listening abilities with all the fun of...

Страница 9: ...peration to procedures for special applications for example using the KR as an accompanist and creating songs that will help you master the KR s many performance functions Conventions Used in This Man...

Страница 10: ...12 Phrase Button This is used to play a short phrase with the Performance Pads p 63 13 User Function Button This is used to assign a variety of functions to the Performance Pads p 147 Performance Pad...

Страница 11: ...the sounds played with the keyboard p 64 30 Tone buttons Select the Tones that will be played from the keyboard p 25 Record Playback 31 Menu button You can select functions for playing back recording...

Страница 12: ...ns to the Performance Pads p 147 Performance Pads 10 1 2 The operation of each is changed depending on the Style Orchestrator User Function button 11 Music Style buttons Selects a Music Style for auto...

Страница 13: ...e Button Adds harmony to the sounds played with the keyboard p 64 26 Tone buttons Select the Tones that will be played from the keyboard p 25 Record Playback 27 Menu button You can select functions fo...

Страница 14: ...an put scores on the screen and display lyrics p 21 Bottom Panel 1 Computer connector You can connect a computer to this connector to exchange performance data p 163 2 Computer switch The setting for...

Страница 15: ...one Quality Equalizer KR 7 34 Adding Effects to Each Tone and Voice 36 Applying Effects to the Sound Effects 36 Adding Effects to Mic Vocals Vocal Effect KR 7 37 Enjoying Karaoke Performances with Mus...

Страница 16: ...Favorites to Disks KR 7 111 Chapter 5 User Program Registration 112 Saving Performance Settings User Program 112 Calling Up Saved User Programs 113 Changing the Way User Programs Are Called Up 113 Sav...

Страница 17: ...ages with the External Display External Display KR 7 153 Selecting Images To Be Shown on the KR 7 and External Displays User Image Display KR 7 154 Turning Off the Beat Indicator Beat Indicator 155 Re...

Страница 18: ...of the speakers Connect the Power Cord Insert the included power cable into the AC inlet on the bottom panel of the KR 7 5 and then plug it into an electrical outlet NOTE Be sure to use the supplied p...

Страница 19: ...e lid pull it gently toward yourself and lower it softly after it has been fully extended fig 00 05 NOTE When opening and closing the lid be careful not to let your fingers get caught If small childre...

Страница 20: ...on carpet adjust this so that the pedals firmly contact the floor fig 00 09 j Adjusting the Sound s Volume and Brilliance Turn the Volume knob to adjust the overall volume Turn the Brilliance knob to...

Страница 21: ...xternal display settings refer to Changing the Settings for Showing Images with the External Display External Display KR 7 p 153 For more on displaying images refer to Selecting Images To Be Shown on...

Страница 22: ...nstrument Turning the Power Off After use turn off the power using the following procedure 1 Turn the volume all the way down on the KR 7 2 Turn off the KR 7 3 Turn off the connected display About the...

Страница 23: ...ons you can use on these screens are as follows NOTE The explanations in this manual include illustrations that depict what should typically be shown by the display Note however that your unit may inc...

Страница 24: ...Touch the piano lid on the screen and listen to the tone change as you slide your finger or touch or to open and close the lid This simulates the actual changes in sound that occur when the lid of a...

Страница 25: ...e selected fig d tonesel eps_60 This screen is called the Tone selection screen You can touch Audition for an audio demonstration of a particular tone Touch to switch the screen and display the next s...

Страница 26: ...and watch the indicator light up 2 Touch Drums or SFX fig d drum eps_60 Each note of the keyboard will play a different sound You can also have play sounds by touching the screen 3 Touch Exit several...

Страница 27: ...screen Searching by Tone Name 3 Touch By Name Touch By Key to go to the condition search screen 4 Decide which character is to be used for the search Enter the character you re searching for For exam...

Страница 28: ...tone to be changed The tone name will be highlighted in white 3 Press a Tone button to select the new tone p 25 4 When you have selected the tone touch Exit The display returns to the Basic screen Ca...

Страница 29: ...Tones 2 Touch the name of the tone to be changed The tone name will be highlighted in white 3 Press a Tone button to select the tone p 25 4 When you have selected the tone touch Exit The display retu...

Страница 30: ...layer performance or split performance 2 To apply Octave Shift touch the name of the tone you ve selected 3 Press the Tone button to display the Tone selection screen fig d octshift eps_60 4 Touch Oc...

Страница 31: ...tudio A recording studio Gymnasium In a gymnasium Hall Large concert hall reverberation Dome A domed ballpark Cave Adds the extended reverberations found inside a cave GS Room 1 Reproduces an indoor t...

Страница 32: ...With this effect called Advanced 3D you seem to be surrounded by the sound of the performance fig panel1 4 1 Press the Advanced 3D button and watch the indicator light up The following Advanced 3D sc...

Страница 33: ...screen like the one shown below appears fig d adv3dopt eps_60 3 Touch All Parts or Layer Part When you touch Exit you return to the Advanced 3D screen Display Explanation All Parts The effect is appli...

Страница 34: ...0 2 Touch the Type icon to make your selection 3 Touch the slider to make adjustment Display Explanation Bottom This setting greatly boosts the low end Power Boosts both the low and high frequency ran...

Страница 35: ...d settings 1 Press the Equalizer button and watch the indicator light up The Equalizer screen appears 2 Adjust the equalizer 3 Touch Write The settings are stored Even after editing the settings you c...

Страница 36: ...th to adjust the amount of effect applied The amount increases as the value is raised You can also move the slider with the buttons and the dial Pressing the buttons simultaneously returns the slider...

Страница 37: ...al voice p 40 About the Effect Settings When the effects is set to ON the appropriate effect is applied for the currently selected sound You can also apply different effect types to each tone except G...

Страница 38: ...ch the bar graph to adjust the amount of echo applied to the vocal 3 Touch the Echo Type 1 or 2 to change the echo type Touch Exit to return to the Vocal Effects screen Vocal Count In Allows you to st...

Страница 39: ...2 The Voice Transformer effect is eliminated Touch Exit to return to the Vocal Effects screen Display Explanation Child Transforms the input into the sound of a child s voice Bear Transforms the inpu...

Страница 40: ...y Explanation Duet Provides an effect resembling the sound of two people singing the same melody Oct Up Adds another voice one octave higher than the original Oct Down Adds another voice one octave lo...

Страница 41: ...For example if you select a time signature of 4 4 then count to four count to three when 3 4 time is selected The tempo is automatically set according to the interval between the counts as you speak i...

Страница 42: ...the pitches of the specified part 1 Select the song to which you want to add harmony If selecting a song on a disk insert the floppy disk in the disk drive For more on how to select songs refer to Pl...

Страница 43: ...s refer to Playing a Song p 69 4 Adjust the tempo as required with the Tempo buttons 5 If necessary change the key of the song p 90 When you press the Play Stop button the accompaniment starts playing...

Страница 44: ...button and watch the indicator light up You will hear the metronome The following Metronome screen appears fig d metro eps_60 You can touch Exit to have the metronome continue to play while you retur...

Страница 45: ...tempo marks You can set the tempo by choosing a tempo indicator such as Allegro indicated on the score 1 On the Metronome screen touch the tempo indicator bar graph The tempo is set to match the tempo...

Страница 46: ...and choosing sets it to the highest level Choose to silence the metronome sound Changing the Type of Sound You can change the sound the metronome makes The setting is at normal metronome sound when t...

Страница 47: ...sounds You can set the Metronome to play at even smaller intervals 1 On the Metronome screen touch Pattern The available choices for the metronome pattern appear at the bottom of the screen 2 Choose...

Страница 48: ...hythm settings Changing the Rhythm 1 Touch a Rhythm name on the Rhythm screen The selected Rhythm plays The Rhythms available for selection will depend on the beat Touch to switch the screens and show...

Страница 49: ...ouch Volume The available choices for volume level appear at the bottom of the screen 2 Select a volume icon When you touch the selection moves to the side allowing you to access other volume levels C...

Страница 50: ...combination of elements like instrumentation melody and phrasing which interact to create the musical character Elements of Music Styles A Music Style consists of a set of six sections called division...

Страница 51: ...t hand the accompaniment also changes fig arr split e 3 Press the Intro Ending button After the ending plays the accompaniment stops When you select an internal song or music file that includes the ly...

Страница 52: ...ompaniment chords the moment you play a key To play a C chord for example you normally have to play the three keys C E and G But with Chord Intelligence you only have to press the C key to start a C c...

Страница 53: ...play the notes of the chord on the screen 1 On the Basic screen touch fig d arrbasic eps_60 2 Touch the root of the chord you want to learn about The chord fingering appears on screen fig d crdfind ep...

Страница 54: ...an listen to the Music Style by touching Audition Touch to switch the screen and display the next selections You can touch Search to find Styles that match the selected criteria p 56 3 Select a Music...

Страница 55: ...een for selecting Trad Kids Music Styles appears 3 Touch KR 7 The Music Styles saved on the disk are displayed When you touch the Music Styles stored in User memory are displayed 4 Select a Music Styl...

Страница 56: ...yle Search screen Searching by Music Style name 3 Touch By Name Touch By Key to return to the Condition Search screen 4 Decide which character you ll use for the search The selected character appears...

Страница 57: ...ing button and make changes to the rhythm patterns with the Fill In button p 61 Adjusting the Accompaniment Tempo fig panel2 5 When the Basic screen is displayed you can use the Tempo buttons or the b...

Страница 58: ...ings go into effect 2 Play a chord on the lower part of keyboard As you play the keys the intro and accompaniment begins simultaneously Changing the intro When set for Sync Start the indicators of bot...

Страница 59: ...short intro plays Stopping Automatic Accompaniment Stopping with an added ending 1 Press the Intro Ending button An ending plays and the Automatic Accompaniment stops When you press the Intro Ending...

Страница 60: ...indicator light goes out 2 Touch Countdown The following Countdown settings screen appears fig d cntdwn eps_60 3 Touch Switch to set this to ON When you press the One Touch Program Arranger button the...

Страница 61: ...variation performance pattern is played Press the Fill In Original button and watch the indicator light up The instrument is set so that the original performance pattern is played Pressing these butto...

Страница 62: ...gement with the Performance Pad 1 or 2 button A screen like the one shown below appears fig d phrase eps_60 The Style Orchestrator value assigned to the current Pad is indicated You can change the arr...

Страница 63: ...to choose the type of phrase 3 Press one of the Pads The selected phrase plays When the phrase continues playing press the Pad once more to stop it With certain phrases the accompaniment stops while...

Страница 64: ...on the right hand section of the keyboard harmony is added The following Melody Intelligence screen appears fig d melointel eps_60 2 Select and touch a harmony type Then when you play a melody on the...

Страница 65: ...nes from the left side of the keyboard play simultaneously with the Automatic Accompaniment 1 Press the One Touch Program Arranger button This sets the Automatic Accompaniment 2 On the Basic screen to...

Страница 66: ...tomatic Accompaniment without splitting the keyboard This function is called Piano Style Arranger This makes it possible to add an accompaniment automatically as you play a song by playing chords in t...

Страница 67: ...lume Balance for Each Performance Part Part Balance You can adjust the volume of each performance part in a Music Style and the balance between parts when playing multiple Tones on the keyboard fig pa...

Страница 68: ...so make these adjustments by touching the adjustment sliders and then using the buttons or the dial Touch Exit to go back to the previous screen Display Performance part Rhythm Music Style Rhythm Part...

Страница 69: ...ecting the song When playing back songs on floppy disks first insert the floppy disk in the disk drive 1 Press the Select Listen to a Song button The following Genre Selection screen appears fig d gen...

Страница 70: ...gs the measure number on the Basic screen appears in reverse video The performance data is being loaded while the indication is highlighted please wait a few moments for this to be completed Song Numb...

Страница 71: ...ata then displaying it in the KR 7 5 s score you can display information about the selected data 4 Touch Search The search results appear in the display Touch the song name to select the song Touch Ex...

Страница 72: ...below appears fig m fvrtadd eps_60 4 Touch OK The selected song is registered to Favorites Now you can select the registered song by selecting Favorites for the genre in the Song Selection screen On...

Страница 73: ...is deletes registered songs for Favorites 1 In the Song Selection screen select Favorites for the genre fig d song fvrt eps_60 2 Touch the name of the song to be deleted 3 Touch Del A screen like the...

Страница 74: ...ressed for the sounds played back Selects the part for which the score is displayed You can specify the track or part to be displayed with Option p 76 Option Makes detailed settings for the score disp...

Страница 75: ...ing precisely detailed scores or complex songs On the score display screen lyrics and notes may extend beyond the range displayed on the screen and may not be visible Playback may start over from the...

Страница 76: ...expanded OFF Not displayed C D E The pitch names C D E are displayed Do Re Mi Fixed The pitch names fixed Do are dis played Do Re Mi Movable The syllable names movable Do are dis played Clef L Determi...

Страница 77: ...e shown below appears fig d scorebmp eps_60 6 Touch for each parameter to set the range of the image data 7 Touch Execute The score is saved to the floppy disk as image data in BMP bitmap format Item...

Страница 78: ...core screen 2 Press the Score Display button The Score screen appears 3 Touch Tutor The following Tutor screen appears fig d tutor1 eps_60 2 Practicing Listening to a reference of the Performance Firs...

Страница 79: ...ll probably want to select specific phrases and practice that material repeatedly at a slower tempo 1 Touch Options A screen like the one shown below appears Touch the Notes When you touch a note on...

Страница 80: ...can specify the markers range by touching Prev or Next Tempo Original Tempo A Little Slower Slower Much Slower Selects the practice tempo Accomp On Quiet Off When On is selected song accompaniment par...

Страница 81: ...panel3 2 Adjusting the tempo with the Tempo buttons Pressing the button once increases the tempo by one unit Holding down the button makes the tempo increase continuously Pressing the button once dec...

Страница 82: ...ress the User Function button and watch the indicator light up fig d usrfunc eps_60 2 Touch for the Performance Pad to which the function is assigned then select Tap Tempo 3 Touch Exit the tempo is in...

Страница 83: ...erformance Pad 1 or 2 to assign Tap Tempo 3 Touch Exit the tempo is indicated in the upper left of the screen Specifying the Tempo 4 Press the Pad to which Tap Tempo is assigned at least twice The tem...

Страница 84: ...actice the song first at a steady tempo Overriding tempo changes is called Tempo Muting 1 Hold down the Play Stop button and press one of the Tempo buttons When tempo muting is in effect the tempo dis...

Страница 85: ...ch Count In The following Count In settings screen appears fig d cntin eps_60 3 Touch Switch to set this to ON With this setting two measures count down before the song playback starts Cancelling the...

Страница 86: ...ll not sound Practice your right hand performance along with the left hand playback Playing back a song 3 Press the Play Stop button The song will begin playing back The part you selected in step 2 wi...

Страница 87: ...arker even while playback is in progress Access the Marker screen First select the song in which you ll set the markers p 69 1 Press the Menu button Touch to switch the screens 2 Touch Marker The Mark...

Страница 88: ...g a Marker 1 Touch Clear for the marker you want to erase fig d markclear eps_60 The marker disappears and the on screen display changes to Moving a Marker You can move a marker that has been placed i...

Страница 89: ...nt to repeat For instance suppose you want to play back the passage from the fifth through eighth measures over and over You should place Marker A at the beginning of the fifth bar and Marker B at the...

Страница 90: ...o read and play You can also use this function to play back a song in a different key When accompanying a vocalist you can easily transpose the pitch to a range that is comfortable for the singer whil...

Страница 91: ...s in effect and you re returned to the previous screen Cancelling Transposition 4 Press the Transpose button and the indicator light goes out Transposition is cancelled The next time you press the Tra...

Страница 92: ...witch the screens 2 Touch Play Mode A screen like the one shown below appears fig d plymode eps_60 3 Touch the icon to choose the setting 4 Touch Exit to go back to the Menu screen 5 After changing th...

Страница 93: ...ig d lyric eps_60 3 Touch to select the setting 4 Touch Exit to return to the Menu screen Display Explanation ON Lyrics are displayed automatically when performance data con taining lyrics is played b...

Страница 94: ...one shown below appears fig d trkasgn eps_60 3 Touch to select the setting 4 Touch Exit to return to the Menu screen After changing this setting try selecting the song once again For more detailed in...

Страница 95: ...and songs on disks Recording Along with a Song p 100 Re recording Recording While Selecting the Track Buttons Redoing Recordings p 101 If the following screen appears If you ve recorded a song or cha...

Страница 96: ...New Song This switches the KR 7 5 to the settings required for recording a new song The KR 7 5 is put in recording standby To cancel recording press the Rec button once more 4 Decide on the tempo and...

Страница 97: ...gle Tone from the entire keyboard The performance is recorded to the 1 Whole button Layer performance The performance is recorded to the 1 Whole button Split performance The left hand part of the keyb...

Страница 98: ...y To cancel recording press the Rec button once more 4 Decide on the tempo Start recording 5 Play a chord on the left hand part of the keyboard An Automatic Accompaniment intro starts and recording st...

Страница 99: ...ack 1 Whole When using Piano Style accompaniment p 66 the performance played on the keyboard is recorded here 2 Bass Accomp The Automatic Accompaniment bass part and accompaniment part are recorded he...

Страница 100: ...ed song Selecting the track to record 4 Press the track button for the track that you want to record i e the track that you want to play yourself The indicator of the button you pressed will blink and...

Страница 101: ...the Track button for the track you want to re record The indicator for the selected Track button starts blinking The Play Stop button s indicator flashes and the KR 7 5 is put in recording standby To...

Страница 102: ...ased Erasing the Performance on Specific Tracks You can select and erase performances on specific tracks 1 Hold down the Track button for the track containing the performance you want to erase then pr...

Страница 103: ...on so the indicator is lit The KR 7 5 is put in recording standby 1 Press the Bwd button one time The measure number in the upper right of the Basic screen changes to PU and the KR 7 5 is set to recor...

Страница 104: ...format that doesn t match the format of this unit you won t be able to use that floppy disk fig panel4 3 First make sure that the protect tab of the floppy disk is in the Write write enable position f...

Страница 105: ...Disk The following screen appears fig d format eps_60 5 Touch OK Initialization of the disk begins Touch Cancel to go back to the previous screen When initialization is completed you re returned to th...

Страница 106: ...ed off Preparations for Saving Data When saving to floppy disks first check to make sure that the floppy disk s protect tab is set to the Write position p 104 then insert the floppy disk in the disk d...

Страница 107: ...to English upper case When you touch Del the character at the cursor position is deleted When you touch Ins a space is inserted at the cursor position 5 When you have finished with the name touch Exi...

Страница 108: ...saved as data capable of reproducing performances with richness of expression using the KR 7 5 s special Tones MT Data is saved in a form that can also be played on the Roland Digital Pianos or Music...

Страница 109: ...h Disk if you are deleting a song from a floppy disk touch Favorites if you are deleting a song from Favorites 5 Touch to select the song to be deleted 6 Touch Delete A screen like the one shown below...

Страница 110: ...copied to Favorites Specifying the Copy Destination 6 Touch Favorites to select the copy destination for the song If a song name is displayed with a number a song is already saved to that number If y...

Страница 111: ...s case in the Copy Song screen in Step 4 above touch the large arrow icon in the center to point the arrow upwards This sets the KR 7 to copy the song in Favorites to the floppy disk fig d songcopy2 e...

Страница 112: ...n like the following appears fig d upgname eps_50 When you touch the cursor moves When you touch the icon for the character to be input the character appears of the cursor potion For example touching...

Страница 113: ...ng to a floppy disk first insert a floppy disk in the disk drive For more on working with the disk drive refer to Using Floppy Disks p 104 1 Press the User Program button 2 Touch File 3 Touch Save A S...

Страница 114: ...ram Sets p 115 Loading Saved User Program Sets User Programs that have been saved on floppy disks or in user memory KR 7 can be called up on an individual set basis to the User Program button Note tha...

Страница 115: ...R 7 You can copy sets of User Programs saved on floppy disks and to user memory You can also copy sets of User Programs saved in user memory and to floppy disks 1 Insert the disk with the settings to...

Страница 116: ...u can register PC number settings to each of the User Programs just as you can with button settings and other settings preferences Calling Up the Performance Settings to Be Set 1 Press the User Progra...

Страница 117: ...g Refer to Recording With Accompaniment p 98 Commercially Available Music Files Commercially available song file recorded in Roland s SMF format is also composed of sixteen parts By loading the song f...

Страница 118: ...g the buttons and the dial When you press the Play Stop button you hear what the song sounds like as you change the settings When you press the Play Stop button playback of the song stops 5 Touch to m...

Страница 119: ...Recording Selecting the song to record 1 Press the Select Listen to a Song button 2 Touch the genre of the song you re recording When recording a new song try recording to Favorites 3 Select the song...

Страница 120: ...rding the song You only need to follow the procedure described in Step 1 Prepare for Recording when you re recording the first Part For the second Part and after you can skip step 1 and proceed from S...

Страница 121: ...p 117 Layering a Recording Over Previously Recorded Sounds Mix Recording You can record a performance layered over a previously recorded performance This method is called Mix Recording 1 In the Rec M...

Страница 122: ...ing Recording starts from Marker A When the song reaches Marker B it then returns to Marker A where recording continues Each time the recording is looped the newest sounds are layered over previously...

Страница 123: ...urn to the Menu screen 3 Begin recording Begin recording using the procedures described in Recording While Selecting the Track Buttons Redoing Recordings p 101 or Multitrack Recording with 16 Parts 16...

Страница 124: ...nd Fwd buttons to move the cursor one measure at a time 2 Enter the chord progression and the changes in the accompaniment pattern and arrangement Just as when performing with Automatic Accompaniment...

Страница 125: ...reen like the one shown below appears fig d chordinput eps_50 2 Touch in each to specify the chords 3 Touch Execute to enter the chord You are returned to the Chord Sequencer screen Editing Songs Ther...

Страница 126: ...hat can be undone appear on screen fig d e undo eps_50 If you touch Cancel the undo is cancelled and you re returned to the Song Edit screen If you touch OK the confirmation message appears on screen...

Страница 127: ...rate fig e quantize e At Step 3 of Selecting the editing function p 125 select Quantize A screen like the one shown below appears fig d e quant eps_50 When finished with the Quantize settings return t...

Страница 128: ..._insert e At Step 3 of Selecting the editing function p 125 select Insert A screen like the one shown below appears fig d e ins eps_50 Item Content From Measure number of the first measure of the segm...

Страница 129: ...Pt Track button or part number to be transposed When All is selected the same portion of all parts is transposed Bias The range of transposition You can select the range to transpose the data from 24...

Страница 130: ...ayed notes Changing the scale of a single note Changing the force used in playing a single key velocity At Step 3 of Selecting the editing function p 125 select Note Edit A screen like the one shown b...

Страница 131: ...p then select a Tone with the buttons and the dial When selecting Part 10 or 11 select the drum set or effect sound If you want to delete the Program Change touch Delete When you re done making all th...

Страница 132: ...ing to a Song You can add ritardando and other such gradual tempo changes Setting the Rec Mode to Tempo 1 Press the Menu button The Menu screen appears 2 Touch Rec Mode A screen like the one shown bel...

Страница 133: ...ng s tempo changes starts with the measure you selected While tempo recording is being used to write tempo the tempo display in the screen will be highlighted 5 When you press the Play Stop button the...

Страница 134: ...s and arranges the Style Style Converter features an Auto mode that allows you to easily create Styles from songs with a single chord and a Manual mode in which you create Styles from songs with three...

Страница 135: ...ttern With this arrangement when the accompaniment pattern changes from the original to the variation it creates a more elaborate effect in the accompaniment For more on Divisions refer to the Style A...

Страница 136: ...a Manual mode in which you create Styles from songs with three kinds of chords major minor and seventh chords When creating a song in order to create an music style it s good practice to consider the...

Страница 137: ...ppy disk or in the internal memory KR 7 p 139 When you touch OK the previously recorded User Style is deleted and a new User Style is created A Style Converter screen like the one shown appears fig d...

Страница 138: ...w for the Parts of the 16 track sequencer The chords all share the same Rhythm Part If you want to use the performance of other part check out Changing an Extracted Part p 138 Creating songs 1 Use the...

Страница 139: ...k drive 1 Press the Music Style User button A User Style screen like the following appears fig d usrdisk eps_50 If the User Style screen is not displayed touch User Disk in the lower part of the scree...

Страница 140: ...or in user memory KR 7 When deleting a User Style on a floppy disk first insert the floppy disk in the disk drive 1 Press the Music Style User button A User Style screen appears If the User Style scr...

Страница 141: ...for the Style If a Style name is displayed a style is already saved to that number If you select a number with a previously saved Style and then copy to that number the previously saved Style is delet...

Страница 142: ...damper pedal is depressed At Step 3 in Procedure p 142 touch Resonance fig d p reso eps_50 On the KR 7 touch the Standard Advanced or Demo icon to choose the type of resonant sound Touch Level to adju...

Страница 143: ...ons in the reverberations of the chords you play Touch the Stretch Tuning ON or OFF icon to select the tuning curve When set to ON the tuning curve features extended low and high ranges Stretch Tuning...

Страница 144: ...ure p 142 touch Hammer Response fig d p hmreso eps_50 Touch ON to turn the Hammer Response function on Touch the screen slider to adjust the time it takes for a key to sound after it is pressed The mo...

Страница 145: ...y you play the keyboard Light This sets the keyboard to a light touch You can achieve fortissimo ff play with a less forceful touch than usual so the keyboard feels lighter This setting makes it easie...

Страница 146: ...within a range of B1 to B6 Changing Music Styles Without Changing the Tone or Tempo One Touch Setting Normally when you select a Music Style the Tone and tempo settings suitable for that Music Style...

Страница 147: ...nce Pads KR 7 1 Press the User Function button and watch the indicator light up A screen like the one shown below appears fig d usrfunc eps_50 2 Touch to assign functions to each of the Performance Pa...

Страница 148: ...turns to the beginning of the Division p 50 Intro 1 Ending 1 Performs the same function as the Intro Ending button p 58 Intro 1 and Ending 1 are played Intro 2 Ending 2 Performs the same function as...

Страница 149: ...ops the playback When the pedal is released playback resumes from the begin ning of the measure that was playing when the pedal was pressed When the pedal is pressed in rapid succession the playback w...

Страница 150: ...Menu screen appears 2 Touch Marker The Marker screen appears 3 Touch Option A screen like the following appears fig d funcmenu2 eps_50 4 Touch Resolution to choose the marker setting 5 Touch Exit to g...

Страница 151: ...Countdown p 60 fig d funcmenu2 eps_50 Parame ter Name Value Description Switch ON OFF Count in will be added ON or not OFF Sound Stick Click Electronic Voice JPN Voice ENG Wood Block Triangle Casta n...

Страница 152: ...one shown below appears fig d tuning eps_50 Touch to change the pitch Standard pitch can be set to any value from 415 3 466 2 Hz The setting is at 440 0 Hz when the KR 7 5 is powered up Changing the...

Страница 153: ...you touch All Clear at the bottom of the screen and then touch Execute the display reverts to the screen that normally appears when you turn on the power to the instrument Changing the Settings for Sh...

Страница 154: ...to be displayed First take a floppy disk to which the image data stored in the KR 7 has been saved and insert the disk in the disk drive 2 Touch File A screen like the one shown below appears fig d u...

Страница 155: ...ng the Factory Settings Factory Reset You can return the content stored with Memory Backup p 155 and the User Programs p 112 to their original factory settings This operation is referred to as Factory...

Страница 156: ...This restores the content registered to the KR 5 s Favorites p 72 to the original factory settings 1 Press the Disk button 2 Touch File 3 Touch Clear Favorites A screen like the one shown below appear...

Страница 157: ...0 3 Touch ON or OFF When set to ON the Quick Tour starts when you turn on the power The demo stops as soon as you carry out any kind of operation If no operation is performed for 5 10 minutes after th...

Страница 158: ...f performance data between electronic instruments and computers The KR 7 5 is equipped with MIDI connectors and a Computer connector to let it exchange performance data with external devices These con...

Страница 159: ...In connector for ensemble playing Making the MIDI settings for the instrument connected to the MIDI In connector is easy The sounds from the connected MIDI instrument are played from the KR 7 5 s spea...

Страница 160: ...ght hand and left hand sections messages from the left hand section are fixed at 3 The KR 7 5 receives messages on all channels from 1 through 16 Disconnecting the Internal Sound Generator and Keyboar...

Страница 161: ...ected to the KR 7 5 The MIDI device that receives the Program Number changes the tone to the corresponding Program Number Normally the Tone is selected from the 128 Tones available Some MIDI devices h...

Страница 162: ...nt or Recording Your Performances on a Recording Device fig 09 1 Turn the volume all the way down on the KR 7 5 and on the device you re about to connect 2 Turn off the power to the KR 7 5 and other c...

Страница 163: ...hange performance data Use a computer cable sold separately to make the connection The type of cable required will depend on your computer Computer Switch The setting for this switch is made depending...

Страница 164: ...using the Macintosh Patch Bay utility specify 1 MHz as the Interface Type MIDI Interface Clock fig 09 Connection with an IBM PC Use a computer cable sold separately to connect the Computer connector o...

Страница 165: ...165 Chapter 9 Connecting External Devices Chapter 9 MEMO KR 7_5_e book 165...

Страница 166: ...ting Images To Be Shown on the KR 7 and External Dis plays User Image Display KR 7 p 154 to set the External Display image Also refer to Changing the Settings for Showing Images with the External Disp...

Страница 167: ...ill change de pending on the Key Transpose setting Case Cause Remedy A High pitched whine is produced When listening through headphones Some of the more flamboyant and effervescent piano tones feature...

Страница 168: ...own in the display the lyrics will disap pear To recall them touch lyrics in the Pi ano or Basic screen or press the Play Stop button In the score screen some lyrics or notes could extend beyond the e...

Страница 169: ...or user memory KR 7 is damaged and cannot be used Insert a different disk and re peat the procedure or format the user memory p 156 Error 15 This song or music style cannot be read Please use a Rolan...

Страница 170: ...Strings Warm Strings Violin Slow Strings Cello St Harp DecayStrings Legato Str Strings Oct Strings PizzicatoStr Mellow Pizz Bell Strings Orchestra OrchestraHit Warm JP Str Slow Violin Contrabass Timpa...

Страница 171: ...Drum 808 Tom Elec Perc Reverse Cym Gt FretNoise Gt Cut Noise String Slap Breath Noise Fl Key Click Seashore Rain Thunder Wind Stream Bubble Bird Dog Horse Gallop Bird 2 Telephone 1 Telephone 2 DoorCr...

Страница 172: ...SlowStrings2 Bell Strings OrchestraHit Warm JP Str Slow Violin Contrabass Timpani Syn Strings1 Syn Strings2 Strings 2 OB Strings Euro Hit 6th Hit Bass Hit Sax Brass EX Tenor Sax Soprano Sax Flute Tru...

Страница 173: ...oorCreaking Door Scratch Windchime Helicopter Car Engine Car Stop Car Pass Car Crash Siren Train Jetplane Starship Burst Noise Applause Laughing Screaming Punch Heart Beat Footsteps Gun Shot Machine G...

Страница 174: ...Pa Vox Bom Vox Toear Vox Aahhu Vox Toya Vox Thu Vox Cheey Vox Cymm Vox Tub Vox Pruru Vox Tut Vox Tyun Vox Tdum Vox Afahhhh High Bongo 2 Low Bongo 2 Mute Conga High Conga 2 Low Conga 2 High Timbale 2 L...

Страница 175: ...histle EXC2 Short Guiro EXC3 Long Guiro EXC3 Claves High Wood Block Low Wood Block Mute Cuica EXC4 Open Cuica EXC4 Mute Triangle EXC5 Open Triangle EXC5 Shaker Jingle Bell Bell Tree Castanets Mute Sur...

Страница 176: ...XC2 Long Low Whistle EXC2 Short Guiro EXC3 Long Guiro EXC3 808 Claves High Wood Block Low Wood Block Mute Cuica EXC4 Open Cuica EXC4 Mute Triangle EXC5 Open Triangle EXC5 Shaker Jingle Bell Bell Tree...

Страница 177: ...are Drum 2 Room Low Tom 2 Closed Hi hat 1 EXC1 Room Low Tom 1 Pedal Hi hat 1 EXC1 Room Mid Tom 2 Open Hi hat 1 EXC1 Room Mid Tom 1 Room Hi Tom 2 Crash Cymbal 1 Room Hi Tom 1 Ride Cymbal 1 Chinese Cymb...

Страница 178: ...y Click Laughing Screaming Punch Heart Beat Footsteps1 Footsteps2 Applause Door Creaking Door Scratch Wind Chimes Car Engine Car Stop Car Pass Car Crash Siren Train Jetplane Helicopter Starship Gun Sh...

Страница 179: ...Chorus Applies both enhancer and chorus effects Enhancer Flanger Applies both enhancer and flanger effects Enhancer Delay Applies both enhancer and delay effects Chorus Delay Applies both chorus and...

Страница 180: ...ldies 2 CountryBalad OldtimeCntry D Country Rock n Roll3 Surf fun JB Soul Blues 50s R B Summer Days PianoRagtime Charleston Bluegrass Country CountryWaltz Train Beat Country Song P Country Big Band Sw...

Страница 181: ...tryWaltz Surf fun Rock n Roll2 Slow Dance Bluegrass P Country Train Beat Slow Oldies JB Soul Blues 50s R B Summer Days PianoRagtime Charleston Country Big Band Swing LooseBigBand Scat Swing 2 Big Sere...

Страница 182: ...m7 5 C C D E E F Cmaj7 C maj7 Dmaj7 E maj7 Emaj7 Fmaj7 C7 C 7 D7 E 7 E7 F7 Cm C m Dm E m Em Fm Cm7 C m7 Dm7 E m7 Em7 Fm7 Cdim C dim Ddim E dim Edim Fdim Dm7 5 Em7 5 Caug C aug Daug E aug Eaug Faug Csu...

Страница 183: ...B B F maj7 Gmaj7 A maj7 Amaj7 B maj7 Bmaj7 F 7 G7 A 7 A7 B 7 B7 F m Gm A m Am B m Bm F m7 Gm7 A m7 Am7 B m7 Bm7 F dim Gdim A dim Adim B dim Bdim Gm7 5 Am7 5 Bm7 5 F aug Gaug A aug Aaug B aug Baug F s...

Страница 184: ...oration Petit chien 2001 Roland Corporation Prelude28 15 1996 Roland Corporation Traumerei 1996 Roland Corporation TurkishMarch 1996 Roland Corporation Ungarische Tanze V 1996 Roland Corporation Jazzy...

Страница 185: ...orporation SmallGathering 1999 Roland Corporation Innocence 1999 Roland Corporation Progress 1999 Roland Corporation Clear Stream 1999 Roland Corporation Gracefulness 1999 Roland Corporation The Hunt...

Страница 186: ...relude op28 15 1996 Roland Corporation HarmoniousBlacksmith 1996 Roland Corporation Ungarische Tanze 5 1996 Roland Corporation Turkischer Marsch Beethoven 1996 Roland Corporation NocturneNo 2 1996 Rol...

Страница 187: ...2 Swing 2 2 8 Stick 0 4 1 March 2 4 2 Country 2 4 8 Samba 2 4 4 Waltz 1 3 4 4 Waltz 2 3 4 4 Waltz 3 3 4 1 CntryWltz 3 4 2 Gospel 3 4 4 JazzWaltz 3 4 4 3 4 Simple 3 4 1 8 Beat1 4 4 2 8 Beat2 4 4 2 8 Be...

Страница 188: ...oard settings One Touch Piano One Touch Arranger Others Reverb On Off Type Depth Vocal Effects KR 7 On Off Echo Type Depth Transformer Type Harmonist Type Transformer Harmonist Music Files Part Bend R...

Страница 189: ...itations of proprietary designs and standardize the MIDI capabilities of sound generating devices Sound generating devices and music files that meets the General MIDI standard bears the General MIDI l...

Страница 190: ...O O O O O O O O O O O O O O O O O O Reverb O Chorus O O 0 127 O x x x O x x x x x O x 1 16 1 16 Mode 3 Mode 3 4 M 1 O x 0 127 0 127 O O O O 0 127 O x x x x x O 120 126 127 O O O 123 125 O x Bank selec...

Страница 191: ...alizer 5 bands Master level Arranger Music Styles Style Search by terms and by letters 6 groups 204 styles x 4 types Style Orchestrator 6 groups 165 styles x 4 types Style Orchestrator Music Assistant...

Страница 192: ...e Germany French Spanish Lyrics Yes built in external display MIDI output Yes built in MIDI output Control Volume Brilliance Volume Balance Contrast Mic Volume Volume Brilliance Volume Balance Contras...

Страница 193: ...24 Chord Tone 59 150 Chord type 52 Chords 52 76 Clef L 76 Clef R 76 Compatibility 108 Composer MIDI Out 161 Computer 163 Computer Connector 163 Computer Switch 163 Connecting Audio Equipment 162 Compu...

Страница 194: ...utton 58 Intro Ending Type 58 K Karaoke 43 Key 76 Key Template QS 3 Key Touch 145 L Language 152 Layer 28 Layer Set QS 14 Layer tone 28 Leading bass 148 Lid 19 Local Control 160 Loop Recording 122 Low...

Страница 195: ...ack 20 Phrase 63 Phrase button 63 Piano 24 Piano Screen 23 Pickup 103 Pitches 76 Play Mode 92 Play Stop button 70 Playing 69 All of the internal songs 70 At a fixed tempo Tempo Mute 84 In random 70 Re...

Страница 196: ...reen 139 Save User Program screen 113 Score screen 74 Song Edit screen 125 Song File screen 105 Song Search screen 71 Song Selection screen 69 Style Composer screen 135 Style Converter screen 137 Styl...

Страница 197: ...roubleshooting 166 Tuning 143 Tuning Curve 143 Tutor 78 Tutor screen 78 Tx Channel 160 U Undo Song Edit 126 User Functions 147 User Image Display 154 User Memory 139 Formatting 156 User Program 112 Ca...

Страница 198: ...vnsvej 7 Postbox 880 DK 2100 Copenhagen DENMARK TEL 3916 6200 FRANCE Roland France SA 4 Rue Paul Henri SPAAK Parc de l Esplanade F 77 462 St Thibault Lagny Cedex FRANCE TEL 01 600 73 500 FINLAND Rolan...

Страница 199: ...within an equilateral triangle is intended to alert the user to the presence of important operating and maintenance servicing instructions in the literature accompanying the product INSTRUCTIONS PERTA...

Страница 200: ...oper operation of the unit Additionally in order to feel assured that you have gained a good grasp of every feature provided by your new unit Owner s Manual should be read in its entirety The manual s...

Отзывы: