background image


12


[Visual Lesson] button


fig.b-main3


You can enjoy your practices with the KR-107’s “Visual 
Lesson” function.

Play along with the accompaniment, and a notation 
indicating how well you have performed appears in the 
display.

You can select the level and practice songs to match your 
current abilities. You can also supplement your stock of 
practice songs with internal songs and additional music 
data in external memories. 


1


Press the [Visual Lesson] button


2


Touch a course to select it.


At this time, start out by touching the “Beginner Course.”


3


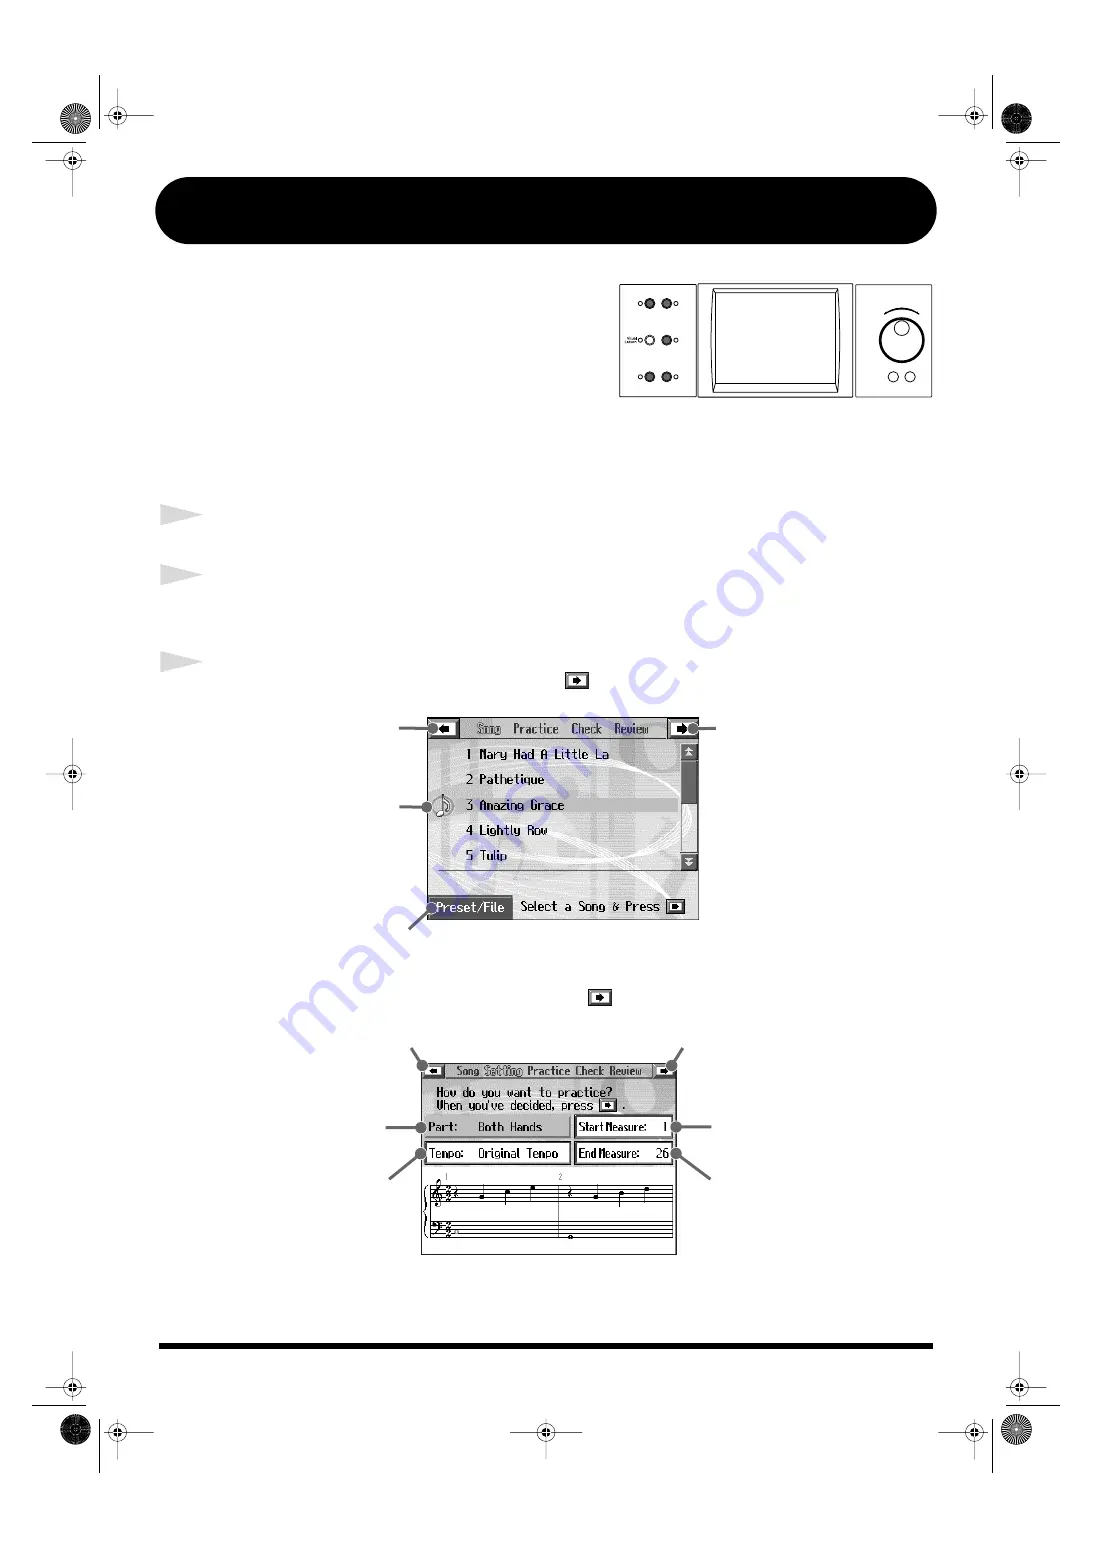
Select a practice song, then touch the <

>.


fig.Q-lesson2e


A screen like the one below appears when you touch <

> at the “Repertoire” course.


fig.Q-lesson3e

Selects the internal songs or 

songs in files as the practice songs.

This returns to the 

course selection screen.

Touch the song name

you want to practice

This starts the 

practice.

This selects the part 
to be practiced.
setting: Both Hands, 

Left Hands, 
Right Hands

This sets the tempo for your 
practice.
setting: Original Tempo,

A Little Slower,
Slower,
Much Slower

Press here to return to the song selection screen.

This starts the practice.

Selects the measure from which 
the performance is to start.

Selects the measure at which
 the performance is to end.

KR107_q_e.book 12 ページ 2005年9月6日 火曜日 午後3時57分

Содержание KR-107

Страница 1: ...RATION All rights reserved No part of this publication may be reproduced in any form without the written permission of ROLAND CORPORATION Congratulations on choosing of the Roland Digital Intelligent...

Страница 2: ...want to play fig Q Wonder1e fig Q Wonder2e 3 Touch Exit to return to the Wonderland screen 4 Touch Exit on the Wonderland screen to end the Wonderland Reference When connecting a mic to the KR refer...

Страница 3: ...no button and switch back to piano performance fig Q_panel_piano For more detailed information refer to Playing the Keyboard Like a Piano One Touch Piano in the Owner s Manual About the Key Template U...

Страница 4: ...s see what we get by touching Song The Song button demo starts playing 3 Press the Exit button to return to the Quick Tour screen Try the other categories 4 Press the Exit button at the Quick Tour scr...

Страница 5: ...hen connecting a mic to the KR refer to Connecting a Microphone in the Owner s Manual You can have the demos start automatically refer to Automatically Starting the Quick Tour in the Owner s Manual Ab...

Страница 6: ...Width Adjusts the sense of breadth in the sound The sound broadens as you drag the corner outward Dragging this inward focuses the sound more toward the center increasing the audibility and making the...

Страница 7: ...nctions of the Remote Control s Buttons in the Owner s Manual Remote Control Infrared Receiver Range of operation Distance 4 m approximately 13 feet Angle 40 degrees to the left and right of the recei...

Страница 8: ...to hear then touch the song name Touch here to play songs Touch and drag here to scroll through the song list Touch here to search for songs You can select songs in each genre The currently selected...

Страница 9: ...he Song button then selecting External Memory in Genre Please refer to Playing a Song in the Owner s Manual Reference For more detailed information about playing back songs refer to Playing a Song in...

Страница 10: ...e Keyboard You can display the keyboard and the notation in the same screen 1 Press the Option button 2 Touch Keyboard to switch to On 3 Press the Exit button fig Q Score2 Bouncing Ball The bouncing b...

Страница 11: ...y Stop button once more fig Advanced Use Practicing Songs Visual Lesson button p 12 Displaying the Notation on a Large Screen Connecting an External Display in the Owner s Manual When displaying the n...

Страница 12: ...inner Course 3 Select a practice song then touch the fig Q lesson2e A screen like the one below appears when you touch at the Repertoire course fig Q lesson3e Selects the internal songs or songs in fi...

Страница 13: ...notation as a graphics file by pressing the Option button in the performance results confirmation screen For more detailed information refer to Chapter 4 Saving Notations as Image Data in the Owner s...

Страница 14: ...n divide the keyboard into two sections each of which covers the same registers allowing two players to perform piano in the same registers Pedal EX Tones These Tones change when the left pedal is pre...

Страница 15: ...d be 16 for one octave above the reference the pipe would be 4 and to take the pitch up yet another octave it would be shortened to 2 Try experimenting by touching different icons to change the tone a...

Страница 16: ...fer to Using Keywords to Search for Music Styles Style Search in the Owner s Manual This displays presets along with the composition of the song in an easy to grasp manner The title of the selected so...

Страница 17: ...t function Accompaniment is started and chords are switched on the left hand side The right hand side is used for playing melodies The included key template p 3 makes it easier to figure out the keys...

Страница 18: ...registers When playing such songs change the point dividing the keyboard the split point to a key further to the left For details refer to Changing the Keyboard s Split Point Split Point in the Owner...

Страница 19: ...want to play fig Q Wonder1e fig Q Wonder2e 3 Touch Exit to return to the Wonderland screen 4 Touch Exit on the Wonderland screen to end the Wonderland Reference When connecting a mic to the KR refer...

Страница 20: ...RATION All rights reserved No part of this publication may be reproduced in any form without the written permission of ROLAND CORPORATION Congratulations on choosing of the Roland Digital Intelligent...

Отзывы: