


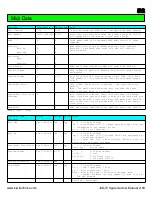
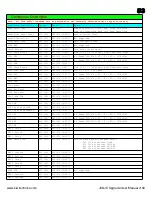
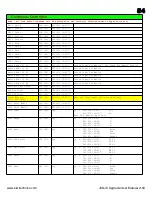
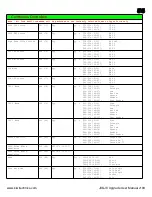

43
Step 1) Opening the MKS-70. Remove the rack mounts if fitted. These can have 3 or 4 countersunk bolts each and shaped spring washers. Put these to one side
and do not lose the screws or washers as these are hard to replace. Remove the small screw at the top center rear and then turn over the MKS-70 and
remove the three screws located at each side that are holding the top part of the case on.
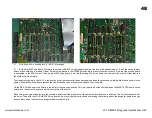
Step 2) Removing the voice boards and cpu board.
JX-10 Boards.
Open the JX-10 top. Carefully mark and unplug all the cables from the cpu board (9 in total). Mark which way around the gray ribbon
cables leading to the display & cartridge socket are and then unplug these cables. This is done by pulling them straight out of the socket they are in.
Remove the 4 screws holding the board into the JX-10. The voice board can now be removed from the JX-10.
Mark the left voice board with an 'L' (Lower) and the right voice board with a 'U' (Upper) so they are not mixed up. For both voice boards there are 3
cables and 8 screws that need to be removed.
MKS-70 Boards.
With the synth top removed the voice boards need to be removed first. The top voice board is the Lower so mark this as it needs to
be replaced last. Remove the two screws on the posts with the metal tags attached. You may need to hold the posts with pliers to stop them turning.
Next slide off the cable ties holding the cables as these can be replaced later without requiring new cable ties. Remove the two posts and the two
screws. Again you may need to hold the posts under the board to stop them turning. Remove the 3 cables that are plugged into the board and lastly
remove the two screws holding the board to the hinge. The board can then be lifted out of the synth.
The next voice board in the MKS-70 is actually the “Upper” board (you should mark this) and is removed next and the process is the same as the
top voice board. Again the cable ties can be slid off the posts and reused.
The cpu can now be removed. Mark and carefully remove the 5 plugs. Mark which way around the gray ribbon cables leading to the display &
cartridge socket are and then unplug these cables. This is done by pulling them straight out of the socket they are in. Remove the 4 screws holding
the board into the MKS-70. The voice board can now be removed from the MKS-70.
www.kiwitechnics.com
JX-10/MKS-70 Upgrade User Manual v100
Содержание Kiwitechnics KIWI-SJX
Страница 1: ......
Страница 6: ...Kiwi SJX JX 10 Flow Chart...
Страница 7: ...Kiwi SJX MKS 70 Flow Chart...
Страница 8: ...Kiwi SJX JX 10 Front Panel...
Страница 9: ...Kiwi SJX MKS 70 Front Panel...
Страница 89: ...89 www kiwitechnics com JX SJX Upgrade User Manual v100...