


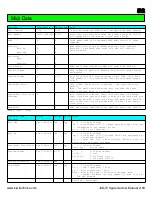
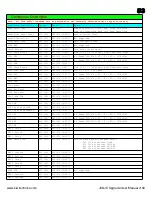
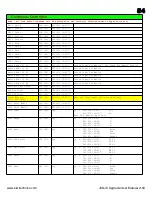
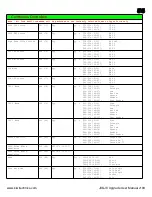

42
UNPLUG THE JX-10!
UNPLUG THE JX-10!
There are dangerous voltages inside the unit and it must not be opened until the power plug is removed from
the power supply.
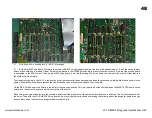
Three 40 pin cpus, Two 40 pin I/O chips, two 16 pin A to D chips and other components need to be removed and replaced with five 40 pins sockets, some links and
some resistors which are supplied with the KiwiTechnics JX-10/MKS-70 Upgrades. These instructions are supplied as a guide for your technician only and it is your
responsibility to have this done professionally. This can take up to 120 mins depending on your skill level.
Step 1) Opening the JX-10 – Turn over the JX-10 and support it so that no weight is on the joystick lever. With the synth front keys facing you remove the six screws
located in the end panels and the two larger black screws on the underside that are marked in the drawing. There are 8 screws in total. Carefully turn the
synth back over to the right side up keeping hold of the lid so it does not open.
www.kiwitechnics.com
JX-10/MKS-70 Upgrade User Manual v100
Содержание Kiwitechnics KIWI-SJX
Страница 1: ......
Страница 6: ...Kiwi SJX JX 10 Flow Chart...
Страница 7: ...Kiwi SJX MKS 70 Flow Chart...
Страница 8: ...Kiwi SJX JX 10 Front Panel...
Страница 9: ...Kiwi SJX MKS 70 Front Panel...
Страница 89: ...89 www kiwitechnics com JX SJX Upgrade User Manual v100...