background image

Panel Descriptions 

14 

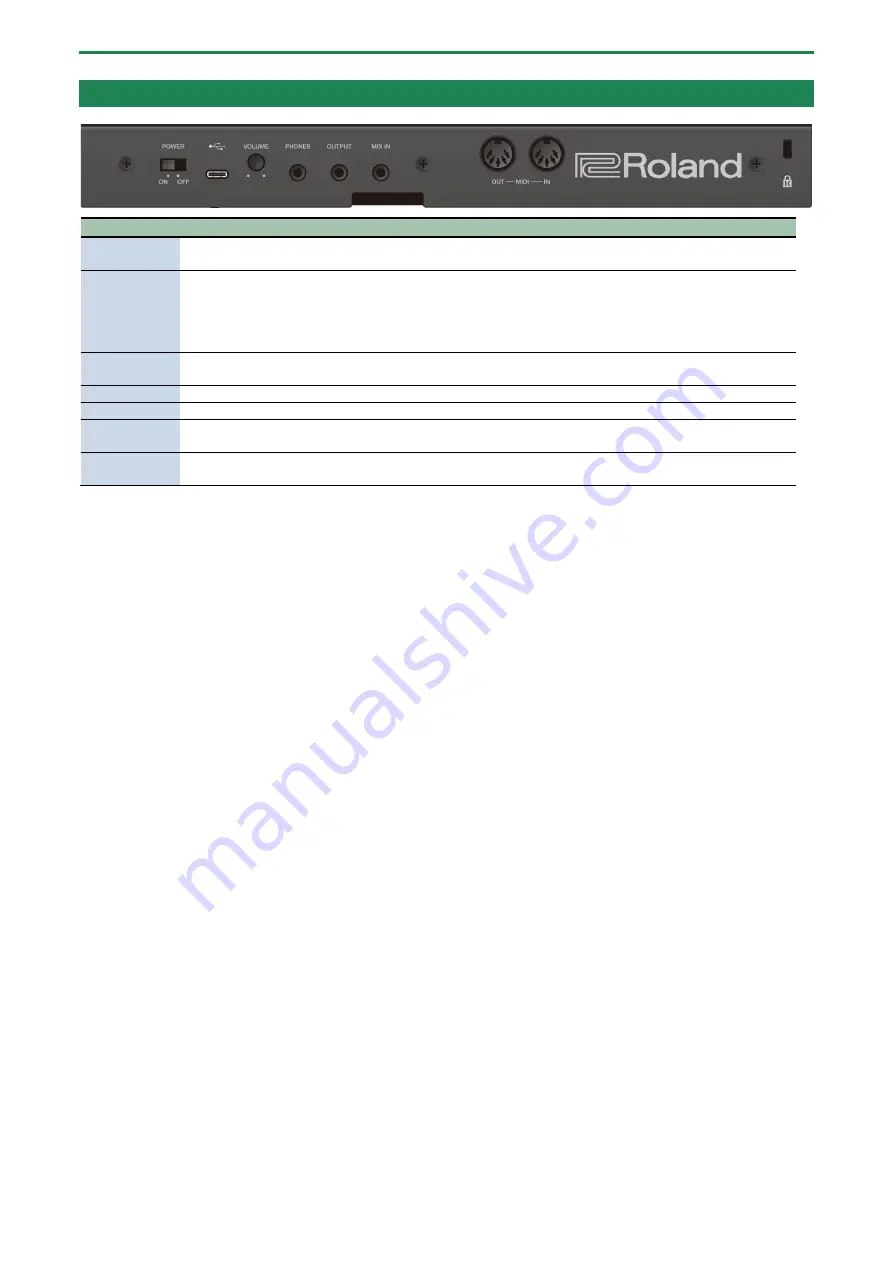
Rear Panel 


Controller 

Explanation 

[POWER] 

switch 

Turns the power on/off. 

USB Type-
C

®

 port 

Use a commercially available USB Type-C

®

 cable to connect this port to your computer. This is used to 

transfer USB MIDI and USB audio. 

You must install the USB driver if you want to connect this unit to your computer. Download the software 
from the Roland website. 

http://www.roland.com/global/support/


[VOLUME] 

knob 

Adjusts the volume. 

PHONES jack 

Used for connecting headphones (sold separately). 

OUTPUT jack 

Connect this jack to your amp or monitor speakers. 

MIX IN jack 

Used for inputting audio. The sound from connected devices is output from the PHONES and OUTPUT 

jacks. 

MIDI 

connectors 

Connect a MIDI device to these connectors using a commercially available MIDI cable. This lets you control 

the connected MIDI devices from this unit. 

Содержание JX-08

Страница 1: ...JX 08 Owner s Manual ...

Страница 2: ... After Step 17 PAGE 30 Selecting the Part for Recording Notes 30 Connecting Notes Tie Input 31 Inputting Notes Step by Step Step Input 31 Recording Your Performance in Real Time 32 Setting the Note Loudness and Length Velocity Gate Time 33 Making sequencer settings 34 Saving a Pattern 35 Backing Up Data 36 Restoring the Settings Restore 37 Configuring the Settings of This Unit 38 Part Settings 38 ...

Страница 3: ...e button to show the arpeggio settings menu NOTE button If this is on note mode is enabled In note mode you can use the 1 13 buttons as a keyboard SEQ button If this is on the unit enters sequencer mode You can edit the sequencer when in sequencer mode Long press the button to display the sequencer settings menu When all of the buttons are unlit the unit is in normal mode You can select and edit t...

Страница 4: ...n together with the 1 16 buttons to switch to different patterns MENU button Displays the menu screen VALUE knob Turn Edits the parameter s value Press Confirms an operation or value Display Shows the bank and patch number parameter value and tempo 1 16 buttons PAGE TIE button Use these buttons to switch between tones number bank and to input notes into the sequencer ...

Страница 5: ...ation RATE knob 0 10 Sets the speed of the LFO cycle DELAY TIME knob 0 10 Sets the time it takes before the LFO effect begins after you press a key The larger the value the longer it takes for the LFO effect to start after you play the keyboard WAVEFORM switch Đ sine wave square wave RND random Selects the LFO waveform ...

Страница 6: ...eform Sawtooth wave Pulse wave ē Square wave Noise CROSS MOD switch This selects the mode in which the modulation operates X MOD The DCO 1 and DCO 2 interact to generate the pitch harmonic components and output waveform SYNC Synchronizes the oscillators This creates a complex waveform by forcibly restarting DCO 2 so that it syncs with the cycle of DCO 1 OFF DCO 1 and DCO 2 each generate their own ...

Страница 7: ...Parameter Value Explanation DCO 1 slider DCO 2 slider 0 10 Adjusts the volume of DCO 1 and DCO 2 ENV knob 0 10 Sets how much the DCO 2 volume is changed by the envelope selected with the MODE switch MODE switch 1 2 Sets the envelope used for DCO 2 ...

Страница 8: ... frequencies around the cutoff frequency for a more unusual sound Excessively high settings can produce oscillation causing the sound to distort LFO slider 0 10 Sets how much LFO modulation is applied to the cutoff frequency KEY FOLLOW slider 0 10 Changes the cutoff frequency according to the keys you play With a larger value playing notes above C4 middle C on the keyboard increases the cutoff fre...

Страница 9: ...me Controller Parameter Value Explanation LEVEL slider 0 100 Adjusts the volume MODE switch This selects the mode used to adjust the volume ENV 2 Adjusts the volume using the envelope set in ENVELOPE 2 GATE Sound is played at a set volume only while a key is played ...

Страница 10: ...ider 0 10 Sets the attack time DECAY slider 0 10 Sets the decay time RELEASE slider 0 10 Sets the release time KEY FOLLOW switch 0 3 Changes the envelope time ATTACK DECAY RELEASE according to the key you play Playing notes higher than C4 middle C shortens the envelope time as you go up and playing notes in the lower range lengthens the envelope time as you go down Larger values produce greater ch...

Страница 11: ...eyboard The portamento effect is applied when the PORTAMENTO button is on Controller Parameter Value Status Explanation PORTAMENTO button Lit Plays the notes by smoothly changing the pitch portamento Unlit Plays the pitches of each note separately this is the normal setting PORTAMENTO knob 0 10 Sets the time over which the portamento effect changes the pitch ...

Страница 12: ...us effects I II on and off Long press the buttons to configure the effects When you press both CHORUS 1 and 2 buttons at the same time you can get other effects besides chorus For details refer to 12 1 CHORUS MFX parameters P 46 REVERB button Turns reverb on off Long press the button to configure the effect For details refer to 12 1 CHORUS MFX parameters P 46 ...

Страница 13: ...Panel Descriptions 13 EXT CLK IN jack Use this jack to input clock signals from an external source You can make the steps of the sequencer advance in sync with the clock pulse that s inputted ...

Страница 14: ...mputer Download the software from the Roland website http www roland com global support VOLUME knob Adjusts the volume PHONES jack Used for connecting headphones sold separately OUTPUT jack Connect this jack to your amp or monitor speakers MIX IN jack Used for inputting audio The sound from connected devices is output from the PHONES and OUTPUT jacks MIDI connectors Connect a MIDI device to these ...

Страница 15: ...ate a malfunction 1 To turn on the power slide the POWER switch to ON When you operate the sound module such as for adjusting the angle or mounting the unit be careful not to get your fingers pinched between the movable parts and this unit In places where small children are present make sure that an adult provides supervision and guidance Do not use a USB cable that is designed only for charging a...

Страница 16: ... x 8 x 8 256 patches 1 Press the NUMBER 1 8 buttons This selects the patch You can use the VALUE knob to select from all of the patches in order You can select separate patches for parts A and B For details on the part settings refer to 3 2 Switching Between Parts P 18 Selecting Groups and Banks Here s how to switch the group and bank for the patches 1 Press the BANK 1 5 4 8 buttons This selects t...

Страница 17: ...Selecting a Tone Patch 17 2 Press the NUMBER 1 8 buttons The selected group and bank s patch is selected the unit switches to that patch ...

Страница 18: ... the parts when you play Also you can select a patch for each part 1 Press the PART A or B button This switches between parts If you switch patches here you can change the tone of this part By holding down the NOTE button and pressing the PART A or B button the unit switches to that part regardless of the current mode ...

Страница 19: ...Patch 19 Playing PART A and PART B at the Same Time DUAL Mode In DUAL mode both PART A and PART B sound at the same time when you play the keyboard 1 Press the DUAL button to make the indicator light DUAL mode turns on ...

Страница 20: ...y PART B 1 Press the SPLIT button to make the indicator light SPLIT mode turns on Changing the position that divides the zones split point You can change the split point on this unit 1 Press the MENU button The MENU screen appears 2 Use the VALUE knob to select KEY and press the VALUE knob The KEY setting screen appears 11 2 Keyboard Settings P 40 3 Use the VALUE knob to select SPLt and press the ...

Страница 21: ...son be sure to save your important settings A dot is shown in the display once you edit a tone 1 Press the BANK 1 5 4 8 buttons to select the group and bank where you want to save the data 2 Long press one of the NUMBER 1 8 buttons to select the patch number you wish to save to The display blinks several times The tone is saved in the patch number you selected ...

Страница 22: ...he OCT and buttons to switch the tonal range of the keyboard in octaves Press the 16 button to switch to solo mode SOLO button and the PAGE TIE button to switch to poly mode POLY button Also you can switch to unison mode by pressing the PAGE TIE button while holding down the 16 button SOLO POLY buttons When you hold down the NOTE button and press the 16 button or the PAGE TIE button you can switch...

Страница 23: ...oly mode Plays multiple tones polyphonic The POLY indicator lights up Press the PAGE TIE button while holding down the 16 button Unison mode Plays in unison The SOLO and POLY indicators light up When in unison mode press the PAGE TIE button while holding down the 16 button again Unison solo mode Plays single tones in unison The SOLO and POLY indicators blink When you hold down the NOTE button and ...

Страница 24: ...ettings menu appears 2 Use the VALUE knob to select the item and press the VALUE knob The parameter setting screen appears 3 Turn the VALUE knob to set the value 4 To exit the settings press the MENU button Arpeggio parameters Step buttons Indication Value Explanation 1 rAtE 4 8 8t 16 16t 32 12 1 18 About note values P 57 Sets the length of one note for each step that the arpeggio plays 2 NodE Set...

Страница 25: ...oses the arpeggio notes in semitone steps 7 dvr 0 100 Sets the length of each note played by the arpeggiator Larger values lengthen the note value tenuto whereas smaller values shorten the note value staccato 8 UELO REAL 1 127 Sets the velocity of notes played by the arpeggiator To make the arpeggio play at the strength velocity with which you play the keys set this to REAL To make the arpeggio pl...

Страница 26: ...rded sequence data For this reason you can record and play back two tracks of your performance per pattern Selecting a Pattern Your sequencer performance is saved in a memory called a pattern You can recall all kinds of performance patterns by selecting switching between the patterns The patterns are organized by group A B bank 1 8 and number 1 8 letting you save a total of 2 x 8 x 8 128 patterns ...

Страница 27: ...This selects the pattern You can also turn the VALUE knob while holding down the SHIFT button to select the bank and pattern When you press the MENU button while holding down the START button the START button remains in a pressed down state In this case you can still select banks and patterns even if you take your finger off the START button To restore the button to normal press the MENU button ...

Страница 28: ...ng down the START button and pressing the PART A or B button you can mute the playback of the respective part The indicators blink for parts that are muted Tempo Settings Sets the pattern s tempo 1 Press the SEQ button to make the indicator light The unit enters sequencer mode The current tempo is shown on the display 2 Turn the VALUE knob to set the tempo You can switch between the tempo and patc...

Страница 29: ...s the NOTE button 4 Press the 1 13 buttons to input the notes Inputting notes using the K 25m sold separately You can use the K 25m sold separately to directly input notes from the scale on the keys into the steps to record 1 Select the pattern to record 8 1 Selecting a Pattern P 26 2 Press the SEQ button to make the indicator light The unit enters sequencer mode STEP SEQ The current tempo is show...

Страница 30: ...eps later The page switches each time you press the PAGE TIE button Page 1 Steps 1 16 Page 2 Steps 17 32 Page 3 Steps 33 48 Page 4 Steps 49 64 You can switch pages up to the number of steps that you set as the pattern length 4 To select the step to record hold down the desired 1 16 button and press the NOTE button 5 Press the 1 13 buttons to input the notes Selecting the Part for Recording Notes T...

Страница 31: ... holding down a step button a tie is repeatedly input into the steps following the next step When you press the 1 16 buttons where notes have already been input which turns the LED off those notes are deleted When you input a tie the note connected by the tie is input into the next step For this reason the notes already input are deleted Inputting Notes Step by Step Step Input You can input notes ...

Страница 32: ...ion removal angle adjustment refer to the K 25m s Owner s Manual Recording Your Performance in Real Time You can record notes from the scale on the keys and note lengths that you play on the keyboard just as you performed them 1 Select the pattern to record 8 1 Selecting a Pattern P 26 2 Press the SEQ button to make the indicator light The unit enters sequencer mode STEP SEQ The current tempo is s...

Страница 33: ...Selecting a Pattern P 26 2 Press the SEQ button Sequencer mode turns on and the current tempo is shown 3 Hold down the 1 16 buttons and press the VALUE knob to select the step to edit The step number to be edited is shown 4 Press the VALUE knob The current velocity is shown Example indications Explanation U 1 Velocity 1 U 127 Velocity 127 5 Turn the VALUE knob to set the velocity and press the VAL...

Страница 34: ...e last step F_R Plays forward from the first step and plays backward after reaching the last step InV Inverts and plays back the even numbered and odd numbered steps rnd Plays steps randomly K trg The sequence plays back normally while you are playing the keyboard 5 CC OFF On When this is on the unit outputs the control change messages MOTION recorded in a pattern 6 dUPL Doubles the number of step...

Страница 35: ... pattern and then long press the START button a dot is shown next to the pattern number in the display 1 Press the BANK 1 5 4 8 buttons while holding down the START button to select the group and bank where you want to save the data 2 Long press the NUMBER 1 8 buttons while holding down the START button to select the save destination pattern number The display blinks several times The pattern is s...

Страница 36: ...age mode The JX 08 is recognized by your computer as an external storage device It takes around 20 seconds for the connection to be recognized 3 Open the JX 08 on your computer The BACKUP folder is shown in the JX 08 4 Open the BACKUP folder The backup file appears 5 Copy drag and drop the backup file to your computer 6 Disconnect the JX 08 from your computer If you re using Windows click the Safe...

Страница 37: ...he connection to be recognized 3 Open the JX 08 on your computer The BACKUP folder is shown in the JX 08 4 Delete the BACKUP folder 5 Copy drag and drop the backup file that you backed up on your computer to the RESTORE folder on the JX 08 6 Disconnect the JX 08 from your computer If you re using Windows click the Safely Remove Hardware icon in the taskbar and then click Eject Boutique If you re u...

Страница 38: ... Select this to use the utilities 11 5 Using the Utilities P 43 You can also press a corresponding step button to select the parameter items Part Settings These parameters configure the overall settings for the parts Step buttons Parameter as displayed Value Explanation 1 UoL 0 127 Adjusts the part volume You can adjust this parameter for each pattern 2 PAn L 64 r 63 Sets the pan position for each...

Страница 39: ...n the original model is applied LinE A linear curve of change is applied E 1 A non linear curve gradual slope of change is applied E 2 A non linear curve steep slope of change is applied 13 AF LF 63 63 Adjusts how much the LFO is changed by aftertouch only enabled when a product featuring aftertouch is connected 14 AF Fq 63 63 Adjusts how much the low pass filter LPF is changed by aftertouch only ...

Страница 40: ...eel to respond with a lighter touch Nid Sets the keyboard feel to respond with a standard touch HEUY Sets the keyboard feel to respond with a heavier touch 4 SPLt C G9 When the split function is on this sets the position of the split the split point on the keyboard All notes on the keyboard at or below the split point play PART A and all notes above the split point play PART B When a K 25m is conn...

Страница 41: ...external MIDI keyboard OFF Select this when a MIDI keyboard is not connected Normally you will leave this OFF NiDi Select this when connecting to the MIDI connector USB Select this when connecting to the USB connector 5 SynC This specifies the synchronization signal that this unit s sequencer follows Avto Automatically detects the signal inputted to the jack InT The unit operates according to its ...

Страница 42: ...whether the unit will turn off automatically after a certain time has elapsed If you don t want the unit to turn off automatically choose OFF setting The setting is disabled the power does not turn off automatically when the unit is connected via USB 3 tunE 415 3 466 2 Hz Adjusts the overall tuning The value shown is the frequency of the A4 key middle A on a piano keyboard You can also press a ste...

Страница 43: ...e functionality that s useful when editing Step buttons Parameter as displayed Explanation 1 P CLr Initializes the selected pattern 2 T CLr Initializes the selected tone 3 T rnd Replaces the currently selected tone with a random tone You can also press a step button to select the parameter items ...

Страница 44: ...faults 1 While holding down the PART B button turn on the power The PAGE TIE button blinks To cancel the factory reset turn off the power 2 Press the PAGE TIE button Initialization begins Once the JX 08 is restored to factory default settings donE appears in the display 3 Turn the power of the JX 08 off and then on again ...

Страница 45: ...hen you connect the unit to another USB port This lets you use this unit on battery power while the USB port is connected to a device that can t supply it with power 1 While holding down the PAGE TIE button turn the power on This makes this unit operate on batteries If you handle batteries improperly you risk explosion and fluid leakage Make sure that you carefully observe all of the items related...

Страница 46: ...ner P 52 Bit C 12 1 11 Bit Crusher P 53 L CNp 12 1 12 LOFI Comp P 53 PhA1 12 1 13 Script 90 P 54 PhA2 12 1 14 M StagePhsr P 54 FiLt 12 1 15 SuperFilter P 54 Ptc1 12 1 16 PitchShiftr P 55 Ptc2 12 1 17 2V PShifter P 56 JUNO 106 CHORUS Step buttons Parameter Value Explanation 1 type Cho1 Models the chorus section of the Roland JUNO 106 2 Sľ Off On Turns the effects on off 3 NodE Chorus types 1 The ef...

Страница 47: ...the volume of the chorus effect 4 Lo 15 15 dB Amount of low range boost cut 5 Hi 15 15 dB Amount of high range boost cut 6 LEU 0 127 Output level You can also press a step button to select the parameter items SDD 320 Step buttons Parameter Value Explanation 1 tyPe Cho3 This models Roland s DIMENSION D SDD 320 It provides a clear chorus sound 2 Sľ Off On Turns the effects on off 3 Node Switches the...

Страница 48: ... from the direct sound until the delay sound is heard 5 notE 12 1 18 About note values P 57 6 Fb 98 98 Adjusts the proportion of the delay sound that is fed back into the effect Negative values invert the phase 7 bAL Volume balance between the effect sound and dry original sound 0 Effect sound Dry sound 0 100 100 Effect sound Dry sound 100 0 8 EQ Lo 15 15 dB Amount of low range boost cut 9 EQ Hi 1...

Страница 49: ...ert the phase 7 H dNP 200 250 315 400 500 630 800 1000 1250 1600 2000 2500 3150 4000 5000 6300 8000 Hz byPS Center frequency at which the high frequencies of the delay sound fed back to the input are cut byPS does not cut the frequencies 8 PAn1 L 64 r 63 Delay 1 pan 9 PAn2 L 64 r 63 Delay 2 pan 10 LUL1 0 127 Delay 1 volume 11 LUL2 0 127 Delay 2 volume 12 EQ Lo 15 15 dB Amount of low range boost cu...

Страница 50: ...ee the algorithm diagram 10 Fb 98 98 Adjusts the proportion of the delay sound that is fed back into the effect Negative values invert the phase 11 H dNP 200 250 315 400 500 630 800 1000 1250 1600 2000 2500 3150 4000 5000 6300 8000 Hz byPS Center frequency at which the high frequencies of the delay sound fed back to the input are cut byPS does not cut the frequencies 12 Nod These parameters config...

Страница 51: ...eard 5 notE 12 1 18 About note values P 57 6 Fb 98 98 Adjusts the proportion of the delay sound that is fed back into the effect Negative values invert the phase 7 bAL Volume balance between the effect sound and dry original sound 0 Effect sound Dry sound 0 100 100 Effect sound Dry sound 100 0 8 EQ Lo 15 15 dB Amount of low range boost cut 9 EQ Hi 15 15 dB Amount of high range boost cut 10 LEU 0 1...

Страница 52: ...off 3 dru 0 127 Adjusts the amount of distortion The volume also changes 4 tonE 0 100 Sound quality 5 LEU 0 127 Output level You can also press a step button to select the parameter items Fattener Step buttons Parameter Value Explanation 1 tyPe dru An effect that apply a unique distortion and harmonic effect to fatten up the sound 2 Sľ Off On Turns the effects on off 3 Odd 0 400 The higher the val...

Страница 53: ...he tonal character 2 Sľ Off On Turns the effects on off 3 CONP 1 6 Selects the type of filter applied to the sound before it passes through the Lo Fi effect 1 Compressor off 2 6 Compressor on 4 LoFi 1 9 Degrades the tonal character The tonal character degrades as this value is increased 5 FiLt Selects the type of filter applied to the sound after it passes through the Lo Fi effect OFF Filter is no...

Страница 54: ...nu 0 127 Center frequency from which the sound is modulated 5 Sync OFF ON When this is ON the effect synchronizes with the tempo of the rhythm 8 2 1 Tempo Settings P 28 6 tiNE 0 05 10 00 Hz Frequency of modulation 7 notE 12 1 18 About note values P 57 8 dEPt 0 127 Depth of modulation 9 rESo 0 127 Amount of feedback 10 NiX 0 127 Volume of phased sound 11 PAn L 64 r 63 Stereo position of the output ...

Страница 55: ...GAin 0 12 dB Amount of boost for the filter output 8 Nod Off On On off switch for cyclic change 9 Nod ľ These waves control how the cutoff frequency changes tri Triangle wave Sqr Square wave Sin Sine wave Saľ1 Sawtooth wave upward Saľ2 Sawtooth wave downward 10 Sync Off On When this is ON the effect synchronizes with the tempo of the rhythm 8 2 1 Tempo Settings P 28 11 tiNE 0 05 10 00 Hz Rate of m...

Страница 56: ...utput level You can also press a step button to select the parameter items 2V PShifter Step buttons Parameter Value Explanation 1 tyPe Ptc2 Shifts the pitch of the dry sound You can layer two pitch shifted sounds onto the dry sound 2 Sľ Off On Turns the effects on off 3 1 CrS 24 12 semitones Amount of pitch shift applied for pitch shift 1 in semitones 4 1 Fin 100 100 cent Amount of pitch shift app...

Страница 57: ...nto the effect Negative values invert the phase 11 2 PAn L 64 R 63 Panning for pitch shift 2 sound 12 2 LEU 0 127 Pitch shift 2 volume 13 EQ Lo 15 15 dB Amount of low range boost cut 14 EQ Hi 15 15 dB Amount of high range boost cut 15 bAL Volume balance between the effect sound and dry original sound 0 Effect sound Dry sound 0 100 100 Effect sound Dry sound 100 0 16 LEU 0 127 Output level You can ...

Страница 58: ...to add the reverb effect set it to 0 2 tyPE roN 1 Selects the types of reverb roN 2 haL 1 haL 2 PLAt 3 P dLy 0 100 Sets the delay time from when the direct sound is heard until the reverb sound is heard 4 tiNE 1 100 Adjusts the decay length of the reverb sound 5 LEUL 0 127 Adjusts the output level of the sound with reverb applied ...

Страница 59: ...iYuSenJiKou A 33 5th Synth 1 A 34 Scorched Pad A 35 Dynamic Lush Pad A 36 Slow Atk Strings A 37 Hollow Daddy A 38 Hinode A 41 Bowed Synth A 42 Choir Pad A 43 Ancient One A 44 Soft Pad 1 A 45 Res Plasto A 46 Dyna Reso A 47 Descender Pad A 48 5th Synth 2 A 51 Reso Sweep 1 A 52 Reso Sweep 2 A 53 Reso Sweep 3 A 54 Severed Strings A 55 Gross dude A 56 Soft Pad 2 A 57 Porto Strings A 58 Dulci Synth A 61...

Страница 60: ...B 26 DoubleFilter Bs B 27 5th Stac Bass B 28 Dub Bass B 31 Pipe Buzz Bass B 32 Body Bass B 33 On Backwards B 34 Break Dancing B 35 Storyteller B 36 Microchips B 37 Light Pluck B 38 Velo Pluck B 41 Sqr Pluck 1 B 42 Sqr Pluck 2 B 43 Toy Darts B 44 Vel Seq Tone B 45 Puny Pluck B 46 Fat Fifth 2 B 47 Crop Chop Short B 48 XMod Compu B 51 Tech Chord B 52 Dub Kick 1 B 53 Synth Tom B 54 Noise Tom B 55 Tele...

Страница 61: ... T O M S B 83 CLAV B 84 SQUARELEAD B 85 POLY BRASS B 86 SOFT BRASS B 87 STAB BRASS B 88 AGOGO BELL C 11 PIANO 4 C 12 PIANO 5 C 13 STRINGBRASS C 14 STRINGS 1 C 15 STRINGS 2 C 16 CHOIR C 17 MAY S WIND C 18 MARIMBA C 21 HARPSICHORD C 22 XMAS BELL C 23 VIBES C 24 UPRIGHT BASS C 25 LOG DRUM C 26 MALLET C 27 POLY SYNTH ...

Страница 62: ...ORTAMENTO TIME 7 PATTERN PART LEVEL 9 VCF RESONANCE 11 Expression 16 DCO 1 LEVEL 17 DCO 2 LEVEL 18 MIXER ENV 19 MIXER ENVELOPE MODE 20 DCO 1 RANGE 21 DCO 1 ENEV MOD 25 DCO 2 LFO 26 DCO 1 LFO 27 LFO DELAY TIME 28 VCF LFO DEPTH 29 LFO RATE 35 LFO WAVEFORM 41 BEND PITCH 46 DCO 1 WAVEFORM 47 DCO 1 RANGE 56 DCO 2 FINE TUNE 59 DCO CROSS MOD 60 DCO ENVELOPE MODE 61 DCO 2 WAVEFORM 62 DCO 2 RANGE 63 DCO 2 ...

Страница 63: ... UNISON Program Change LSB 0 0 MSB 0 1 0 1 PC 0 127 0 127 System Exclusive System Common Song Position Song Select Tune Request System Realtime Clock Commands Aux Messages All Sound Off Reset All Controllers Local On Off All Notes Off Omni Off Works the same as all notes off Omni On Works the same as all notes off Mono Mode On Works the same as all notes off Poly Mode On Active Sensing System Rese...

Страница 64: ...en the selected part and the system Note Off Aftertouch Key s Transmits receives between the selected part and the system Channel s Pitch Bend Control Change Program Change 0 127 0 127 Selects the step sequencer pattern System Exclusive System Common Song Position Song Select Tune Request System Real Time Clock Start Continue Works the same as start Stop Aux Messages All Sound Off Reset All Contro...

Страница 65: ...DI IN OUT connectors USB port USB Type C Audio MIDI Power Supply Ni MH battery AA HR6 x 4 or Alkaline battery AA LR6 x 4 USB bus power Current Draw 500 mA USB bus power Expected battery life under continuous use Ni MH battery Approx 6 hours When using batteries having a capacity of 1 900 mAh This can vary depending on the specifications of the batteries capacity of the batteries and the conditions...

Страница 66: ...Main Specifications 66 JX 08 Owner s Manual 1 00 Roland Corporation 2021 Roland Corporation ...

Отзывы: