36
Using the JUNO-DS with DAW Software
Using the JUNO-DS As a DAW Controller
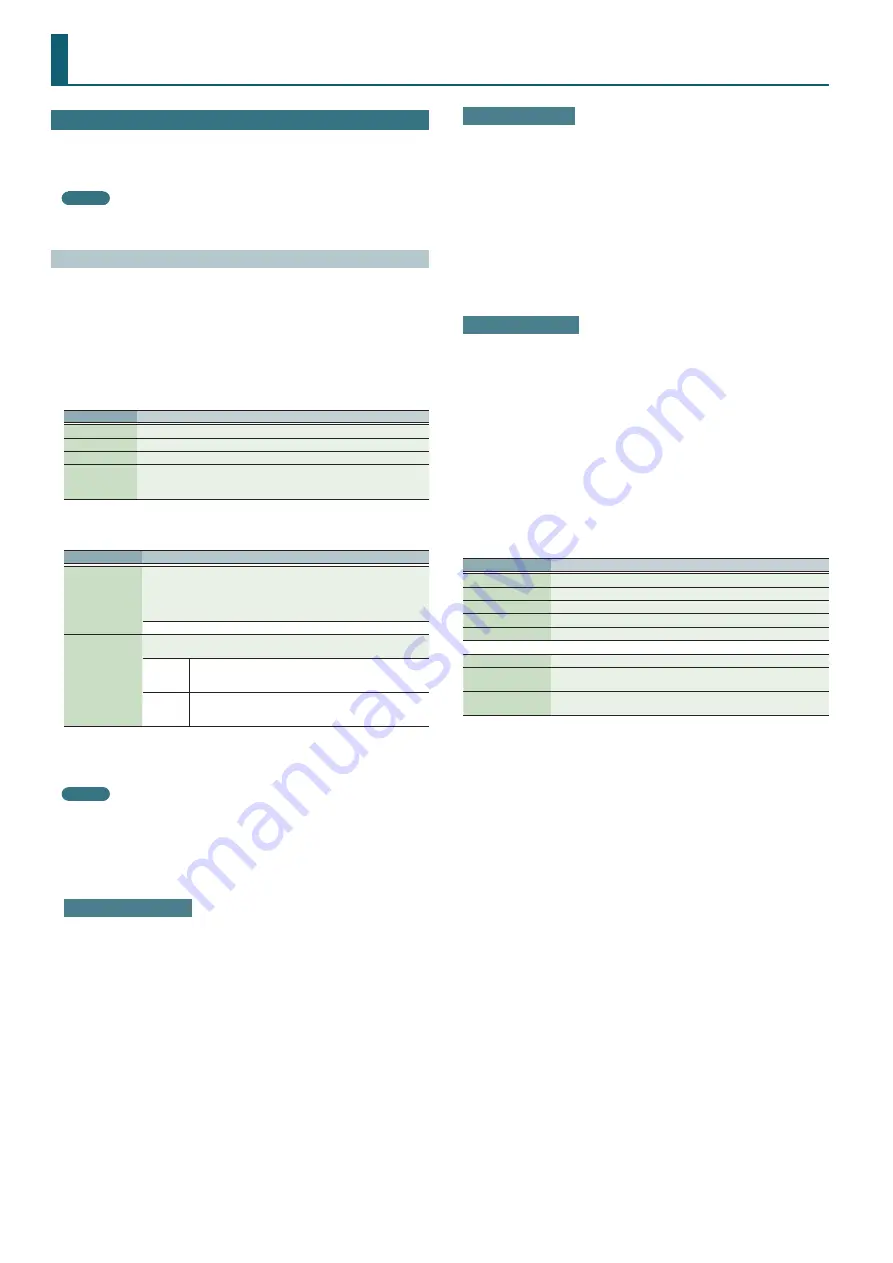
You can use the JUNO-DS as a controller for your DAW software.
The JUNO-DS provides various DAW control maps. Simply select the appropriate
control map to apply the appropriate settings for the DAW software that you’re
using.
MEMO
If you want to use the JUNO-DS as a controller for your DAW software, set the USB
Driver setting to “VENDOR.”
Using the JUNO-DS to Control DAW Software
1 .
Use a USB cable to connect the JUNO-DS to your computer.
A confirmation message appears.
*
This message is not shown if you power-on the JUNO-DS with it already
connected to the computer.
2 .
Move the cursor to “YES,” and press the [ENTER] button.
DAW Control mode is on, and the DAW CONTROL screen appears.
3 .
Move the cursor to “Control Map,” and use the value dial to select the DAW
software that you’re using.
Value
Explanation
LOGIC PRO
When controlling Logic Pro.
SONAR
When controlling SONAR.
CUBASE
When controlling Cubase.
USER
Choose “USER” if your system cannot use the Mackie Control control surface.
You’ll be able to choose the MIDI messages that are transmitted when you
press pads [1]–[8].
4 .
As necessary, move the cursor to “Sync Output” or “Sync Mode,” and use the
value dial to change the setting.
Parameter
Value/Explanation
Sync Output
Specifies whether clock, start, continue, stop, and song position pointer
messages are transmitted to another device (ON) or are not transmitted
(OFF).
*
When the DAW CONTROL screen is not shown, this parameter is forcibly
turned OFF.
OFF, ON
Sync Mode
Specifies the synchronization message that the JUNO-DS will use for
operation.
MASTER
The JUNO-DS will be the master. Choose this setting when
using the JUNO-DS by itself without synchronizing to another
device.
SLAVE
The JUNO-DS will be the slave. Choose this setting when you
want the JUNO-DS to synchronize to MIDI Clock messages
received from another MIDI device.
5 .
Turn the Local Switch “OFF” in the “Controller” tab (p. 37).
6 .
In your DAW software, open the project file that you want to control.
MEMO
Before you continue, select “JUNO-DS” as the MIDI input device and output
device.
For details on how to do this, refer to the owner’s manual of your DAW software.
7 .
Make the appropriate control surface settings for the DAW software you
selected.
Settings in LOGIC PRO
This explanation describes the procedure when using Logic Pro X. The procedure
may differ for other versions.
1 .
From the Logic Pro X menu, choose [Logic Pro X]
0
[Control Surfaces]
0
[Setup] to open the setting screen.
2 .
From the menu, choose [New]
0
[Install].
3 .
From the list of Model, choose “Mackie Control” and press “Add.”
4 .
As the input port and the output port, specify “JUNO-DS DAW CTRL.”
Settings in SONAR
This explanation describes the procedure when using SONAR X2 Producer. The
procedure may differ for other versions.
1 .
From the SONAR menu, choose [Edit]
0
[Preferences]
0
[MIDI Devices]
to open the input/ output device selection.
2 .
To the input devices and output devices, add “JUNO-DS DAW CTRL.”
3 .
In [Preferences], choose [MIDI Control Surfaces].
4 .
Press “Add new Controller/Surface” to access the control surface settings
dialog box.
5 .
Choose “Mackie Control” as the control surface, choose “JUNO-DS DAW CTRL”
as the input port and output port, and then press “OK.”
Settings in CUBASE
This explanation describes the procedure when using the Mac OS X version of
Cubase 7. The procedure may differ for other versions.
1 .
From the Cubase [Devices] menu, choose [Device Setup].
2 .
Press the [+] button located in the upper left of the dialog box, and choose
“Mackie Control” from the pulldown menu.
3 .
As the MIDI input and MIDI output for Mackie Control, specify “JUNO-DS DAW
CTRL.”
4 .
In the left side of the dialog box, choose “MIDI Port Setup” to access the
setting screen.
5 .
In “JUNO-DS DAW CTRL,” clear the check box from “In ’ALL MIDI Inputs’.”
8 .
Operate the JUNO-DS to control your DAW software.
Available controllers Explanation
[
s
] button
Playback/Stop
[
t
] button
Start recording on record-standby tracks.
[
u
] button
Return the current position to the beginning.
[SHIFT]+Pad [2]
Rewind
[SHIFT]+Pad [3]
Fast forward
The [
s
] through [
u
] buttons emulate the Mackie Control control surface.
Pad [1]–[8]
Emulate the Mackie Control control surface Function buttons (F1–F8).
Control knobs
You can control the functions that are assigned (p. 33) to Assign 1–4
[LEVEL] sliders
You can control the functions that are assigned to the four sliders


