3
Making Connections
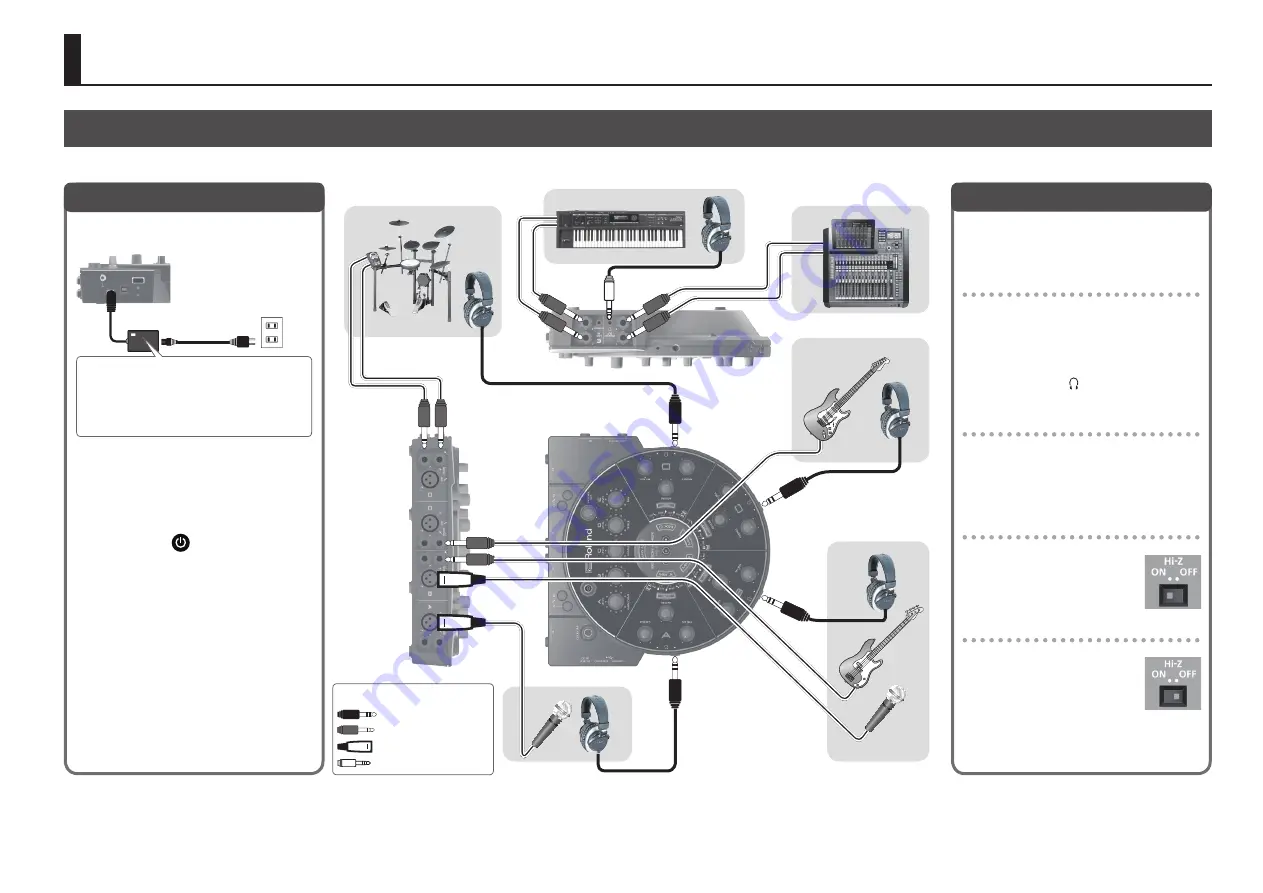
Connect the HS-5, the AC adaptor, mics, guitars, and other devices as shown in the connection examples.
Using the HS-5
1
Connect the included AC adaptor to the
DC IN jack.
2
Make sure that the volume of all
connected devices is at the minimum
setting.
3
Connect your mics, guitars, and other
equipment that you use when performing.
4
Hold down the
button to turn on the
power of the HS-5.
5
Turn on the power of the connected
devices.
* This unit is equipped with a protection circuit.
A brief interval (a few seconds) after turning
the unit on is required before it will operate
normally.
* This device will automatically power-off (Auto
Off function) if there is no USB connection
and 600 minutes have elapsed since the last
operation.
&
“About the Auto Off function” (p. 12)
To turn the power off, turn off the power of
your equipment in the order of steps 5, 4, and 3.
Place the AC adaptor so the side with the
indicator (see illustration) faces upwards and the
side with textual information faces downwards.
The indicator will light when you plug the AC
adaptor into an AC outlet.
Turning the Power On/Off
The jacks and settings depend on the
instruments you're using. Refer to the following
instructions, and make the correct connections.
Connecting headphones
5
Sections A–D have both 1/4” and stereo-
mini headphone jacks. Use the jack that’s
appropriate for the type of connector of your
headphones.
5
For section E, you can connect headphones
to the stereo-mini jack in the MAIN MIX
OUT section.
Connecting a dynamic mic
1
Turn the mic gain adjustment knob
toward the left to the minimum setting.
2
Connect your dynamic mic to the mic
input jack.
Connecting a guitar
1
On the bottom of the HS-5,
turn the [Hi-Z] switch on.
2
Connect your instrument to
the guitar (L/MONO) jack.
Connecting electronic drums or a synthesizer
1
On the bottom of the HS-5,
turn the [Hi-Z] switch off.
2
Connect your instrument
to the guitar (L/MONO) jack
and R jack.
Connecting Your Equipment
* To prevent malfunction and equipment failure, always turn down the volume, and turn off all the units before making any connections.
* Once everything is properly connected, be sure to follow the procedure above to turn on their power. If you turn on equipment in the wrong
order, you risk causing malfunction or equipment failure.
* Before turning the unit on/off, always be sure to turn the volume down. Even with the volume turned down, you might hear some sound when
switching the unit on/off. However, this is normal and does not indicate a malfunction.
* When connection cables with resistors are used, the volume level of equipment connected to the inputs (MIC jacks Guitar (L/MONO)/R jack, LINE
IN L, R/STEREO jacks) may be low. If this happens, use connection cables that do not contain resistors.
* Acoustic feedback could be produced depending on the location of microphones relative to speakers. This can be remedied by:
Section A
Section B
Section C
To PA
Section E
Section D
About plugs in figures
Stereo 1/4”phone
Stereo miniature phone
1/4”phone
XLR
• Relocating microphone(s) at a greater distance from speakers. • Lowering volume levels.
• Changing the orientation of the microphone(s).
Содержание HS-5
Страница 15: ...15 ...


