background image

13


°

Recording Your Performance

Recording Your Keyboard Performance

You can record your own keyboard performance, and then play back 

to check it.

Getting Ready to Record

1. 

Select the tone that you want to play.

2. 

You can sound the metronome if you like.

Set the metronome’s tempo and time signature. The metronome 

setting is stored in the song, and you can use the same settings 

during playback.

3. 

Press the [

t

] button.

The [

t

] button lights, the [

s

] button blinks, and the piano 

enters record-standby mode.
If you decide to cancel recording, press the [

t

] button once again.

Starting/Stopping Recording

4. 

Press the [

s

] button.

After a one-measure count, recording starts, and the [

7

button and [

s

] button are both lit. The performance is saved 

automatically.

MEMO

You can also start recording by playing the keyboard instead of 

pressing the [

s

] button. In this case, a count is not sounded.

5. 

To stop recording, press the [

s

] button once 

again.

Recording stops.

Listening to the Recorded Performance

6. 

Press the [

s

] button.

After you record, the newly recorded song is selected.
The recorded song starts playing back.

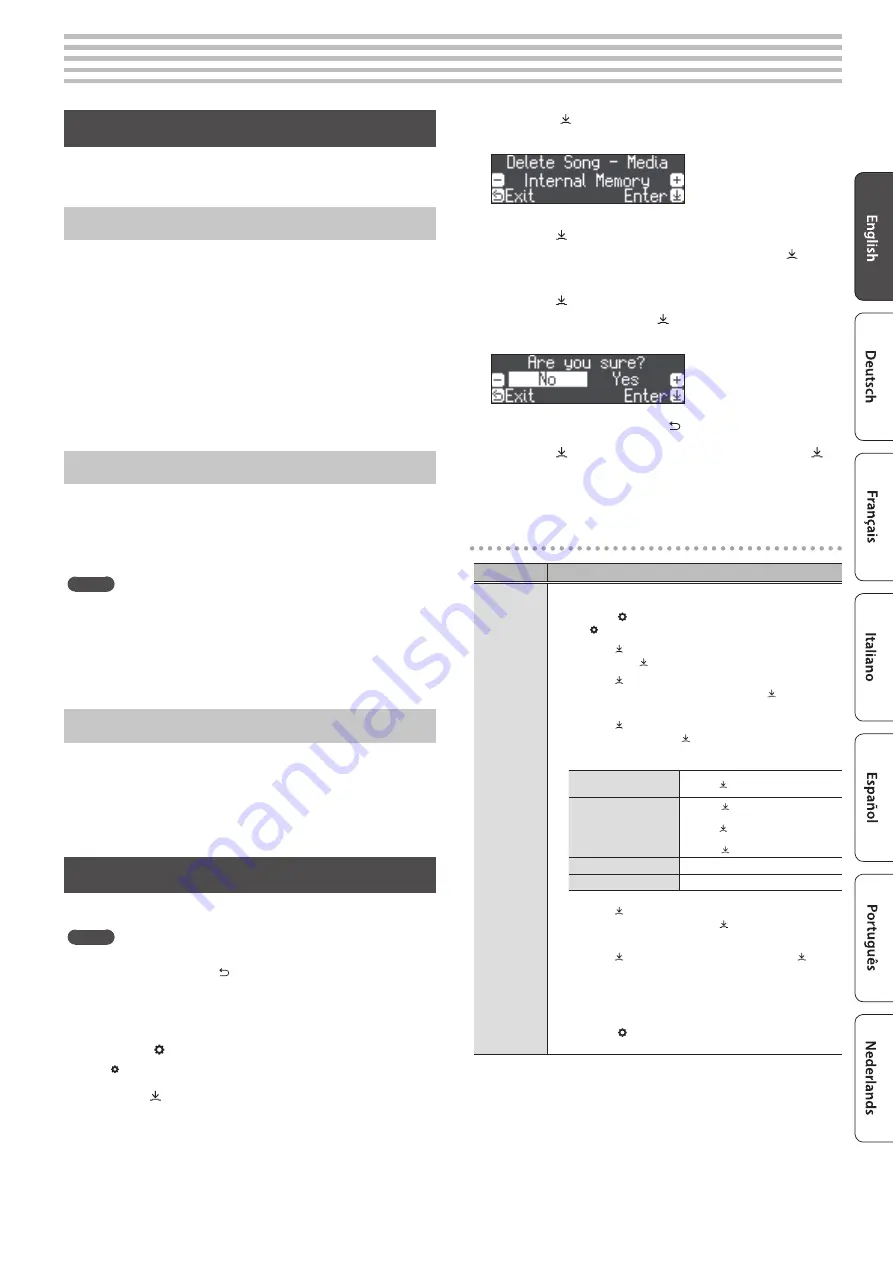
Deleting a Saved Song

You can delete a song that you saved.

MEMO


5

You can also delete a recorded song by holding down the [

7

button and pressing the [ ] button.


5

If you want to delete all songs that have been saved to internal 

memory, initialize the memory (“Initializing the Memory 

(Format Media)” (p. 23)).

1. 

Press the [ ] button.

The [ ] button is lit, and the piano is in function mode.

2. 

Turn the [ ] knob to access the “Delete Song” 

screen.

3. 

Press the [ ] knob to confirm.

The Delete Song screen appears.

4. 

Turn the [ ] knob to select the media that contains 

the song you want to delete, and press the [ ] knob 

to confirm.

5. 

Turn the [ ] knob to select the song that you want 

to delete, and press the [ ] knob to confirm.

A confirmation message appears.

If you decide to cancel, press the [ ] button.

6. 

Turn the [ ] knob to select “Yes,” and press the [ ] 

knob to confirm.

The deletion is executed.

Managing songs you recorded

Operation

Renaming 

a recorded 

song

You can rename a saved song.

1. 

Press the [ ] button.

The [ ] button is lit, and the piano is in function mode.

2. 

Turn the [ ] knob to access the “Rename Song” screen, 

and press the [ ] knob to confirm.

3. 

Turn the [ ] knob to select the media that contains the 

song you want to rename, and press the [ ] knob to 

confirm.

4. 

Turn the [ ] knob to select the song that you want to 

rename, and press the [ ] knob to confirm.

5. 

Rename the song.

Select the character which 

you want to change

Turn the [ ] knob

Change the character

Press the [ ] knob (confirm)

/

Turn the [ ] knob (change the character) 

/

Press the [ ] knob (back)

Insert one character

Press the [

s

] button

Delete one character

Press the [

7

] button

6. 

Turn the [ ] knob to select the 

(

 at the right edge of 

the screen, and then press the [ ] knob to confirm.

A confirmation message appears.

7. 

Turn the [ ] knob to select “Yes,” and press the [ ] knob 

to confirm.

The song is renamed.

*  Never turn off the power or disconnect the USB flash drive 

while the screen indicates “Executing...”

8. 

Press the [ ] button.

You exit function mode.

Содержание HP 702-LA

Страница 1: ...Owner s Manual...

Страница 2: ...5 W 4 16 W Dimensions including piano stand With music rest 1 377 W x 468 D x 1 113 H mm 54 1 4 W x 18 7 16 D x 43 7 8 H inches When folding down the music rest 1 377 W x 468 D x 957 H mm 54 1 4 W x...

Страница 3: ...tooth for Use with an App 21 Convenient Functions 22 Loading Saving Piano Setups 22 Saving Piano Settings Piano Setup Export 22 Loading Piano Settings Piano Setup Import 22 Initializing the Memory For...

Страница 4: ...11 5 Split Dual button Lets you play different tones in the left and right hand areas of the keyboard Split Play or layer two tones together on the keyboard Dual Play p 10 6 Tone buttons Select the s...

Страница 5: ...r computer allowing you to produce or edit music 21 USB Memory port Here you can connect a USB flash drive You can use it to record your piano performance as audio or use the piano to play back music...

Страница 6: ...cover Using the Music Rest HP704 only 1 2 1 Gently raise the music rest 2 Fit the latch into one of the slots so that the music rest is at the desired angle The long groove is the normal position 3 R...

Страница 7: ...When operating the pedal take care not to pinch your fingers between the moving part and the body of the unit Pay special attention to this when using the unit where children are present NOTE Under t...

Страница 8: ...ange to another category SavingYour Performance Settings Registration Lets you register your favorite performance settings so that you can easily recall those settings while you perform Such settings...

Страница 9: ...n appears 5 Rename the registration set Select the character which you want to change Turn the knob Change the character Press the knob confirm Turn the knob change the character Press the knob back I...

Страница 10: ...t to change MEMO You can specify the Split Point by holding down the Split Dual button and pressing the key where you want to split the keyboard Changing the volume balance of the left hand tone and r...

Страница 11: ...rm 4 Turn the knob to select the value that you want to change Suppressing a strong beat downbeat on the first beat Changing the metronome s pattern Changing the metronome s volume Changing the metron...

Страница 12: ...ss the button The button goes dark Changing how songs play back Operation Playing back individual performance parts The built in songs consist of three parts right hand left hand accompaniment and you...

Страница 13: ...ess the button The button is lit and the piano is in function mode 2 Turn the knob to access the Delete Song screen 3 Press the knob to confirm The Delete Song screen appears 4 Turn the knob to select...

Страница 14: ...me if you like Set the metronome s tempo and time signature The metronome setting is stored in the song and you can use the same settings during playback 3 Press the t button The t button lights the s...

Страница 15: ...lit The performance is saved automatically MEMO You can also start recording by playing the keyboard instead of pressing the s button In this case a count is not sounded 8 To stop recording press the...

Страница 16: ...ou can apply a Headphones 3D Ambience effect that creates the impression that the sound is being heard from the piano itself even when you re using headphones The Headphones 3D Ambience effect applies...

Страница 17: ...priate for this tuning Kirnberger II This is a revision of Kirnberger I that reduces the limitations on the usable keys Kirnberger III This is an improvement of the Meantone and Just tunings that prov...

Страница 18: ...ff 1 10 Adjusts the overall resonance of the acoustic piano when its damper pedal is pressed the sound of other strings vibrating in sympathy when you press the damper pedal and the resonance of the e...

Страница 19: ...peakers Make settings so that music data saved on your smartphone or other mobile device can be played wirelessly through the piano s speakers As an example we explain how to make settings for an iOS...

Страница 20: ...uetooth MIDI The information provided about apps made by Roland was current when this manual was published For the latest information refer to the Roland website Pairing You can make settings for usin...

Страница 21: ...of p 20 from step 1 1 Make sure that the piano s Bluetooth function is On 1 Press the piano s button The button is lit and the piano is in function mode 2 Turn the knob to access the Bluetooth screen...

Страница 22: ...Turn the knob change the character Press the knob back Insert one character Press the s button Delete one character Press the 7 button 5 Turn the knob to select the at the right edge of the screen and...

Страница 23: ...Never disconnect the USB flash drive or turn off the power while the screen indicates Executing 7 Press the button to exit function mode The button goes dark Restoring the Factory Settings Factory Re...

Страница 24: ...You can divide the keyboard into left and right areas so that two people can play the same range of pitches One person can play a model performance and the other person can practice along with that mo...

Страница 25: ...odes You can choose whether to record as SMF or as audio MEMO You can also switch recording modes by holding down the t button and turning the knob SMF Your performance is recorded to Internal Memory...

Страница 26: ...SB set this parameter to Local Off Since most sequencers have their Thru function turned on notes you play on the keyboard may be sounded in duplicate or get dropped To prevent this you can enable the...

Страница 27: ...and on again Off Settings are not saved When you turn the power off and on again settings will return to their default values On The settings are saved automatically This is convenient since you don t...

Страница 28: ...he power off and on again Settings that are saved automatically This piano automatically saves the following settings These settings are remembered even if the power is turned off Setting Page Speaker...

Страница 29: ...tion p 18 The sound of the higher notes suddenly changes from a certain key This simulates the characteristics of an acoustic piano and is not a malfunction The sound will change where there is a chan...

Страница 30: ...play back a song Could the SMF Play Mode be set to Internal Set the SMF Play Mode to External p 25 Can t play back a song saved in USB flash drive Is the file extension WAV or MP3 or MID This piano ca...

Страница 31: ...emory in the save destination Either insert other USB flash drive or delete unneeded files and try again Error 14 An error occurred during reading The USB flash drive may be corrupted Insert other USB...

Страница 32: ...r AC adaptors may use a different polarity or be designed for a different voltage so their use could result in damage malfunction or electric shock Use only the supplied power cord Use only the attach...

Страница 33: ...we will do our utmost to preserve the data stored in your unit when we carry out repairs in some cases such as when the memory section is physically damaged restoration of the stored content may be im...

Страница 34: ...usic Box 63 Vibraphone 64 Vibraphone w 65 Marimba 66 Marimba w 67 Xylophone 68 TubularBells 69 Church Bell 70 Carillon 71 Santur 72 Organ 1 73 TremoloOrgan 74 60 s Organ 75 Organ 2 76 Perc Organ 1 77...

Страница 35: ...tness 223 Goblins 224 Echo Drops 225 Echo Bell 226 Echo Pan 227 Star Theme No Tone Name 228 Sitar 1 229 Sitar 2 230 Banjo 231 Shamisen 232 Koto 233 Taisho Koto 234 Kalimba 235 Bagpipe 236 Fiddle 237 S...

Страница 36: ...yderyk Franciszek Chopin 20 Valse op 64 1 Fryderyk Franciszek Chopin 21 Fantaisie Impromptu Fryderyk Franciszek Chopin 22 Tr umerei Robert Alexander Schumann 23 Dolly s Dreaming Awakening Theodor Oest...

Страница 37: ...y 22 Gondola Song 23 The Return 24 The Swallow 25 The Knight Errant Czerny 100 1 100 1 100 Carl Czerny All rights reserved Unauthorized use of this material for purposes other thanprivate personal enj...

Страница 38: ......

Отзывы: