66
The FANTOM lets you create samples by sampling the following
sounds .
5
Keyboard performance
5
Sound input from MIC/LINE INPUT jacks 1, 2 (an audio device or
microphone)
5
Sound input from the USB COMPUTER port
Preparing for Sampling
1.
As necessary, connect the device that you
want to sample (an audio device or mic) to
MIC/LINE INPUT jacks 1, 2.
MEMO
If you’re sampling in stereo from an audio device, connect its left
channel to MIC/LINE INPUT jack 1 and its right channel to MIC/LINE
INPUT jack 2.
2.
Press the [SAMPLING] button to make it light.
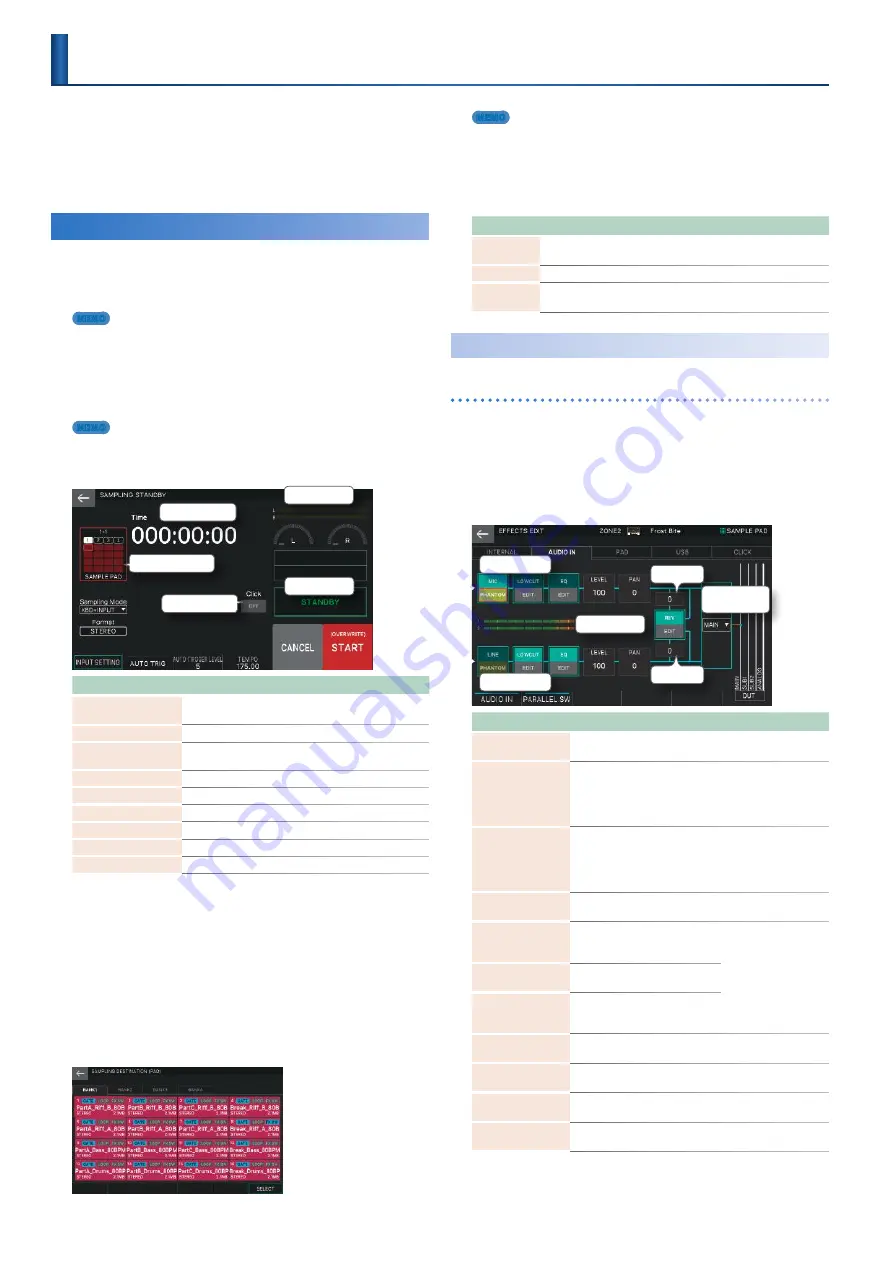
The SAMPLING STANDBY screen appears .
MEMO
If there is already a sample in the pad to which you’re sampling, the
message “Sample Already Exists. Overwrite?” appears. Press [E5] OK if
you want to overwrite, or press [E6] CANCEL if you want to cancel.
Level meter
Time counter
Rec status
Click ON/OFF
SAMPLE PAD display area
Menu
Explanation
[E1] INPUT SETTING
Makes input-related settings in the EFFECTS EDIT
screen .
[E2] AUTO TRIG
Turns AUTO TRIGGER on/off .
AUTO TRIGGER LEVEL
[E3] knob
Specifies the AUTO TRIGGER LEVEL .
TEMPO [E4] knob
Changes the click tempo .
[E5] CANCEL
Cancels the sampling standby state .
[E6] START
Starts sampling .
<Click>
Turns the click tone on/off .
<Sampling Mode>
Selects the sampling mode (input source) .
<Format>
Selects the sampling format .
3.
Note that the bank and number of the sample
pad you’re sampling are shown in the SAMPLE
PAD display area.
In this example, the BANK 1-1 pad is selected .
4.
If you want to change the bank and number of
the sample pad, touch <SAMPLE PAD>.
In the SAMPLING DESTINATION (PAD) screen, select the bank and
number of the pad to which you want to sample, and then select
[E6] SELECT .
MEMO
If there is already a sample in the pad to which you are sampling, the
message “Sample Already Exists. Overwrite?” appears. Press [E5] OK if
you want to overwrite, or press [E6] CANCEL if you want to cancel.
5.
Touch <Sampling Mode> and select the
sampling mode.
Parameter
Explanation
KBD+INPUT
Samples the keyboard performance and the audio input from
MIC/LINE INPUT jacks 1, 2 and the USB COMPUTER port .
KBD
Samples the keyboard performance .
INPUT
Samples the audio input from MIC/LINE INPUT jacks 1, 2 and the
USB COMPUTER port .
Specifying the Input Volume
(Input Setting)
Specifying the input volume of an audio device or mic
Here’s how to specify the input volume of an audio device or
mic connected to MIC/LINE INPUT jacks 1, 2 .
1.
In the SAMPLING STANDBY screen, select [E1]
INPUT SETTING.
The EFFECTS EDIT screen’s AUDIO IN tab appears .
INPUT1 (L ch)
REV Send
REV Send
INPUT2 (R ch)
Audio Input
Output Assign
Level meter
Menu
Explanation
[E1] AUDIO IN
Turns on/off the input from MIC/LINE INPUT jacks 1, 2 . If
this is off, the signal is not input .
[E2] PARALLEL SW
If this is on, you can make input settings individually for
the INPUT 1 (L ch) side and the INPUT 2 (R ch) side . If this
is off, only the INPUT 1 (L ch) side is shown, and the same
settings are applied to both INPUT 1 and INPUT 2 . Turn
this off if you connect a stereo device .
<LINE>/<MIC>
Specifies the input gain . Each time you touch this, it
alternates between “LINE” and “MIC .” Select “LINE” is a
line-level audio device is connected, or select “MIC” is a
mic is connected . This can be set individually for INPUT 1
and INPUT 2 .
<PHANTOM>
Turns on/off phantom power (DC 48 V, 10 mA Max) . Turn
phantom power on if you connect a condenser mic .
<LOWCUT>
(INPUT 1/2 independent)
Applies a low cut to the audio
input . This cuts the unwanted
low-frequency region .
Indicates the effect
on/off status and
shows the edit screen .
For details, refer to
“Editing the sampling
input effects” (p . 56)
and “Parameter Guide”
(PDF) .
<EQ>
(INPUT 1/2 independent)
Applies an equalizer to the
audio input .
<REV>
Applies reverb to the audio
input . This setting is common to
INPUT 1 and INPUT 2 .
<LEVEL>
(INPUT 1/2 independent)
Specifies the volume level after the sound passes
through Low Cut and EQ . (Range: 0–127)
<PAN>
(INPUT 1/2 independent)
Specifies the pan after the sound passes through Low Cut
and EQ . (Range: 63R–L64)
<REV Send>
(INPUT 1/2 independent)
Specifies the amount that is sent to reverb . (Range:
0–127)
<Audio Input
Output Assign>
Specifies the jack from which the audio input of INPUT 1
and INPUT 2 is output .
Sampling
Содержание FANTOM Series
Страница 1: ...Reference Manual 2019 Roland Corporation 01...
Страница 28: ...28 Memo...
Страница 78: ...78 Memo...
Страница 106: ...106 Memo...
Страница 118: ...118 Memo...
Страница 131: ...131 Memo...
Страница 132: ......


