104
Controlling an External MIDI Device
This unit’s knob operations and keyboard performance can be
transmitted as MIDI messages from the MIDI OUT connector
and from USB MIDI OUT .
Keyboard data can be output from the CV/GATE OUT jacks as
CV/GATE signals . By setting a specific zone to “EXT,” you can use
that zone for controlling an external MIDI device .
1.
Press the ZONE SELECT button of the zone
that you want to use for MIDI output.
To select zones 9–16, use the [ZONE 1-8/9-16] button to switch
groups, and then press a ZONE SELECT [1]–[8] button .
2.
Press the ZONE INT/EXT button of the selected
zone to make it light green.
If it’s not green, hold down the [SHIFT] button and press the
corresponding ZONE INT/EXT button to make it light green (EXT
setting) .
If it is lit green (EXT setting), MIDI messages are output .
If the ZONE INT/EXT buttons of multiple zones are lit, these settings
in conjunction with the zones specified by the ZONE SELECT
button (current zone) determine whether MIDI is output to an
external sound module (p . 24) .
Button
status
When the applicable
zone is the current zone
When the applicable zone is
not the
current zone
Unlit
(COMMON)
The internal sound engine
and the external sound
module both produce
sound when you play the
keyboard .
Neither the internal sound engine nor the
external sound module produce sound
when you play the keyboard . You can use
the internal sequencer or MIDI data from
an external device to play the internal
sound engine .
Lit red
(INT)
The internal sound engine
produces sound when
you play the keyboard .
Only if the ZONE INT/EXT button of
another current zone is on (lit red or
green), the internal sound engine produces
sound when you play the keyboard .
Lit green
(EXT)
The external sound
module produces sound
when you play the
keyboard .
Only if the ZONE INT/EXT button of another
current zone is on (lit red or green), the
external sound module produces sound
when you play the keyboard .
Lit orange
(MUTE)
The sound engine is muted . The internal sound engine does not
produce sound . If the immediately previous state was lit green, the
external sound module produces sound .
EXT
MUTE
INT
COMMON
Set in the MIXER screen
[SHIFT] +
ZONE INT/EXT button
Red
Unlit
Green
Orange
ZONE INT/EXT
button
ZONE INT/EXT
button
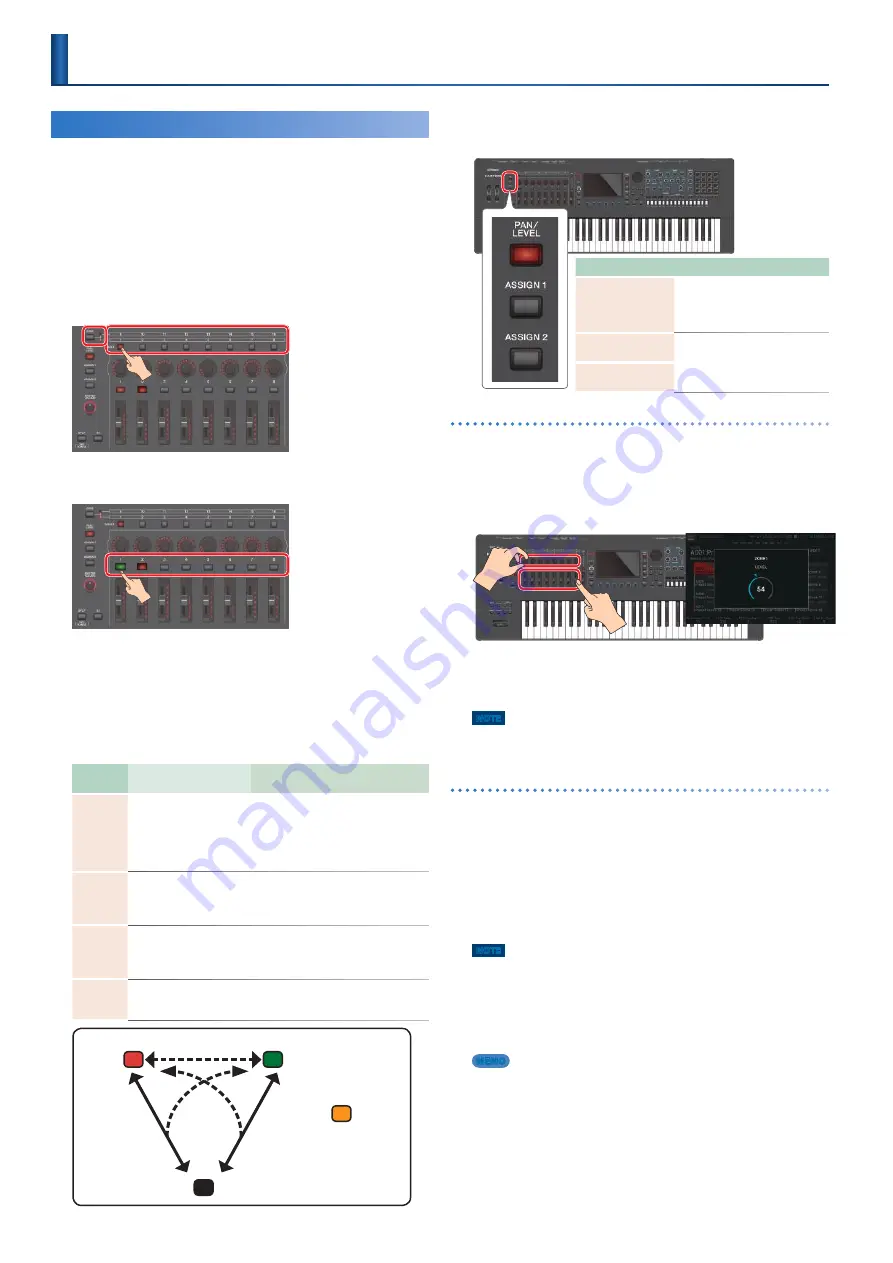
3.
Press a function select button to select the
parameter that you want to operate.
Using with PAN/LEVEL
4.
Press the [PAN/LEVEL] button to make it light.
5.
Move the control knobs and sliders of zones
that are set to “EXT.”
Pan or level MIDI messages are output .
When you change the settings of the control knobs or sliders, the
edited parameter and its value appear in a popup window.
The popup window closes automatically after a time.
For some parameters, a popup window does not appear.
NOTE
When using this function with [PAN/LEVEL], the number of the control
knob or slider corresponds to the number of each zone.
Using with ASSIGN 1 or ASSIGN 2
6.
Press the [ASSIGN 1] or [ASSIGN 2] button to
make it light.
7.
Select a zone set to “EXT” as the current zone.
As necessary, specify layering as well .
8.
Move the control knobs or sliders.
MIDI messages are output according to the assigned function .
NOTE
When using this function with [ASSIGN1] or [ASSIGN2], operating a
control knob or slider will output MIDI to the EXT zone that outputs
keyboard playing. (If layer settings are used, MIDI is output to multiple
zones.) You are free to create layers that combine INT zones and EXT
zones. In this case, the keyboard and controllers will simultaneously
control the internal sound engine and the external sound module. If
layer settings are not used, MIDI is output for the current zone.
MEMO
5
ASSIGN 1 is assigned functions individually for each scene .
ASSIGN 2 is assigned functions for the entire system .
5
By holding down the [SHIFT] button and pressing the [ASSIGN 1]
or [ASSIGN 2] button, you can access the edit screen for assigning
parameters or functions . For details, refer to “Parameter Guide” (PDF) or
“System Parameters” (p . 112) .
5
You can make detailed settings in ZONE EDIT (p . 43) .
5
The settings that you make are saved as scene settings (p . 44) .
Button
Explanation
[PAN/LEVEL] button
When this is lit, the control knobs
adjust the pan of each zone and
the sliders adjust the volume of
each zone .
[ASSIGN1] button
(SCENE)
When one of these is lit, the
control knobs and sliders adjust
the parameters that are assigned
for the scene or for the system .
[ASSIGN2] button
(SYSTEM)
Controlling an External MIDI Device
(EXT MIDI OUT)
Содержание FANTOM Series
Страница 1: ...Reference Manual 2019 Roland Corporation 01...
Страница 28: ...28 Memo...
Страница 78: ...78 Memo...
Страница 106: ...106 Memo...
Страница 118: ...118 Memo...
Страница 131: ...131 Memo...
Страница 132: ......


