background image

30

Two Parts (LOWER, UPPER)

The A-88 stores the keyboard settings for two parts, LOWER and UPPER.
The keyboard settings include the MIDI channel and octave shift.
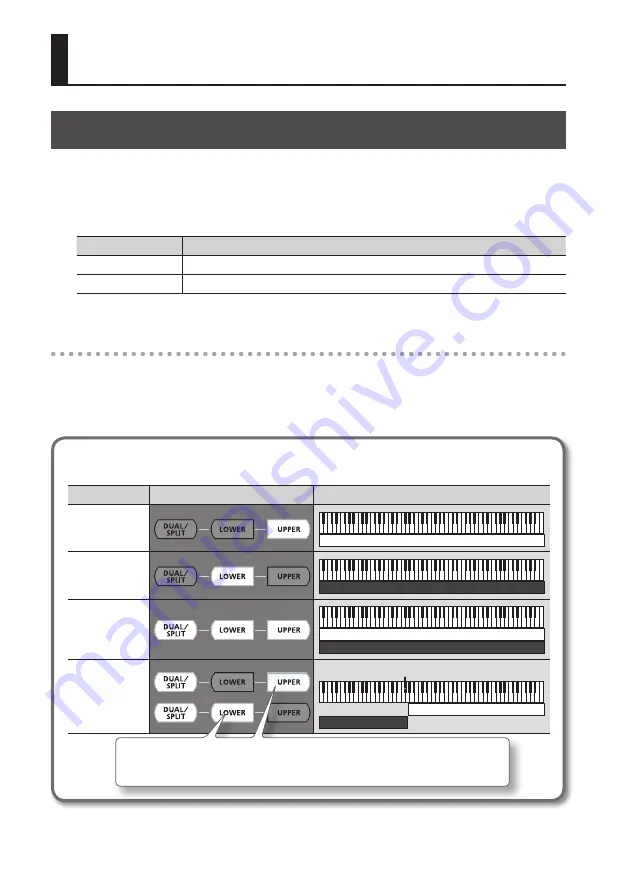
Such settings are stored individually for the UPPER and LOWER parts. When the [DUAL/SPLIT] 

button is off, you’ll be able to use one or the other of these parts.

Button

Function

[LOWER] button

Sound is produced according to the LOWER part settings when you play the A-88.

[UPPER] button

Sound is produced according to the UPPER part settings when you play the A-88.

In FUNCTION mode

Either the [UPPER] or the [LOWER] button will blink. MIDI messages of the part whose button is 

blinking will be transmitted.
You can use the [LOWER][UPPER] buttons to switch the setting even after pressing the 

[FUNCTION] button.

How the buttons indicate the DUAL/SPLIT status

Status

Button illumination

Keyboard section

Single  

(Only UPPER)

UPPER

Single  

(Only LOWER)

LOWER

DUAL

UPPER

LOWER

SPLIT

Split point (F#3)

LOWER

UPPER

In Split mode, controllers other than the keyboard (pitch bend lever, pedals, etc.) will 

affect only the part whose indicator is lit.

Layering Two Parts

Содержание A-88

Страница 1: ...Owner s Manual ...

Страница 2: ...nd is received by the computer s software sound module and then the software sound module plays the note C Software sound module C is played MIDI signal C key is pressed Information meaning the C key was pressed In this way MIDI is used to send performance information to other instruments for example the C key was pressed with a certain amount of force the instrument was changed to a violin sound ...

Страница 3: ...g placement of this unit on a stand Be sure to follow the instructions in the Owner s Manual carefully when placing this unit on a stand p 9 If it is not set up properly you risk creating an unstable situation which could lead to the unit falling or the stand toppling and may result in injury USING THE UNIT SAFELY Used for instructions intended to alert the user to the risk of injury or material d...

Страница 4: ...rop or subject to strong impact Protect the unit from strong impact Do not drop it WARNING Turn off the unit if an abnormality or malfunction occurs Immediately turn the unit off remove the AC adaptor from the outlet and request servicing by your retailer the nearest Roland Service Center or an authorized Roland distributor as listed on the Information page when The AC adaptor the power supply cor...

Страница 5: ...a dry cloth to wipe all dust and other accumulations away from its prongs Also disconnect the power plug from the power outlet whenever the unit is to remain unused for an extended period of time Any accumulation of dust between the power plug and the power outlet can result in poor insulation and lead to fire Manage cables for safety Try to prevent cords and cables from becoming entangled Also al...

Страница 6: ...close to the unit such as a piano light or powerful spotlights to shine upon the same area of the unit for extended periods of time Excessive heat can deform or discolor the unit When moved from one location to another where the temperature and or humidity is very different water droplets condensation may form inside the unit Damage or malfunction may result if you attempt to use the unit in this ...

Страница 7: ...sunlight Please be aware of this when using the D BEAM controller outside Handling CDs DVDs Avoid touching or scratching the shiny underside encoded surface of the disc Damaged or dirty CD DVD discs may not be read properly Keep your discs clean using a commercially available CD DVD cleaner Copyrights Licences Trademarks Before you open the included CD ROM or DVD ROM you must read the license agre...

Страница 8: ...ny pen or other implement and do not stamp or place any marking on the instrument Ink will seep into the surface lines and become unremovable Do not affix stickers on the keyboard You may be unable to remove stickers that use strong adhesives and the adhesive may cause discoloration Care and maintenance Please note the following points Failure to do so may result in scratches on the surface finish...

Страница 9: ...rubber feet on the keyboard side of the bottom of the keyboard fit into the holes provided for the rubber Top view KS 18Z Adjust the width of the stand so that the rubber feet of the A 88 straddle the stand Align the front of the A 88 with the front of the stand Adjust so that the height does not exceed 1 meter Adjust the stand to a level no higher than the fourth level from the bottom Top view Pl...

Страница 10: ...ing the D BEAM to Modify the Sound 36 Using the Knobs to Modify the Sound 37 Using the Pedals to Modify the Sound 38 Using Aftertouch to Modify the Sound 39 Halting Stuck Notes PANIC 39 Changing the A 88 Settings 40 Changing the Velocity Curve VELO CURVE 41 Specifying the Keyboard Velocity Value KEY VELO 41 Making the Power Automatically Turn Off After a Time Auto Off 42 Switching the Function of ...

Страница 11: ...tuck notes p 39 Performing with a SuperNATURAL sound module p 28 Controlling MIDI Visual Control compatible video equipment p 29 Changing the A 88 s Settings Changing the velocity curve VELO CURVE p 41 Specifying the keyboard velocity value KEY VELO p 41 Making the Power Automatically Turn Off After a Time Auto Off p 42 Assigning functions to the knobs buttons and jacks p 43 Switching the function...

Страница 12: ...ERIC ENTRY to enter a value Value 0 127 0 9 NUMERIC ENTRY keys pressed in this order This value is entered 6 4 ENTER 64 1 2 7 ENTER 127 1 2 8 ENTER 28 9 3 5 7 ENTER 57 If you specified a value that s outside the accept able range the valid value that had been entered before you pressed ENTER will be used Explanation of the icons Icon Explanation Rotate the C1 or C2 knob Step on the pedal for which...

Страница 13: ...unction of the software Avoid touching or scratching the shiny underside encoded surface of a disc Damaged or dirty discs may not be read properly Use a commercially available CD ROM DVD ROM cleaner to keep your disc clean You need DAW software for Mac OS X Cakewalk SONAR LE installation guide Windows This explains the installation and user registration process for the software included on the Cak...

Страница 14: ...the appropriate keys p 27 POWER switch This turns the power on off When not connected to a computer the A 88 will automatically be switched off four hours after you stop playing or operating it if the factory settings have been unmodified If you don t want the unit to turn off automati cally change the AUTO OFF setting to OFF as described on p 42 S1 S2 buttons You can switch sounds by pressing the...

Страница 15: ...transpose setting p 34 Indicates the transpose setting The OCTAVE TRANSPOSE indicator and the setting it shows 6 Unlit Lit 5 4 3 2 1 0 1 2 3 4 5 DUAL SPLIT LOWER UPPER buttons These buttons allow you to play two layered sounds simultaneously Dual or to play different sounds in the left and right sections of the keyboard divided at a specified key Split p 30 How the buttons indicate the DUAL SPLIT ...

Страница 16: ...eed to be connected Use this setting when the A 88 is connected to a desktop computer AC ADAPTOR The A 88 will use the AC adaptor Use this setting when the A 88 is connected to a notebook computer or when you are not connecting it via USB Pedal unit RPU 3 sold separately Included damper pedal Or Set the switch on the included pedal to Continuous when the pedal is connected Or expression pedal EV 5...

Страница 17: ...connected Disconnect all USB cables other than those for a USB keyboard and or USB mouse if used Windows Log on to the computer with a user account that has administrator privileges Windows 8 Switch to the Desktop 3 Exit all applications that are running 4 Insert the included CD ROM into the DVD ROM drive Windows 8 Windows 7 Windows Vista If the AutoPlay dialog box appears click Open folder to vie...

Страница 18: ... XP p 52 and try installing again 9 When the screen indicates Ready to install the driver use the USB cable to connect the A 88 to your computer and then turn on the POWER switch Turn down the volume on any peripheral devices before connecting the USB cable This unit is equipped with a protection circuit A brief interval a few seconds after turning the unit on is required before it will operate no...

Страница 19: ...th installation 13 When Completing the Found New Hardware Wizard appears click Finish 14 When Installation has been completed appears click Close Close the A Series Keyboard Driver Setup dialog box If the System Settings Change dialog box appears click Yes to restart Windows Windows 8 Windows 7 Windows Vista 10 When Installation has been completed appears click Close Close the A Series Keyboard Dr...

Страница 20: ...ake some time for the computer to restart 11 After the Mac restarts use the USB cable to connect the A 88 to the Mac and then turn on the POWER switch Turn down the volume on any peripheral devices before connecting the USB cable This unit is equipped with a protection circuit A brief interval a few seconds after turning the unit on is required before it will operate normally 12 Open the Applicati...

Страница 21: ...lick Rescan MIDI Also try disconnecting and reconnecting the A 88 s USB cable 15 Click Add Device two time Two New Device items will appear 16 Specify device names for the newly added New Device 1 Click each newly added New Device to select it and then click Show Info 2 Enter the desired name in the Device Name field and then click Apply Enter the following for each New Device New Device Device Na...

Страница 22: ...t the and which represent the input output ports of each device of the A Series Keyboard and each New Device that you added so that they are connected as shown in the figure 15 17 16 14 18 Close the MIDI Studio window or the Audio MIDI Setup dialog box page 24 ...

Страница 23: ...ck Preferences then in the menu at left click Devices in the MIDI area The Select MIDI input and output devices dialog box will appear 3 Choose the following MIDI devices in the Inputs and Outputs fields Input device Output device A Series Keyboard A Series Keyboard MIDI OUT If you re unable to select A Series Keyboard as an input output device it may be that a problem has occurred Refer to Proble...

Страница 24: ...nd Mac OS X GarageBand is software that is included with Apple s iLife Here the explanation assumes that you re using GarageBand 11 The steps or screens may be different if you re using a different version 1 In the Applications folder double click GarageBand 2 When GarageBand has started up click the File menu item New 3 In the New Project screen assign a name and click Create 4 Play the A 88 s ke...

Страница 25: ...e correctly connected to your computer s headphone jack If you don t hear sound in software other than GarageBand you ll need to make MIDI and audio input output settings Make the following settings for MIDI input output Input device Output device A Series Keyboard A Series Keyboard MIDI OUT MIDI Signal Flow The illustration below shows the MIDI signal flow MIDI OUT device MIDI IN device MIDI mess...

Страница 26: ...sed when performing When you play the keyboard note messages will be transmitted causing your MIDI device to produce sound In PLAY mode you can use the keyboard to play a connected sound module You can also use functions such as the Pitch Bend Modulation lever to change the pitch of the currently sounding notes Pitch Bend or apply a vibrato effect Modulation and change the octave Octave Shift Func...

Страница 27: ...it reset messages All Sound Off All Notes Off Reset All Controllers to solve the problem p 39 Change the keyboard settings You can adjust the velocity sensitivity or specify the velocity value that is transmitted when you play the keyboard p 41 Change the functions that are assigned to the knobs buttons and pedals You can change the function CC of the functions assigned to the C1 C2 knobs S1 S2 bu...

Страница 28: ... the performer plays resulting in true to life expressive sounds in realtime Functionality in SuperNATURAL mode Buttons knobs etc Function PITCH button The same functionality as in PLAY mode VOL button ASSIGN button General purpose controller 3 CC 18 FUNCTION button Not in use S1 button General purpose controller 5 CC 80 S2 button General purpose controller 6 CC 81 C1 knob General purpose controll...

Страница 29: ...musical performance Video equipment that is compatible with MIDI Visual Control can be connected to electronic musical instruments via MIDI in order to control video equipment in tandem with a performance Functionality in MIDIVisual Control mode Buttons knobs etc Function PITCH button The same functionality as in PLAY mode VOL button ASSIGN button Attack time CC 73 FUNCTION button Not in use S1 bu...

Страница 30: ...is produced according to the UPPER part settings when you play the A 88 In FUNCTION mode Either the UPPER or the LOWER button will blink MIDI messages of the part whose button is blinking will be transmitted You can use the LOWER UPPER buttons to switch the setting even after pressing the FUNCTION button How the buttons indicate the DUAL SPLIT status Status Button illumination Keyboard section Sin...

Страница 31: ...e is called the Split Point While in Split mode a sound played in the right side is called an UPPER part and the sound played in the left side is called a LOWER part The split point key is included in the LOWER section Press either The following controllers will affect only the part whose indicator is lit UPPER or LOWER Pitch Bend Modulation lever C1 C2 knobs S1 S2 buttons D BEAM controller Pedals...

Страница 32: ...ansmit Channel MIDI CHANNEL In order to play sounds on your MIDI sound module the A 88 s MIDI transmit channel must match your MIDI sound module s MIDI receive channel 1 16 MEMO The settings of the part whose UPPER LOWER button is blinking will be changed For details on how to set the transmit channel of your external MIDI device refer to its owner s manual When you turn off the power the setting ...

Страница 33: ...ge message What is a bank MIDI sound modules organize their numerous sounds in various groups according to the category of sound These groups are called banks Program change messages can only select sounds within the same bank but by using these in conjunction with bank select messages you can select different variations of sound The way in which sounds are organized will differ for each sound mod...

Страница 34: ...sly this setting will be reset to 0 Changing the pitch Transpose You can transpose the pitch in semitone step by using the buttons while holding down the TRANSPOSE button You can change this setting in the range of 6 to 5 The current transpose setting is shown by the OCTAVE TRANSPOSE indicator When the TRANSPOSE button is turned on the transposition setting is enabled When the TRANSPOSE button is ...

Страница 35: ...tion messages CC 01 applying a vibrato effect to the sound The way in which the sound changes will depend on the settings of your sound module MEMO Moving the lever toward the left while you play will lower the pitch and moving it toward the right will raise the pitch This effect is called pitch bend Moving the lever away from yourself will apply vibrato This effect is called modulation If you mov...

Страница 36: ...fect that s applied will depend on the sound module For details refer to the owner s manual of your sound module MEMO You can change the function that s assigned to the ASSIGN button For details refer to Assigning Functions to the Knobs Buttons and Jacks p 43 2 While playing the keyboard to produce sound position your hand above the D BEAM controller and slowly move it up and down 3 To turn off th...

Страница 37: ... a Cutoff CC 74 message C2 knob Transmits a Resonance CC 71 message The effect that s applied will depend on the sound module For details refer to the owner s manual of your sound module MEMO You can change the functions that are assigned to the C1 C2 knobs For details refer to Assigning Functions to the Knobs Buttons and Jacks p 43 ...

Страница 38: ...ound module For details refer to the owner s manual of your sound module MEMO If you want to assign a function other than those listed above such as when you want to connect an expression pedal and use it to control the volume expression refer to Assigning Functions to the Knobs Buttons and Jacks p 43 p 45 Adding expression to your performance Expression Pedal While playing the keyboard raise or l...

Страница 39: ... Value 0 127 0 9 If you specify an aftertouch value other than 0 the change will continue to be applied to the sound Return the value to 0 if you don t need this MEMO The A 88 is only able to transmit the variety of aftertouch called channel pressure it cannot transmit polyphonic key pressure messages You can assign aftertouch to the C1 C2 knobs or to the FC1 FC2 jacks For details refer to Assigni...

Страница 40: ...ns and jacks p 43 C2 knob Resonance CC 71 ASSIGN button Aftertouch S1 button Switches the sound decrements the program number S2 button Switches the sound increments the program number DAMPER jack Hold CC 64 FC1 jack Soft pedal CC 67 FC2 jack Sostenuto CC 66 CTRL DIR Positive direction Specifies whether turning the knob toward the right will transmit successively higher or successively lower value...

Страница 41: ...ouch This is the closest to the touch of an acoustic piano 3 HEAVY This sets the keyboard to a heavy touch You have to finger the keyboard more forcefully than usual in order to play fortissimo ff so the keyboard touch feels heavier Dynamic fingering adds even more feeling to what you play 4 SUPER HEAVY An even heavier setting than HEAVY Specifying the KeyboardVelocityValue KEYVELO For details on ...

Страница 42: ...12 Value 0 1 0 1 Value Settings Explanation 0 OFF The power will not turn off automatically 1 ON default When not connected to a computer the A 88 will automatically be switched off four hours after you stop playing or operating it Switching the Function of the C2 Knob in SuperNATURAL Mode SN SETTING Button Setting Explanation button MODE 1 General purpose controller 4 CC 19 will be assigned to th...

Страница 43: ...nobs Buttons and Jacks Assigning a Program Change Message PRGM CHANGE S1 S2 buttons Press either Button Function S1 button Decrement the program number S2 button Increment the program number Other controllers Operate either Assigning Aftertouch Operate either ...

Страница 44: ... S1 S2 buttons button The button will alternately transmit ON 127 and OFF 0 each time you press it Latched operation button The button will transmit ON 127 when you press it and OFF 0 when you release it Momentary operation Other controllers Operate either Value 0 127 0 9 For details on this value refer to p 12 You can t assign CC 0 Bank Select MSB or CC 32 Bank select LSB ...

Страница 45: ...65 Portamento 66 Sostenuto FC2 jack 67 Soft FC1 jack 71 Resonance C2 knob 72 Release time 73 Attack time 74 Cutoff C1 knob 75 Decay time 76 Vibrato rate 77 Vibrato depth 78 Vibrato delay 84 Portamento control 91 General purpose effect 1 Reverb send level 93 General purpose effect 3 Chorus send level The effect that s applied will depend on the sound module For details refer to the owner s manual o...

Страница 46: ...ssing a pedal will increase the value button REVERSED The opposite will occur Selecting the Dedicated Driver or the Generic Driver Normally you can leave this set to ADVANCED Button Setting Explanation button ADVANCED default The dedicated driver described in Driver Installation p 17 will be used button GENERIC The generic driver provided by the operating system will be used This is convenient if ...

Страница 47: ...Pedal Jacks Assignments to the Factory Settings Here s how to return the functions assigned to the DAMPER FC1 and FC2 jacks to their factory set settings For details on this value refer to p 12 Value 2 2 Restoring the Factory Settings FACT RESET ...

Страница 48: ...s displayed Reinstall the driver p 54 Installer does not exit Is your computer running on battery power Connect the power cord to the computer Other than a mouse and keyboard are any USB devices connected Make sure that there are no USB devices connected to the computer other than a mouse and keyboard during installation Is the unit connected to a USB hub that is not connected to a power supply Us...

Страница 49: ...unit s device name displayed Close all software that is using the unit then turn the unit s POWER switch off then back on again If the problem is not resolved reinstall the driver p 54 Is another program using the unit Did the computer enter standby suspend mode hibernate mode or sleep mode while the unit was connected Close all software that is using the unit then turn the unit s POWER switch off...

Страница 50: ...d Close all software that is using the unit then turn the unit s POWER switch off then back on again If the problem is not resolved restart the computer Did you disconnect and reconnect the USB cable while using the unit Was the unit connected to the computer while the computer was starting up Connect the unit after the computer has started up With some computers the unit cannot be used if it is c...

Страница 51: ...ter s USB connectors Windows Is the driver s Lighten Load setting turned off Place a check in the Lighten Load check box p 55 Did you try to play back or record immediately after the computer started up or after it woke up from sleep mode Wait a while before attempting playback or recording There s a time lag from when you play the keyboard until your software sound generator produces sound Have y...

Страница 52: ... the System Properties dialog box 5 Install the driver as described in Driver Installation p 17 When you have completed the installation return the Driver Signing Options setting to its original setting Power Management Settings If the sound is interrupted during a performance or if sounds are missing you may be able to resolve the problem by changing the computer s power management settings Windo...

Страница 53: ... double click Power Options 2 Click the Power Schemes tab and set Power schemes to Always On 3 Click OK to close Power Options Properties Mac OS X This setting is not available on certain versions of Mac OS X 1 Open System Preferences and click Energy Saver 2 Click Options 3 Set Processor Performance to Highest To open the Control Panel Windows 8 1 On the Start screen click the Desktop 2 Move the ...

Страница 54: ...puter without the unit connected Disconnect all USB cables other than those for a USB keyboard and or USB mouse if used 2 Log on to the computer with a user account that has administrator privileges 3 Insert the included CD ROM into the computer s DVD ROM drive 4 Double click the Uninstall icon in the WinDriver folder on the included CD ROM 5 When a confirmation screen regarding user account contr...

Страница 55: ...ears click OK The authentication dialog box or the message Uninstaller requires that you type your password will appear 6 Enter the password and click OK 7 When Uninstallation is completed appears click Restart to restart the Mac It may take some time for the Mac to restart Lightening the MIDI Load Windows The MIDI load can be lightened in the driver setting dialog box 1 Exit all programs that are...

Страница 56: ... USB COMPUTER port USB Type B DC IN jack Power Supply AC adaptor Supplied from the computer via USB COMPUTER port Current Draw 100 mA AC Adaptor 150 mA USB Dimensions 1 443 W x 273 D x 116 H mm 56 7 8 W x 10 3 4 D x 4 5 8 H inches Weight 15 9 kg 35 lbs 1 oz Accessories Owner s Manual Damper Pedal capable of continuous detection AC Adaptor Power Cord for AC Adaptor A Series Keyboard CD ROM USB cabl...

Страница 57: ... v 1 127 9n v 0 Aftertouch Key s Ch s O Pitch Bend O Control Change 0 119 O Program Change True O 0 127 System Exclusive O O System Common Song Pos Song Sel Tune O O 0 127 O System Real Time Clock Command O O Aux Message All Sound Off Reset All Controller Local control All Notes Off Active Sense Reset O 1 120 O 1 121 O O 1 123 O O Notes 1 Transmits When the Panic function is executed Mode 1 OMNI O...

Страница 58: ...L Lightening the MIDI load 55 LOWER 30 LOWER button 15 30 LSB 33 M MIDI CHANNEL 32 MIDI OUT connector 16 MIDI transmit channel 32 MIDI Visual Control 29 MIDI Visual Control mode 29 Modulation 35 MSB 33 O Octave Shift 34 OCTAVE TRANSPOSE indicator 15 Operating modes 26 P PANIC 39 Parts 30 Pedal 38 47 Pitch bend 35 Pitch Bend Modulation lever 14 PITCH button 14 36 PLAY mode 26 POWER indicator 14 POW...

Страница 59: ...59 MEMO ...

Страница 60: ...60 MEMO ...

Страница 61: ...61 MEMO ...

Страница 62: ...62 For EU Countries For China ...

Страница 63: ...he dealer or an experienced radio TV technician for help This device complies with Part 15 of the FCC Rules Operation is subject to the following two conditions 1 this device may not cause harmful interference and 2 this device must accept any interference received including interference that may cause undesired operation This equipment requires shielded interface cables in order to meet FCC class...

Страница 64: ... 5 1 0 0 0 2 9 9 0 9 0 2 ...

Отзывы: