1/2
© 2021 ROHM Co., Ltd.
No. 63UG098E Rev.001
Jan.2021
User’s Guide
Accelerometer
KXTJ3-1057-EVK-001 Manual
KXTJ3-1057-EVK-001 is an evaluation board for KXTJ3-1057 accelerometer. This User’s Guide will show how to use KXTJ3-1057-EVK-001
together with Accelerometer Evaluation Kit that is sold as RKX-EVK-001.
Preparation
⚫
KXTJ3-1057-EVK-001
1pc
⚫
RKX-EVK-001
1pc
Setting
1.
Download and Install the latest release of the RoKiX
Windows GUI following this link:
https://www.rohm.com/support/accelerometer-evk-support
Note: After installation, the shortcuts to the RoKiX Windows
GUI and to the RoKiX Development Kit User’s Guide can
be found on the desktop, in the Windows Start menu under
RoKiX folder, and in the installation directory:
\Documents\RoKiX\
2.
Start RoKiX Windows GUI. If Configuration update pop-up
window is shown, click Yes to download the latest
configurations from the server.
Figure 1. Configuration update pop-up window
3.
(Optional) The CY8CKIT-059 PSoC® 5LP Prototyping Kit
comes preloaded with the custom firmware when
purchased as part of RKX-EVK-001. The latest version of
the firmware can be found in the installation directory:
\Documents\RoKiX\RoKiX-Firmware\Cypress-PSoC
Note: The guide for programming the custom firmware to
the Cypress CY8CKIT-059 PSoC® 5LP Prototyping Kit can
be found in the RoKiX Development Kit User’s Guide.
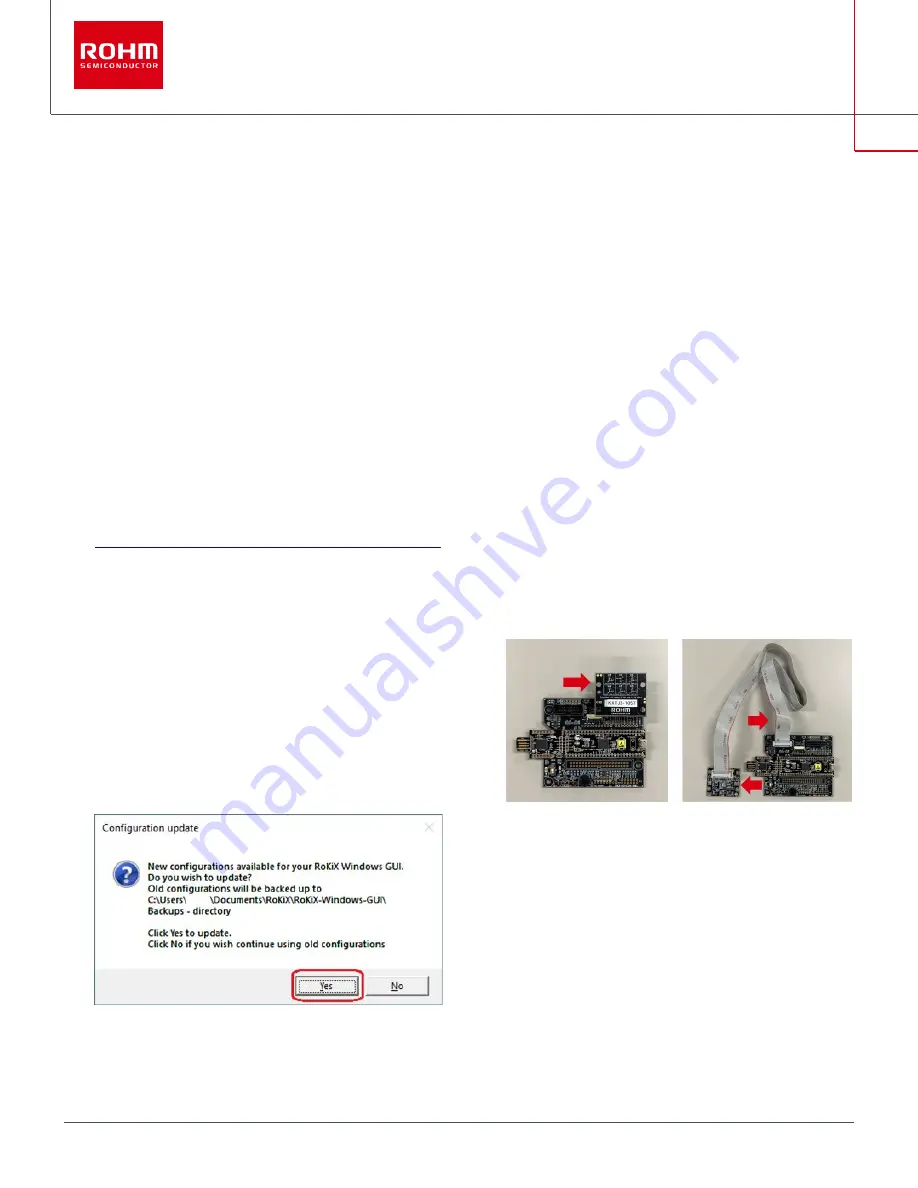
4.
Connect KXTJ3-1057-EVK-001 to RKX-EVK-001 directly
to the 18-pin header J6 or using the provided ribbon cable.
Direct Ribbon cable
Figure 2. KXTJ3-1057-EVK-001 connection
5.
Connect the CY8CKIT-059 to the PC using the provided
micro-USB cable to establish the connection with RoKiX
Windows GUI.
Note: With Windows 10, the operating system should
automatically use the correct driver. For the earlier
Windows versions, please follow the driver installation
procedure in the RoKiX Development Kit User’s Guide.


