Publication 2094-UM001A-EN-P — September 2006
Configure and Startup the Kinetix 6000 Drive System
141
Tune the Axes
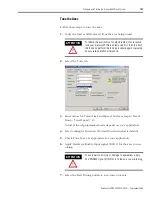
Follow these steps to tune the axes.
1.
Verify the load is still removed from the axis being tuned.
2.
Select the Tune tab.
3.
Enter values for Travel Limit and Speed. In this example, Travel
Limit = 5 and Speed = 10.
Actual value of programmed units depend on your application.
4.
Select setting for Direction (Forward Uni-directional is default).
5.
Check Tune boxes as appropriate for your application.
6.
Apply Hardware Enable Input signal (IOD-2) for the axis you are
tuning.
7.
Select the Start Tuning button to auto-tune your axis.
ATTENTION
To reduce the possibility of unpredictable motor response,
tune your motor with the load removed first, then re-attach
the load and perform the tuning procedure again to provide
an accurate operational response.
ATTENTION
To avoid personal injury or damage to equipment, apply
24V ENABLE signal (IOD-2) only to the axis you are tuning.
Содержание Allen-Bradley Kinetix 6000
Страница 8: ...Publication 2094 UM001A EN P September 2006 8 Table of Contents...
Страница 18: ...Publication 2094 UM001A EN P September 2006 18 Start...
Страница 118: ...Publication 2094 UM001A EN P September 2006 118 Connecting the Kinetix 6000 Drive System...
Страница 144: ...Publication 2094 UM001A EN P September 2006 144 Configure and Startup the Kinetix 6000 Drive System...
Страница 168: ...Publication 2094 UM001A EN P September 2006 168 Removing and Replacing the Kinetix 6000 Drive Modules...
Страница 190: ...Publication 2094 UM001A EN P September 2006 190 Specifications and Dimensions...
Страница 256: ...Publication 2094 UM001A EN P September 2006 256 Integrating Resistive Brake Modules with Kinetix 6000 Drives...
Страница 265: ...Publication 2094 UM001A EN P September 2006 265 Notes...
Страница 266: ...Publication 2094 UM001A EN P September 2006 266 Notes...
Страница 267: ...Publication 2094 UM001A EN P September 2006 267 Notes...


