background image

23

Gas unit heaters

Installation and use manual 

Gas unit heaters chronothermostat 

28/09/2021

21MCLSDC032

Rev.: C

Cod.: D-LBR500

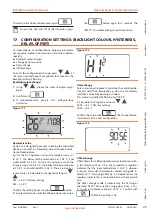
Figure 14.6

The 

 icon and the number of the program 

in use will start flashing again on the display. 

The procedure must be repeated for each subse-

quent program. 

Confirm selection by pressing the  


button.

15    DELETING A PROGRAM

To delete a selected program, set “dashes” in the temper-

ature field.

Figure 15.1

Programs with the same program numbers, but as-

signed to other days of week can have completely 

different settings. E.g.: program 1 on Saturday can 

start at 08:00, and program 1 on Sunday can start 

at 10:00. Days from 

 to 

 (from Monday to 

Friday) have the same programs.

On the same day of week, the next program should 

start at least a minute after the start of the previous 

one. Otherwise the regulator will renumber the 

programs in order to preserve the chronology of 

temperature setpoints.

16    SPECIAL FUNCTIONS: MANUAL, VACATION AND ANTIFREEZE

The chronothermostat allows temperature management 

according to three special functions with preset but mod-

ifiable temperatures:


manual temperature (

) – within the range from 5 

°C to 30 °C


vacation temperature (

) – within the range from 

5 °C to 30 °C


antifreeze temperature (

) – within the range from 

4 °C to 10 °C

To set one of the three temperatures:

1.  Press 

 repeatedly and until you see the 

 icon coupled with the icon of the desired 

mode.

2.  Each of the three programs has a default temperature 

value that can be changed via 


.

3.  Confirm the change via 

.

Figure 16.1

Factory defaults


Manual 20 °C


Vacation 16 °C


Antifreeze 7 °C

+39 035 888111 - F +39 035 884165

w

w

w

.robur

.it

24040 

Ver

dellino/Zingonia (BG) I

taly

via P

ar

ig

i 4/6

robur@r

obur

.it

Robur S.p

.A.

Содержание AURATON 2030

Страница 1: ... danni derivati da usi im propri erronei o irragionevoli Qualifica dell installatore L installazione deve essere effettuata esclusivamente da un impresa abilitata e da personale qualificato con specifiche competenze sugli impianti termici elettrici e apparecchiature a gas ai sensi di legge del Paese d installazione La progettazione l installazione la conduzione e la manuten zione degli impianti de...

Страница 2: ...Il display LCD retroillumi nato permette di sovrintendere il funzionamento del disposi tivo anche in un ambiente poco illuminato Caratteristiche 3 colori di retroilluminazione selezionabili 4 DESCRIZIONE Sul lato destro del pannello frontale del cronotermostato si trova un coperchio scorrevole sotto il quale vi sono i pulsanti di programmazione Rimuovendo completamente il coper chio è possibile so...

Страница 3: ...a che la tensione della batteria è scesa sotto il livello minimo consentito In tal caso so stituire le batterie al più presto Al fine di preservare i parametri programmati l opera zione di sostituzione della batteria non deve superare i 30 secondi 11 Icona funzionamento del dispositivo controllato Informa sullo stato operativo del dispositivo controllato 12 Informazioni sul funzionamento del crono...

Страница 4: ...care due fori di diametro 6 mm nella parete utilizza re il modello allegato al presente libretto per segnare la posizione dei fori 2 Inserire i tasselli in plastica forniti a corredo 3 Avvitare la vite di sinistra lasciando una distanza di 3 mm 4 Posizionare il foro sagomato presente nella parete poste riore del cronotermostato sulla testa della vite di sinistra far scorrere il cronotermostato ver...

Страница 5: ...nto delle batterie nel vano bat terie tutti i segmenti del display LCD vengono visualizzati test del display per un secondo e poi viene visualizzato il numero di versione del software Figura 9 1 Di seguito il cronotermostato passa automaticamente alla fase di impostazione dell orario facendo lampeggiare le cifre dell ora Premere e per impostare l ora corrente e confermare con Figura 9 2 Lampeggera...

Страница 6: ...o come una conferma tramite 10 IMPOSTAZIONE ORARIO Per correggere eventualmente l orario 1 Premere fino a visualizzare l icona informando che il cronotermostato è entrato nel modo di impostazione dell orario e il campo delle ore inizia a lampeggiare 2 Modificare con e fino a visualizzare l ora desiderata 3 Confermare con o e ripetere le opera zioni di modifica e conferma per le cifre dei minuti Fi...

Страница 7: ...sa bato e otto per la domenica Questo consente una pianificazione estremamente precisa della temperatura nell edificio durante le 24 ore Tabella 13 1 Impostazioni di fabbrica Prog Start time Temperature Prog Start time Temperature Prog Start time Temperature 1 06 00 21 C 1 06 00 21 C 1 06 00 21 C 2 08 30 20 C 2 23 00 19 C 2 23 00 19 C 3 15 00 21 C 4 23 00 19 C 14 PROCEDURA PROGRAMAZIONE MANUALE O ...

Страница 8: ...vedi punti 4 5 Figura 14 3 Figura 14 4 4 Assegnazione temperatura del programma Dopo aver scelto il programma da utilizzare premere per assegnare una temperatura al programma L icona inizierà a lampeggiare richieden do l impostazione della temperatura Impostare la temperatura desiderata utilizzando Confermare la selezione tramite Figura 14 5 L icona e il numero di programma in corso di modifica in...

Страница 9: ... preservare la crono logia dei setpoint di temperatura 16 FUNZIONI SPECIALI MANUALE VACANZA E ANTIGELO Il cronotermostato permette la gestione della temperatura secondo tre funzioni speciali con temperature preimpostate ma modificabili Temperatura Manuale range da 5 C a 30 C Temperature Vacanza range da 5 C a 30 C Temperatura Antigelo range da 4 C a 10 C Per impostare una delle tre temperature 1 P...

Страница 10: ...i la modalità di vacanza dovrebbe finire L icona lampeggerà Usare e per impostare il giorno in cui deve terminare il funzionamento in modalità vacanza 3 Confermare Figura 16 3 Figura 16 4 L icona verrà visualizzata sul display mentre è attiva la modalità vacanza È possibile uscire dalla modalità vacanza precedentemente impostata premendo il tasto Modalità antigelo La modalità antigelo è utile per ...

Страница 11: ...eresi so no due E possibile modificare l impostazione tramite HI 2 0 2 C settaggio di fabbrica HI 4 0 4 C Confermare l impostazione con Il cronotermostato passerà alla configurazione successiva Figura 17 2 Cambio ritardo L impostazione Ritardo è utile per impedire che il cronter mostato effettui spegnimenti troppo frequenti a causa per esempio di una momentanea apertura di una finestra Questa moda...

Страница 12: ...ranno perse Quando lampeggia l icona batterie esaurite la fun zione retroilluminazione non è più attiva onde evi tare ulteriore consumo di energia 19 RESET DEL REGOLATORE DI TEMPERATURA Premendo il pulsante RESET vengono resettati l orologio e il giorno impostati mentre le altre impostazioni sono mantenute in memoria 20 RESET RIAVVIO DEL REGOLATORE DI TEMPERATURA La funzione di riavvio del regolat...

Страница 13: ...Avvertenze per il corretto smaltimento del prodotto ai sensi della direttiva europea 2002 96 EC Ai sensi dell art 13 del Decreto Legislativo 25 Luglio 2005 n 151 Attuazione delle Direttive 2002 95 CE 2002 96 CE e 2003 108 CE relative alla riduzione dell uso di sostanze pericolose nelle apparecchiature elettriche ed elettroniche nonché allo smaltimento dei rifiuti Il simbolo del casso netto barrato...

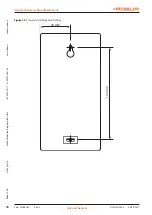
Страница 14: ...ori 14 Rev C Cod D LBR500 21MCLSDC032 28 09 2021 Figura 23 1 Dima per praticare i fori per il fissaggio 40 mm 124 mm 39 035 888111 F 39 035 884165 www robur it 24040 Verdellino Zingonia BG Italy via Parigi 4 6 robur robur it Robur S p A ...

Страница 15: ...ous or unreasonable use Installer s qualifications Installation must exclusively be performed by a qualified firm and by skilled personnel with spe cific knowledge on heating electrical systems and gas appliances in compliance with the laws in force in the Country of installation The design installation operation and maintenance of the systems shall be carried out in compliance with cur rent appli...

Страница 16: ...erature measurements within the range of 3 C LCD Backlit LCD display The backlit LCD display allows for supervising operation of the device even in a poorly lighted room Features 3 selectable backlight colours 4 DESCRIPTION Ontherightsideofthefrontpaneloftheregulatoryouwill find a sliding cover There are buttons under the cover You can replace batteries by removing the cover completely Figure 4 1 ...

Страница 17: ...de 10 Low battery icon This icon will be visible when the battery voltage drops below the minimal allowable level In such an event replace the batteries as soon as possible In order to preserve the programmed parameters the battery replacement operation must not ex ceed 30 seconds 11 Controlled device operation icon It informs about the operating status of the con trolled device 12 Information abo...

Страница 18: ...OM NO NC 8 MOUNTING 1 Drill two holes of diameter 6 mm in the wall use the template attached to the manual to mark the spacing between these holes 2 Insert plastic wall plugs included in the kit 3 Screw in the left screw with a 3 mm clearance 4 Put the key hole shaped opening in the rear wall of the regulator over the screw head and slide it to the right 39 035 888111 F 39 035 884165 www robur it ...

Страница 19: ...lacement of batteries in the battery holder all segments of the LCD display are displayed dis play test for one second and after that the software ver sion number is displayed Figure 9 1 Following that the regulator automatically enters the time setting mode the hour field flashes prompting for setting it Using the and buttons set the de sired hour value and confirm the setting with the button Fig...

Страница 20: ...amming any other functions failing to press any button in 10 seconds is equivalent to pressing the button 10 SETTING THE CLOCK In order to set the clock 1 Press the button until the icon is displayed informing that the regulator has en tered the time setting mode and the hour field starts flashing 2 Change with and until the desired time is displayed 3 Confirm with or and repeat the modification a...

Страница 21: ... regulator allows for saving up to eight programs for weekdays eight programs for Saturday and eight for Sunday This allows for exceptionally precise planning of tempera ture in the building depending on the time of day Table 13 1 Factory defaults Prog Start time Temperatures Prog Start time Temperatures Prog Start time Temperatures 1 06 00 21 C 1 06 00 21 C 1 06 00 21 C 2 08 30 20 C 2 23 00 19 C ...

Страница 22: ...et programs can be modified ac cording to the user s needs both as a temperature set point and as the starting time of the program itself see points 4 5 Figure 14 3 Figure 14 4 4 Assigning temperature to the program After choosing the program to use press to assign a temperature to the program The icon will start flashing requesting the temperature setting Set the desired temperature using Confirm...

Страница 23: ...t at least a minute after the start of the previous one Otherwise the regulator will renumber the programs in order to preserve the chronology of temperature setpoints 16 SPECIAL FUNCTIONS MANUAL VACATION AND ANTIFREEZE The chronothermostat allows temperature management according to three special functions with preset but mod ifiable temperatures manual temperature within the range from 5 C to 30 ...

Страница 24: ...o set the time at which operation in vacation mode must end 2 With you can set the day when the vacation mode should end The icon will flash Use and to set the day when vacation mode opera tion should end 3 Confirm Figure 16 3 Figure 16 4 The icon will appear on the display while the vaca tion mode is active You can exit the previously set vaca tion mode by pressing the button Antifreeze mode The ...

Страница 25: ... temperature is set to 20 C the boiler will be switched on at 19 6 C and switched off at 20 4 C There are two hys teresis values It is possible to change the setting via HI 2 0 2 C factory setting HI 4 0 4 C Confirm the setting by pressing the button Il cronotermostato passerà alla configurazione successiva Figure 17 2 Delay change Delay is designed to prevent switching the controlled de vice on a...

Страница 26: ...ime program etc will NOT be lost When flashing low battery symbol appears on the display the backlight function is inactive This fea ture designed to conserve energy remaining in batteries 19 RESET OF THE TEMPERATURE REGULATOR Pressing the RESET button resets the set clock and day while the other settings are kept in memory 20 RESET RESTART OF THE TEMPERATURE CONTROLLER The controller restart func...

Страница 27: ...able 5 days a week Saturday Sunday Maximum load current for relay contacts 8 A 250 VAC inductive load 5 A Power supply 2 x AA alkaline battery 23 DISPOSING OF THE DEVICES Warnings for the correct disposal of the product in ac cordance with the European directive 2002 96 EC The devices are marked with the crossed waste bin sym bol According to the European Directive no 2002 96 EU and the Act concer...

Страница 28: ...ronothermostat Rev C Cod D LBR500 21MCLSDC032 28 09 2021 Figure 23 1 Template for drilling holes for fixing 40 mm 124 mm 39 035 888111 F 39 035 884165 www robur it 24040 Verdellino Zingonia BG Italy via Parigi 4 6 robur robur it Robur S p A ...

Отзывы: