background image

Instructions for use and installation 

Cooker Hood 

Istruzioni per l’uso e l’installazione 

Cappa 

Instrucciones de instalacion e utilizacion 

Campana 

Bedienungsanleitung und Einrichtung 

Dunstabzugshaube 


GB

 IT 

E

DE

Instructies voor het gebruik en installeren

Dampkap

NL 

Inspiration 770

Mode d’emploi et installation 

Hotte de Cuisine 

FR

Содержание Inspiration 2 770

Страница 1: ...l uso e l installazione Cappa Instrucciones de instalacion e utilizacion Campana Bedienungsanleitung und Einrichtung Dunstabzugshaube GB IT E DE Instructies voor het gebruik en installeren Dampkap NL...

Страница 2: ...TALACION DEL APARATO FUNCIONAMIENTO CONSEJOS DE UTILIZACION MANTENIMIENTO GARANTIA Y ASSISTENCIA TECNICA NOTA GB CONTENTS ELECTRICAL WIRING INSTALLATION ADVICE FITTING THE APPLIANCE OPERATION USEFUL H...

Страница 3: ...ll avant la hotte Le fil de terre Jaune vert ne doit pas tre interrompu par cet interrupteur 2 CONSEILS D INSTALLATION Pour un fonctionnement id al nous vous conseillons une plage de hauteur de pose q...

Страница 4: ...rture pour l embo tage sur la surface inf rieure de l Armoire Murale comme indiqu Percer le dessus du meuble haut ou le fond pour l vacuation Fixer les 2 querres l aide des vis fournies Mettre en plac...

Страница 5: ...3 4 FONCTIONNEMENT F...

Страница 6: ...de l air Conduit d vacuation V rifier tous les 6 mois le bon coulement de l air vici Observer les prescriptions r glementaires locales concernant l vacuation de l air vici clairage Avant toute interve...

Страница 7: ...cela signifie que le produit est couvert par la Directive Europ enne 2002 96 EC Votre produit est con u et fabriqu avec des mat riaux et des composants de haute qualit qui peuvent tre recycl s et uti...

Страница 8: ...derside of the cooker hood and the cooker hood should be positioned away from doors and windows which will create turbulence Ducting If the room where the hood is to be used contains a fuel burning ap...

Страница 9: ...drill the outlet onto the top or the back of the wall furniture To fix the 2 squares using the provided screws To place the anti backflowflats item 9 over the round outlet To secure the connections w...

Страница 10: ...nections with appropriate clamping rings or adhesive tape not provided To Install the charcoal filters inside the canopy The hood can be connected to the mains supply via a double pole switch having 3...

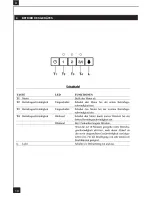
Страница 11: ...9 4 OPERATION GB...

Страница 12: ...ove the metal grease filters one at a time by releasing the catches on the filters the filters can now be removed The metal grease filters should be washed by hand in mild soapy water or in a dishwash...

Страница 13: ...ed This Guarantee does not cover Damage or calls resulting from transportation improper use or neglect the replacement of any light bulbs or filters or removable parts of glass or plastic These items...

Страница 14: ...Oberkante Kochfl che einzuhalten um einen optimalen Betrieb des Ger tes zu gew hrleisten Jedoch ist es untersagt Dunstessen oder Einbauger te mit einem Abstand der niedriger als 650 mm ist einzubauen...

Страница 15: ...geschranks wie in der Abbildung gezeigt eine ffnung anbringen In das ber oder der hintere Teil der Haube vorhandene Bord ein Loch bohren Die 2 Winkeln mit den gelieferten Schrauben fixieren Der Haube...

Страница 16: ...14 4 BETRIEB DES GER TES D...

Страница 17: ...dig auch in kurzen Intervallen mit der Hand lauwarmes Wasser mit Waschmittel und Nachsp len oder in der Geschirrsp lmaschine zu REINIGEN Diese Massnahmen vermindern die Brandgefahr starke Fettr ckst n...

Страница 18: ...er sind als Verbrauchsg ter anzusehen 8 WICHTIGE HINWEISE Dieses Ger t entspricht den europ ischen Niederspannungsrichtlinien 2006 95 EWG zur elektrischen Sicherheit den europ ischen Richtlinien 20041...

Страница 19: ...piano di cottura Tuttavia formalmente vietata l istallazione di qualsiasi cappa o gruppo aspirante ad una distanza inferiore a 0 65 m dal piano di cottura rischio di incendio dei filtri I fumi devono...

Страница 20: ...erire la cappa nel taglio e fissarla sui 2 quadrati per mezzo delle 4 viti fornite Posizionare la valvola di non ritorno Rif 9 sull uscita dell apparecchio Fissare il tutto tramitecollari o nastro ade...

Страница 21: ...19 4 FUNZIONAMENTO I...

Страница 22: ...l aria viziata Rispettare le norme nazionali vigenti relative all evacuazione dell aria viziata Illuminazione Prima di effettuare qualsiasi intervento sull apparecchio mettere l interruttore di accens...

Страница 23: ...ato il simbolo del bidone con le ruote segnato da una croce significa che il prodotto tutelato dalla Directiva Europea 2003 96 EC Questo prodotto stato progettato e fabbricato con materiali e componen...

Страница 24: ...campana o grupo de aspiraci n a una distancia inferior a 0 65 m del plano de cocci n entonces existir a riesgo de incendio del filtro Los humos deben salir libremente por la zona de aspiraci n atenci...

Страница 25: ...ijar el conjunto con ayuda de cuellos o cinta adhesiva convenientes Embalar el aparato en el recorte y fijarlo en las 2 escuadras con ayuda de los 4 tornillos proporciona dos CONEXIONES Versi n Evacua...

Страница 26: ...24 E 4 FUNCIONAMIENTO...

Страница 27: ...o con agua templada y aclarado o en el lavavajillas cada dos meses m s o menos para una utilizaci n normal Carcasa Limpiar regularmente la carcasa utilizando detergentes no abrasivos y una esponja lig...

Страница 28: ...que son considerados como materiales de consumo 8 NOTA Este aparato esta en conformidad con la norma europea en relaci n con baja tensi n 2006 95 CE de la securidad electrica y a las normas europeas...

Страница 29: ...het is absoluut verboden om een afzuigkap of inbouwfilterunit te installeren op een installatiehoogte die minder is dan 65 cm vanaf de kookplaat vanwege het gevaar dat de filters vlam zouden kunnen va...

Страница 30: ...even De anti retour klep opstellen Rep 9 op de output van het apparaat Het geheel bepalen l helpt van aangewezen kettingen of plakband Het apparaat in de opening ineenvoegen en het bepalen op de 2 tek...

Страница 31: ...29 NL 4 BEDIENIEG...

Страница 32: ...wasmachine Deze maatregel voorkomt het gevaar van brand Behuizing Gebruik geen natte doeken om de behuizing te reinigen Het gebruik van een milde zeep in combinatie met een vochtige doek wordt aangera...

Страница 33: ...08 EEG inzake de elektromagnetische compatibiliteit en 93 68 EEG inzake de CE markering Wanneer het symbool van een doorstreepte vuilnisemmer op wielen op een product is bevestigd betekent dit dat het...

Страница 34: ...32 1 2 736 3 0 6...

Страница 35: ...3 12b 12a 155 4 130 42 105 33...

Страница 36: ...34 5 306 736 130 42 105...

Страница 37: ...35 306 736 298 150 29 259 86 0 7 731 320 770 300 258 110 80 140 80 120...

Страница 38: ...36 6 C 6...

Страница 39: ...37 A...

Страница 40: ...650 mm mini...

Страница 41: ...Eclairage Lighting Beleuchtung Illumiazione Iluminaci n Verlichting 2 x 9 W 12EC003 39...

Страница 42: ...BLAU Br BROWN BRUN BRAUN G Y GREEN YELLOW VERT JAUNE GR N GELB Gr GREY GRIS GRAU L B LIGHT BLUE BLEU CLAIR HELL BLAU P PINK ROSE ROSA V PURPLE MAUVE MALVER FARBIG R RED ROUGE ROT W WHITE BLANC WEISS...

Страница 43: ...Connection Unit to BS 1363 Part 4 fitted with a 3 Amp fuse is a recommended mains supply connectionaccessoryto ensure compliance with the Safety Requirements applicable to fixed wiring instructions T...

Страница 44: ...42 30 2 4 770 Composants Components Bauelemente Componenti Componentes Onderdelen...

Страница 45: ...rie Numero de serie Serienummer Mod le Model Modell Modello Modelo Model Plaque Signal tique de la hotte Rating plate of the cookerhood Typenschild im Inneren der Dunstesse Etichetta all interno della...

Страница 46: ...44 Charni re Hinge Scharnier Cerniera Bisagra Scharnier...

Страница 47: ...45 ACCESSOIRES ACCESSORIES ZUBEH RE ACCESSORI ACCESORI ACCESSOIRES 12EC003...

Страница 48: ...20NO260 100304...

Отзывы: