ROBLIN Graphic Скачать руководство пользователя страница 1


Libretto di Istruzioni 


Instructions Manual 


Manuel d’Instructions 


Bedienungsanleitung 


Gebruiksaanwijzing 


Содержание Graphic

Страница 1: ...Libretto di Istruzioni Instructions Manual Manuel d Instructions Bedienungsanleitung Gebruiksaanwijzing...

Страница 2: ...INSTALLATION 16 USE 19 MAINTENANCE 20 SOMMAIRE CONSEILS ET SUGGESTIONS 23 CARACTERISTIQUES 24 INSTALLATION 26 UTILISATION 29 ENTRETIEN 30 INHALTSVERZEICHNIS EMPFEHLUNGEN UND HINWEISE 33 CHARAKTERISTI...

Страница 3: ...fiamme libere a forte intensit sotto la Cappa in funzione Regolare sempre le fiamme in modo da evitare una evidente fuoriuscita laterale delle stesse rispetto al fondo delle pentole Controllare le fri...

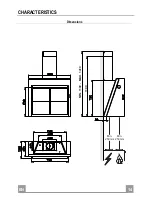
Страница 4: ...IT 4 4 CARATTERISTICHE Ingombro Min 250mm Min 250mm 1100 MIN 1100 MAX 1410...

Страница 5: ...Griglia direzionata Uscita Aria 10 1 Flangia con Valvola D 150 mm 16 1 Coperchio filtrante Rif Q t Componenti di Installazione 7 2 1 2 Staffe Fissaggio Camino Superiore 11 6 Tasselli 11a 2 Tasselli SB...

Страница 6: ...to e 112 mm A sopra il Piano di Cottura Ripetere questa operazione dalla parte opposta verificandone il livellamento Forare 12 mm i punti 1 segnati Forare 8 mm i punti 2 segnati Inserire i tasselli co...

Страница 7: ...nte collegare la Cappa alla tubazione di uscita per mezzo di un tubo rigido o flessibile la cui scelta lasciata all installatore Collegamento tubo 150 Inserire la Flangia con valvola 10 150 sull Uscit...

Страница 8: ...amino inferiore Allargare leggermente le due falde laterali del Camino aggan ciarle tra il Camino superiore e la parete e richiuderle fino a battuta Fissare lateralmente la parte inferiore al Corpo Ca...

Страница 9: ...ioni sono visibili solo a motore spento Visualizza 24 e il punto in basso a destra lampeggia mentre il motore in funzione Terminata la procedura si spegne la segnalazione precedentemente visua lizzata...

Страница 10: ...so particolarmente intenso Reset del segnale di allarme Spegnere le Luci e il Motore di aspirazione quindi qualora fosse attivata la funzione 24h disattivarla Premere il tasto E sino allo spegnersi de...

Страница 11: ...otore di aspirazione Scollegare la cappa dall alimentazione di rete Ripristinare il collegamento tenendo premuto il tasto B Rilasciando il tasto sul display compaiono due rettangoli in rotazione Entro...

Страница 12: ...e da 20 W Togliere la plafoniera svitando le viti che la fissano Estrarre la Lampada dal Supporto Sostituirla con una nuova di uguali caratteristiche facendo at tenzione di inserire correttamente i du...

Страница 13: ...es other than for which it has been designed Never leave high naked flames under the hood when it is in operation Adjust the flame intensity to direct it onto the bottom of the pan only making sure th...

Страница 14: ...EN 1 4 14 CHARACTERISTICS Dimensions Min 250mm Min 250mm 1100 MIN 1100 MAX 1410...

Страница 15: ...1 Directional Air Outlet grille 10 1 Dumper 16 1 Filter cover Ref Q ty Installation Components 7 2 1 2 Upper Chimney Section Fixing Brackets 11 6 Wall Plugs 11a 2 Wall Plugs SB 12 10 12a 6 Screws 4 2...

Страница 16: ...on the other side checking that the two marks are level Drill at the points 1 marked using a 12 mm drill bit Drill at the points 2 marked using a 8 mm drill bit Insert the bracket plugs 11a into the h...

Страница 17: ...SYSTEM When installing the ducted version connect the hood to the chimney using either a flexible or rigid pipe the choice of which is left to the installer To install a 150 To install the dumper 10...

Страница 18: ...9 x 6 5 supplied Lower exhaust flue Slightly widen the two sides of the flue and hook them be tween the upper flue and the wall making sure that they are well seated Fix the lower part laterally to t...

Страница 19: ...cations are only visible when the motor is turned off Displays 24 and the spot at the bottom right flashes while the motor is running When the procedure has been completed the indication previously di...

Страница 20: ...reset Switch off the hood and the lights If the 24h function has been activated this has to be deactivated Press the E key till the display is unlit Cleaning the filters Pull the comfort panels to op...

Страница 21: ...off the hood and the lights Disconnect the hood from the mains supply When restoring the connection press and hold B key When releasing the key two rotating rectangles appear on the display Within 3 s...

Страница 22: ...light Remove the light cover by unfastening the screws that hold it Extract the lamp from the Support Replace with another of the same type making sure that the two pins are properly inserted in the...

Страница 23: ...a hotte Ne pas laisser les flammes libres forte intensit quand la hotte est en service Toujours r gler les flammes de mani re viter toute sortie lat rale de ces derni res par rapport au fond des marmi...

Страница 24: ...FR 2 4 24 CARACTERISTIQUES Encombrement Min 250mm Min 250mm 1100 MIN 1100 MAX 1410...

Страница 25: ...8 1 Grille orient e Sortie de l Air 10 1 Buse avec clapet 150 mm 16 1 Couvercle filtrant R f Q t Composants pour l installation 7 2 1 2 Brides Fixation Chemin e Sup rieure 11 6 Chevilles 11a 2 Chevil...

Страница 26: ...ation du c t oppos en v rifiant le nivellement Percer des trous de 12 mm en correspondance des points 1 marqu s Percer des trous de 8 mm en correspondance des points 2 marqu s Ins rer les chevilles av...

Страница 27: ...ION ASPIRANTE En cas d installation en version aspirante brancher la hotte la tuyauterie de sortie via un tube ri gide ou flexibleau choix de l installateur branchement avec un tube de 150 Ins rer la...

Страница 28: ...hemin e inf rieure Elargir l g rement les deux bords lat riaux de la Chemin e et les accrocher entre la Chemin e sup rieure et la paroi refermer jusqu la but e Fixer lat ralement la partie inf rieure...

Страница 29: ...me Ces signalisations sont visi bles uniquement quand le moteur est teint Affiche 24 et le point en bas droite clignote quand le mo teur est en marche la fin de la proc dure le signal affich pr c demm...

Страница 30: ...as d utilisation particuli rement intensive R tablissement du signal d alarme Eteint les lumi res et le moteur d aspiration au cas o la fonc tion 24h est active il convient de la d sactiver Appuyer su...

Страница 31: ...rieurement teindre les lumi res et le moteur d aspiration D brancher la hotte du r seau lectrique R tablir le branchement en appuyant sur la touche B L cher la touche et deux rectangles en rotation a...

Страница 32: ...plafonnier en d vissant les vis qui fixent ce dernier Extraire la Lampe du Support Remplacer par une nouvelle lampe poss dant les m mes carac t ristiques en veillant ce que les deux fiches soient cor...

Страница 33: ...geschalteter Haube niemals unbedeckt lassen Die Intensivit t der Flamme ist so zu regulieren dass sie den Topfboden nicht ber ragt Frittierger te m ssen w hrend des Gebrauchs stets beaufsichtigt werde...

Страница 34: ...DE 3 4 34 CHARAKTERISTIKEN Platzbedarf Min 250mm Min 250mm 1100 MIN 1100 MAX 1410...

Страница 35: ...1 Luftleitgitter Luftaustritt 10 1 Flansch mit Ruckstauklappe 150 mm 16 1 Filterdeckel Pos St Montagekomponenten 7 2 1 2 Befestigungsb gel oberer Kaminteil 11 6 D bel 11a 2 D bel SB 12 10 12a 6 Schra...

Страница 36: ...liegenden Seite wiederholen und die Ausrichtung berpr fen Die gekennzeichneten Punkte 1 mit einem Bohrer 12 mm bohren Die gekennzeichneten Punkte 2 mit einem Bohrer 8 mm bohren Die D bel mit dem B gel...

Страница 37: ...UFTVERSION Bei Abluftbetrieb kann die Haube vom Installateur wahlweise mittels Rohr oder Schlauch an die Au en rohrleitung angeschlossen werden Anschlussrohres 150 Den Flansch mit Ruckstauklappe 10 15...

Страница 38: ...Unterer Kaminteil Die beiden seitlichen Schenkel des Kaminteils leicht auseinan derbiegen zwischen dem oberen Kaminteil und der Wand ein h ngen und bis zum Anschlag wieder schlie en Den unteren Teil...

Страница 39: ...en der Taste ein Reset des Alarms ausgel st Derlei Anzeigen sind nur bei abgestelltem Mo tor sichtbar Zeigt 24 an und der Punkt unten rechts blinkt w hrend der Motor in Betrieb ist Nach abgeschlossene...

Страница 40: ...t des Gebrauchs Reset des Alarmsignals Die Beleuchtung und den Absaugmotor abschalten und dann die 24 Stunden Funktion deaktivieren falls diese zuvor aktiv war Die Taste E dr cken bis das Display verl...

Страница 41: ...gshaube von der Netzversorgung trennen Den Anschluss wieder herstellen indem die Taste B gedr ckt wird Bei Loslassen der Taste erscheinen am Display zwei drehende Rechtecke Innerhalb von 3 Sekunden di...

Страница 42: ...ung durch L sen der Schrauben demontie ren Die Lampe aus der Halterung nehmen Die Lampe durch eine gleichwertige ersetzen und bei der Re montage darauf achten da die beiden Steckerstifte vor schriftsm...

Страница 43: ...hoog brandende branders onbedekt onder de wasemkap terwijl deze in werking is Regel de vlammen altijd zo dat ze niet langs de pannen omhoogkomen Controleer frituurpannen tijdens het gebruik de overver...

Страница 44: ...NL 4 4 44 EIGENSCHAPPEN Buitenafmetingen Min 250mm Min 250mm 1100 MIN 1100 MAX 1410...

Страница 45: ...htingrooster luchtuitlaat 10 1 Toom met Klep 150 mm 16 1 Filterdeksel Ref Installatieonderdelen 7 2 1 2 Bevestigingsbeugels Bovenstuk van de Schouw 11 6 Pluggen 11a 2 Pluggen SB 12 10 12a 6 Schroeven...

Страница 46: ...eling aan de andere kant en controleer de uitlijning Boor gaten van 12 mm op de plaats van de getekende punten 1 Boor gaten van 8 mm op de plaats van de getekende punten 2 Plaats de pluggen met de beu...

Страница 47: ...fzuigversie moet u de wasemkap met de uitlaatleiding verbinden door middel van een starre of buigzame leiding van naar keuze van de installateur Leiding van 150 De Toom met Klep 10 150 worden aangebra...

Страница 48: ...van de schouw De twee zijplaten van de schouw enigszins openen ze vastha ken tussen het bovenstuk van de schouw en de wand en ze weer zo ver mogelijk sluiten Bevestig het onderstuk aan de zijkanten aa...

Страница 49: ...ijzingen zijn alleen zichtbaar als de motor uitgeschakeld is 24 wordt weergegeven en de punt rechtsonder knippert terwijl de motor in werking is Na afloop van de procedure gaat de hiervoor weergegeven...

Страница 50: ...f zelfs va ker bij een bijzonder intensief gebruik Reset van het alarmsignaal Doof de verlichting en schakel de zuigmotor uit indien de 24 uren functie actief is schakel dan ook deze uit Druk op toets...

Страница 51: ...l de verlichting en de zuigmotor uit Sluit de wasemkap van het elektriciteitsnet af Sluit de wasemkap opnieuw aan op de netspanning door toets B in te drukken Op het moment dat U deze toets loslaat ve...

Страница 52: ...de plafondverlichting door de bevestigingsschroe ven los te draaien Trek de lamp uit de houder Vervang de lamp door een nieuwe lamp metdezelfde eigens chappen en let er hierbij op dat de twee pinnen c...

Страница 53: ......

Страница 54: ......

Страница 55: ......

Страница 56: ...436004919_ver1...

Отзывы: