background image

R9939

PLL Synthesised 3 band mains battery radio

Please read this manual before use

ROBER

TS

Sound for Generations

Содержание R9939

Страница 1: ...R9939 PLL Synthesised 3 band mains battery radio Please read this manual before use ROBERTSSound for Generations ...

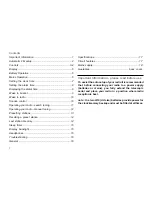
Страница 2: ... station memory 14 Sleep timer 15 Display backlight 15 Headphones 15 Troubleshooting 16 General 16 Contents Specifications 17 Circuit features 17 Mains supply 18 Guarantee back cover Important Information please read before use To assist the auto setup of your radio it is recommended that before connecting your radio to a power supply batteries or mains you fully extend the telescopic aerial and p...

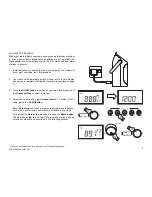
Страница 3: ...dio will automatically switch off and return to time display when setup is complete Setting the clock time is described on page 7 3 Press the On Off button to switch on your radio and press one of the Preset buttons to select a station 4 Adjust the volume using the Volume control To switch off your radio press the On Offbutton Note Auto setup can take 3 4 minutes to complete and is depend ent on t...

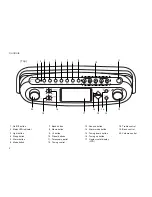
Страница 4: ...op 1 4 8 10 11 12 14 17 19 20 13 Snooze button 14 Alarm mode button 15 Tuning down button 16 Tuning up button 17 Liquid crystal display LCD 15 3 5 6 7 9 16 18 7 Band button 8 Memo button 9 5 button 10 Preset buttons 11 Telescopic aerial 12 Tuning control 18 Treble control 19 Bass control 20 Volume control 2 13 ...

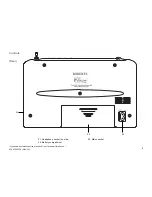
Страница 5: ...If you need any further advice please call our Technical Helpline on 020 8758 0338 Mon Fri 4 Controls Rear 21 Headphone socket on side 22 Battery compartment 22 23 21 23 Mains socket ...

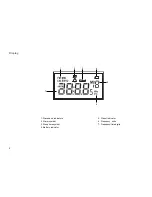
Страница 6: ...5 5 2 3 4 1 6 Display 7 1 Waveband indicators 2 Alarm symbol 3 Sleep time symbol 4 Battery indicator 5 Preset indicator 6 Frequency units 7 Frequency time digits ...

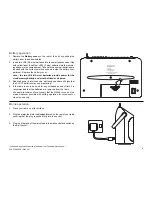
Страница 7: ...ze batteries provide power for the clock memory backup and must be fitted at all times 3 Reduced power distortion and a stuttering sound are all signs that the 4 LR14 batteries may need replacing 4 If the radio is not to be used for any extended period of time it is recommended that the batteries are removed from the radio We would recommend for economy that the R9939 is used on the mains whenever...

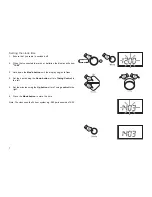
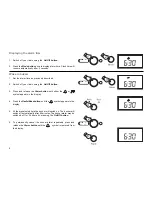
Страница 8: ... 00 3 Hold down the Mode button until the display begins to flash 4 Set the hours using the Down button or turn Tuning Control to the left 5 Set the minutes using the Up button or turn Tuning control to the right 6 Press the Mode button to store the time Note The clock uses the 24 hour system e g 2 00pm is shown as 14 00 3 5 4 6 5 4 1 ...

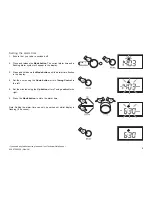
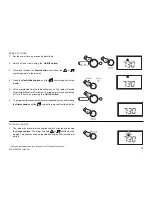
Страница 9: ...hing alarm symbol will appear in the display 3 Press and hold down the Mode button until the alarm time flashes in the display 4 Set the hours using the Down button or turn Tuning Control to the left 5 Set the minutes using the Up button or turn Tuning control to the right 6 Press the Mode button to store the alarm time 2 5 4 6 1 3 5 4 Note Setting the alarm time can only be carried out whilst dis...

Страница 10: ...ress and release the Alarm button until either the or symbol appears in the display 4 Press the Radio Buzz button until the symbol appears in the display 5 At the preselected time the buzzer will switch on The buzzer will switch off automatically after 90 minutes The buzzer alarm may be switched off for 24 hours by pressing the On Off button 6 To permanently cancel the buzzer alarm repeatedly pres...

Страница 11: ...display 5 At the preselected time the radio will switch on The radio will switch off automatically after 90 minutes The radio alarm may be switched off for 24 hours by pressing the On Off button 6 To permanently cancel the radio alarm repeatedly press and release the Alarm button until the symbol is removed from the display 2 3 4 5 6 Snooze control 1 The radio or buzzer alarm can be silenced for 5...

Страница 12: ...r Down buttons or turn the Tuning control left or right until the frequency in the display begins to change rapidly Release the button Your radio will scan the selected waveband stopping each time it finds a station of sufficient strength 4 Adjust the Volume Bass and Treble controls to the required settings 5 To search for additional stations repeat the above procedure Search tuning may be stopped...

Страница 13: ...eband selected will appear in the display On FM fully extend the Telescopic aerial On MW and LW rotate your radio for best reception 3 A single press on either the Tuning or buttons or turn and release the Tuning control to change the frequency up or down The frequency steps are FM 50kHz MW 9kHz and LW 1kHz 4 Adjust the Volume Bass and Treble controls to the required settings 5 Press the On Off bu...

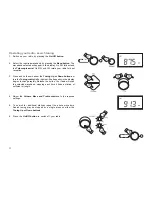
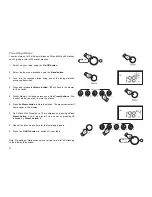
Страница 14: ...for 8 seconds 5 Whilst Memory is flashing press one of the Preset buttons 1 to 5 under which you wish to store the station 6 Press the Memo button to store the station The preset number will now appear in the display 7 On FM and MW Presets 6 to 10 are obtained by pressing 5 and Preset button 1 to 5 e g preset 7 can be set by pressing 5 followed by Preset button 2 8 Repeat the above procedure for t...

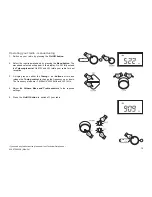
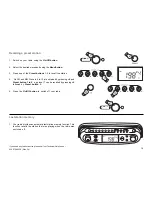
Страница 15: ... the Preset buttons 1 5 to recall the station 4 On FM and MW Presets 6 to 10 are obtained by pressing 5 and Preset button 1 to 5 e g preset 7 can be recalled by pressing 5 followed by Preset button 2 5 Press the On Off button to switch off your radio 14 1 2 3 Last station memory 1 Your radio provides an automatic last station memory function This function recalls the station that was playing when ...

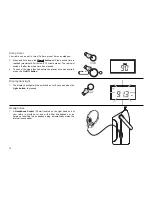
Страница 16: ...hones or an earpiece Inserting the headphone plug automatically mutes the internal loudspeaker Sleep timer Your radio can be set to turn off after a preset time has elapsed 1 Press and hold down the button until the desired time is reached maximum 90 minutes in 10 minute steps The radio will switch off after the sleep time has elapsed 2 To cancel the sleep function before the preset time has expir...

Страница 17: ...in terms of quality and freedom from interference will usually be obtained than on the MW or LW bands Troubleshooting Due to external interference caused by static charges from carpets thunderstorms etc the control electronics of your radio could receive bad information If the display is incomplete or the radio is not responding to control buttons proceed as follows Remove the power supply the mai...

Страница 18: ...ttery Life Approx 40hrs of listening for 4 hours a day at normal volume using alkaline cells Frequency Coverage FM 87 5 108MHz MW 522 1620kHz LW 144 281kHz Circuit Features Loudspeaker 92mm 4ohms Output Power 1W into 4ohms Headphone socket 3 5mm dia Aerial System FM Telescopic aerial MW Built in Ferrite aerial LW Built in Ferrite aerial ...

Страница 19: ...mains plug is cut off remove the fuse and dispose of the plug immediately This will avoid a possible shock hazard by inadvertent connection to the mains supply If this product is not supplied with a mains plug or one has to be fitted then follow the instructions given below IMPORTANT DO NOT make any connection to the larger terminal which is marked with the letter E or by the safety earth symbol o...

Страница 20: ...ntial damage 3 Receivers with removed or defaced serial numbers N B Damaged or broken telescopic aerials will not be replaced under guarantee Procedure Any claim under this guarantee should be made through the dealer from whom the instrument was purchased It is likely that your Roberts dealer will be able to attend to any defect quickly and efficiently but should it be necessary the dealer will re...

Отзывы: