


27
5. Preparing the machine
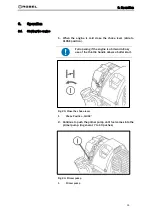
5.2
Checking/adjusting the carburetor setting
NOTICE
Risk of engine damage!
The carburetor has been factory-set for an altitude of 400 m
MSL. If the engine is operated at lower altitude without ad-
justing the carburetor setting, it will show low performance,
tend to overheat and finally even suffer severe damage due
to a mixture which is too lean.
►
Adjust the carburetor setting according to the altitude.
►
Do not change the carburetor setting without reason.
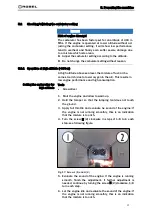
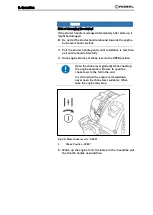
5.2.1
Operation at high altitude (>800 m)
At high altitude above sea level, the mixture of fuel/air be-
comes too rich (due to lower oxygen in the air). This results in
low engine performance and high consumption.
Tools
•
Screwdriver
1.
Start the engine and allow to warm up.
2.
Hold the tamper so that the tamping tool does not touch
the ground.
3.
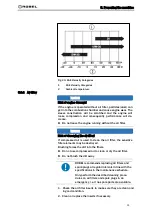
Apply full throttle and evaluate he sound of the engine: If
the engine is not running smoothly, this is an indication
that the mixture is too rich.
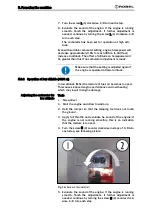
4.
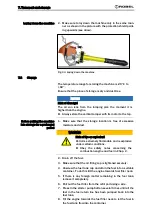
Turn the screw H (2) clockwise in steps of 1/8 turn each
step, see following figure.
Fig. 17: Screw L (1) und H (2)
5.
Evaluate the sound of the engine: If the engine is running
smooth, finish the adjustment. If further adjustment is
needed, continue by turning the screw H (2) clockwise, 1/8
turn each step.
6.
Let the engine idle and evaluate the sound of the engine: If
the engine is not running smoothly, this is an indication
that the mixture is too rich.
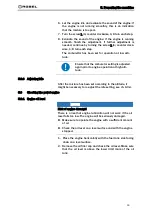
Setting the carburettor for
high altitude
Содержание 62.05L
Страница 1: ...1 Content OPERATING MANUAL ROTAMP LIGHT 62 05L Vers 02 Vertical tamper ...
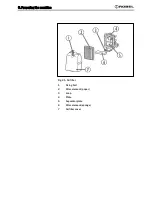
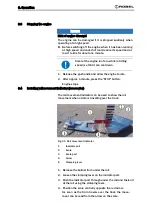
Страница 34: ...5 Preparing the machine 34 Fig 22 Filling the tank 1 Fuel tank cap 2 Fuel upper limit 3 Fuel tank ...
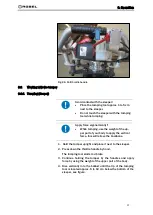
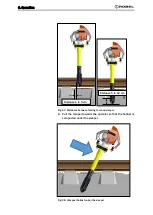
Страница 65: ...65 9 Maintenance Fig 56 Place auxiliary plate on tamping tool Fig 57 Insert injection into auxiliary plate ...
Страница 73: ...73 11 Appendix 11 Appendix Fig 66 EC Declaration of Conformity EC Declaration of Conformity ...
Страница 74: ...Content 目录 1 产品说明书 ROTAMP LIGHT 62 05 L 版本 02 立式捣固机 ...
Страница 79: ...目录 6 ...
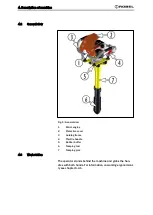
Страница 96: ...4 机器简介 23 4 4 汽油发动机 图 2 汽油发动机 1 反冲起动器手柄 2 燃油箱 3 发动机停止 按钮 4 离心式离合器 5 油门杆 ...
Страница 109: ...5 机器准备 36 图 22 油箱加油 1 油箱盖 2 燃料上限 3 燃油箱 ...
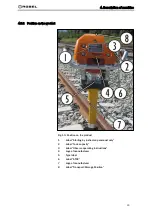
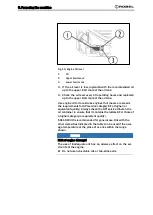
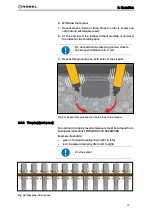
Страница 113: ...6 操作 40 图 27 捣固机具与轨枕间距 5 将捣固机拉向操作人员 以便将道碴压实在轨枕之下 图 28 压实轨枕下的道碴 距离 1 5 厘米 距离 5 10 厘米 ...
Страница 133: ...9 保养维护 60 图 41 燃油管 1 燃油管 1 每年或每 200 个运行小时更换燃油管 2 如果在检查过程中发现任何泄漏 应立即更换燃油管 ...
Страница 140: ...9 保养维护 67 图 51 交货范围 1 注射针管 环氧树脂 2 转接器 3 混合管 4 口罩 5 防护手套 6 辅助板 注意数据表及安全数据表 工具 装置 材料 多用途润滑脂 刷子 纸巾 锉刀 侧铣刀 ...
Страница 141: ...9 保养维护 68 2 在铝管底部 200 毫米处涂上多用途润滑脂 并将其涂在定 心处 用润滑脂作为脱模剂 使铝管不与捣固机具连接 图 52 在铝管和定心处涂上润滑脂 3 擦去多余的多用途润滑脂 图 53 擦去多余的润滑脂 ...
Страница 142: ...9 保养维护 69 4 准备注入 图 54 拆下保护盖 图 55 固定转接器 拧下混合管 缩短混合管 ...
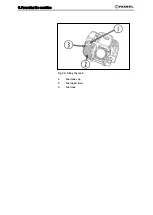
Страница 143: ...9 保养维护 70 5 在捣固机具上放置辅助板 并将注射针管插入辅助板 图 56 将辅助板放置在捣固机具上 图 57 将注射针管插入辅助板 ...
Страница 151: ...11 附录 78 11 附录 图 66 欧共体符合性声明 欧共体符合性声明 ...