background image

28

Rittal cooling unit assembly and operating instructions

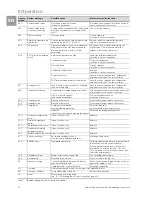
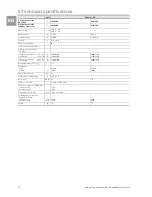
9 Technical specifications

EN

Unit

Model no. SK

e-Comfort controller, 
RAL 7035


3386.540

3387.540

e-Comfort controller, 
stainless steel cover


3386.640

3387.640

Rated voltage

V, Hz

400, 3~, 50/
460, 3~, 60

Rated current

A

3.4/3.4

3.9/3.9

Start-up current

A

8.0/9.0

17.0/19.0

Pre-fuse T

A

6.3 – 10.0

Motor circuit-breaker


Transformer circuit-breaker

Miniature circuit breaker or 
fuse gG (T) 

Useful cooling output Q

k

L 35 L 35

to DIN 3168

L 35 L 50

W
W

3000/3300
2200/2500

4000/4200
3250/3490

Power consumption P

el

L 35 L 35

to DIN 3168

L 35 L 50

W
W

1190/1500
1440/1780

1630/2070
1880/2350

Refrigeration factor 

ε

 = Q

k

/P

el

2.5

Refrigerant
– Type
– Filling

g

R134a
1600

R134a
1800

Admissible pressure

bar

25

Temperature setting range

°C

+20 to +55

Noise level

dB (A) 64

70

Type of connection

Plug-in terminal strip 

Protection category to EN 60 529
– Internal circuit
– External circuit


IP 54
IP 34

Dimensions (W x H x D)

mm

796 x 470 x 580

Air throughputs of the fans 
(unimpeded airflow)
– Internal circuit
– External circuit

m

3

/h

m

3

/h

1280
3450

1420
3870

Weight

kg

70

77

.

.

Содержание SK 3273.xxx

Страница 1: ...xx SK 3273 xxx SK 3382 xxx SK 3383 xxx SK 3384 xxx SK 3385 xxx SK 3386 xxx SK 3387 xxx Montage Installations und Bedienungsanleitung Assembly and operating instructions Manuel d installation et de maintenance Montage en bedieningshandleiding Montage och hanteringsanvisning Istruzioni di montaggio e funzionamento Instrucciones de montaje ...

Страница 2: ......

Страница 3: ...d 10 4 5 3 Three phase devices 11 4 5 4 Door limit switch 11 4 5 5 Notes on the flicker standard 11 4 5 6 Potential equalisation 11 4 6 Carrying out the electrical installation 11 4 6 1 Bus connection only in conjunction with several units with an e Comfort controller 11 4 6 2 Connection X3 for serial interface 11 4 6 3 Installing the power supply 13 4 7 Finalising assembly 15 4 7 1 Installing the...

Страница 4: ...bserve the following safety instructions and other notes in this guide Symbol for an instructed action The bullet point indicates that you should perform an action Safety and other instructions 2 Safety notes Please observe the following general safety instruc tions when assembling and operating the unit Assembly installation and servicing may only be performed by properly trained specialists Do n...

Страница 5: ...oling circuit Fig 2 Cooling circuit In the evaporator coil 1 the liquid coolant is con verted to a gaseous state The energy needed for this purpose is taken from the enclosure air in the form of heat which has the effect of cooling the enclosure air In the compressor 2 the coolant is heavily compressed so that it achieves a higher temperature inside the condenser 3 than the ambi ent air This means...

Страница 6: ...ater is routed out of the unit via a drain pipe at the side or rear for safety reasons For this purpose a hose must be connect ed to the condensate nozzle see 4 4 Connecting the condensate discharge page 10 Condensate hoses are available as accessories refer also to the accessories section in the Rittal Catalogue 3 1 6 Filter mats The cooling unit condenser is finished all over with a dirt repelli...

Страница 7: ...o as to ensure good ventilation Depending on the siting of the unit if several units are installed direct ly adjacent to one another the distance from the wall must be at least 200 mm The cooling unit must be installed and operated in a vertical position maximum deviation 2 The site must be free from excessive dirt and moisture The ambient temperature must not exceed 55 C It must be possible to fi...

Страница 8: ...t and therefore prevent adequate climate control or may even cause the cooling unit s internal safety devices to cease cooling operation Note When using an air duct system care must be taken to ensure that it is laid straight and without kinks wherever possible This mini mises the resistance to the cold airflow It is important to ensure even air circulation inside the enclosure Under no circum sta...

Страница 9: ...xx SK 3383 xxx to SK 3387 xxx Fig 7 Sealing plate underneath the plastic base of the cooling unit Mount the cooling unit on the enclosure roof Screw the supplied twin threaded bolts into the core holes in the plastic base on the underside of the cooling unit with a maximum of 5 Nm Secure the unit using the supplied washers and nuts Fig 8 Roof plate reinforcement for the TS 8 enclosure Accessories ...

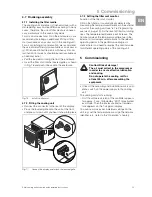
Страница 10: ...end Install the pre fuse specified on the rating plate to protect the cable and equipment from short circuits The mains connection must ensure low noise potential equalisation 4 5 2 Overvoltage protection and supply line load The unit does not have its own overvoltage protec tion Measures must be taken by the operator at the supply end to ensure effective lightning and overvoltage protection The m...

Страница 11: ...e responsible power supply company If there is no way of influ encing the supply impedance and sensitive installed components e g BUS are subjected to interfer ence a line reactor or starting current limiting device should be connected upstream of the cooling unit to restrict the startup current of the cooling unit 4 5 6 Potential equalisation If for EMC reasons the unit is to be integrated into t...

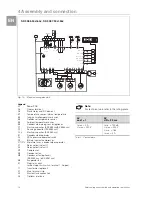
Страница 12: ...ig 12 Connection example Door limit switch and master slave operation Legend 1 Master cooling unit 2 Slave cooling units 3 2 door enclosure with two door limit switches 4 Enclosure with door limit switch X2 CMC I O unit RTT Master Adr 09 X1 X2 X3 X1 X2 X3 X1 X2 X3 X1 X2 X3 X2 X3 X2 X2 X2 X2 X2 X2 St St St Bu St Bu X2 Adr 11 Adr 12 RTT Slave RTT Slave Adr 19 RTT Slave St Bu St Bu 3 2 1 X10 L1 L2 N ...

Страница 13: ...ring plan no 2 Mains S1 A2 Power E1 F11 Term F2 C1 F2 PE T1 M4 M2 M1 X1 NTC E blue NTC I red F12 1 M M M4 M2 M1 1 5 1 S1 3 1 2 3 2 1 3 2 1 L1 5 4 N L2 PE 3 2 1 3 2 1 3 2 1 4 2 2 B2 B1 P X2 X3 K2 K1 B5 B4 B3 2 2 2 NTC C white NTC A yellow Level green 1 2 MS1 Serial 3 8 2 L N A1 Kx 13 12 11 10 14 SK 3359 5xx 6xx SK 3382 5xx 6xx PE PE PE 22 21 SK 3383 5xx 6xx SK 3384 5xx 6xx SK 3385 5xx 6xx Power F3 ...

Страница 14: ...Relay collective fault 1 K2 Relay collective fault 2 M1 Compressor M2 Condenser fan M3 Condenser fan optional SK 3383 xxx to SK 3387 xxx M4 Evaporator fan S1 Door limit switch without door limit switch terminal 1 2 open T1 Transformer optional X1 Main terminal strip X2 Master slave connection X3 Optional interface Tab 2 Contact data Mains S1 A2 Power E1 F11 Term F2 Kx PE A1 M4 M2 M1 X1 NTC E blue ...

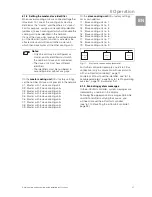
Страница 15: ... display and attach the louvred grille 4 7 3 Setting the filter mat monitor Function of the filter mat monitor Dirt on the filter mat is automatically detected by measuring the temperature difference in the external circuit of the cooling unit see 6 1 6 Programming overview page 19 As the level of filter mat soiling rises the temperature difference will increase The nominal value of the temperatur...

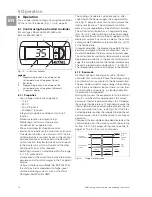
Страница 16: ...e compressor and con denser fan are regulated by the e Comfort controller The e Comfort controller has a 7 segment display Fig 18 no 4 After switching on the power supply the current software version initially appears on this display for approx 2 seconds as well as the activat ed eco mode Followed by a preset option e g t10 or the temperature In regular operation the display shows both the tem per...

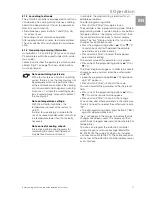
Страница 17: ... to be able to change a value you must enter the authorisation code 22 Keep the programming button C held down until 22 appears Press button 2 Set to confirm the code You can now alter the parameter within the preset limits Press one of the programming buttons C or F until the required value appears Press button 2 Set to confirm the change You can now alter other parameters in the same way There i...

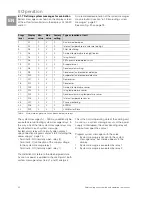
Страница 18: ... in the factory 99 off 3 Ad Master slave identifier 0 19 0 See 6 1 8 Setting the master slave identifier page 21 4 CF Temperature conversion C F 0 1 0 The temperature display can be switched from C 0 to F 1 The corresponding LED displays the current unit of temperature 5 H1 Setting for switching difference hysteresis 2 10 5 The cooling unit is preset in the factory to a switching hysteresis of 5 K...

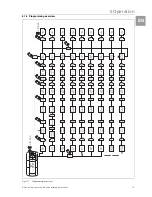
Страница 19: ...6 Operation Rittal cooling unit assembly and operating instructions 19 EN 6 1 6 Programming overview Fig 20 Programming overview 5 sec 5 sec ...

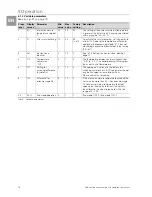
Страница 20: ...e relays relay 1 and 2 energise This is the normal operating state of the cooling unit As soon as a system message occurs or the power supply is interrupted the corresponding relay will drop out and open the contact Program system messages with the value 0 System message is not sent to the system message relay but merely appears in the display 1 System message is evaluated by relay 1 2 System mess...

Страница 21: ...9 Master with 9 slave cooling units On the slave cooling unit 00 factory setting set its own address 11 Slave cooling unit no 1 12 Slave cooling unit no 2 13 Slave cooling unit no 3 14 Slave cooling unit no 4 15 Slave cooling unit no 5 16 Slave cooling unit no 6 17 Slave cooling unit no 7 18 Slave cooling unit no 8 19 Slave cooling unit no 9 Fig 21 Master slave connection example For further conne...

Страница 22: ... reset the e Comfort controller A08 Condensate warning Condensate discharge kinked or blocked Check condensate discharge repair any kinks or blockages in the hose as necessary Only in units with optional condensate evaporation Check the evaporation unit exchange if necessary A09 Condenser fan Blocked or defective Clear the blockage replace if necessary A10 Evaporator fan Blocked or defective Clear...

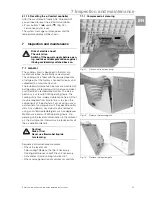
Страница 23: ...hus largely maintenance free All that may be required from time to time is to clean the components of the external air circuit using a vacu um cleaner or compressed air if they become visibly dirty Any stubborn oily stains may be removed using a non flammable detergent such as degreaser Maintenance interval 2000 operating hours De pending on the level of contamination in the ambient air the mainte...

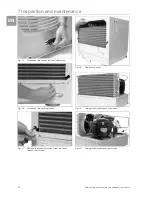
Страница 24: ...aintenance EN Fig 25 Disconnect the connector from the display Fig 26 Disconnect the earthing cable Fig 27 Remove the assembly screws from the cover loosen four screws Fig 28 Remove the cover Fig 29 Cooing unit without cover front view Fig 30 Cooing unit without cover rear view ...

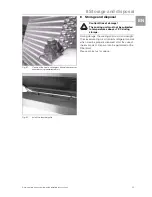
Страница 25: ...louvred grille 8 Storage and disposal During storage the cooling unit must stand upright The closed cooling circuit contains refrigerant and oil which must be properly disposed of for the sake of the environment Disposal can be performed at the Rittal plant Please contact us for advice Caution Risk of damage The cooling unit must not be subjected to temperatures above 70 C during storage ...

Страница 26: ...9 0 18 4 18 0 5 4 5 2 8 8 10 1 14 4 15 8 4 6 5 7 Pre fuse T A 10 0 6 3 10 0 6 3 10 0 10 0 11 0 16 0 6 3 10 0 10 0 11 0 16 0 6 3 10 0 Motor circuit breaker Transformer circuit breaker 䡲 䡲 䡲 䡲 䡲 䡲 Miniature circuit breaker or fuse gG T 䡲 䡲 䡲 Useful cooling output Qk L 35 L 35 to DIN 3168 L 35 L 50 W W 500 586 373 429 750 625 304 368 1000 1088 709 807 Power consumption Pel L 35 L 35 to DIN 3168 L 35 ...

Страница 27: ...former circuit breaker 䡲 䡲 䡲 䡲 䡲 Miniature circuit breaker or fuse gG T 䡲 䡲 䡲 Useful cooling output Qk L 35 L 35 to DIN 3168 L 35 L 50 W W 1100 1200 850 870 1500 1637 1207 1308 2000 2030 1454 1547 2000 2140 1409 1511 Power consumption Pel L 35 L 35 to DIN 3168 L 35 L 50 W W 760 780 830 970 970 810 860 1010 641 743 741 857 666 757 775 899 970 1155 1081 1511 1020 1235 1141 1310 Refrigeration factor ...

Страница 28: ...ling output Qk L 35 L 35 to DIN 3168 L 35 L 50 W W 3000 3300 2200 2500 4000 4200 3250 3490 Power consumption Pel L 35 L 35 to DIN 3168 L 35 L 50 W W 1190 1500 1440 1780 1630 2070 1880 2350 Refrigeration factor ε Qk Pel 2 5 Refrigerant Type Filling g R134a 1600 R134a 1800 Admissible pressure bar 25 Temperature setting range C 20 to 55 Noise level dB A 64 70 Type of connection Plug in terminal strip...

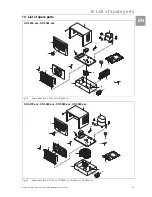
Страница 29: ...g 34 Spare parts for SK 3359 xxx SK 3382 xxx Fig 35 Spare parts for SK 3273 xxx SK 3383 xxx SK 3384 xxx SK 3385 xxx 101 102 100 71 45 55 25 5 10 10 95 95 70 70 40 75 30 80 15 20 1 90 SK 3359 xxx SK 3382 xxx 101 15 95 25 20 45 55 100 75 30 90 5 71 1 10 70 80 40 102 SK 3273 xxx SK 3383 xxx SK 3384 xxx SK 3385 xxx ...

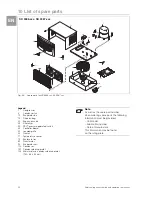
Страница 30: ...xpansion valve 25 Filter dryer 30 PSAH pressure operated switch 40 Controller board 45 Louvred grille 55 Display 71 Temperature sensor 75 Enclosure tray 80 Transformer 90 Evaporator coil 100 Condenser 101 Condensate evaporator 102 Miniature fuse condensate evaporator T4A 6 3 x 32 mm Note As well as the spare part number when ordering spare parts the following information must be provided Unit mode...

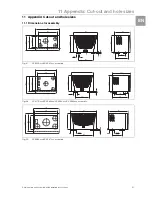
Страница 31: ... Dimensions for assembly Fig 37 SK 3359 xxx SK 3382 xxx assembly Fig 38 SK 3273 xxx SK 3383 xxx SK 3384 xxx SK 3385 xxx assembly Fig 39 SK 3386 xxx SK 3387 xxx assembly 375 415 326 170 597 415 365 Ø 80 30 475 260 326 375 597 475 415 420 280 597 415 380 Ø 100 27 490 597 420 390 475 580 520 392 796 692 470 796 538 Ø 150 38 5 580 238 Ø 150 ...

Страница 32: ...no A4491300SK23 䡲 Enclosures 䡲 Power Distribution 䡲 Climate Control 䡲 IT Infrastructure 䡲 Software Services RITTAL GmbH Co KG Postfach 1662 䡠 D 35726 Herborn Phone 49 0 2772 505 0 䡠 Fax 49 0 2772 505 2319 E mail info rittal de 䡠 www rittal com ...

Отзывы: