background image

Before Starting to Use

Originals

18

Originals

Size and Weight Restrictions

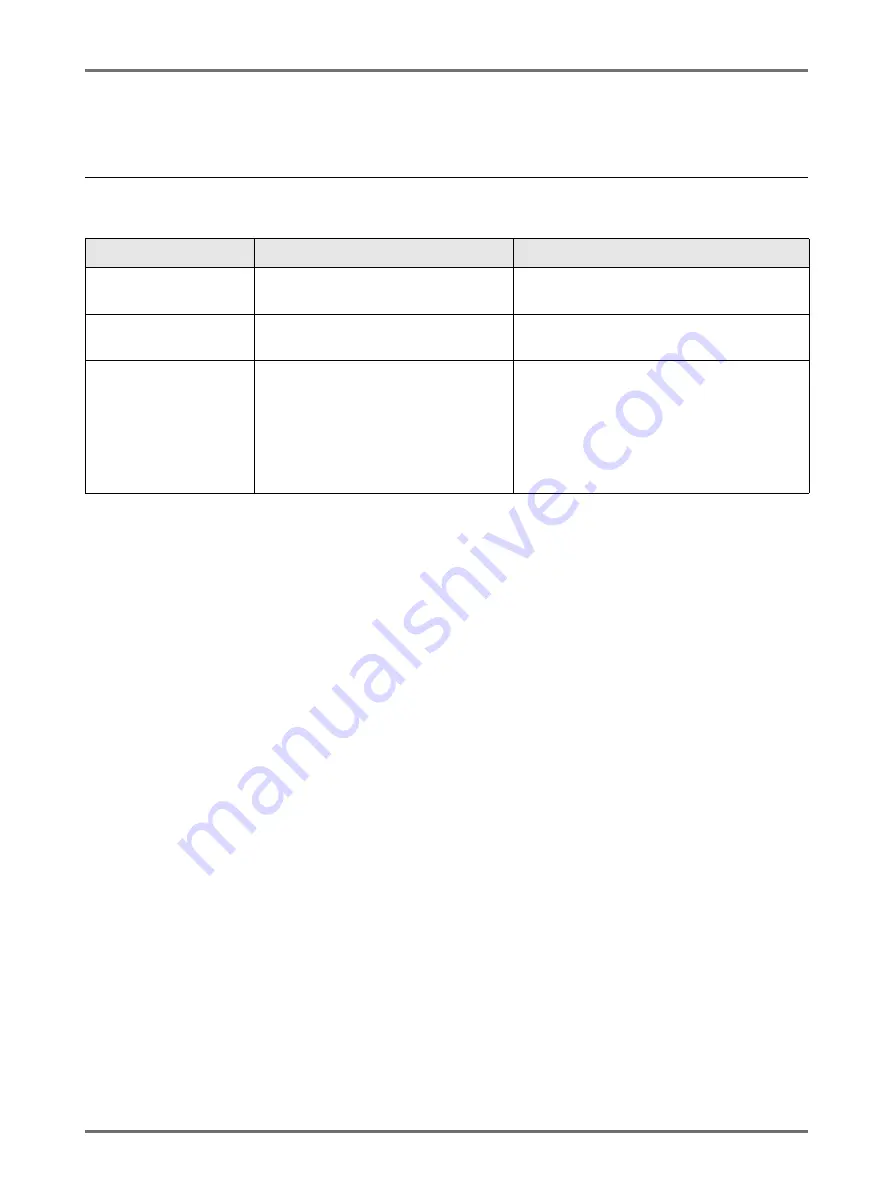
Usable originals are as follows.

* The paper weight limit differs depending on which sides of the original are scanned. Scanning sides can be speci-

fied using “Scanning Side -ADF”.  

)

p.156

• Originals are scanned according to the size of paper placed on the Paper Feed Tray when masters are made. Posi-

tion the Feed Tray Paper Guides to the same width as the original.
When the paper placed is smaller than the original, the entire original will not be scanned.
When the placed paper is larger than an original, dirt on the glass or shade of the original, may result in unexpected 
dirt in the area beyond the size of the original.

• Bound originals can also be used on the Glass Platen.
• You can automatically feed up to 50 original sheets 80 g/m

2

 (21-lb bond) when using the optional ADF (Auto Doc-

ument Feeder) unit. 

Note:

• Use the Glass Platen when printing the following originals:

– Patched or worn originals
– Wrinkled, curled, folded, or torn originals
– Transparent originals (such as tracing paper or OHP transparencies)
– Chemically treated originals (such as thermal or carbon paper)
– Originals with correction fluid or glue
– Extremely thin originals

Using the optional Auto Document Feeder AF-VI:II: less than 50 g/m

2

 (13-lb bond)

Using the optional Auto Document Feeder DX-1: 
less than 40 g/m

2

 (11-lb bond) (Front Side -> Simplex) / less than 52 g/m

2

 (14-lb bond) (Duplex -> Simplex)

– Extremely thick originals

Using the optional Auto Document Feeder AF-VI:II: greater than 128 g/m

2

 (34-lb bond) 

Using the optional Auto Document Feeder DX-1: 
 greater than 128 g/m

2

 (34-lb bond) (Front Side -> Simplex) / greater than 105 g/m

2

 (28-lb bond) (Duplex -> Sim-

plex)

– Heavy drawing paper
– Originals with staples or clips

• If an original is wrinkled, curled, or creased flatten it thoroughly so that the originals can be pressed directly onto 

the Glass Platen during processing.

Used Device Name

Size

Weight

Glass Platen

50 mm 

×

 90 mm to 310 mm 

×

 432 mm 

(1

31

/

32

×

 3

17

/

32

" to 12

7

/

32

×

 17")

Max. 10 kg (22 lb)

Document Feeder AF-
VI:II (Option)

100 mm 

×

 148 mm to 310 mm 

×

 432 mm 

(3

15

/

16

×

 5

13

/

16

" to 12

7

/

32

×

 17")

50 g/m

2

 to 128 g/m

2


(13-lb bond to 34-lb bond)

Document Feeder DX-1 
(Option)

105 mm 

×

 128 mm  to  297 mm 

×

 432 mm 

(4

1

/

8

×

 5

1

/

32

" to 11

11

/

16

×

 17")

The weight differs depending on the setting 
on the scanning side.

<Front Side -> Simplex>

*

40 g/m

2

 to 128 g/m

2

 (11-lb bond to 34-lb bond)

<Back Side -> Simplex or Duplex -> 
Simplex>

52 g/m

2

 to 105 g/m

2

 (14-lb bond to 28-lb bond)

Содержание SE 9380

Страница 1: ......

Страница 2: ......

Страница 3: ...urself with the printing machine is a registered trademark of RISO KAGAKU CORPORATION in Japan and other countries is a trademark of RISO KAGAKU CORPORATION is a trademark of RISO KAGAKU CORPORATION A...

Страница 4: ...nnection with a Computer 14 Connection Method 14 Software Installation 15 Paper Recommendations 16 Size and Weight Restrictions 16 Tips for Better Paper Feeding 17 Storing Environment 17 Originals 18...

Страница 5: ...Changed Aspect Ration Free 63 Enlarging and Reducing with the Zoom Function Zoom 64 Using Custom Sized Paper Paper 65 Automatic Printing Auto Process 66 Processing Photos with Dot Screen Dot Process 6...

Страница 6: ...9 Making changes to Special Paper Ctrl Setting 110 Clearing Special Paper Ctrl Settings 111 Adjusting the Auto control Stacking Tray when using the optional Auto control Stacking Tray Receive Tray 112...

Страница 7: ...ing Default Settings Admin 166 Configurable Functions 166 Customizing the Default Settings 173 Setting Up Direct Access Area and Selections Tab DirectAccess Entry Selections Entry 176 Registering a Cu...

Страница 8: ...g the Print Drum Cylinder 213 Disposal of Depleted Consumables 214 Maintenance 216 Cleaning 216 Thermal Print Head 217 Glass Platen and Platen Cover Pad 217 Scanner Glass and White Sheet of ADF unit O...

Страница 9: ...ns basic printer operations handy tips and how to set up the high speed print function It also contains user cautions information on storing and changing consumables and troubleshooting procedures RIS...

Страница 10: ...tion could cause injury or damage to property Important Indicates items that require special attention or that are prohibited actions Read carefully and follow the directions as instructed Note Gives...

Страница 11: ...wings or lightly printed doc uments Touch Photo Duo or Pencil to select more detailed settings A4 Line Black Page A4 Basic Selections Functions Admin Contrast Auto Size Paper Idle Multi Up Print D Fee...

Страница 12: ...e machine in the locations listed below Failure to observe this precaution may lead to machine failure Locations with exposure to direct sunlight such as locations close to windows Curtain all windows...

Страница 13: ...result in fire Important Check the power cord and plug for poor connections Plug the power cord securely into a nearby electrical outlet Be sure to turn off the POWER switch when connecting or discon...

Страница 14: ...c shock Never stick your hands or fingers in the openings of the machine during operation Keep loose clothing or long hair away from moving parts to avoid becoming entangled Do not place heavy objects...

Страница 15: ...ridge or the inside of Master Core Store consumables such as Master Roll and Ink properly Do not store the consumables in the following places Locations that are subject to direct sunlight or bright l...

Страница 16: ...Important Before connecting the USB turn on the machine and computer and wait until the initial screen is displayed The maximum allowable voltage for USB connector input and output is 5 V For the USB...

Страница 17: ...RISO Printers only Before setup be sure to read the User s Guide carefully The User s Guide can be found as a PDF file in the CD ROM which came with the RISO Printer To be able to view PDF format file...

Страница 18: ...ter than 210 g m2 110 lb index Wrinkled curled folded or torn paper Chemically treated or coated paper such as thermal or carbon paper Paper having a sticky section or holes such as an envelope and la...

Страница 19: ...f folds If curled paper is unavoidable place the printing paper so that the curl faces down Paper may stick to the Print Drum Cylinder surface if the top margin is too narrow on the original or if the...

Страница 20: ...rmal or carbon paper Originals with correction fluid or glue Extremely thin originals Using the optional Auto Document Feeder AF VI II less than 50 g m2 13 lb bond Using the optional Auto Document Fee...

Страница 21: ...of the size of the original the printing area is decided by the paper size set in the Paper Feed Tray The printing area is the printing paper size excluding the margins shown in the figure below The...

Страница 22: ...paper in use 4 Paper Feed Tray p 34 Load print paper on this tray 5 Feed Tray Paper Guides p 34 Hold and guide paper Slide to fit to the sides of paper 6 Platen Cover Opened and closed when placing th...

Страница 23: ...er 24 Receiving Tray Paper Guides p 37 Aligns the printed paper neatly Slide according to the width of paper to be printed 25 Paper Stopper p 37 Slide to adjust to the length of print paper size 26 Pa...

Страница 24: ...ing Tray Press the Opening Button to open the Receiving Tray Paper Guides Stopper so that paper can be removed During standby when the Auto control Stacking Tray is empty Press the Opening Button to m...

Страница 25: ...ADF unit 3 ADF Original Guides Slide and adjust to the width of the originals to hold them together Auto Document Feeder DX 1 The Feeder can hold approximately 50 original sheets 80 g m2 21 lb bond p...

Страница 26: ...ed printing 7 C Key Cancels the entered numerical values or resets the counter to 0 8 Print Quantity Keys 0 to 9 Keys Use to enter the number of copies or the numerical val ues for various settings 9...

Страница 27: ...so use this key to log out from the machine 18 Auto Process Key p 66 Performs non stop operation from master making through printing When activated the indicator besides the key lights up 19 Print Key...

Страница 28: ...Start Up Screen on the Admin Screen Initial screen settings You can select Mode Screen RISO Print or Scanning as the initial screen to best suit your needs Select Display Priority on the Admin Screen...

Страница 29: ...ter Ready to Make Master Selections Basic Functions Admin Renew Page Confiden tial Book Shadow Interval Contrast Adj Job Memory Basic Selections Functions Admin Ready to Make Master Ready to Make Mast...

Страница 30: ...ation that you are going to perform 1 Master Make Scan the original set on the Glass Platen and make a master 2 Printing Print with the master currently on the Print Drum Cylinder Select Printing when...

Страница 31: ...onal Document Storage Card or USB Flash Drive is attached The data in Storage Memory can be edited using Editor functions See Converting Hard copies into Stored Data Scan Mode p 188 for information on...

Страница 32: ...nect the registered USB Flash Drive Con sult your administrator for the PIN Code and the regis tered USB Flash Drive PIN Code Input Screen Registered USB Flash Drive Screen Touch the Mode button on th...

Страница 33: ...ton to make the necessary changes 4 Direct Access Area Up to four buttons can be selected in advance Use this area to store most frequently used functions You can make selections on the Admin Screen p...

Страница 34: ...device is attached Touch to activate Note When no optional device is attached High Speed button is displayed 7 Status Area Displays the current status of the machine This area shows the same informat...

Страница 35: ...er the number of copies to be printed and start printing Printing from a Computer Data Transfer the original data created using a computer to the machine via a network or USB Flash Drive The generated...

Страница 36: ...Feed Tray Pull the Paper Feed Tray to open it until it comes to a rest 3 Load paper 1 Place paper in the printing orientation 2 Slide the Feed Tray Paper Guides to fit to the sides of the paper Then...

Страница 37: ...de 2 Touch MasterMake on the Operation Selection Screen The Master Making Basic Screen appears Note The paper size is automatically detected When the size display shows Custom even if stan dard sized...

Страница 38: ...has been replenished the Paper Feed Tray automatically rises when you press the Key on the Control Panel Important When changing to a different paper size remember to readjust the Receiving Tray Paper...

Страница 39: ...actual paper width 3 Set the Paper Stopper 1 Raise the Paper Stopper 2 Slide to fit the length of the paper 4 Adjust the Paper Arrangers Alignment of paper is affected by sizes and strength of paper A...

Страница 40: ...the printed copies and follow the steps below 1 Slide the Paper Stopper to the edge of the Paper Receiving Tray and fold in 2 Pull up the Paper Arrangers slide the Receiving Tray Paper Guides to the l...

Страница 41: ...can be adjusted on the Touch Panel p 112 Pressing the Receiving Tray Paper Guides Opening Button during printing moves the Receiving Tray Paper Guides for about 1 mm 3 64 outward each time 4 Adjust th...

Страница 42: ...Stack ing Tray Important If any printed copies remain on the Auto control Stack ing Tray press the Receiving Tray Paper Guides Open ing Button to remove them 1 Make sure there is no paper on the Auto...

Страница 43: ...ADF Original Guides with the page width and set originals fully to the rear of the ADF Important If the original is smaller than the paper size that can be set in the ADF unit place the original on t...

Страница 44: ...is read can be specified For details about the settings refer to p 156 Important The placeable original size of 105 mm 128 mm 41 8 51 32 and above Tip Setting Direction direction of text on the origi...

Страница 45: ...Recognition Screen is displayed Follow the message on the screen For details see p 114 The initial screen will be displayed after the user has been identified When the initial screen is displayed Proc...

Страница 46: ...available when the Document Storage Card option is attached Job Separation 4 This setting is available when the Job Separator option is installed Storage Memory 5 p 193 1 This setting is available on...

Страница 47: ...the machine is inactive for a certain period of time it deter mines that the current job is completed even if the actual printing is still under way If another person accidentally initiates another jo...

Страница 48: ...Screen When User Management is set by the adminis trator the users will be asked to identify them selves User identification access if he she is registered or not during operations The user identific...

Страница 49: ...machine an error message will be displayed Connect a registered USB Flash Drive Important After printing is completed press the key to log out before leaving the machine If you do not log out the logg...

Страница 50: ...his machine so that you can print by con necting a USB Flash Drive that stores the data of originals to the machine even if the computer and machine are not connected by a cable Note First install a p...

Страница 51: ...s select one of the following three options for Process in the printer properties dialog box Pause before Master Halts the operation before master making To change settings to change paper and to chan...

Страница 52: ...r p 36 3 Set printing options from your com puter screen Use the printer driver Important Make sure to remove the checkmark from the Collate option in the Print dialog box Note If you are using RISO N...

Страница 53: ...ntering the number of copies from the Print Quantity Keys will override the number speci fied in the Print dialog box For ID Print printing starts with specified Auto Process mode after recognition To...

Страница 54: ...splay the Recognition Screen and follow the message on the screen The timing of the Recognition Screen differs depending on the User Management settings done by the administrator p 171 Note To set the...

Страница 55: ...the USB Flash Drive 4 Make sure the machine is ON Check the Control Panel Note When the power is OFF both the Display and the key are off Turn the power ON p 34 If the key is lit the machine is in th...

Страница 56: ...ings See p 196 for operational details 11 Touch Retrieve The data is retrieved and the following screen appears Note You can change the output directions and stop timing settings on the Master Making...

Страница 57: ...rrent one is damaged without having to receive original data from the computer Note If multiple pages exist only the last page will be processed Rotate can also be specified The confirmation screen fo...

Страница 58: ...Clear All 1 Touch Clear All 2 Touch OK Clears current job Starts processing next data in queue Document_1 doc Owner RISO Date Time Nov25 XX 05 30 Format A4 Ready to Make Master Ready to Make Master B...

Страница 59: ...cally prints Pause before Master The operation stops before making a master Pause before Print After a master is made and a proof copy is printed the operation stops Auto process OFF Stops before maki...

Страница 60: ...Ready to Make Master Cancel OK Image Line Photo Photo Pencil Duo Standard Standard Group Portrait Image Type Image Detailed settings Description Photo Standard Select this setting for photos other th...

Страница 61: ...e Processing mode is updated Note Some functions are not available in certain Image Processing mode settings available not available In Line mode when Contrast is set to Auto the background color of t...

Страница 62: ...nly when Image Processing mode has been set to Line p 58 Note Default Scanning Contrast can be set on the Admin Screen p 167 1 Touch Contrast on the Master Mak ing Basic Screen 2 Touch the desired con...

Страница 63: ...m and left right of the original can be magnified or reduced and printed as desired Specify the zoom ratio between 50 and 200 in increments of 1 Zoom Allows you to specify numerical resize ratio Speci...

Страница 64: ...before printing Important The Margin setting is not available when Auto Zoom or Free is selected Note Standard Ratio and Margin can be selected at the same time The Current field will indi cate the co...

Страница 65: ...in increments of 1 Note Print Quantity Keys can also be used to enter numbers Press the key to restore the original size 100 4 Touch OK Returns to the Master Making Basic Screen Size is updated B4 Lin...

Страница 66: ...of 1 Note Print Quantity Keys can also be used to enter numbers Press the key to restore the original size 100 4 Touch OK Returns to the Master Making Basic Screen Size is updated B4 Line Black Page...

Страница 67: ...istered on the Admin Screen Failure to do so may make an incomplete master p 178 1 Touch Paper on the Master Making Basic Screen 2 Touch the desired paper size Important Previously recorded custom pap...

Страница 68: ...mpleted Print Quantity will restore the number originally entered On the Admin Screen you can make such a setting that Auto Process is always set to ON when you reset or start the machine p 168 Press...

Страница 69: ...or Pencil Dot Process cannot be used 1 Touch Dot Process on the Func tions Screen 2 Select a dot pattern Note Touch OFF to cancel the Dot Process 3 Touch OK Returns to the Functions Screen Dot Process...

Страница 70: ...ter Lightens dark sections Use this setting if the entire photo is underex posed and the target subject of the photo is ill defined Darker Clarifies lighter portions Use this setting if the entire pho...

Страница 71: ...nt buttons Lights Adjusts the portion of the picture most exposed to light Shadows Adjusts the portion of the picture least exposed to light Use 1 or 1 to strengthen or weaken each respectively 3 Touc...

Страница 72: ...ving is selected p 60 p 99 Touch Ink Saving on the Functions Screen Ink Saving is set Ink Saving will appear in the message area Note Ink Saving is a useful function for master making Even if this fun...

Страница 73: ...times Multiple Original Multiple originals are printed multiple times Multi Up Tickets You can print multiple long thin custom originals such as tickets Single Original and Multiple Original can prin...

Страница 74: ...nal Note When Multiple Original is used in Multi Up Print the actual number of pages to be scanned is specified In the case that the actual number of pages in the document is less than the number of p...

Страница 75: ...on one sheet of paper Up to 4 originals can be scanned 16 Up 16 on 1 Prints 16 images of the original on one sheet of paper Up to 4 originals can be scanned Glass Platen Single original For multiple o...

Страница 76: ...ning p 19 Note A margin on the top edge will remain regardless of the enlargement or reduction settings Orientation of Print Paper Always place paper in the Feed Tray as shown below Multi Up Interval...

Страница 77: ...en 2 Touch 2 Up on the Functions Screen 3 Make necessary settings Afterwards perform the same operation as the normal master making and printing process The reproduction size needs to be set according...

Страница 78: ...same as the original and touch Next Reproduction Size is set automatically and Multi Up Print screen is displayed 4 Touch Single for Single Original touch Multiple for Multiple Original 5 Touch the bu...

Страница 79: ...al to be loaded Set the next original and press Press to cancel the Multi Up Print mode The Glass Platen and the optional ADF unit cannot be used at the same time If using the Glass Platen to scan the...

Страница 80: ...Set the original and print paper Place the original on the Glass Platen Important Pay attention to the orientation of the original Make sure to load paper as shown below 2 Touch Multi Up Print on the...

Страница 81: ...igger size does not exceed the specified Page Width or the short edges of the print paper When magnifying make sure to prepare paper that fits the enlarged size 7 Touch OK Returns to the Functions Scr...

Страница 82: ...original to use Important The reproduction size is determined from the page size and printing paper size When the reproduction size is not appropriate an error message is displayed In such case use a...

Страница 83: ...on that allows the characters on the original to be read Ex Number of images 8UP Original orientation orientation of characters on the original Align Side Note Depending on the Number of images and Or...

Страница 84: ...ouch Next The reproduction size is automatically set and the Layout Screen is displayed 4 Touch the button for the number of images to set Touch the button for the number of images to be laid out and...

Страница 85: ...n scanned If the original has less pages than the set number of pages touch Yes after all of the original has been scanned The unscanned part becomes blank When original scanning is complete a master...

Страница 86: ...s set to Auto the following image areas are also erased or half toned A continuous black image area non white from the edge of the original A continuous black image area from the center of the origina...

Страница 87: ...ly select Auto If you set Erasure Width to Auto original detection is performed automatically and the erasure width is calculated from the detected size If you specify the erasure width original detec...

Страница 88: ...ouch OK Returns to the Functions Screen Book Shadow setting is updated Note When Page split is set the original is scanned twice In this case B is printed first Important When Page split is set use A4...

Страница 89: ...function cannot be used with Multi Up Print or 2 Up 1 Place an original Place the original face down on the Glass Platen Align center on the top edge and close Platen Cover p 41 2 Touch Top Margin on...

Страница 90: ...to the Paper Receiving Tray The binding margin can be set to either the Top Bottom Right and Left of printed copies When auto reproduction is set move the image to where it should appear after the ma...

Страница 91: ...ion the image with out a Shift designated for the Margin mode becomes the print image and the size is reduced around the center of the print image so that the original is completely printed within the...

Страница 92: ...d the printing paper first p 16 Maximum printing area SE9480 291 mm 425 mm 1115 32 1623 32 SE9380 291 mm 413 mm 1115 32 161 4 Important The 5 mm 3 16 margin on the top cannot be scanned even in the Ma...

Страница 93: ...ake a mas ter When this function is used for the original data of a wide range of solid colors on the top side you can prevent paper jams After the machine receives the original data touch Rotate on t...

Страница 94: ...orarily stops to display the preview Scan Mode When setting functions master making functions related to Scanning setting from Functions After Scanning the Original There is no Auto Process in scan mo...

Страница 95: ...on The image moves in the direction of the displayed arrow Checking and Printing the Preview Display The operational procedures for Printing from the Original Document are explained below 1 Place an o...

Страница 96: ...ck the preview image 6 Touch Continue A master is created After this please follow the same operations for normally making a master Note Touching Cancel will cancel the image returning to the Master M...

Страница 97: ...Functions for Master Making Checking the Print Image Prior to Making Master Preview 95...

Страница 98: ...actory default is level 3 approximately 100 sheets minute p 167 When ECO mode is set the default print speed is 3 You can adjust the print speed when the ECO mode is set p 167 Print Speed p 167 Print...

Страница 99: ...1 to 5 until the internal temperature of the machine is higher than 15 C 59 F The time it takes for the internal temperature to rise depends upon the machine environ ment Touch High Speed on the Prin...

Страница 100: ...ng Silent mode reduces the print speed Print Speed 1 Note To cancel Silent mode during printing touch Silent to return to the previous speed The Print Speed Adjustment Keys on the Control Panel can al...

Страница 101: ...g is selected p 70 Note The default print density can be set on the Admin Screen The factory default is set at level 3 Standard p 167 When ECO mode is set the default print density is 1 The print dens...

Страница 102: ...wnward in steps of about 0 5 mm 1 64 2 Key Press the key to move the print image about 0 5 mm 1 64 to the left on the paper 3 Key Each press shifts the print position upward in steps of about 0 5 mm 1...

Страница 103: ...settings please contact your dealer or authorized service representative When Fine Adjust Mode is available the button Fine Adjust Mode is displayed on the Functions Screen Touch Fine Adjust Mode to...

Страница 104: ...stments to the print position or density check the print quality in a proof copy Proof copies are not counted towards the number of copies displayed on the Print Quantity Display Note The machine will...

Страница 105: ...en when one sheet of paper is properly supplied In the following instances please set D Feed Check to OFF When a multi feed detection message is occasionally displayed even though no multi feed has oc...

Страница 106: ...t Quantity Keys can also be used to enter numbers If you are using extended paper and set the Print Drum Cylinder skip rotation to an odd number the actual skip rotation is the Set Number 1 p 180 4 To...

Страница 107: ...or CARD Special Paper Ctrl You can save settings for easy retrieval next time The Special Paper Ctrl menu contains the following options Paper Feed Adj Adjust Paper Feed Tray position and paper feed a...

Страница 108: ...Printing Types Jump Wing Control Special Paper Ctrl 106 Setting the Jump Wing Control Jump Wing Control Touch Jump Wing Control on the Func tions Screen Jump Wing Control is selected Jump Wing Control...

Страница 109: ...Paper Ctrl S Tray Upper Limit Paper Feed Amount Auto Auto Revise Entry Call Paper Feed Adj Air Blow Separation Fan ON 2 Paper Eject Adj Pre suction Fan Suction Fan OFF 4 Close Special Paper Ctrl S Tra...

Страница 110: ...press key on the control panel 7 Touch Rename 8 Touch the button to rename Unregistered buttons are grayed out and are not available 9 Touch character buttons to enter a new name Change capitalizatio...

Страница 111: ...s to the Functions Screen and the settings are updated After this follow the same operations for normal printing 4 4 P Basic Selections Functions Admin Select Print Quantity Auto Page Renewal Special...

Страница 112: ...Special Paper Ctrl S Tray Upper Limit Paper Feed Amount Auto Auto Revise Entry Call Paper Feed Adj Air Blow Separation Fan ON 2 Paper Eject Adj Pre suction Fan Suction Fan OFF 4 Close Parameter List...

Страница 113: ...Feed Amount 1 2 Revise Entry Call Paper Feed Adj Air Blow Separation Fan ON 2 Paper Eject Adj Pre suction Fan Suction Fan OFF 4 Close Parameter List A 1 A 4 Poster A 5 A 3 A 6 Register Retrieve Renam...

Страница 114: ...be effective after paper size is set Touch Auto to reset both Side and End to the default value of 0 mm 0 and reacti vate automatic adjustment Note The Receiving Tray Paper Guides side can be widened...

Страница 115: ...control Stacking Tray Wider Outwards on the Auto control Stacking Tray Button Activated component Direction Close Special Paper Ctrl S Tray Upper Limit Paper Feed Amount Auto Auto Revise Entry Call Pa...

Страница 116: ...t function and how to make those settings set by the Administrator Feature Management Level High Full Management Mid ID Print Only Low Admin tab Only ID Counter Report for managing the number of print...

Страница 117: ...egistered in User Management administrator user registration included and return to the factory settings Important If the Recognized by setting is changed all settings in User Management including the...

Страница 118: ...Drive and a user registration number ID Rename Group User groups can be set Limit The upper limit of the copies masters can be set Disable User identification access can be enabled or disabled Regist...

Страница 119: ...mode 2 Touch OK Skip to step 4 if the administrator is not registered If the administrator is already registered the Rec ognition Screen is displayed here See step 3 3 Identify the administrator When...

Страница 120: ...by 6 Touch the button to select the Rec ognized by option Note If you touch OFF Delete all settings set in User Management will be deleted and returned to the factory settings 7 Touch OK Returns to th...

Страница 121: ...n and Identification System p 117 2 Touch Management Level 3 Touch the button to select the Man agement Level option See p 114 for details about Management Level options 4 Touch OK Returns to the User...

Страница 122: ...from the printer driver Basic operation for registering administrator users 1 Display the User Management Screen Follow steps 1 to 4 in Selecting Recognition and Identification System p 117 Important...

Страница 123: ...antity Keys Up to 8 digits can be input Press the key to clear the PIN Code When Recognized by is set to USB Flash Drive Connect the registered USB Flash Drive to the USB slot The number that identifi...

Страница 124: ...can continue registering users and renaming groups if needed To close the User Management settings touch Close on the User Management Screen to return to the Admin Screen Enter the User Name 1 Touch R...

Страница 125: ...the group that you have set Setting the Upper Limit of the User s Usage Set the upper limit of the number of copies masters Up to 99 999 999 can be set The present copy count and master count can also...

Страница 126: ...entification access Touch Disable on the Register Screen to turn it ON User identification access is disabled and the user can not use the machine Note To inactivate Disable touch Disable to turn it O...

Страница 127: ...Button to change Registered buttons are displayed with a solid line Unregistered buttons are grayed out and are not available 5 Change various settings Follow steps 4 to 5 in Basic operation for regi...

Страница 128: ...n is cleared it cannot be recovered 3 Touch Clear 4 Touch the User Button to clear Registered buttons are displayed with a solid line Unregistered buttons and 0 Admin button are grayed out and are not...

Страница 129: ...ch the Group button to rename 4 Touch the character buttons to enter a new name Change capitalization by selecting the Small or Capital button p 136 Note You can enter up to 10 characters 5 Touch OK R...

Страница 130: ...nters are cleared they cannot be recovered 1 Display the User Management Screen Follow steps 1 to 4 in Selecting Recognition and Identification System p 117 2 Touch Reset Counter 3 Touch OK Returns to...

Страница 131: ...school Program consists of two types Single and Multiple Important Program is not available when Auto Page Renewal is selected Single Page Mode From a single original document print into multiple gro...

Страница 132: ...original Up to 9999 copies can be made from a single original Each original can reproduce a pre assigned number of sheets up to 20 originals Note This function cannot be used for printing from comput...

Страница 133: ...Note The optional Job Separator is useful for Programed Printing The Job Separator releases a piece of tape after each set or original document thereby automatically separating sets or groups It elim...

Страница 134: ...e 1 Enter the number of copies using the Print Quantity Keys 2 Press the key or the key 3 Enter the number of sets in the group using the Print Quantity Keys 4 Press the key or the key To program more...

Страница 135: ...number press the key and enter again To clear all number of copies and number of sets touch Clear All The total number of all copies to be printed is shown on the top of the screen Important To save t...

Страница 136: ...nce See step 3 in Renaming a Program p 135 Note After saving the Program touch Close on the Program List Screen to return to the Program Screen Touch OK on the Program Screen to print from a saved Pro...

Страница 137: ...Mode Program indi cates Multi Page Mode Program 4 Select a program to rename 5 Touch character buttons to enter a new name Change capitalization by selecting Small or Capital button p 136 Note To del...

Страница 138: ...en The program is renamed Tip Rename Screen Small Capital Note You can enter up to 10 characters Print Quantity Keys may also be used for enter ing numbers button or the key clears previously saved or...

Страница 139: ...Functions Program and then touch Cancel Job on the next screen Cancel ling program printing by pressing the button will reset other settings Ready to Make Master Basic Selections Functions Admin 1 9 P...

Страница 140: ...o be Cleared Job 1 P 07 P 08 P 11 P 12 Program A Program B Program C Pattern A Program X P 09 P 10 Close Clear Rename Retrieve Register Program List Select a Button to be Cleared Job 1 P 07 P 08 P 11...

Страница 141: ...e Setting Up for Programed Printing p 132 for details on how to set up a pro gram 3 Touch Revise 4 Touch OK Returns to the Program Screen Program set tings are updated overwritten Cps Sets Cps Sets To...

Страница 142: ...can be saved to Job Memory MasterMaking Print Available with optional device Image Multi Up Print Print Position Auto Page Renewal Dot Process Layout Paper Feed Adj Scanning Side ADF Contrast Top Marg...

Страница 143: ...ll down to check all items Note To change a setting touch Cancel and start over again Return to step 1 5 Touch OK Returns to the Job Memory Screen Settings are updated Each job memory can be named for...

Страница 144: ...ss the key 5 When entered touch OK Returns to the Job Memory Screen The name is updated Dot Process Contrast Adj Tone Curve Basic Selections Functions Admin Ready to Make Master P Program Book Shadow...

Страница 145: ...Advanced Features Using Job Memory Functions Job Memory 143 6 Touch Close Returns to the Functions Screen Select a Button Name to be Changed Close Job Memory Register Retrieve Rename Rename Clear...

Страница 146: ...ieved using the Print Quantity Keys M 1 to 9 to M 10 4 Confirm the settings and touch OK Returns to the Functions Screen Ready to print using the retrieved job settings Continue with the normal printi...

Страница 147: ...ory 145 Tip Quick Retrieval A job setting can be retrieved via hardware keys without touching the Touch Screen For example to retrieve and print job M 2 press the key in that order M 2 is retrieved an...

Страница 148: ...ocess Contrast Adj Tone Curve Basic Selections Functions Admin Ready to Make Master P Program Book Shadow 2 Up 1 4 Job Memory Multi Up Print Select a Button to be Cleared Close Job Memory Register Ret...

Страница 149: ...o ON Idling Action is executed using a confidential master use this function when not using the Print Drum Cylinder for extended period of time You can set the machine to remind users to use the Confi...

Страница 150: ...elect from 5 10 or 30 minutes as the Reserve Period on the Admin Screen The factory default is 5 minutes p 169 The following operations do not count towards reservation period When the machine is oper...

Страница 151: ...king a master after a specified period of time since the last print job set Auto Idling on the Admin Screen p 171 1 Touch Idling Action on the Func tions Screen appears on screen 2 Press the key After...

Страница 152: ...age works with data sent from a computer as well However if multiple pages exist only the last page will be processed with Renew Page The Renew Page function is not available in the following conditio...

Страница 153: ...he machine rotates the original 180 degrees for renewing the master while executing Auto Page Renewal To cancel Rotate touch Rotate again 2 Touch OK Renew Page begins reproducing the master Basic Sele...

Страница 154: ...e is pressed When attempting to process the next job with direct print Note The factory settings are such that a master is recreated every 1000 copies with a setting to print 3 proofs This set ting ca...

Страница 155: ...Default Settings CI Select p 168 Note Output reversal is not available in combination with the following functions Program Multiple Preview Overlay Storage Memory 1 Set the original and print paper Pl...

Страница 156: ...t making a master touch No To return to the previous step touch Back 8 Press the key The master making starts from the last page scanned and Print Basic Screen for storage data is displayed 9 Enter th...

Страница 157: ...y turn off the Auto Process key on the Control Panel 2 Place original s in the ADF unit The ADF unit detects the document and automat ically opens the Master Making Basic Screen To place the original...

Страница 158: ...Scans the front side of the original and prints on one side Important If the Top Margin function is used the setting Front Side Sim plex must be used Back Side Simplex Scans the back side of the origi...

Страница 159: ...e top Note In Program Multi Page Mode the first page of the original scanned is displayed as Page01 on the Setup Screen e g With the Back Side Simplex option the last page of the original is displayed...

Страница 160: ...een once more The selected settings buttons are highlighted Ready to Make Master Ready to Make Master Duplex Front Side Simplex Simplex Simplex Simplex Simplex Back Side Scanning Side ADF Cancel OK Fr...

Страница 161: ...d to scan both sides of an original and print on both sides of paper e g Scanning the duplex original for duplex print ing 1 Set the original for duplex printing 2 Select Front Side Simplex for printi...

Страница 162: ...the USB Flash Drive USB Flash Drive must be connected to the USB slot in advance Note By using the RISO Utility Software RISO COPY COUNT VIEWER included on the provided CD ROM the counter data output...

Страница 163: ...n of the desired out put method Returns to the Basic Screen after output If the mail setting is not set E mail is not avail able Consult your dealer or authorized service repre sentative about mail se...

Страница 164: ...s in Febru ary the Reminder Screen is displayed on the last day of the month If you are not setting the reminder date touch OFF 4 Touch OK Returns to the ID Counter Report Screen The reminder date is...

Страница 165: ...top as needed For example to keep a track of the number of prints made in a day set Job Count to 0 in the morning and check the counter at the end of the work day to get the count Note When using more...

Страница 166: ...be registered My Direct Access registered by each user can be displayed after the user has been identified and cannot be changed by other users Note My Direct Access can be set when Management Level i...

Страница 167: ...to display more func tions if necessary To remove a function that is accidentally assigned touch No Entry Functions already assigned are grayed out and are not available Some functions are displayed o...

Страница 168: ...al settings factory default This function can be set only when the option is installed Display Access Button Functions Description Display DirectAccess Entry Store frequently used functions on the Bas...

Страница 169: ...ssing Change the default setting for the image processing mode Line Photo Duo Text and Photo Pencil Scanning Contrast Change the default settings for the scanning contrast Contrast Range Lighter Stand...

Страница 170: ...Paper Ejection Adj Air Blow ON OFF Separation Fan OFF 1 2 3 4 Pre suction Fan ON OFF Suction Fan 1 2 3 4 Default Folder When the optional Document Storage Card is attached change the folder to which d...

Страница 171: ...hen touching Base IP Address touch Cancel and wait for the RISO Network Card to finish starting up approx 1 minute and then try again Margin Plus Rate Specify default size reduction rate for the Margi...

Страница 172: ...Automatically shuts the power off Data cannot be received Energy Saving Mode OFF Auto Sleep Auto Power OFF Waiting Time 1 99 mn factory default is 5 mn Power OFF Schedule Set a time of the day to auto...

Страница 173: ...umber of copies reached the master in use is automatically discarded and a new one is created You can also specify the number of proof copies to make after recreating the master Auto Page Renewal OFF...

Страница 174: ...rs ON Beeps when any key button is pressed Beeps when an event occurs is completed Limited Does not beep when keys buttons are pressed Does not beep when restarting the machine OFF Does not beep OFF L...

Страница 175: ...n the Basic Screen for each mode 2 Touch OK Note When an administrator is registered in User Management the Recognition Screen is dis played Operate the screen to log in as the administra tor If alrea...

Страница 176: ...tions to choose from Touch the function name button to change the value displayed to the right Additional Setup Screen Available Button Style Choosing a button makes it default Additional Setup Screen...

Страница 177: ...See p 193 for details on specifying the data 5 Touch OK Skip to step 6 if there is no additional Setup Screen Note Touch Cancel to cancel the changes and return to the Admin Screen The selected value...

Страница 178: ...with factory default Direct Access area and Selections Screen entries which can be changed Any function available in the Functions Screen can be selected Optional attachment is automatically added to...

Страница 179: ...try Functions already assigned are grayed out and not available for selection Some functions display only when optional devices are installed 5 Touch OK Returns to DirectAccess Entry Screen or Selec t...

Страница 180: ...entered Failure to do so may result in incorrect scanning Entering sizes and changing names 1 Touch Admin on the Basic Screen for each mode 2 Touch OK If the Recognition Screen is displayed follow the...

Страница 181: ...r buttons to enter a new name Change capitalization by selecting Small or Capital button p 136 Note To clear the current name touch button or press the key 11Touch OK when done Note To change a name r...

Страница 182: ...ics or may get smudged with Ink due to its image positioning Consult your dealer or authorized service representative for advice Extended Paper Mode When the machine is on Extended Paper mode it is in...

Страница 183: ...D Feed Check Check Renew Page Ready to Make Master Ready to Make Master OFF Internal CI P 1 5 All Display Default System Editor Custom Paper Entry Irregular Fitter Folder Renaming CI Select Base IP A...

Страница 184: ...ster Disposal Box can be unlocked and removed if the master is jammed in the Disposal Unit or the Master Disposal Box is full Locking the Master Disposal Box To prevent any leak of master documents af...

Страница 185: ...e on the screen See step 2 in Customiz ing Default Settings p 173 3 Touch Protect Protect is turned ON Note When Protect is set to ON Energy Saving Mode Auto Sleep or Auto Power OFF is auto matically...

Страница 186: ...int Drum Cylinder that has been removed without the Confidential operation or the machine goes into the sleep mode after a cer tain period of time has passed after the confirma tion message was displa...

Страница 187: ...Advanced Features Keeping Masters Secure After Printing Protect 185 3 Touch Protect After a Please Wait a Moment message is dis played the Protect setting is canceled...

Страница 188: ...ws Storing data from a hard copy original by using the scanner of the machine Storing original data created on a computer The methods of storing data from a hard copy original and printing the stored...

Страница 189: ...make back up copies of any important documents Note You can easily delete unnecessarily stored data when the remaining free space of the optional Document Storage Card or USB Flash Drive is limited Th...

Страница 190: ...torage function is not available in the machine equipped with the optional RISO IS300 controller The data scanned in the Scan Mode is stored in IS300 Note Delete unnecessary stored data when the remai...

Страница 191: ...n to check data before saving See the previous section for the functions that can be set Important Set Format when scanning custom sized orig inals p 192 5 Press the key The scan starts Note After sca...

Страница 192: ...d enter the file name p 135 4 Touch OK The file name is confirmed and the screen returns to the Scan Basic Screen 2 Specifying a Directory When saving in the USB Flash Drive connect the USB Flash Driv...

Страница 193: ...er Screen Touch the button of the owner to rename The Rename Screen appears 2 Touch the button to delete the current name 3 Enter the Owner name 4 Touch OK The owner name is confirmed and the screen r...

Страница 194: ...onal ADF unit the original size is detected automatically The orig inal is saved by original format 1 Touch Format on the Scan Basic Screen The Format Screen appears 2 Touch the paper size button to b...

Страница 195: ...played See step 2 1 Touch Storage Memory on the Functions Screen The Storage Selection Screen or USB Job List Screen with Non ID Print is displayed The ID Print Job button is displayed on the screen 2...

Страница 196: ...cify output settings See p 196 for operational details Note Touch the Preview when you want to enlarge and confirm the thumbnail 5 Touch Retrieve The data is retrieved and Storage Mode Basic Screen ap...

Страница 197: ...nactive if there is no storage data USB Flash Drive data or only one stored item 2 On the View Edit Screen touch the button of the order you want Note By using ON inverted OFF of File name only the da...

Страница 198: ...Copy Move Copy Move the stored data between the Storage Mem ory and USB Flash Drive From the Storage Retrieve Screen copy move data to the USB Flash Drive From the USB Job List Retrieve Screen copy m...

Страница 199: ...r 1 Place an original Place the original on Glass Platen or in ADF unit option See the Basic Operations chapter for informa tion on placing the original 2 Touch Overlay on the Functions Screen The Sto...

Страница 200: ...en returns to the Functions Screen 6 Make necessary operation to print For subsequent operations see step 6 of Printing from a Paper Document or Book p 43 Tip Overlaying Storage Data The stored data o...

Страница 201: ...rive is explained here 1 Confirm that the USB Flash Drive that will store the data is connected If the USB Flash Drive is not connected connect the USB Flash Drive to the USB slot 2 Touch Storage Memo...

Страница 202: ...ant While processing the data do not remove the USB Flash Drive This will cause data to disap pear and the USB malfunctioning Note When the remaining free space of the USB Flash Drive is limited the f...

Страница 203: ...Storing Original Data and Use Method Copying Moving Stored Data 201...

Страница 204: ...n the Management Level in the User Manage ment is set to High Full Management touch My Counter to display My Counter Screen On the My Counter Screen you can confirm the current user s Limit C C M C an...

Страница 205: ...matching information was correctly retrieved from the consumable normal dis play When matching information is not available gray display When the icon is grayed the remaining amount of master Ink cann...

Страница 206: ...If the indicator is off press the Master Making Unit Release Button to turn it on Important When the Print Drum Cylinder is out Master Making Unit cannot be pulled out Return the Print Drum Cylinder i...

Страница 207: ...e section when removing the shrink wrap If the section is bent or the perforation cut the master will become unusable Do not remove the tape yet 8 Close the Master Roll Holder Remove the tape once the...

Страница 208: ...aster Guide Flap Turn the dial on the edge of the Master Guide Flap towards the rear and raise the Master Guide Flap 2 Pull out the master to the line indicated by the arrow 3 Lower the Master Guide F...

Страница 209: ...eep the power ON while replacing the Ink Cartridge Replace with an Ink Cartridge of the same Ink color If you want to change the Ink color replace the Print Drum Cylinder itself p 211 1 Open the Front...

Страница 210: ...er left of the Print Drum Cylinder 4 Insert the new Ink Cartridge Align the arrow on the Ink Cartridge to the mark on the print drum cylinder unit and insert until it stops 5 Lock the Ink Cartridge Tu...

Страница 211: ...carding the master When Protect is ON you can remove the Master Disposal Box only when the messages such as Master Dis posal Box is Full or Master Jammed in Disposal Unit are displayed p 182 1 Remove...

Страница 212: ...osal Box 210 Important Dispose the ejected masters according to the disposal rule of your local community p 214 Note If necessary slide the lever to the left to lock the Master Disposal Box and also h...

Страница 213: ...um Cylinder case and store horizontally Removing the Print Drum Cylinder 1 Open the Front Cover 2 Check that the indicator of the Print Drum Cylinder Release Button is ON If the indicator is off press...

Страница 214: ...s Replacing the Print Drum Cylinder 212 BCaution Do not touch the connector on the Print Drum Cylinder Neglecting this may result in malfunction of the Print Drum Cylinder because of static electric i...

Страница 215: ...n pushing in the Print Drum Cylinder Tip Changing the Print Drum Cylinder Type When you install a different type of Print Drum Cylinder the Confirm Print Drum Cylinder Type screen appears 1 Select the...

Страница 216: ...ely Because Ink may have adhered to the outlet surface of the Ink Cartridge be careful not to smudge your clothes Master core A metallic component has been attached to the bottom of the end section ha...

Страница 217: ...ables 215 Ejected Master Note It is made of carbon and hydrogen compounds If fully combusted it will turn into water and carbon dioxide Parts Materials Master material plastic Japanese paper Ink mater...

Страница 218: ...f you suspect any dangerous situations or have questions or problems with the machine Contact your service representative before moving the machine Do not allow unauthorized persons to make adjustment...

Страница 219: ...Head is very delicate avoid shocks or scratches with a hard object Since Thermal Print Head is susceptible to damage by static electricity please be sure to remove the static elec tricity charged in...

Страница 220: ...ss and the White Sheet several times with a soft cloth or tissue Important Since the Glass Platen is very delicate avoid shocks or scratches with a hard object For the Auto Document Feeder AF VI II Cl...

Страница 221: ...211 BCaution Be sure to turn OFF power to the machine when cleaning the Pressure Roller When you insert a hand inside the machine be careful not to touch the paper separation hook or master removal ho...

Страница 222: ...nt use one recommended by your authorized service representative Important Because the machine exterior is plastic never use alcohol or solvent when cleaning The Display may be cleaned by gently wipin...

Страница 223: ...Maintenance Cleaning 221...

Страница 224: ...phic Area Visually demonstrates how to resolve the problem 4 Counter Display Touch to display the Counter Display window Error Number Error Types Description Reference page T00 000 Service Call Error...

Страница 225: ...rized service representative Message Possible Cause Action Master Disposal Error Pull Out Print Cylinder and Discard Master The master was not properly discarded 1 Pull out the Print Drum Cylinder and...

Страница 226: ...d in indicated area 1 Remove the jammed paper 2 Press the key or touch OK Safety SW on Paper Feed Tray is Activated Reset paper on Paper Feed Tray The safety switch for the Paper Feed Tray has been ac...

Страница 227: ...n ON If Recovery has Failed Call Service A system error has occured Shut off power then restart If recovery has failed contact your dealer or authorized service representative Message Possible Cause A...

Страница 228: ...ll Rear Cover of Main Body is Off Call Service The machine rear cover is removed Contact your dealer or authorized service representative Set Master Disposal Box in Place The Master Disposal Box is im...

Страница 229: ...master core is missing or it has worn off or it has been tilted The section on the master core contains information needed for making masters If the machine cannot read the information it does not op...

Страница 230: ...Cause Action Paper is jammed in the Paper Feed area 1 Check the paper feed side and remove the jammed paper 2 Touch OK Note When using special paper adjust the Paper Feed Pressure Adjustment Lever ac...

Страница 231: ...er inside the unit It may cause smudges on the original or a paper jam Removing originals jammed in the document feeder Open the ADF Cover and pull out the original Removing originals jammed in the do...

Страница 232: ...moving originals jammed in the duplex document carrier Open the ADF Cover and raise the document tray as shown Pull out the original Removing originals jammed in the original receiving unit Lift the P...

Страница 233: ...hook are sharp When you insert a hand inside the machine to remove paper be careful not to touch the paper separation hook or master removal hook This may cause injury Paper did not eject correctly 1...

Страница 234: ...service personnel is required p 232 F00 000 Warning Messages Pops up when printing job cannot proceed due to a conflict between a Control Panel setting and the status of the machine p 233 Message Sym...

Страница 235: ...tempting to copy an irregular size original using Auto Action Select a Feed Tray with the correct size paper Cause 2 A normal size original has been set in the wrong position Action Lift the Platen Co...

Страница 236: ...ng area extra areas may not be printed Action Modify the reproduction size To change the Size setting Touch Size Setting When resuming the print job Touch Continue Alternatively press the key to print...

Страница 237: ...nfirm Print Drum Cylinder Type screen when it was installed Action Select the type of Print Drum Cylinder currently installed Alternatively you can change the Print Drum Cylinder p 211 When changing a...

Страница 238: ...or the key to clear No Master on Print Drum Make a New Master Symptom You are attempting to print but there is no master on the Print Drum Cylinder Action Set the original and create a master Touch C...

Страница 239: ...rrect size printer paper To override the message and to print with possible Ink smears on the roller Press the key When stopping the print job Touch Cancel You can also stop by pressing the key or the...

Страница 240: ...mitted Scan mode is disabled Touch Close Initiate the Print job after the transmission is complete or print from the machine Protect Discard Current Master Symptom Protect function is set to ON Action...

Страница 241: ...tment Lever is set to CARD Check if the setting is consistent with paper in the Standard Feed Tray Symptom The Paper Feed Adjustment under Administrator Settings is set to Auto and the Paper Feed Pres...

Страница 242: ...vely press the key or the key to clear Unmatched Size Current Page and Printing Paper Check Paper Size Symptom The original data sent from the computer does not match the print paper size Action Check...

Страница 243: ...perations the values set on the Consumables Information Input Wizard Screen disappears and thus you need to enter the values again After the power switch is set to OFF and the switch is set to ON agai...

Страница 244: ...the Master Roll Touch OK and enter values as shown below H2 Print Density Fine Adjustment Select a Print Density level to match the Ink to fine tune print result 1 Light 5 Dark H3 First Print Density...

Страница 245: ...Fine Adjustment 1 Light 5 Dark 2 3 4 5 1 7 8 9 10 6 Consumables Information Input Wizard Consumables Information Input Wizard Master Information Input Next H4 Master Density 2 3 4 5 1 Consumables Info...

Страница 246: ...utlet Check the power breaker The front cover is closed but the error message still does not clear The Front Cover has not been firmly closed Completely close the Front Cover The magnetic latch should...

Страница 247: ...ck which side of the original was placed on the Glass Platen or in the ADF unit See Placing the original p 41 The master is installed with the incorrect side out Reinstall the Master Roll with correct...

Страница 248: ...edges of printed copies are smudged with Ink Larger size of paper than the original was placed on the Paper Feed Tray at the time of the master making process Because a master was made according to a...

Страница 249: ...printing just after printing starts The Ink on the Print Drum Cylinder will dry when the machine is not in use for an extended period Printing with dried Ink will produce light or faded copies Press...

Страница 250: ...inal has a solid black portion at its top If an original has a solid black portion at the top printed copies may not be with proper quality Replace the original in the reverse direction and restart th...

Страница 251: ...he document carrier Open the ADF cover and raise the feed roller as shown in Important Take care not to touch the roller inside the unit It may cause smudges on the original or a paper jam Removing or...

Страница 252: ...e positions of the Receiving Tray Paper Guides and the Paper Stopper are inappropriate Adjust the Receiving Tray Paper Guides and the Paper Stopper to the size of paper For thick paper slightly widen...

Страница 253: ...en using thick or slippery paper set the Paper Feed Pressure Adjustment Lever to Thick Paper p 34 Multi up did not function There is nothing printed on one side Did you place the second original in ti...

Страница 254: ...te is inappropriate Turn the Stripper Plate Angle Adjustment dial as follows When the feeding skips Turn the dial to the left When multiple sheets are fed Turn the dial to the right Important Before m...

Страница 255: ...the printed card is peeling or the leading edge gets wrinkled The angle of the Stripper Plate is in appropriate Turn the Stripper Plate Angle Adjustment Dial to adjust the angle An error message displ...

Страница 256: ...it was not received by the machine Is the Admin Screen currently showing on the display Touch and switch to the Basic Screen from the Admin Screen The key is lighting Received data is waiting for outp...

Страница 257: ...Troubleshooting Troubleshooting 255...

Страница 258: ...eceiving Tray Paper Guides Stopper are automatically adjusted according to the paper and reproduction size Wide Stacking Tray This unit can take paper up to 340 mm 555 mm 133 8 2127 32 in size Key Car...

Страница 259: ...per Supply Capacity Approx 1000 sheets 64 g m2 17 lb bond 80 g m2 21 lb bond Maximum Height 110 mm 4 11 32 Paper Receiving Capacity Approx 1000 sheets 64 g m2 17 lb bond 80 g m2 21 lb bond Maximum Hei...

Страница 260: ...out Binding Margin Reservation Output Reversal Proof Double Feed Check User Management Management of Consumables Contrast Adjustment Print Density Adjustment Print Position Adjustment Tone Curve Jump...

Страница 261: ...80 g m2 21 lb bond Maximum Height 110 mm 4 11 32 Printing Paper Weight 46 g m2 12 lb bond 210 g m2 110 lb index Image Processing mode Line Photo Standard Portrait Group Duo Line Photo Shadow off Penc...

Страница 262: ...y Adjustment Print Position Adjustment Tone Curve Jump Wing Control Top Margin Paper Size detection Renew Page Dot Process 4 types Preview Rotate Scanning Side with optional ADF DX 1 Admin Mode Interv...

Страница 263: ...Appendix Specifications 261...

Страница 264: ...l 32 55 56 Clearing Programs 138 Clearing User Registration 126 Clock Calendar 169 Closing the Auto control Stacking Tray 40 Closing the Paper Feed Tray 36 Closing the Paper Receiving Tray 38 Color Dr...

Страница 265: ...256 Jump Wing Control 105 106 168 K Key Card Counter 256 L Layout 80 Limit 123 Line 58 Location of Caution Label 13 Low Admin tab only 114 115 M Machine Handling 12 Maintenance 216 Maintenance Call 2...

Страница 266: ...eys 24 99 Print Drum Cylinder 21 211 Print Drum Cylinder Handle 21 211 Print Drum Cylinder Release Button 21 211 Print Drum Cylinder Replacement 211 Print Key 25 Print Paper 16 36 Print Paper Handling...

Страница 267: ...ecifications 257 Speed print speed 96 Standard Ratio 61 62 Start Key 25 Start Up Screen 26 Status Area 31 32 Stock Management 171 Stop Key 25 Stop Timing 49 57 Storage Memory 193 Storing Environment 1...

Страница 268: ...266 056 36003 001...

Отзывы: