background image


Quick Guide


- iDC9272A 


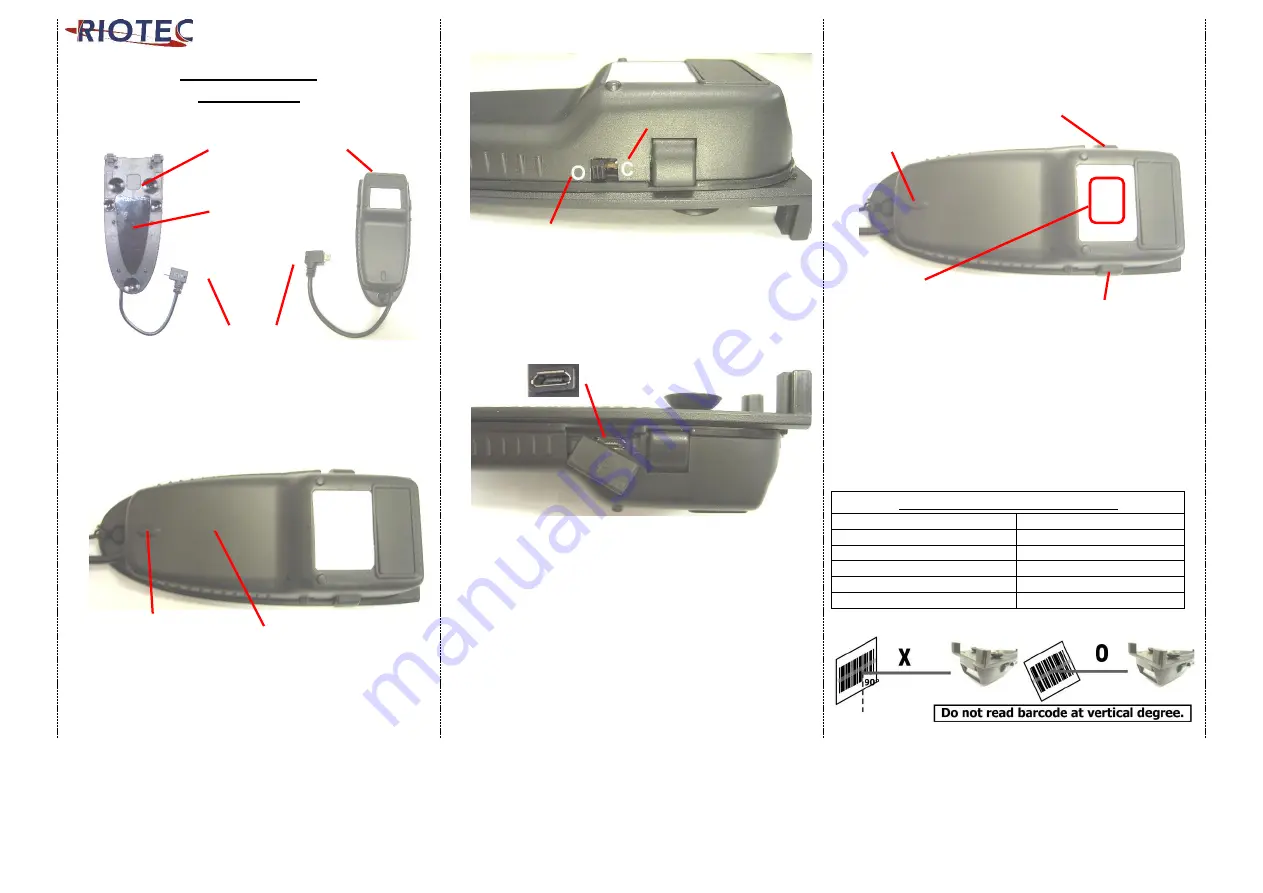
Connect to micro USB port of   

Smartphone 


*


Before you use scanner, please switch to "C- Charge 

mode" and charge inside battery for 3~4 hours first. 

*


Under “C- Charge mode”, you can raise/lower soft-

keyboard easily.


(For HID profile only)


iDC9272A is with Li-Ion battery inside. When in charging, 

please use the original USB power adaptor of 
Smartphone (recommended). Through it, it charges both 
smartphone    & iDC9272A batteries at the same time.   

When in low battery (Orange LED flashing), please 
charge it immediately.   


Attention: Please don’t charge iDC9272A when in Operation 

mode. Otherwise, the smartphone’s battery will charge back 
to iDC9272A’s battery.


** When pressing Left  Right button for 8~9 

seconds, 

iDC9272A

 will enter deep sleeping mode. 

** Please press Left  Right  Touch trigger 

for 8~9 seconds to activate 

iDC9272A

.   

** The touch sensor area is around the central area.   

Please check the above drawing for your reference. 

LED Indicator Information 

Orange LED ON 

Full charged 

Orange and Red LED Flashing 

Charging 

Orange LED Flashing 

Low battery 

Red LED ON 

Off line / out of service 

Green LED ON 

Good read 

Orange LED ON 

Good read (Batch mode) 


O=Operation mode 

C=Charge mode 

Left Button 

Under BT HID Profile, press Left button to 

raise/lower soft-Keyboard; press the left button for 4 
seconds to un-pair. Then, scanner can be connected 

with other BT devices (Please check page #2, left 

column) 

Touch Trigger Area 

SCAN/ Power ON 

Press 1 second to wake it 

up from power saving 

mode 

Right Button 
Power Saving button: 

Press the button for 4 second 

then enter power saving mode 

Indicator   

(LED) 

Charge port 

Suction Cup 

PU Glue 
(Can be used 

repeatedly) 

Micro USB 

cable (OTG) 

Exit Window 

Li- Ion Battery inside 

Indicator (LED) 

Содержание iDC9272A

Страница 1: ...ease press Left button Right button Touch trigger for 8 9 seconds to activate iDC9272A The touch sensor area is around the central area Please check the above drawing for your reference LED Indicator Information Orange LED ON Full charged Orange and Red LED Flashing Charging Orange LED Flashing Low battery Red LED ON Off line out of service Green LED ON Good read Orange LED ON Good read Batch mode...

Страница 2: ...to raise lower soft keyboard please read the above setting code first Then press left button refer to drawing 5 on page 1 to raise keyboard LED is RED Bluetooth is offline press it again to lower keyboard LED is off Bluetooth is online It will take 5 10 seconds to make BT online offline Please be noted that when BT is offline scanning function is stopped Or switch C to O to make BT online Drawing ...

Страница 3: ...der not to lose data please choose the correct speed Middle speed is the Default High speed Ultra Slow speed transmission 1 transmission Middle speed Ultra Slow speed transmission 2 transmission Slow speed Ultra Slow speed transmission Default 3 transmission Power saving Mode Power saving mode OFF Power saving mode ON Default Enter power saving mode after 5 minute inactivity This function converse...

Страница 4: ...rom Prefix Suffix TABLE below page 3 then end by scanning Code X below right The max of special characters is 5 When you append 1 4 required values for Prefix or Suffix it must end with Code X It doesn t need Code X if you append 5 values to barcode data How to delete Prefix or Suffix 1 scan above configuration code for Prefix or Suffix 2 enter the 0 0 above left 3 then end by scanning Code X belo...

Страница 5: ...SABLE ENABLE CODE 93 DISABLE ENABLE CODE 11 DISABLE ENABLE Interleaved 25 DISABLE ENABLE Discrete 25 DISABLE ENABLE CODABAR DISABLE ENABLE MSI DISABLE 1D Symbologies 3 ENABLE Matrix 25 DISABLE ENABLE GS1 DataBar DISABLE ENABLE GS1 DataBar Limited DISABLE ENABLE GS1 DataBar Expanded DISABLE ENABLE Composite CC C DISABLE ENABLE Composite CC A B DISABLE ENABLE Composite TLC 39 DISABLE ENABLE Code 39 ...

Отзывы: