background image

1.Detailed Descriptions 


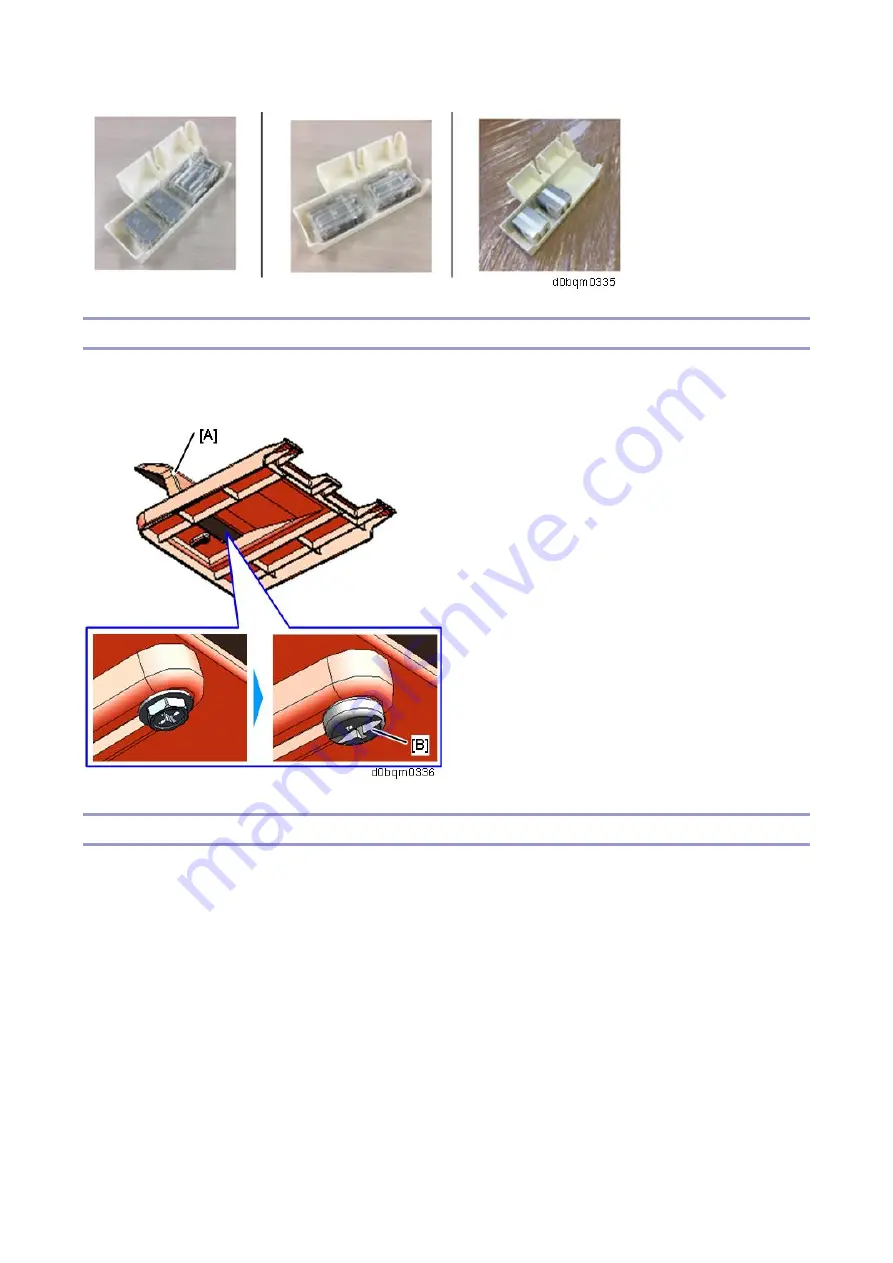
Allowing the Customer to Detach and Reattach the End Fence of the Booklet Tray 

The screw for securing the end fence [A] has been changed to a coin screw, allowing the customer to 

detach and reattach the end fence. 


Staple Near-End Detection 

For details about staple near-end detection, refer to "

Staple Near-End Detection

". 

Содержание SR3280

Страница 1: ...Booklet Finisher SR3290 Finisher SR3280 Machine Code D3FN D3G4 Field Service Manual Ver 1 0 Latest Release December 2018 Initial Release December 2018 Copyright c 2018 Ricoh Co Ltd ...

Страница 2: ......

Страница 3: ...Cyan M Magenta Y Yellow B W BW Black and White FC Full color A Short Edge Feed SEF B Long Edge Feed LEF Trademarks Adobe Acrobat PageMaker PostScript and PostScript 3 are either registered trademarks or trademarks of Adobe Systems Incorporated in the United States and or other countries The Bluetooth word mark and logos are registered trademarks owned by Bluetooth SIG Inc and any use of such marks...

Страница 4: ...ered trademark of The Open Group UPnP is a trademark of UPnP Implementers Corporation This product includes RSA BSAFE Cryptographic software of EMC Corporation RSA and BSAFE are registered trademarks or trademarks of EMC Corporation in the United States and other countries The proper names of Internet Explorer 11 is as follows Windows Internet Explorer 11 The proper names of the Windows operating ...

Страница 5: ...duct names of Windows Server 2008 R2 are as follows Microsoft Windows Server 2008 R2 Standard Microsoft Windows Server 2008 R2 Enterprise The product names of Windows Server 2012 are as follows Microsoft Windows Server 2012 Foundation Microsoft Windows Server 2012 Essentials Microsoft Windows Server 2012 Standard The product names of Windows Server 2012 R2 are as follows Microsoft Windows Server 2...

Страница 6: ......

Страница 7: ... 16 Electrical Component Layout 17 Transport Layout 22 Proof Transport Layout Drive 22 Proof Transport Layout Sensors 23 Shift Transport Layout Drive 23 Operation Details 24 Shift Operation Shift Transport 24 Pre stack Operation In Corner Stapling 24 Pre stack Operation Booklet Stapling 25 Upper Tray Shift Drive Limit Sensor Full Sensor 27 Pull in Roller Paper Stack Holder 31 Corner Stapling 34 St...

Страница 8: ...5 72 Paper Stacking Holder HP Sensor S24 73 Stacking Sponge Roller HP Sensor S32 74 Staple Tray Paper Sensor S31 75 Feed out Belt HP Sensor S12 75 Leading Edge Guide HP Sensor S33 76 Upper Tray Height Limit Switch SW3 77 Sub Height Sensor S51 S52 77 Saddle Stitch Unit Motors 79 Saddle Stitch Unit 79 Press Fold Motor STM10 80 Booklet Jogger Motor STM11 84 Paper Guide Unit 86 Paper Guide Unit 86 Pap...

Страница 9: ...3 ...

Страница 10: ...s from the Previous Machine Improving Stackability of Stapled Sheets Retraction Mode for Stapled Job Delivery Added To improve the stackability of stapled sheets the trailing edge alignment unit framed in yellow now has a stapled job delivery control system ...

Страница 11: ...ry to the return position During paper delivery these parts move to the home position and the stacking sponge roller is a little bit retracted within the end fence On this machine the stacking sponge roller A and actuator B are completely retracted within the end fence when delivering stapled sheets to improve their stackability On the previous machine the stapled jobs were also at the home positi...

Страница 12: ...corner stapling this prevents the sheets from colliding with the paper guide edge guide and other sheets because of the stapled points being stacked up If one of the sensors detects sheets the machine determines that the height limit has been reached and stops printing Improved Replaceability of Staple Cartridge The exterior of the stapler unit has been changed from a bracket to a resin cover A ha...

Страница 13: ... Descriptions 7 Service for Staple Near End Detection A holder for storing stock stapler cartridges has been added This stapler holder A is affixed to the back of the finisher s front door with double sided tape ...

Страница 14: ...h the End Fence of the Booklet Tray The screw for securing the end fence A has been changed to a coin screw allowing the customer to detach and reattach the end fence Staple Near End Detection For details about staple near end detection refer to Staple Near End Detection ...

Страница 15: ...SEF LEF 8K SEF 16K SEF LEF SRA3 SEF SRA4 SEF LEF 8 1 2 x 132 5 LEF custom size Paper weight for the finisher shift tray 52 300 g m2 14 lb Bond 110 lb Cover Paper sizes that can be shifted when delivered to the finisher shift tray A3 SEF A4 SEF LEF A5 SEF LEF B4 JIS SEF B5 JIS SEF LEF B6 JIS SEF 12 x 18 SEF 11 x 17 SEF 11 x 15 SEF 10 x 14 SEF 8 1 2 x 14 SEF 8 1 2 x 13 LEF 8 1 2 x 11 SEF LEF 8 1 4 x...

Страница 16: ...xed Size 2 19 sheets 150 sets A4 LEF 8 1 2 x 11 LEF 20 50 sheets 150 46 sets A4 LEF 8 1 2 x 11 LEF 2 14 sheets 100 sets A4 SEF B5 JIS SEF SEF 8 1 2 x 11 SEF 15 50 sheets 100 23 sets A4 SEF B5 JIS SEF SEF 8 1 2 x 11 SEF 2 14 sheets 100 sets other size paper 15 50 sheets 100 23 sets other size paper With Mixed Size 2 50 sheets 23 sets A3 SEF A4 LEF B4 JIS SEF B5 JIS SEF 11 x 17 SEF 8 1 2 x 11 SEF St...

Страница 17: ...hifted when delivered to the finisher shift tray A3 SEF A4 SEF LEF A5 SEF LEF B4 JIS SEF B5 JIS SEF LEF B6 JIS SEF 12 x 18 SEF 11 x 17 SEF 11 x 15 SEF 10 x 14 SEF 8 1 2 x 14 SEF 8 1 2 x 13 LEF 8 1 2 x 11 SEF LEF 8 1 4 x 14 SEF 8 1 4 x 13 SEF 8 x 13 SEF 8 x 10 SEF 5 1 2 x 8 1 2 SEF 7 1 4 x 10 1 2 SEF LEF 8K SEF 16K SEF LEF SRA4 LEF 8 1 2 x 13 2 5 LEF custom size Paper weight that can be shifted whe...

Страница 18: ...heets 23 sets A3 SEF A4 LEF B4 JIS SEF B5 JIS SEF 11 x 17 SEF 8 1 2 x 11 SEF Staple position 4 positions Top Top Slant Bottom 2 Staples Saddle stitch paper size A3 SEF B4 JIS SEF A4 LEF B5 JIS LEF 11 x 17 SEF 8 1 2 x 14 SEF 8 1 2 x 11 LEF 8 1 4 x 14 SEF 8 1 4 x 13 SEF 12 x 18 SEF 11 x 15 SEF 10 x 14 SEF 8 1 2 x 13 2 5 LEF custom size Saddle stitch paper weight 64 105 g m2 17 28 lb Bond You can use...

Страница 19: ... 9 24 2 37 8 inches Tray is extended the height to reach the top board Weight Approx 56 kg 123 5 lb without punch unit Approx 59 kg 130 1 lb with punch unit Paper Specifications Size Normal Thin 52 59 Norm 1 60 74 Norm 2 75 81 Med Thk 82 105 Thk 1 160 169 Thk 2 170 220 Thk 3 221 256 Thk 4 257 300 A3 SEF B4 SEF A4 SEF A4 LEF B5 SEF B5 LEF A5 SEF A5 LEF B6 SEF A6 SEF 13 19 2 SEF 12 18 SEF 12 6 17 7 ...

Страница 20: ...Shift tray proof tray punching possible Shift tray punching possible Shift tray proof tray possible Shift tray possible x Cannot be used Incompatible Color Translucent Label SA Postcard Transparencies A3 SEF B4 SEF A4 SEF A4 LEF B5 SEF B5 LEF A5 SEF A5 LEF B6 SEF B6 LEF 12 18 SEF 1 11 17 SEF 8 1 2 14 SEF 8 1 2 11 SEF 81 2 11 LEF 51 2 81 2 SEF 51 2 81 2 LEF 1 No corner stapling Here is the key for ...

Страница 21: ...1 4 x 101 2 16K custom size 4 holes type 4 holes SEF A3 B4 JIS A4 B5 JIS A5 11 x 17 81 2 x 14 81 2 x 11 51 2 x 81 2 71 4 x 101 2 8 x 13 81 2 x 13 81 4 x 13 8K 16K 81 4 x 14 8 x 10 11 x 15 10 x 14 custom size 4 holes type 4 holes LEF A4 B5 JIS A5 81 2 x 11 71 4 x 101 2 16K custom size 2 3 holes type 2 holes SEF A3 B4 JIS B5 JIS A5 11 x 17 81 2 x 14 81 2 x 11 51 2 x 81 2 71 4 x 101 2 8 x 13 81 2 x 1...

Страница 22: ...1 Detailed Descriptions 16 Layout General Layout No Name No Name 1 Punch Units 5 Corner Stapler 2 Side to Side Fold Roller 6 Shift Tray 3 Booklet Stapler 7 Proof Tray 4 Booklet Staple Tray ...

Страница 23: ...t Motor DCM4 2 Transport Motor DCM3 3 Positioning Roller Motor DCM14 4 Controller Board PCB1 5 Pre stack Transport Motor DCM5 6 Entrance Transport Motor DCM1 7 Horizontal Transport Motor DCM2 8 Tray Lift Motor DCM9 9 Paper Guide Motor STM18 10 Paper Guide HP Sensor S50 ...

Страница 24: ...wer Junction Gate Motor STM2 11 Horizontal Transport Sensor S13 4 Proof Tray Full Sensor S21 12 Switchback Transport Sensor S14 5 Entrance Sensor S17 13 Transport Path Paper Sensor S15 6 LED 1 LED1 14 Proof Tray Exit Sensor S20 7 LED 4 LED4 15 Lower Junction Gate JP Sensor S18 8 Front Door Switch SW1 16 Shift Roller HP Sensor S19 ...

Страница 25: ... Motor STM4 10 Stacking Sponge Roller HP Sensor S32 2 Paper Exit Guide Plate Limit Switch SW2 11 Paper Stacking Holder Motor DCM6 3 Booklet Stack Height Sensor 1 S26 12 Shift Tray Lower Limit Sensor 5 S37 4 Booklet Stack Height Sensor 2 S27 13 Shift Tray Lower Limit Sensor 4 S36 5 Exit Guide Plate HP Sensor S34 14 Shift Tray Lower Limit Sensor 3 S30 6 Paper Stacking Holder HP Sensor S24 15 Shift T...

Страница 26: ...et Upper Transport Path Stack Sensor S2 13 Booklet LED 2 LED6 5 Booklet Jogger Motor STM11 14 Booklet LED 3 LED7 6 Booklet Jogging HP Sensor S10 15 Booklet LED 4 LED8 7 Booklet Bottom Fence Motor STM12 16 Booklet LED 5 LED9 8 Booklet Trailing Edge Bottom Fence HP Sensor S5 17 Booklet LED 6 LED10 9 Booklet Lower Transport Path Stack Sensor S11 No Part 1 Fold Plate HP Sensor S1 2 Booklet Tray Full S...

Страница 27: ...10 Punch Unit Option No Part 1 Punch Unit Movement Motor STM13 2 Punch Unit HP Sensor S40 3 Punch Registration HP Sensor S41 4 Punch Registration Motor STM14 5 Punch Registration Sensor S43 6 Punchout Hopper Full Sensor S42 7 Punch HP Sensor S38 8 Punch Drive Motor DCM13 9 Punch Motor Rotation Sensor S39 10 Punch Unit Controller Board PCB2 ...

Страница 28: ...ugh Path Orange Proof Path Green Pre stack Path Purple Corner Staple Path Pink Booklet Staple Path Proof Transport Layout Drive No Name No Name A Exit Motor DCM4 C Entrance Transport Motor DCM1 B Upper Junction Gate Solenoid SOL1 D Horizontal Transport Motor DCM2 ...

Страница 29: ...ay Full Sensor S21 C Horizontal Transport Sensor S13 B Proof Tray Exit Sensor S20 D Entrance Sensor S17 Shift Transport Layout Drive No Name No Name A Shift Motor STM3 shift only D Transport Motor DCM3 B Entrance Transport Motor DCM1 E Exit Motor DCM4 C Horizontal Transport Motor DCM2 ...

Страница 30: ...tack Operation In Corner Stapling Pre stack Capacity 1 sheet Pre stack Size A4 SEF LEF B5 SEF LEF LT SEF LEF There are four steps as follows 1 The upper tray exit guide plate A moves up opens Paper comes through the entrance transport path and reaches the relay transport path 2 After paper passes the pre stack junction gate A the pre stack junction gate A moves down closes and the relay transport ...

Страница 31: ...llowing sheet comes through the entrance and reaches the relay transport path After that the shift roller A drops to press the pre stacked sheet and the following sheet Then with the pre stacked sheet the following sheet goes to the next process corner stapling Pre stack Operation Booklet Stapling Pre stack Capacity 2 sheets Pre stack Size All Sizes There are five steps as follows 1 The upper tray...

Страница 32: ... pressure between itself D and the relay transport roller C 4 The following sheet comes thorough the entrance and reaches the relay transport path After that the shift roller A drops to press the pre stacked sheet and the following sheet With the pre stacked sheet the following sheet goes toward the exit does not pass through completely 5 The pre stack junction gate B drops closes again and the re...

Страница 33: ...ion Detection With the actuator the Shift Tray Paper Height Sensor S35 B detects the upper position of the tray without output paper To prevent too much moving upward the Upper Tray Height Limit Switch SW3 interlock switch C is installed When the upper tray moves up to the upper position but doesn t stop the forced stop switch is pushed and the tray shift motor stops ...

Страница 34: ...oint are stacked this prevents the sheets from colliding with the paper guide edge guide and other sheets because of the stapled points being stacked up If one of the sensors detects sheets the machine stops the job in progress Upper Tray Full Detection Condition 1 Five shift tray lower limit sensors D are installed on the rear side of the machine ...

Страница 35: ... 1 000 sheets Shift Tray Lower Limit Sensor 4 S36 A3 SEF A4 SEF B4 SEF B5 SEF B5 LEF DLT SEF LG SEF LT SEF 12 x18 SEF SRA3 13 x19 2 SEF 182 to 488 mm 2 000 sheets Shift Tray Lower Limit Sensor 2 S29 A4 LEF LT LEF Finisher SR3280 State Sensors Paper Size Length 500 sheets Shift Tray Lower Limit Sensor 5 S37 A5 SEF A5 LEF B6 SEF HLT SEF A6 SEF 148 to 182 mm 1 500 sheets Shift Tray Lower Limit Sensor...

Страница 36: ...OFF Booklet Stack Height Sensor 2 S27 B SP6 123 037 INPUT Check ON If the above condition continues for 13 seconds the machine detects that the stacking limit has been reached The purpose is to accurately detect tray full for stacks of Z folded paper or incorrectly stacked documents Condition 3 Shift tray detection input check SP6 123 035 normally set to 0 default tray not full A Shift Tray Paper ...

Страница 37: ...1 Detailed Descriptions 31 Pull in Roller Paper Stack Holder Components No Name No Name 1 Paper Stacking Holder 7 Paper Stacking Holder Lift Motor ...

Страница 38: ...der Motor DCM8 rotates the paper stacking holder cam B to move the paper stacking holder A down 2 The paper stacking holder lift motor D rotates the stacking sponge roller cam to move the stacking sponge roller E down The Paper Stacking Holder Motor DCM8 rotates the paper stacking holder cam B to lift the paper stacking holder A up to its HP until the paper stacking holder interrupts the Paper Sta...

Страница 39: ... its HP position At the same time the Paper Stacking Holder Motor DCM8 rotates the holder cam E to lift the paper stacking holder B up to its HP until the Paper Stacking Holder HP Sensor S24 C detects the end of the paper stacking holder B Staple Mode Operation On this machine the stacking sponge roller A and actuator B are completely retracted within the end fence C when delivering stapled sheets...

Страница 40: ...tapling Components No Name No Name 1 Positioning Roller Shift Motor STM5 5 Drag Roller 2 Positioning Roller 6 Stapler 3 Exit Motor DCM4 7 Stapler Move HP Sensor S23 4 Corner Stapler Movement Motor STM7 8 Positioning Roller HP Sensor S28 ...

Страница 41: ... No Name No Name 1 Feed out Belt with stack feed out pawl 3 Trailing Edge Fence 2 Feed out Belt Motor DCM7 4 Feed out Belt HP Sensor S12 Edge Guide This machine applies a corner staple to the paper stack while it is hanging out of the exit At this time to prevent the paper stack from dropping to the upper tray the edge guide D comes out of the unit The edge guide operates as follows 1 When a job s...

Страница 42: ... the machine when the last sheet of a job is output the Leading Edge Guide HP Sensor S33 C detects the edge guide Stapler Movement The Corner Stapler Movement Motor STM7 A moves the stapler C along the guide rod B After a job finishes the stapler C returns to its HP the Stapler Move HP Sensor S23 D detects the base of the stapler ...

Страница 43: ... tray 3 The Positioning Roller Motor DCM14 B also rotates the drag roller C The drag roller C is a sponge roller that pushes paper against the trailing edge fence in order to hold paper in the stapling position Jogger The Jogger Motor STM1 A moves the jogger fences C to the ready position and wait for the first sheet As each sheet enters the jogger fences push toward the center At the end of the j...

Страница 44: ...ched to the stack feed out belt C pushes the paper out The Feed out Belt Motor DCM7 D moves the stack feed out pawl A and the trailing edge fence B After a stack is output both the trailing edge fence B and stack feed out pawl A return to their HP There are two types of stack output 1 Pawl exit roller Small sizes A4 LT B4 SEF Output is done by the exit roller as described above 2 Roller exit A4 LT...

Страница 45: ...ted that the staples have run out End it is reset when it detects staples replenished Staples used in the End status are not counted Number of Remaining Staples Maximum number Counted Number of Staples Used The remaining number of staples is logged in SP6 795 002 SP6 796 002 Staple N E Setting Staple Remaining Setting You can also change the remaining number of staples on this counter by changing ...

Страница 46: ... the estimated number of remaining staples in the new cartridge Automatic Counter Reset After reaching the near end status if the staples do not run out End even after the number of staples used exceeds 1 5 times that of the specified number of staples in the near end status the counter is automatically reset according to the determination that the staples have been replaced The automatic counter ...

Страница 47: ...arge This finisher however in spite of being very small uses the device described below to achieve a better saddle shape 1 Pressure is applied to the fold with a roller to form the saddle 2 Pressure is applied while the paper is buckled at the top and bottom with two rollers to form the saddle The rollers move to front and back to strengthen the crease with two folds not just one fold Components ...

Страница 48: ...1 3 Shift Roller drive Motor DCM11 10 Bottom Fence 4 Booklet Upper Transport Path Stack Sensor S2 11 Jogger Fence 5 Booklet Jogger Motor STM11 12 Booklet Stapler 6 Booklet Jogging HP Sensor S10 13 Booklet Guide Plate Sensor S4 7 Booklet Bottom Fence Motor STM12 14 Shift Roller No Name No Name 1 Side to side Shift Fold Roller 4 Fold Plate 2 Fold Plate HP Sensor S1 5 Fold Plate Cam HP Sensor S9 3 Pr...

Страница 49: ...sport paper The shift roller lift motor moves the shift roller unit A The Shift Roller drive Motor DCM11 rotates the shift roller B to transport paper to the bottom After the transportation has finished the shift roller unit B moves up away from the paper face While the shift roller unit moves up the shift roller A rotates to feed paper out to the bottom Then the shift roller unit drops to bump th...

Страница 50: ...on this depends on the paper size Bottom Fence Operation Stapling The stack that is pushed with the stack junction gate bumps against the bottom fence B in order to align the stack Then the booklet staplers C staple at the middle points of the stack After that the Booklet Bottom Fence Motor STM12 A moves the bottom fence B up to the position where the stack is folded with the fold plate ...

Страница 51: ... to side fold roller E can operate at the same time A is the Fold Plate Cam HP Sensor S9 B is the Fold Plate HP Sensor S1 Center Folding and Saddle Shaping Operation The operation of stack folding and saddle shaping is described below Saddle shaping alone is described below under Saddle Shaping Operation When the fold plate B pushes the center of the stack between the fold transport rollers E the ...

Страница 52: ...s it toward the left as shown below Next when Fold Plate Cam HP Sensor S9 A goes on twice after the cam has rotated twice the saddle shape operation is half finished the fold roller unit is at position D and then the Press Fold Motor STM10 switches into reverse At the same time in the upper path the top of fold roller unit reverses releasing pressure on the fold When the fold roller unit C release...

Страница 53: ...m A to C It moves along a rail when it comes to the center the upper fold up descends and then pressure from a large spring folds the center of the stack With the pressure of the side to side fold roller applied the unit moves forward from C to D When the roller moves as far as D the upper roller of the roller unit ascends from the lower path to the upper path releasing the pressure on the center ...

Страница 54: ...shift tray The Paper Guide Motor STM18 drives the paper guide cover to reduce the amount of curl and prevent the leading edges from curling and improve the output of stapled copies on the shift tray Related SP Codes The paper guide mode for corner stapled copies does not operate for shift tray exit booklet stapled copes large paper sizes above 300 mm SP6126 001 Use Paper Guide Small sizes up to 30...

Страница 55: ...o access the following parts after running SP 6 160 004 Positioning Roller A The paper exit guide plate moves upwards and the positioning roller pops up in front for easier access Stacking Sponge Roller B The paper exit guide plate moves upwards and the reverse roller can be accessed ...

Страница 56: ...justment 50 2 Replacement and Adjustment Covers Rear Upper Cover Rear Lower Cover 1 Remove the Rear upper cover A 2 Remove the Rear lower cover A Upper Cover 1 Remove the rear upper cover Rear Upper Cover Rear Lower Cover ...

Страница 57: ...nt 51 2 Remove the 2 screws and release the 2 hooks 3 Open the front cover A and remove the 2 screws 4 Remove the upper cover A When you detach or reattach the upper cover be sure to check the locations of the hooks on the cover ...

Страница 58: ... B 2 Remove the Front door A 1 Holding the hinge at the upper part of the cover raise the edge of the upper cover 2 Pull out the cover from the pin B at the bottom Front Left Side Cover 1 Remove the front cover Front Cover 2 Remove the paper guide cover front Paper Guide Cover 3 Remove the front left side cover A ...

Страница 59: ...2 Replacement and Adjustment 53 Paper Guide Cover 1 Remove the rear upper cover Rear Upper Cover Rear Lower Cover 2 Remove the shift tray Shift Tray Upper Tray 3 Push the guides in to the center ...

Страница 60: ... front paper guide cover A x2 Left Upper Cover 1 Remove the rear upper cover Rear Upper Cover Rear Lower Cover 2 Remove the paper guide covers front and rear Paper Guide Cover 3 Lift the front left side B of the upper cover and disconnect the tab C and then remove the left upper cover A ...

Страница 61: ...cement and Adjustment 55 Lower Tray 1 Remove the Lower tray A Proof Tray 1 Remove the following covers Upper cover Rear Upper Cover Rear Lower Cover Left upper cover Left Upper Cover 2 Remove the Proof tray A ...

Страница 62: ...per Tray 1 Remove the shift tray A End Fence 1 Remove the left upper cover Left Upper Cover 2 Remove the rear lower cover SR2380 only Rear Upper Cover Rear Lower Cover 3 Remove the shift tray Shift Tray Upper Tray 4 Remove the shift tray bracket A ...

Страница 63: ...Replacement and Adjustment 57 5 Disconnect the connector CN180 and release the harness 6 Remove the end fence A When you remove the end fence be careful with the harness beneath it Booklet Finisher SR3290 ...

Страница 64: ...2 Replacement and Adjustment 58 Finisher SR3280 Notes on Detaching Reattaching Replacing the End Fence There is a harness routed beneath the end fence Take the following precautions ...

Страница 65: ...ful that no slack is left in the harness otherwise the harness may come into contact with the machine s roller shaft and become worn out Be careful not to leave any slack especially at the parts framed in red as shown To prevent slack make sure that the cable tie A on the harness is located at the right side of the clamp B ...

Страница 66: ...ards Controller Board PCB1 1 Remove the following covers Rear upper cover Rear Upper Cover Rear Lower Cover Rear lower cover Rear Upper Cover Rear Lower Cover 2 Remove the Controller Board PCB1 A Booklet Finisher SR3290 Finisher SR3280 ...

Страница 67: ...rocedure below regarding the dip switch settings 1 Check the settings of dip switch A on the old main board 2 Replace the controller board 3 Change the settings of dip switch A on the new controller board to match the settings on the old controller board 4 Remove the EEPROM B from the old controller board and install it on the new controller board ...

Страница 68: ...ght corner of the board 6 Go into the SP mode open these SP codes and then enter the numbers you see on the label SP6 121 001 NV Adj Data Jog Position Factory Adj SP6 121 002 NV Adj Data Fold Position Factory Adj SP6 121 003 NV Adj Data Staple Stacking Fence Pos Factory Adj ...

Страница 69: ...nt Left Side Cover End fence End Fence Rear lower cover Rear Upper Cover Rear Lower Cover 2 Pull out the saddle stitch unit A and remove the inner upper cover B Disconnect the harness from the back side of the inner upper cover when you remove the inner upper cover 3 Disconnect the staple move HP sensor A and then remove the screws from the front side cover ...

Страница 70: ...ssure release motor bracket A from the rear side of the finisher 5 Remove the gear A and timing pulley B from the rear side of the finisher 6 Remove the pulley A from the rear side of the finisher 7 Remove 6 screws from the rear side of the finisher ...

Страница 71: ...ground wire connectors and clamps 9 Remove the 4 clamps and then pull the harness A out through the hole B on the left side of the finisher 10 Pull the harness C out through the hole D on the left side of the finisher 11 Remove the stapler unit Stapler Unit ...

Страница 72: ...up the paper exit guide unit B 13 Remove the bearings on the sides A from the cutouts on the metal plate 14 Remove the corner stapling unit A When removing the stapler unit make sure to leave the harness of stapler unit is hooked at the position with red circle as shown below ...

Страница 73: ...2 Replacement and Adjustment 67 Trailing Edge Alignment Unit 1 Remove the corner stapling unit Corner Stapling Unit 2 Remove the trailing edge alignment unit A ...

Страница 74: ... edge alignment unit from the corner stapling unit Trailing Edge Alignment Unit 2 Remove the Stacking Sponge Roller Lift Motor DCM6 A 3 Disconnect the harness B from the Stacking Sponge Roller Lift Motor DCM6 A Leading Edge Guide Motor STM6 1 Remove the trailing edge alignment unit Trailing Edge Alignment Unit ...

Страница 75: ... 2 Remove the bracket A 3 Remove the Leading Edge Guide Motor STM6 A with bracket 4 Remove the Leading Edge Guide Motor STM6 A from the bracket B Paper Stacking Holder Motor DCM8 1 Remove the corner stapling unit Corner Stapling Unit ...

Страница 76: ...Remove the Paper Stacking Holder Motor DCM8 A Exit Motor DCM4 1 Remove the rear upper cover Rear Upper Cover Rear Lower Cover 2 Remove the Exit Motor DCM4 A Feed out Belt Motor DCM7 1 Remove the corner stapling unit Corner Stapling Unit ...

Страница 77: ...stment 71 2 Remove the Feed out Belt Motor DCM7 A Jogger Motor STM1 1 Remove the trailing edge alignment unit Trailing Edge Alignment Unit 2 Remove the feed out motor Feed out Belt Motor DCM7 3 Remove the Jogger Motor STM1 A ...

Страница 78: ...rness as shown in the following figure A The sensor layout and harness routing has changed from the previous machine B so be careful not to route the harness as shown in the following figure B Shift Tray Paper Height Sensor S35 1 Remove the trailing edge alignment unit Trailing Edge Alignment Unit 2 Turn over the trailing edge alignment unit and then remove the shift paper height sensor together w...

Страница 79: ...r height sensor S35 A Paper Stacking Holder HP Sensor S24 1 Remove the trailing edge alignment unit Trailing Edge Alignment Unit 2 Turn over the trailing edge alignment unit and then remove the Paper Stacking Holder HP Sensor S24 together with the bracket A ...

Страница 80: ... S24 A Stacking Sponge Roller HP Sensor S32 1 Remove the corner stapling unit Corner Stapling Unit 2 Remove the Stacking Sponge Roller HP Sensor S32 together with the bracket A from the corner stapling unit B 3 Remove the Stacking Sponge Roller HP Sensor S32 A from the bracket ...

Страница 81: ...nt unit Trailing Edge Alignment Unit 2 Remove the Staple Tray Paper Sensor S31 together with the bracket A from the part with the trailing edge alignment unit x 1 x 1 3 Remove the Staple Tray Paper Sensor S31 A x 1 Feed out Belt HP Sensor S12 1 Remove the corner stapling unit Corner Stapling Unit ...

Страница 82: ...emove the Feed out Belt HP Sensor S12 A from the bracket Leading Edge Guide HP Sensor S33 1 Remove the trailing edge alignment unit Trailing Edge Alignment Unit 2 On the part with the corner stapling unit rotate the belt A of the leading edge guide motor until the leading edge guide B is revealed ...

Страница 83: ...to release the hook with a tool such as a ratchet screwdriver Upper Tray Height Limit Switch SW3 1 Remove the corner stapling unit Corner Stapling Unit 2 Remove the bracket B and then remove the lever unit A 3 Remove the Upper Tray Height Limit Switch SW3 A Sub Height Sensor S51 S52 1 Remove the end fence End Fence ...

Страница 84: ...2 Replacement and Adjustment 78 2 Remove the brackets B from the sub height sensors S51 S52 A beneath the end fence ...

Страница 85: ...ve the harnesses and ground wire from the saddle stich unit 3 Open the front door A and pull out the saddle stitch unit B After pulling out the saddle stitch unit be sure to keep the harnesses within the interior of the finisher If the harnesses protrude the connectors may become caught between metal plates when removing the saddle stitch unit A Harnesses stowed in finisher correct B Harnesses pro...

Страница 86: ...cement and Adjustment 80 4 Remove the screws securing the finisher and saddle stitch unit 5 Lift up to remove the saddle stitch unit A Press Fold Motor STM10 1 Remove the saddle stitch unit Saddle Stitch Unit ...

Страница 87: ...bracket A on the saddle stitch unit 3 Remove the screw A shown in the photo below 4 Loosen the screw B to loosen the Press Fold Motor STM10 belt C 5 Remove the clamps indicated by red arrows and connectors pink arrows from the Press Fold Motor STM10 unit ...

Страница 88: ...2 Replacement and Adjustment 82 6 Remove the screws on the Press Fold Motor STM10 unit A 7 Remove the spacer A between the gears taking care not to touch the bracket ...

Страница 89: ...2 Replacement and Adjustment 83 8 Remove the belt A Pulling down the bracket B securing the belt remove the belt from the gear Remove the belt from the gear making sure not to touch the bracket C ...

Страница 90: ...t A 10 Remove the spring B from the Press Fold Motor STM10 bracket A x 1 spring x 1 11 Remove the Press Fold Motor STM10 A x 2 x 1 Booklet Jogger Motor STM11 1 Remove the saddle stitch unit Saddle Stitch Unit 2 Remove the press folding motor bracket Press Fold Motor STM10 ...

Страница 91: ...2 Replacement and Adjustment 85 3 Remove the Booklet Jogger Motor STM11 A x 2 ...

Страница 92: ...Disconnect the cover support bracket 3 Remove the cover support bracket 4 Loosen do not remove the screws on both ends of the paper exit This will loosen the tray so you can move the tray slightly side to side in order to remove the bracket screws more easily 5 Disconnect the rear end of the paper guide unit bracket A ...

Страница 93: ...7 6 Disconnect the front end of the paper guide unit bracket B 7 At the rear open the clamps and disconnect the motor and sensor harnesses 8 Lay the unit A on flat clean surface so you can see the paper guide motor 1 and paper guide ...

Страница 94: ...2 Replacement and Adjustment 88 position sensor bracket 2 Paper Guide HP Sensor S50 1 Remove the left upper cover Left Upper Cover ...

Страница 95: ...2 Replacement and Adjustment 89 2 Remove the bracket A with the Paper Guide HP Sensor S50 3 Open the clamp and disconnect the sensor x1 x1 4 Separate the sensor and bracket x3 ...

Страница 96: ...cement and Adjustment 90 Paper Guide Motor STM18 The Paper Guide Motor STM18 is at A 1 Remove the paper guide unit Paper Guide Unit 2 Remove sensor bracket x1 3 Unfasten the motor and disconnect the belt x2 x1 ...

Страница 97: ...2 Replacement and Adjustment 91 4 Remove the Paper Guide Motor STM18 When you re install the motor make sure that the connector is pointing to the back of the unit ...

Страница 98: ...her 3 At the rear side remove the screw circled in the photo below from the stapler A 4 Push the stapler to the front side of the finisher 5 Remove the inner upper cover A Be sure to open the paper guide B and release its catches on the cover 6 Remove the fixing bracket A of the stapler unit Opening the trailing edge of the bracket B pull it out to the front while releasing the catch of the boss ...

Страница 99: ...nserted to the cutout of the frame firmly 7 Release the clamp and then remove the 2 connectors 8 Remove the stapler unit A Be sure to open the paper guide B and its catches on the unit When removing the stapler unit make sure to leave the harness of stapler unit is hooked at the position with red circle as shown below ...

Страница 100: ...2 Replacement and Adjustment 94 ...

Страница 101: ... Punch Unit 1 Remove the following covers Rear Upper Cover Rear Upper Cover Rear Lower Cover Rear Lower Cover Rear Upper Cover Rear Lower Cover 2 Remove the side to side detection unit A x 2 x 3 x 2 3 Stepper motor bracket A x 1 x 2 ...

Страница 102: ...2 Replacement and Adjustment 96 4 Remove punch unit controller board cover A x1 x2 5 Pull out the punch unit A x 2 x 3 x 2 ...

Страница 103: ... strength adjust the difference in vertical alignment between the flat fold rollers 1 Remove the saddle stitch unit Saddle Stitch Unit 2 Remove the fold plate bracket A x 2 3 Open the bracket A of the flat fold roller 4 Adjust the position of the flat fold lower roller A to adjust the difference in alignment between the ...

Страница 104: ...the upper and lower rollers are aligned vertically If the toner does not stick well to the folding line of the booklet due to excessive folding strength change the lower roller position to C In this position the booklet will be thicker than the factory default position If you want increase the folding strength the lower roller position should be B factory default position In addition this will mak...

Страница 105: ... Enter the SP mode 2 Set the moving speed of the flat fold booklet unit for each paper size with SP6 114 001 to 010 Fold Speed Adj 2K 3K FIN SP Setting Items Selection Default Value SP6 114 001 Fold Speed Adj 2K 3K FIN A3 SEF 0 Standard 1 Middle 2 Low 0 Standard is faster than 1 Middle 0 Standard SP6 114 002 Fold Speed Adj 2K 3K FIN B4 SEF SP6 114 003 Fold Speed Adj 2K 3K FIN A4 SEF SP6 114 004 Fo...

Страница 106: ...n Adjustment 1 Pull out the saddle stitch unit A 2 Remove the timing gear A x 1 3 Turn the knob A clockwise to move the flat fold roller unit B in the direction of the arrow 4 Move the flat fold roller unit until the edge of the unit A is between the guide lines B and C ...

Страница 107: ...01 inscribed on the bracket 5 Check that the fold plate A has been moved in the direction of the arrow as far as it can go and the bushing C on the rear end of the fold plate shaft B is aligned with the fold plate positioning cam D ...

Страница 108: ...e timing gear A x 1 7 Reassemble the finisher and connect it to the copier 8 Turn on the copier 9 After the finisher initialization is complete check that the flat fold roller unit fold plate and the cam are positioned as described in steps 4 and 5 ...

Отзывы: