background image

In no event will the company be liable for direct, indirect, special, incidental, or consequential damages
as a result of handling or operating the machine.

Notes

The manufacturer shall not be responsible for any damage or expense that might result from the use of
parts other than genuine parts from the manufacturer with your office products.
For good output quality, the manufacturer recommends that you use genuine toner from the
manufacturer.
Some illustrations in this manual might be slightly different from the machine.

About IP addresses

In this manual, "IP address" covers both IPv4 and IPv6 environments. Read the instructions that are
relevant to the environment you are using.

Model-Specific Information

This section explains how to identify the region to which your printer belongs.
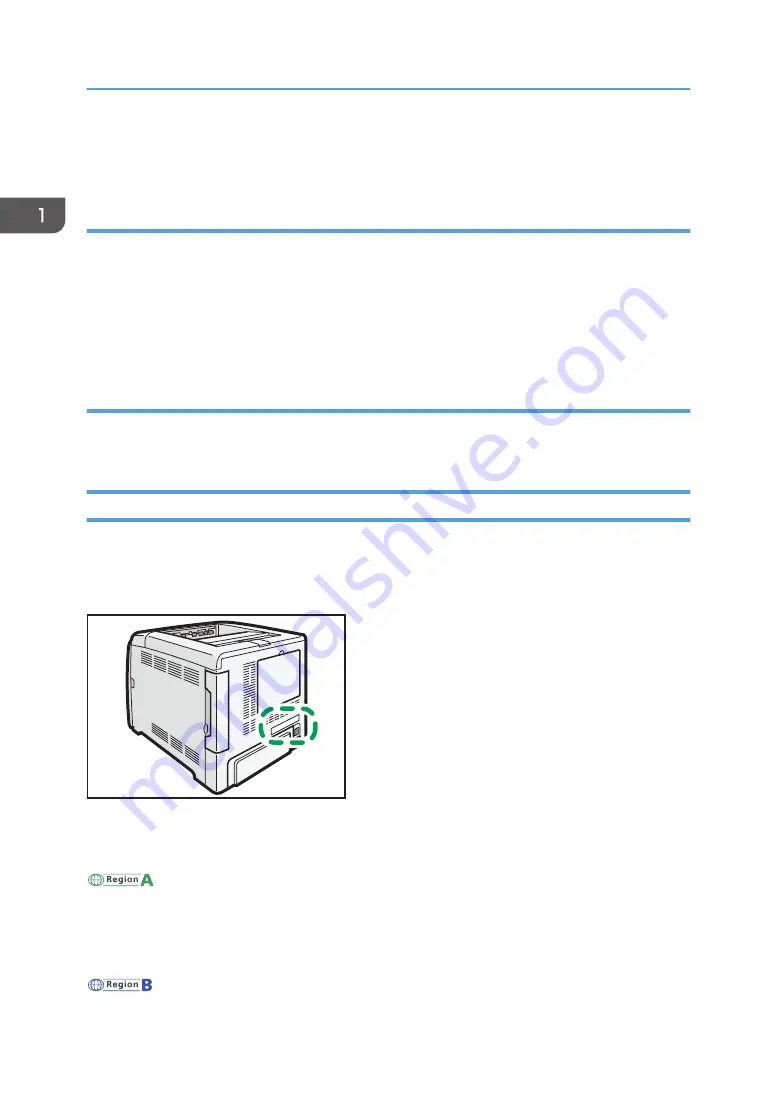
There is a label on the rear of the printer, located in the position shown below. The label contains details
that identify the region to which your printer belongs. Read the label.

DPP283

The following information is region-specific. Read the information under the symbol that corresponds to
the region of your printer.

(mainly Europe and Asia)

If the label contains the following, your printer is a Region A model:

• CODE XXXX -27
• 220–240 V

(mainly North America)

1. Getting Started

8

Содержание SP C340DN

Страница 1: ...For safe and correct use be sure to read the Safety Information in Read This First before using the machine Troubleshooting Loading Paper Getting Started User Guide...

Страница 2: ......

Страница 3: ...nfiguration Screens Using the Control Panel 29 Configuring Printer Settings from the Menu key 29 Configuring Printer Settings from the User Tools key 29 Monitoring and Configuring the Printer 31 Using...

Страница 4: ...ages 67 Alert Messages Displayed on the Control Panel 68 Alert Messages Printed on Error Logs and Reports 79 When You Cannot Print 90 When the Data In Indicator Does Not Light Up or Flash 93 Other Pri...

Страница 5: ...regulations and environmental conformance Quick Installation Guide Describes procedures from unpacking the machine to connecting it to a computer Operating Instructions Provides detailed information a...

Страница 6: ...Image Monitor For details see Before Using This Printer Security Guide Be sure to read this manual when configuring the enhanced security functions or user and administrator authentication Driver Inst...

Страница 7: ...DF Manual Provided HTML Manual Provided User Guide No Yes No Read This First Yes No No Quick Installation Guide Yes No No Operating Instructions No No Yes Extended Feature Settings No No Yes Security...

Страница 8: ...6...

Страница 9: ...ns and instructions on resolving user errors Indicates the names of keys on the machine s display or control panels Indicates the key sequence order you should perform using the control panel Example...

Страница 10: ...P addresses In this manual IP address covers both IPv4 and IPv6 environments Read the instructions that are relevant to the environment you are using Model Specific Information This section explains h...

Страница 11: ...ions for this printer and the names commonly used in this manual Option name Description Paper Feed Unit TK1220 500 sheet paper feed unit Hard Disk Drive Option Type P10 Hard disk IEEE 802 11 Interfac...

Страница 12: ...d internal components Exterior Front view DPP001 11 12 13 5 6 7 8 10 1 2 3 4 9 1 Standard tray Output is stacked here with the print side down 2 Control panel For details see page 16 Guide to the Name...

Страница 13: ...pecifications 8 Main power switch Use this switch to turn the power on and off Perform the shutdown procedure before turning the power off For details about how to shut down the printer see page 26 Tu...

Страница 14: ...inal position The fence may be damaged if it is hit with something or excessive force is applied 13 Standard Tray Extension Use this to support sheets that come out curled after they are printed Flip...

Страница 15: ...tter size paper 5 Cable cover Remove this cover to install the optional interface units and the SD card and to connect various cables 6 Front cover open lever Pull this lever to open the front cover 7...

Страница 16: ...prepared For details about the messages that appear on the screen when consumables need to be replaced see Replenishing and Replacing Consumables Operating Instructions 3 Transfer roller If the messag...

Страница 17: ...ing Instructions 6 Intermediate transfer unit Messages appear on the screen when the intermediate transfer unit needs to be replaced or a new intermediate transfer unit needs to be prepared For detail...

Страница 18: ...directly print images taken with a PictBridge compatible digital camera VM card With this card you can install embedded software applications XPS card Allows you to print XPS files To attach this opt...

Страница 19: ...that you want to move the cursor 5 Escape key Press this key to cancel an operation or return to the previous display 6 Suspend Resume key Press this to suspend the print job currently being processe...

Страница 20: ...splaying the Printer Configuration Screens Using the Control Panel 10 Data in indicator Flashes when the printer is receiving data from a computer The data in indicator is lit if there is data to be p...

Страница 21: ...occurs Steady red Printing is not possible Flashing yellow The printer will soon require maintenance or a replacement consumable such as a print cartridge Printing is possible but print quality cannot...

Страница 22: ...wing items Form Feed Error Log 3 Supplies Press to display the information about printer supplies By default the remaining amount of toner is displayed To avoid displaying the remaining amount of tone...

Страница 23: ...reen 3 Supplies Info screen Checks the printer status such as toner paper and waste toner levels After finishing a job the printer waits a specified length of time then restores its settings to the de...

Страница 24: ...nfo screen to check toner paper and waste toner levels 2 Printer Press to display the Printer screen 3 Shortcut icon area You can add shortcuts to embedded software applications to the Home screen For...

Страница 25: ...m force 1 kgf 9 8N The Home screen is set as the default screen when the printer is turned on 1 4 2 8 5 3 6 7 CZV303 1 Operational status or messages Displays the current printer status such as Ready...

Страница 26: ...hen user authentication is not enabled the screen is displayed after the printer returns from Sleep mode or after a system reset The Information screen appears when the power is turned on regardless o...

Страница 27: ...al number of prints Depending on the printer settings the Information screen may not be displayed For details see Managing Eco friendly Counter Security Guide You can also use Web Image Monitor to che...

Страница 28: ...nnecting the power cord from the wall outlet always pull the plug not the cord Pulling the cord can damage the power cord Use of damaged power cords could result in fire or electric shock Do not press...

Страница 29: ...n Sleep Mode Timer It is the day and time specified in Weekly Timer When the printer is in Sleep mode only the Energy Saver key and the Check Status key are usable for SP C342DN The printer can print...

Страница 30: ...located in an environment where it is exposed to direct sunlight it is advisable that you do not change the factory default configuration and only enable Auto Power Off Only When the printer is in Sle...

Страница 31: ...the next or previous items 3 Press the OK key Any changes you make with configuration screens remain in effect even if the main power switch is turned off To cancel changes made to settings and return...

Страница 32: ...play the next or previous page 3 Change the settings by following the instructions on the display and then press OK 4 Press the User Tools key Any changes you make with the configuration screens remai...

Страница 33: ...computer Displaying printer status or settings Checking the print job status or history Interrupting currently printing jobs Resetting the printer Managing the Address Book Configuring printer setting...

Страница 34: ...using an external DNS server The host file cannot be used To use JAWS 7 0 under Web Image Monitor you must be running Windows and Internet Explorer 6 0 or a later version If you are using Internet Ex...

Страница 35: ...n registered on the DNS or WINS server you can enter it When setting SSL a protocol for encrypted communication under the environment in which server authentication is issued enter https printer s IP...

Страница 36: ...fresh Help Refresh Click at the upper right in the work area to update the printer information Click the Web browser s Refresh button to refresh the entire browser screen Help Use Help to view or down...

Страница 37: ...ck the paper tray available for the size type and weight of the paper you want to use for printing For details about available paper trays for each paper size and type see page 36 Paper Size Specifica...

Страница 38: ...aper size using the control panel You can print on both sides of paper Not supported Metric sizes Paper size name Actual size Bypass tray Tray 1 Trays 2 Two sided A4 210 297 mm A A A A5 148 210 mm A A...

Страница 39: ...ric sizes Tray Horizontal size One sided Vertical size One sided Horizontal size Two sided Vertical size Two sided Bypass tray 64 0 to 216 0 mm 125 0 to 1260 0 mm 90 to 216 0 mm 240 to 356 0 mm Tray 1...

Страница 40: ...dicate the following A Supported You can print on both sides of paper Not supported Paper type Paper weight No Bypass tray Tray 1 Trays 2 Two sided Thin Paper 1 A A A Plain Paper 2 A A A Middle Thick...

Страница 41: ...e 2 A Coated Gloss Thick 4 A Coated Matte Thick 4 A Paper weight No Paper weight 1 60 65 g m2 15 18 lb BOND 2 66 74 g m2 18 20 lb BOND 3 75 90 g m2 20 24 lb BOND 4 91 105 g m2 24 34 lb BOND 5 106 163...

Страница 42: ...before loading For details about available paper sizes and types for each paper tray see page 36 Paper Size Specifications and page 38 Paper Type Specifications Depending on the environment where the...

Страница 43: ...umid areas humidity 70 or less Store on a flat surface Do not store paper vertically Once opened store paper in plastic bags Print Area The following shows the recommended print area for paper printed...

Страница 44: ...mm 35 5 inches in length set the top margin to at least 4 2 mm 0 2 inches the right and left margin to at least 10 mm 0 4 inches and the bottom margin to at least 10 mm 0 4 inches Borderless printing...

Страница 45: ...ntly flip the paper stack in the tray Do not mix different types of paper in the same paper tray After loading paper specify the paper size using the control panel or paper size dial and paper type us...

Страница 46: ...r size DPP044 When loading custom size paper position the paper guide slightly wider than the actual paper size 4 Squeeze the end guide and slide it inward to match the standard size DPP045 5 Load the...

Страница 47: ...se the corners of the paper to catch in the gap at the bottom of the tray resulting in a paper jam or curled corners 7 Lift the front side of the tray and then slide it into the printer carefully unti...

Страница 48: ...48 2 Pull the tray carefully until it stops lift the front side of the tray and then pull it out of the printer DPP042 Place the tray on a flat surface 3 Push the metal plate down until it clicks into...

Страница 49: ...DPP049 After extension make sure the arrows on the extender and tray are aligned DPP050 5 Squeeze the clip on the side paper guide and then slide it to match the legal paper size DPP051 When loading...

Страница 50: ...ueeze the front end paper guide and slide it inward to match the legal paper size DPP052 When loading A4 81 2 11 or smaller paper do not extend the tray Otherwise a paper jam may occur 2 Loading Paper...

Страница 51: ...the printer driver as specified on the printer When loading label paper load it one by one When printing on paper that is longer than A4 load only a single sheet of paper on the bypass tray at a time...

Страница 52: ...e bypass tray it is recommended that you set the paper direction to Before loading Postcard or 148 200 mm paper straighten any curls within 2 mm 0 1 inch upward and 0 mm 0 inches downward on the tray...

Страница 53: ...Icon Meaning Place or load paper printed side face up Place or load paper printed side face down Print side Trays 1 2 Bypass tray One sided Two sided To print on letterhead paper when Letterhead Setti...

Страница 54: ...For details about how to make two sided prints see Printing on Both Sides of a Page Operating Instructions 2 Loading Paper 52...

Страница 55: ...rinter see page 36 Paper Size Specifications and page 38 Paper Type Specifications Misfeeds might occur depending on the length and shape of the flaps Load envelopes with their flaps open Load envelop...

Страница 56: ...et the right left top and bottom print margin to at least 15 mm 0 6 inches each The output quality on envelopes may be uneven if parts of an envelope have differing thicknesses Print one or two envelo...

Страница 57: ...rol panel For details about settings using the control panel see page 59 Configuring Envelope Settings Using the Control Panel Envelopes must be loaded in a specific orientation For details see page 5...

Страница 58: ...Select the envelope size Orientation Select the orientation of the envelope 3 Select Paper Feed in the pop up menu 4 Select the bypass tray 5 Select Printer Features in the pop up menu 6 Switch the F...

Страница 59: ...ol panel and the printer driver The printer cannot print on custom size paper if the application does not support custom size paper Specifying Standard Size Paper Press the Menu key and then select th...

Страница 60: ...vertical dimension of the paper OK Horizontal Enter the horizontal dimension of the paper OK 3 Press OK twice For details about the available paper size see page 36 Paper Size Specifications Specifyin...

Страница 61: ...ontrol Panel When printing on envelopes load envelopes in bypass tray or Tray 1 and then follow the procedure below to specify envelope type and thickness Press the Menu key and then select the settin...

Страница 62: ...ns and page 38 Paper Type Specifications For details about how to load envelopes see page 53 Loading Envelopes Configure the paper settings appropriately using both the printer driver and the control...

Страница 63: ...ong beep Job completed A Printer job has finished Four long beeps Printer initialized The screen is changing back to the initial screen after the printer came out of the energy saving mode or was rese...

Страница 64: ...ing Paper Add Toner indicator Appears when toner runs out For details about adding toner see Replacing the Print Cartridge Operating Instructions Service Call indicator Appears when the printer is mal...

Страница 65: ...disk Print Job s Displays the number of jobs for Hold Print Job s Stored Print Job s Locked Print Job s and Sample Print Job s Machine Adres Info You can check the following items under Machine Adres...

Страница 66: ...printer function is performing a job An error has occurred on the printer An error has occurred in the printer function being used or the printer function cannot be used because an error has occurred...

Страница 67: ...isplayed The printer is unable to connect to the network A network error has occurred Press Check and then check the displayed message and take appropriate action For details about error messages and...

Страница 68: ...ly booted up reconnect the USB cable Windows has already configured the USB settings Check whether or not the computer has identified the printer as an unsupported device Open Windows Device Manager a...

Страница 69: ...n turn it on again Job Suspended All jobs are suspended Turn off the printer and turn it on again to resume the jobs Offline The printer is offline and cannot print Please wait This message may appear...

Страница 70: ...printer is printing Wait a while Ready This is the default ready message The printer is ready for use No action is required Resetting job The printer is resetting the print job Wait until Ready appea...

Страница 71: ...toner bottle For details see Replacing Other Consumables Operating Instructions Remote Cert update failed Updating the Remote certificate failed Turn the printer off and then turn it on again If the...

Страница 72: ...e to change the tray s settings press JobReset to reset the job or press Form Feed to force printing ECO Night Sensor did not turn Power Switch off Turn switch off manually or to use press any key Aut...

Страница 73: ...r There are problems with the printer s font file Turn the printer off and then turn it on again If the problem persists contact your sales or service representative Problem Wireless board Please call...

Страница 74: ...re installation contact your sales or service representative For details see Replacing Other Consumables Operating Instructions Set the Intermediate Transfer Unit correctly The intermediate transfer...

Страница 75: ...printed or deleted This message might appear if you print or delete a job from Web Image Monitor Press Exit on the message screen Toner is almost empty The print cartridge is almost empty For details...

Страница 76: ...Reset to cancel the job The tray selected for other pages is the same as the one for slip sheets Reset the job Be sure the tray you select for slip sheets is not providing paper for other pages Change...

Страница 77: ...sk Operating Instructions Hardware Problem Parallel I F An error has occurred in the IEEE 1284 interface board Turn the main power switch off and then confirm the IEEE 1284 interface board is inserted...

Страница 78: ...r driver into the input tray For details about how to change the paper size see page 35 Loading Paper No toner Replace Toner Cartridge The toner has run out Replace the print cartridge For details see...

Страница 79: ...required Please contact your local vendor You will need to replace the fusing unit soon Contact your sales or service representative to obtain a new unit Replacement of Transfer Unit is now necessary...

Страница 80: ...y manually to continue printing or cancel a print job For details about how to select the tray manually or cancel a print job see If an Error Occurs with the Specified Paper Size and Type Operating In...

Страница 81: ...the PDF file you want to print Contact the owner of the document Classification Code Error The classification code is not specified with the printer driver Select Optional for the classification code...

Страница 82: ...nting could not be performed because the file system could not be obtained Turn the printer off and then turn it on again If the message appears again contact your service representative File System F...

Страница 83: ...he paper type specified using the printer driver Check that the printer is connected to the network correctly and bidirectional communication is enabled If the problem persists check the user paper ty...

Страница 84: ...the network while the error job storing function was enabled Contact your administrator to check whether the machine is connected correctly to the network Address Book is currently in use by another f...

Страница 85: ...working correctly Command Error An RPCS command error occurred Check that the communication between a device and the printer is working correctly Compressed Data Error The printer detected corrupt co...

Страница 86: ...t it was skipped Check that the data is valid Excdd max No of files to print for temp stored jobs While printing a Sample Print Locked Print Hold Print or Stored Print file the maximum file capacity w...

Страница 87: ...n power switch and then back on again If the message appears again contact your service representative File system is full The PDF file does not print out because the capacity of the file system is fu...

Страница 88: ...user name occurred due to a switching of domains servers etc For details about User Authentication see Configuring User Authentication Security Guide Insufficient Memory A memory allocation error occu...

Страница 89: ...n on the printer driver For details about how to change the resolution setting see the printer driver Help Printing privileges have not been set for this document The PDF document you have tried to pr...

Страница 90: ...e user paper type settings of the printer For details see Registering Unique Names to Paper Types Operating Instructions You do not have a privilege to use this function This job has been cancelled Th...

Страница 91: ...ut the kinds of data supported by the Direct printing function from memory storage devices see Direct Printing from a Memory Storage Device Operating Instructions If printing does not start contact yo...

Страница 92: ...s not start The interface cable is not connected correctly For details about how to connect interface cables correctly see Connecting the Printer Operating Instructions Printing does not start The cor...

Страница 93: ...does not start If the printer is using wireless LAN when there is a microwave oven mobile phone industrial machine scientific instrument or medical instrument which uses the same frequency range near...

Страница 94: ...wireless LAN interface is not working Make sure the orange LED is lit and the green LED is lit or flashing during transmission Printing does not start The Login User Name Login Password or Driver Enc...

Страница 95: ...ve When the Data In Indicator Does Not Light Up or Flash When the Data In indicator does not light up or flash after a print job starts data is not being sent to the printer When the printer is connec...

Страница 96: ...rinter driver s Detailed Settings tab click Paper in Menu and then select Bypass Tray in the Input Tray list Then in the Paper Type list select a proper paper type Printed images contain blots or are...

Страница 97: ...ee page 36 Paper Size Specifications and page 38 Paper Type Specifications The printed image is faded over the entire page If On is selected in the Economy Color list in the printer driver settings th...

Страница 98: ...e paper tray or bypass tray matches the paper type set on the display panel For details about paper type settings see page 57 Paper Settings The image is too dark or too light The paper is loaded reve...

Страница 99: ...printed pages when a large number of pages are continuously printed in a high temperature or humid environment Perform the automatic gradation correction For details see Correcting the Color Gradation...

Страница 100: ...from the display Data transmission failed or was canceled during printing Check whether there is failed or canceled data remaining For details about how to identify the cause of the error see Checking...

Страница 101: ...be using paper smaller than the size selected in the application Use the same size paper as that selected in the application If you cannot load paper of the correct size use the reduction function to...

Страница 102: ...and thickness of the lines Images appear only partially colored The paper is damp Use paper that has been stored in the recommended temperature and humidity conditions For details about the proper way...

Страница 103: ...xceeds the capacity of the printer Load paper only as high as the upper limit markings on the side fences of the paper tray or the markings on the paper guides of the bypass tray Misfeeds occur freque...

Страница 104: ...Use clean cut paper with no burrs Misfeeds occur frequently Printed paper is being used Do not load sheets that have already been copied or printed by another printer Misfeeds occur frequently Sheets...

Страница 105: ...You have selected a paper tray that is not set for duplex print Change the setting to enable duplex printing for the paper tray Duplex printing is malfunctioning You have selected a paper type that ca...

Страница 106: ...ter Wait for a moment Changing the following settings with the printer driver may help speed up printing Select Speed in Print Priority list Select a lower resolution For details about how to change t...

Страница 107: ...The printer driver settings are not configured correctly PCL 5c On the printer driver s Print Quality tab select 600 dpi in the Resolution area PCL 6 On the printer driver s Detailed Settings tab cli...

Страница 108: ...Settings tab click Print Quality Standard in Menu and then select Quality in the Print Priority list On the printer driver s Detailed Settings tab click Print Quality Advanced in Menu and then select...

Страница 109: ...Color originals are printed in black and white No color print settings are configured on the printer driver Change the Color Black and White setting on the printer driver For details about how to chan...

Страница 110: ...he capacity of the printer Reduce the number of jobs Printing via wireless LAN is slow A communication error might have occurred Interference from other wireless LAN devices can reduce the communicati...

Страница 111: ...e value of RAM Disk in the System Menu to 2 MB or higher For details about RAM Disk see System SP C340DN Operating Instructions System SP C342DN Operating Instructions When printing a PDF using a pass...

Страница 112: ...the colors are different from what you expect perform Color Registration For details see Adjusting the Color Registration Operating Instructions The color of the printout is different from the color...

Страница 113: ...he printer when it is acclimatized When Printer Is Not Functioning Properly Problem Solutions Paper is not fed from the selected tray When you are using a Windows operating system the printer driver s...

Страница 114: ...r is adjusting the color registration Wait for a while Attached options are not detected in the printer properties The computer and printer are not in bidirectional communication You must configure at...

Страница 115: ...have connected multiple digital cameras Connect only one digital camera Do not connect multiple cameras Printing is disabled The number of originals exceeds the maximum number of pages that can be pr...

Страница 116: ...hot For this reason take care when removing misfed paper Not doing so could result in burns When removing jammed paper make sure not to trap or injure your fingers To prevent misfeeds do not leave any...

Страница 117: ...nt cover with both hands carefully DPP061 Do not pull out the paper tray Tray 1 If paper is jammed in Tray 2 but it is difficult to locate pull out Tray 2 to remove it After removing the paper careful...

Страница 118: ...ed in the bypass tray and then close the bypass tray with both hands DPP062 2 Pull Front Cover Open Lever and then open the front cover with both hands carefully 1 2 DPP058 3 Pull out the jammed paper...

Страница 119: ...er closing the cover check that the error is cleared Paper Misfeed Message B The inside of this printer becomes very hot Before removing paper around the fusing unit wait until the temperature of the...

Страница 120: ...ove it Do not pull it upward If the jammed paper is visible in the output tray lower the blue fusing unit levers and then pull the jammed paper out of the tray If you cannot find the jammed paper open...

Страница 121: ...After closing the cover check that the error has cleared Paper Misfeed Message Y The solution for Paper Misfeed Message Y is the same as that for Paper Misfeed Message A For details see page 114 Paper...

Страница 122: ...ands carefully 1 2 DPP058 2 Carefully remove jammed paper under the paper transfer unit DPP067 3 Close the front cover with both hands carefully DPP061 When closing the front cover push the upper side...

Страница 123: ...ered trademarks or trademarks of Microsoft Corporation in the United States and or other countries Monotype is a registered trademark of Monotype Imaging Inc IPX IPX SPX NCP and NDS are either registe...

Страница 124: ...Windows Server 2003 Enterprise Edition The product names of Windows Server 2003 R2 are as follows Microsoft Windows Server 2003 R2 Standard Edition Microsoft Windows Server 2003 R2 Enterprise Edition...

Страница 125: ...Standard Other product names used herein are for identification purposes only and might be trademarks of their respective companies We disclaim any and all rights to those marks Microsoft product scre...

Страница 126: ...MEMO 124 EN GB EN US M0AG 7600...

Страница 127: ...2016...

Страница 128: ...M0AG 7600 US EN GB EN...

Отзывы: