background image

3.

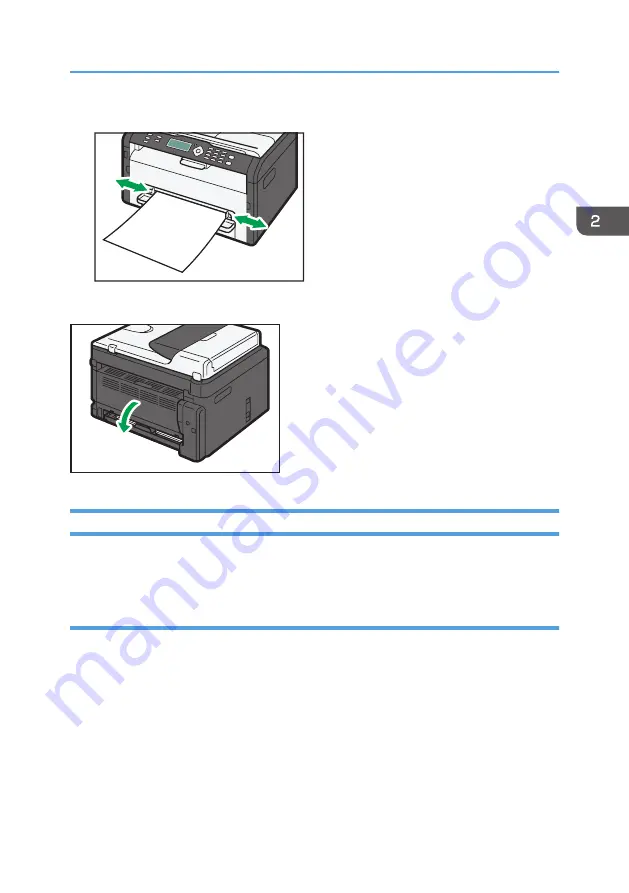
Adjust the side guides to the paper width.

CTT033

To deliver the sheets face up, open the rear cover.

CTT094

Specifying Paper Type and Paper Size Using Smart Organizing Monitor

The procedure in this section is an example based on Windows 7. The actual procedure may vary
depending on the operating system you are using.

Specifying the paper type and paper size

1.

On the [Start] menu, click [All Programs].

2.

Click [Smart Organizing Monitor for SP xxx Series].

3.

Click [Smart Organizing Monitor for SP xxx Series Status].

4.

If the machine you are using is not selected, click [Select Device...], and then select the
machine's model.

5.

Click [OK].

6.

On the [Status] tab, click [Change...].

7.

Select the paper type and paper size, and then click [OK].

Loading Paper

17

Содержание SP 200S

Страница 1: ...Operating Instructions User Guide For safe and correct use be sure to read Safety Information before using the machine...

Страница 2: ......

Страница 3: ...per Supported Paper 13 Non Recommended Paper Types 15 Print Area 16 Loading Paper 18 Loading Paper into Tray 1 18 Loading Paper into Bypass Tray 21 Specifying Paper Type and Paper Size Using Smart Org...

Страница 4: ...ation 43 Printing the Configuration Page 44 Configuring the Machine Settings 45 Tab Settings 45 Updating the Firmware 46 7 Maintaining the Machine Replacing the Print Cartridge 47 Cautions When Cleani...

Страница 5: ...Moving and Transporting the Machine 70 Disposal 70 Where to Inquire 70 Consumables 71 Print Cartridge 71 Specifications of the Machine 72 General Function Specifications 72 Printer Function Specifica...

Страница 6: ...4...

Страница 7: ...ult with your legal advisor Disclaimer Contents of this manual are subject to change without prior notice To the maximum extent permitted by applicable laws in no event will the manufacturer be liable...

Страница 8: ...Place originals here sheet by sheet 2 Control Panel Contains a screen and keys for machine control 3 Exposure Glass Cover Open this cover to place originals on the exposure glass 4 Stop Fences Raise...

Страница 9: ...over to deliver sheets face up or remove jammed paper 11 USB Port Use this port to connect the machine to a computer using a USB cable 12 Tray Cover Attach this cover when you extend the tray Interior...

Страница 10: ...ch segment is lit on this indicator Upper Text Photo Middle Text Lower Photo 2 Original Type key Use this button to select the type of original 3 Density Indicator Displays the copy density in three l...

Страница 11: ...g print job 9 Key Use this button to start copying 10 Power Indicator This indicator lights up blue when the machine is turned on It flashes when a print job is received and while printing or scanning...

Страница 12: ...he printer driver TWAIN driver WIA driver and Smart Organizing Monitor from the CD ROM 1 Close all applications except this manual 2 Insert the CD ROM into the CD ROM drive 3 Select a language for the...

Страница 13: ...want to delete and then click Remove device 3 Click Yes 4 Click any printer icon and then click Print server properties 5 Click the Drivers tab 6 Click Change Driver Settings if it is displayed 7 Cli...

Страница 14: ...pages Prints List Report to check the list of settings for this machine and other information Modify the system settings Use to change custom paper size settings and other settings on this machine Mo...

Страница 15: ...e The following paper sizes are supported as custom paper sizes Width Tray1 Approximately 100 216 mm 3 9 8 5 inches Bypass Tray Approximately 90 216 mm 3 6 8 5 inches Length Approximately 148 356 mm 5...

Страница 16: ...Bypass Tray 1 sheets 70 g m2 19 lb 2 Loading Paper 14...

Страница 17: ...using paper printed on by other than a laser printer e g monochrome and color copiers ink jet printers etc Special paper such as thermal paper and carbon paper Paper weighing heavier or lighter than t...

Страница 18: ...that the machine can print on From the printer driver CHZ904 2 3 3 1 4 4 1 Print area 2 Feed direction 3 Approx 4 2 mm 0 2 inches 4 Approx 4 2 mm 0 2 inches The print area may vary depending on the p...

Страница 19: ...Copier function CHZ904 2 3 3 1 4 4 1 Print area 2 Feed direction 3 Approx 4 mm 0 2 inches 4 Approx 3 mm 0 1 inches The print area may vary depending on the paper size Print Area 17...

Страница 20: ...at the settings configured when paper is loaded can be used for printing If you print test pages or copy when the bypass tray is loaded the paper in the bypass tray is fed first Do not load paper in t...

Страница 21: ...tray 5 Load the new paper stack print side down Make sure paper is not stacked higher than the upper limit marked inside the tray CTT075 6 Carefully push Tray 1 straight into the machine CTT029 To av...

Страница 22: ...s 2 Release the extender locks on both sides of the tray and then pull out the extender until it clicks CTT077 Make sure the extender s inner surface and the scale are aligned 3 Lock the extender in t...

Страница 23: ...cover CTT095 Loading Paper into Bypass Tray 1 Open the bypass tray CTT063 2 Slide the side guides outward then load paper with the print side up and push in until it stops against the machine CTT032...

Страница 24: ...erating system you are using Specifying the paper type and paper size 1 On the Start menu click All Programs 2 Click Smart Organizing Monitor for SP xxx Series 3 Click Smart Organizing Monitor for SP...

Страница 25: ...n select the machine s model 5 Click OK 6 On the User Tool tab click Printer Configuration 7 On the System tab select mm or inch in the Measurement Unit list To specify the bypass tray click the Copy...

Страница 26: ...ou correctly place originals margins of a few millimeters on all four sides of the original may not be scanned Margins when using exposure glass CHZ916 1 Approx 4 1 mm 0 2 inches 2 Approx 3 mm 0 1 inc...

Страница 27: ...n the exposure glass The original should be aligned to the rear left corner CTT023 3 Lower the exposure glass cover Hold down the cover with your hands when using thick folded or bound originals and w...

Страница 28: ...2 Loading Paper 26...

Страница 29: ...n a sheet Splitting a single page across multiple sheets Printing on both sides of sheets Not having blank pages printed Having prints sorted Saving printer driver settings as a file Recalling and del...

Страница 30: ...with the bypass tray 1 After creating a document open the Printing Preferences dialog box in the document s native application 2 On the Setup tab in the Duplex list box select how you want to open th...

Страница 31: ...ing either the machine s control panel or your computer depending on the status of the job Canceling a print job before printing has started 1 Double click the printer icon on the task tray of your co...

Страница 32: ...Canceling a print job while printing 1 Press the key CTT083 3 Printing Documents 30...

Страница 33: ...ey until the number of copies you want to print is displayed CTT085 Holding down the key increases the number in increments of 10 3 Press the key CTT084 If a paper jam occurs printing stops halfway Op...

Страница 34: ...achine is scanning the original copying is canceled immediately and there is no printout If copying is canceled during printing the photocopy process is canceled after the current page has been printe...

Страница 35: ...reduction or enlargement ratio for the current job from Smart Organizing Monitor The procedure in this section is an example based on Windows 7 The actual procedure may vary depending on the operatin...

Страница 36: ...he User Tool tab click Printer Configuration 7 On the Copy tab select the ratio in the Reduce Enlarge list If Zoom 25 to 400 has been selected enter the ratio 8 Click OK 9 Click Close 4 Copying Origin...

Страница 37: ...en copying onto A4 paper you can copy documents that are smaller than A5 Likewise when copying onto Letter size paper you can copy documents that are smaller than Half Letter size To use this function...

Страница 38: ...n the exposure glass Place the card in the center of the specified scan area for sheets that are half the size of the paper to be printed on For example if you print on an A4 sheet place the card in t...

Страница 39: ...e key CTT084 5 Within 30 seconds place the original back side down with the top to the rear of the machine on the exposure glass and then press the key Copying Both Sides of an ID Card onto One Side o...

Страница 40: ...r Left Lighter than normal Middle Normal density Right Darker than normal Selecting the Document Type According to Original There are three document types Text Select this when the original contains o...

Страница 41: ...Specifying the Original Type 1 Continue to press the Original Type key until the indicator next to the appropriate original type lights up CTT088 Specifying the Scan Settings 39...

Страница 42: ...4 Copying Originals 40...

Страница 43: ...nto your computer directly TWAIN Scanning TWAIN scanning is possible if your computer is running a TWAIN compatible application 1 Place the original 2 Open the properties dialog box for this machine u...

Страница 44: ...esolution Select a resolution from the list If Text Text Photo or Photo is selected in Scan Mode the scan resolution cannot be set 1200 dpi 1200 dpi or higher 7 Image Quality Adjustment You can adjust...

Страница 45: ...o use Smart Organizing Monitor install the printer driver Checking the Status Information CTT015 1 2 3 4 1 Image area Displays the status of this machine with an icon 2 Status area Paper Size Displays...

Страница 46: ...ear on the Smart Organizing Monitor Printing the Configuration Page 1 On the Start menu click All Programs 2 Click Smart Organizing Monitor for SP xxx Series 3 Click Smart Organizing Monitor for SP xx...

Страница 47: ...modified using Smart Organizing Monitor For more information on each setting item see the Smart Organizing Monitor Help System tab Register custom paper sizes Adjust the printing position or density...

Страница 48: ...hat the computer will not enter standby or sleep mode during a firmware update Download the firmware from the manufacturer s Web site To update the firmware use the Smart Organizing Monitor from Windo...

Страница 49: ...nvironmental conditions such as temperature and humidity Toner quality degrades over time For good print quality the manufacturer recommends that you use genuine toner from the manufacturer The manufa...

Страница 50: ...nt cartridge in horizontally and then slowly push it in all the way Finally push the cartridge down until it clicks into place CTT048 6 Carefully push up the front cover until it closes 7 Maintaining...

Страница 51: ...dry wipe the area and allow it to dry To avoid deformation discoloration or cracking do not use volatile chemicals such as benzine and thinner or spray insecticide on the machine If there is dust or g...

Страница 52: ...e horizontally holding its center CTT045 3 Using a cloth wipe the inside of the machine CTT047 4 Slide the print cartridge in horizontally and then slowly push it in all the way Finally push the cartr...

Страница 53: ...t to hold the input tray when lifting the exposure glass cover for the tray might be damaged 2 Clean the parts indicated with arrows with a soft damp cloth and then wipe the same parts with a dry clot...

Страница 54: ...7 Maintaining the Machine 52...

Страница 55: ...er plug is firmly inserted into the wall outlet Make sure that the wall outlet is not defective by connecting another working device Pages are not printed The USB cable is not connected correctly Reco...

Страница 56: ...st the paper guides to remove the gaps Avoid printing on both sides of paper when printing images that contain large areas of solid color which consume a lot of toner Use supported types of paper See...

Страница 57: ...n the paper and the paper guides adjust the paper guides to remove the gaps Removing Printing Jams Jammed paper may be covered in toner Be careful not to get toner on your hands or clothes Toner on pr...

Страница 58: ...ay 1 back in until it stops 3 Open the front cover and then carefully lower it CTT054 4 Carefully pull out the print cartridge horizontally holding its center CTT045 Do not shake the removed print car...

Страница 59: ...and then slowly push it in all the way Finally push the cartridge down until it clicks into place CTT048 7 Carefully push up the front cover until it closes CTT055 If the error display continues to a...

Страница 60: ...carefully CTT034 2 Close the bypass tray 3 Follow Steps 3 to 7 in Removing Jammed Paper from Tray 1 If the error display continues to appear perform the procedure described in Opening the Rear Cover t...

Страница 61: ...g cover CTT079 3 Push the levers on the sides down with your thumbs CTT080 4 Remove the jammed paper carefully CTT066 5 Push the levers on the sides up with your thumbs 6 Close the fusing cover Paper...

Страница 62: ...7 Close the rear cover CTT044 8 Troubleshooting 60...

Страница 63: ...y the machine See p 13 Supported Paper The paper type setting is incorrect Make sure that the paper type setting of the printer driver matches the type of paper loaded See p 13 Supported Paper A non g...

Страница 64: ...delay between the print start command and actual printing Processing time depends on data volume High volume data such as graphics heavy documents take longer to process Wait for a while To speed up p...

Страница 65: ...cause may be one of the following Possible Cause Solution Page layout settings are not configured properly Check that the page layout settings are properly configured in the application The paper size...

Страница 66: ...areas Switching the setting for image quality between Photo and Text Photo may eliminate the moire pattern Photocopied paper is dirty Image density is too high Adjust the image density Toner on the p...

Страница 67: ...or out of position The original was moved during scanning Do not move the original during scanning The scanned image is upside down The original was placed upside down Place the original in the corre...

Страница 68: ...has run out of paper Load paper into the bypass tray See p 18 Loading Paper E5 An appropriate size paper for printing Report is not loaded Load the appropriate size paper E6 The print cartridge has n...

Страница 69: ...aded in Tray 1 Press the key to begin printing or press the key to cancel the job P3 The specified paper type of the file does not match that of the paper loaded in the bypass tray Press the key to be...

Страница 70: ...ismatch The paper type specified on the machine and the type specified in the printer driver do not match For details about changing the paper type setting of the machine see p 18 Loading Paper For de...

Страница 71: ...uaranteed if any third party toner is used Depending on printing conditions there are cases where the printer cannot print the number of sheets indicated in the specifications Replace the print cartri...

Страница 72: ...heck the following points The power switch is turned off The power cord is unplugged from the wall outlet All other cables are unplugged from the machine 2 Lift the machine using the inset grips on bo...

Страница 73: ...e replacement we recommend you purchase and store extra print cartridges The actual number of printable pages varies depending on the image volume and density number of pages printed at a time paper t...

Страница 74: ...81 2 11 Letter 81 2 14 Legal B5 JIS 51 2 81 2 Half Letter 71 4 101 2 Executive A5 A6 B6 JIS 16K 197 273 mm 16K 195 270 mm 16K 184 260 mm Custom Paper Size The following paper sizes are supported as cu...

Страница 75: ...W or less Machine dimensions Width Depth Height 402 360 249 mm 15 8 14 2 9 8 inches Weight machine body with consumables Approximately 8 9 kg 19 6 lb or less Printer Function Specifications Printing...

Страница 76: ...seconds or less Multiple copy speed 22 pages per minute Reproduction ratio Fixed ratio 50 71 82 93 122 141 200 Zoom ratio 25 to 400 Copy quantity 99 Scanner Function Specifications Maximum scanning a...

Страница 77: ...ta Business Microsoft Windows Vista Home Premium Microsoft Windows Vista Home Basic Microsoft Windows Vista Enterprise The product names of Windows 7 are as follows Microsoft Windows 7 Starter Microso...

Страница 78: ...without Hyper VTM Microsoft Windows Server 2008 Datacenter without Hyper VTM The product names of Windows Server 2008 R2 are as follows Microsoft Windows Server 2008 R2 Foundation Microsoft Windows S...

Страница 79: ...Job cancel 29 L Legal prohibition 5 Loading paper 18 M Machine settings 45 Moving 70 N Non recommended paper 15 Notes 69 O Original type 38 Originals 24 P Paper feed problems 54 Paper jam 55 58 Placi...

Страница 80: ...Trademarks 75 Troubleshooting 53 54 61 62 63 64 65 TWAIN 41 U Unscannable image area 24 Upgrade 10 W WIA 42 78...

Страница 81: ...MEMO 79...

Страница 82: ...MEMO 80 EN CN M134 8630...

Страница 83: ......

Страница 84: ...EN CN M134 8630 2012...

Страница 85: ...Operating Instructions User Guide For safe and correct use be sure to read Safety Information before using the machine...

Страница 86: ......

Страница 87: ...tor 15 What is Smart Organizing Monitor 16 Configuring Network Settings 17 Configuring the IP Address Settings Using the Control Panel 17 2 Loading Paper Supported Paper 21 Non Recommended Paper Types...

Страница 88: ...onto One Side of Paper 53 Copying an ID Card 53 Making 2 sided Copies 56 Specifying 2 Sided Copying 57 Specifying the Scan Settings 59 Adjusting Image Density 59 Selecting the Document Type According...

Страница 89: ...ful Sending Functions 85 Specifying the Scan Settings 88 Using the Fax Function from a Computer PC FAX 90 Basic Operation for Sending Faxes from a Computer 90 Configuring Transmission Settings 91 Conf...

Страница 90: ...138 Updating the Firmware 138 9 Maintaining the Machine Replacing the Print Cartridge 141 Cautions When Cleaning 143 Cleaning the Inside of the Machine 144 Cleaning the Exposure Glass 145 Cleaning the...

Страница 91: ...es About the Toner 175 Moving and Transporting the Machine 176 Disposal 176 Where to Inquire 176 Consumables 177 Print Cartridge 177 Specifications of the Machine 178 General Function Specifications 1...

Страница 92: ...6...

Страница 93: ...ith your legal advisor Disclaimer Contents of this manual are subject to change without prior notice To the maximum extent permitted by applicable laws in no event will the manufacturer be liable for...

Страница 94: ...202S ADF Auto Document Feeder Not Available Available Standard Available Standard Available Standard Ethernet Port Network Not Available Not Available Available Standard Not Available Scanner Functio...

Страница 95: ...4 models do not come with an Ethernet port Type 4 models do not come with a handset line port or TEL port CTT106 2 8 1 6 3 7 4 5 9 10 11 14 13 12 16 15 17 1 Exposure Glass Place originals here sheet b...

Страница 96: ...put Tray for the ADF Place stacks of originals here They will feed in automatically This tray can hold up to 15 sheets of plain paper 12 ADF Cover Open this cover to remove originals jammed in the ADF...

Страница 97: ...dge Control Panel Type 1 and 2 models do not have the key Type 4 models have the key instead of the key Type 4 models do not have the or key 1 2 3 4 5 6 7 8 9 10 11 12 13 14 CTT100 1 Key Use this key...

Страница 98: ...eception scan or copy 9 Key Use this key to switch the machine to scanner mode 10 Power Indicator This indicator lights up blue when the machine is turned on It flashes when a print job is received an...

Страница 99: ...he Software Installation Guide Quick Install for USB 1 Close all applications except this manual 2 Insert the CD ROM into the CD ROM drive 3 Select a language for the interface and then click OK 4 Fro...

Страница 100: ...ter driver 1 On the Start menu click Devices and Printers Windows XP Windows Server 2003 2003 R2 On the Start menu select Printers and Faxes Windows Vista Windows Server 2008 On the Start menu select...

Страница 101: ...at allows you to modify the machine s settings or view the machine s status from your computer For details see page 16 What is Smart Organizing Monitor 1 Close all applications except this manual 2 In...

Страница 102: ...heck the list of settings for this machine and other information Modify the IPv4 Address Use to specify the IPv4 address Modify the system settings Use to change custom paper size settings and other s...

Страница 103: ...lation Guide The IP address can also be configured via Web Image Monitor For details about configuring the IP address see page 123 Using Web Image Monitor Setting the machine to receive an IPv6 addres...

Страница 104: ...d then press the OK key 5 Make sure Use IPv6 is set to On If this setting is changed the machine will reboot automatically before the procedure is complete When this happens wait for the reboot to fin...

Страница 105: ...and then press the OK key After a setting is changed the machine automatically restarts Install the driver after configuring the IPv6 address For details about installing the driver see the Software I...

Страница 106: ...1 Guide to the Machine 20...

Страница 107: ...llowing paper sizes are supported as custom paper sizes Width Tray1 Approximately 100 216 mm 3 9 8 5 inches Bypass Tray Approximately 90 216 mm 3 6 8 5 inches Length Approximately 148 356 mm 5 8 14 in...

Страница 108: ...Bypass Tray 1 sheets 70 g m2 19 lb 2 Loading Paper 22...

Страница 109: ...using paper printed on by other than a laser printer e g monochrome and color copiers ink jet printers etc Special paper such as thermal paper and carbon paper Paper weighing heavier or lighter than t...

Страница 110: ...the printer driver CHZ904 2 3 3 1 4 4 1 Print area 2 Feed direction 3 Approx 4 2 mm 0 2 inches 4 Approx 4 2 mm 0 2 inches The print area may vary depending on the paper size and printer driver setting...

Страница 111: ...4 2 3 3 1 4 4 1 Print area 2 Feed direction 3 Approx 4 mm 0 2 inches 4 Approx 3 mm 0 1 inches The print area may vary depending on the paper size Fax function CHZ904 2 3 3 1 4 4 1 Print area 2 Feed di...

Страница 112: ...3 Approx 4 2 mm 0 2 inches 4 Approx 4 2 mm 0 2 inches The print area may vary depending on the paper size 2 Loading Paper 26...

Страница 113: ...d can be used for printing To print on paper fed from Tray 1 remove the paper loaded in the bypass tray Otherwise the paper in the bypass tray is fed first Do not load paper in the bypass tray when th...

Страница 114: ...tray 5 Load the new paper stack print side down Make sure paper is not stacked higher than the upper limit marked inside the tray CTT075 6 Carefully push Tray 1 straight into the machine CTT029 To avo...

Страница 115: ...d then pull out the extender CTT077 Make sure the extender s inner surface and the scale are aligned You can adjust the length of the extender in three steps When using A4 paper adjust the length to t...

Страница 116: ...nger than A4 must be loaded without attaching the tray cover Loading Paper into Bypass Tray 1 Open the bypass tray CTT063 2 Slide the side guides outward load paper with the print side up and then pus...

Страница 117: ...de guides to the paper width CTT033 To deliver the sheets face up open the rear cover CTT094 Specifying Paper Type and Paper Size Using Control Panel Specifying the paper type 1 Press the key CTT006 L...

Страница 118: ...ss the OK key 6 Press the key to return to the initial screen Specifying the standard paper size 1 Press the key CTT006 2 Press the or key to select System Settings and then press the OK key To specif...

Страница 119: ...then press the OK key 6 Press the or key to select mm or inch and then press the OK key 7 Press the or key to specify the width and then press the OK key 8 Press the or key to specify the length and t...

Страница 120: ...s 3 Click Smart Organizing Monitor for SP xxx Series Status 4 If the machine you are using is not selected click Select Device and then select the machine s model 5 Click OK 6 On the User Tool tab cli...

Страница 121: ...of originals might be damaged become jammed or result in gray or black lines appearing on prints Originals larger or heavier than the recommended amount Stapled or clipped originals Perforated or torn...

Страница 122: ...t be scanned Margins when using exposure glass CHZ916 Copier Fax 1 Approx 4 1 mm 0 2 inches 2 Approx 3 mm 0 1 inches 3 Approx 4 mm 0 2 inches Scanner Scan to E mail Scan to FTP Scan to Folder 1 Approx...

Страница 123: ...at will appear on copies 1 Lift the exposure glass cover 2 Place the original face down on the exposure glass The original should be aligned to the rear left corner CTT023 3 Lower the exposure glass c...

Страница 124: ...input tray for the ADF CTT035 2 Adjust the guides according to the size of the originals CTT036 3 Place the aligned originals face up in the ADF The last page should be on the bottom CTT037 2 Loading...

Страница 125: ...n a sheet Splitting a single page across multiple sheets Printing on both sides of sheets Not having blank pages printed Having prints sorted Saving printer driver settings as a file Recalling and del...

Страница 126: ...with the bypass tray 1 After creating a document open the Printing Preferences dialog box in the document s native application 2 On the Setup tab in the Duplex list box select how you want to open th...

Страница 127: ...or your computer depending on the status of the job Canceling a print job before printing has started 1 Double click the printer icon on the task tray of your computer 2 Select the print job you want...

Страница 128: ...Canceling a print job while printing 1 Press the key CTT007 2 Press the 1 key To cancel printing press the 1 key 1 Yes To continue printing press the 2 key 2 No 3 Printing Documents 42...

Страница 129: ...Use the form feed function to ignore the error and print using mismatched paper Reset the print job Cancel printing Continuing Printing Using Mismatched Paper If the paper is too small for the print j...

Страница 130: ...3 Printing Documents 44...

Страница 131: ...an be specified for the current job By pressing the or key in the Standby mode screen you can specify the following settings for the current job Tray Paper Settings paper size Sort Original Type Densi...

Страница 132: ...used with the bypass tray When making multiple copies of a multi page document you can select whether copies are output in collated sets or in page batches in the Sort setting under Copier Features 1...

Страница 133: ...and then remove the jammed paper Specify the copy setting again from the page where the paper jammed Canceling a Copy If copying is canceled while scanning an original placed on the exposure glass co...

Страница 134: ...ling ratio using a preset ratio or manually specifying a customized ratio Preset ratio CES103 50 71 A4 A5 82 B5 JIS A5 93 122 A5 B5 JIS 141 A5 A4 200 Custom ratio CES106 25 to 400 in 1 increments Spec...

Страница 135: ...ect Reduce Enlarge and then press the OK key 3 Press the or key to select the ratio and then press the OK key If Zoom 25 400 has been selected enter the ratio using the number keys and then press the...

Страница 136: ...py two pages of an original onto a single sheet of photocopied paper Depending on the orientation of the original the printout format can be selected from the following Portrait CES033 Landscape CES03...

Страница 137: ...a Type 4 model press the key If ID card copy mode is being displayed press the key again to switch to normal copier mode 2 Press the or key in the standby mode screen to select Combine and then press...

Страница 138: ...using the number keys 8 Press the key CTT008 When you place the original on the exposure glass perform the following steps to scan the subsequent pages of the original 9 When the current page is scann...

Страница 139: ...ewise when copying onto Letter size paper you can copy documents that are smaller than Half Letter size To use this function the paper size used for printing copies must be set to A6 A5 A4 Half Letter...

Страница 140: ...e original front side down with the top to the rear of the machine on the exposure glass CTT169 The location to place the original depends on the paper size Position the card so that it is centered at...

Страница 141: ...Within 30 seconds place the original back side down with the top to the rear of the machine on the exposure glass and then press the key In the ID card copy screen you can press the or key to change...

Страница 142: ...rinting copies must be set to A4 or Letter This function cannot be available with the bypass tray You can select top to top or top to bottom binding in either portrait or landscape orientation Top to...

Страница 143: ...s the or key to select the orientation and then press the OK key 5 Press the key to return to the initial screen 6 Place the original on the exposure glass or in the ADF 7 To make multiple copies ente...

Страница 144: ...on the reverse side of the prints turn them over so that the blank side faces down and place them in Tray 1 Portrait CTT009 Landscape CTT010 11 Press the key If the rear cover is open the paper is del...

Страница 145: ...n the standby mode screen to select Density and then press the OK key 3 Press the or key to select the density level and then press the OK key 4 Press the key to return to the initial screen To apply...

Страница 146: ...4 model press the key If ID card copy mode is being displayed press the key again to switch to normal copier mode 2 Press the or key in the standby mode screen to select Original Type and then press...

Страница 147: ...pting you to enter the destination Settings that can be specified for the current job By pressing or on the screen that appears after entering the destination you can specify the following settings fo...

Страница 148: ...ss specify entries for using Scan to E mail Scan to Folder and Scan to FTP To use the Scan to E mail function enter the destination e mail address To use the Scan to Folder function enter the SMB serv...

Страница 149: ...fication is selected the scan result is sent to the sender specified in E mail Address Scan Mode Resolution File Format Density and Document Size can be specified 12 To use Scan to E mail click Server...

Страница 150: ...click Printer Configuration 7 On the Scanner tab select the number you want to register and then click Modify To delete a destination select its registration number and then click Delete 8 Modify the...

Страница 151: ...ies in Smart Organizing Monitor For details see the Smart Organizing Monitor Help Mac OS X 10 7 does not support the Scan to Folder function Also Mac OS X does not support the function that is used in...

Страница 152: ...older create the destination folder on the computer s hard drive and make it a shared folder For details see your operating system s documentation To cancel scanning press the key and then press the k...

Страница 153: ...Registering the Scan Destination 3 Press the OK key 4 Press the or key to select Original Size and then press the OK key 5 Press the or key to select the original size and then press the OK key 6 Pre...

Страница 154: ...hree resolution settings The higher the resolution the higher the quality but greater the file size 1 Press the key CTT103 2 Using the number keys enter the number of a registered scan destination For...

Страница 155: ...describes the preparations and procedure for using the TWAIN scanner To use the TWAIN scanner you must install the TWAIN driver which is on the supplied CD ROM To use the TWAIN scanner a TWAIN complia...

Страница 156: ...Scan Mode the scan resolution cannot be set 1200 dpi 1200 dpi or higher 4 Original Size Select the scanning size If you select Custom Size enter the scanning size directly in the edit box 5 Interface...

Страница 157: ...els Color Balance and Hue Saturation When Auto is selected the default values will be applied to all settings When Manual is selected all settings can be adjusted as required For details see the TWAIN...

Страница 158: ...5 Scanning Originals 72...

Страница 159: ...e Displays the current resolution settings and time Settings that can be specified for the current job By pressing the or key in the Standby mode screen you can specify the following settings for the...

Страница 160: ...y using the number keys and then press the OK key 8 Press the or key to select date format and then press the OK key 9 Press the key 10 Press the or key to select Set Time and then press the OK key 11...

Страница 161: ...a number Use the number keys To enter characters other than digits Press the key Press the key P Pause Press the key To enter a name Letters numbers and symbols can be entered using the number keys To...

Страница 162: ...onsible for any damages resulting from such data loss Registering Fax Destinations 1 Press the key CTT006 2 Press the or key to select Address Book and then press the OK key 3 Press the or key to sele...

Страница 163: ...to return to the initial screen Configuring Fax Destinations Using Smart Organizing Monitor 1 On the Start menu click All Programs 2 Click Smart Organizing Monitor for SP xxx Series 3 Click Smart Orga...

Страница 164: ...e a fax destination select the destination in Speed Dial Destination List and then click Delete 11 Click Apply located in the lower part of the window 12 Click OK 13 Click Close 6 Sending and Receivin...

Страница 165: ...er before the fax number No separator characters or spaces can be entered before the fax number Selecting Transmission Mode There are two transmission modes Memory Transmission and Immediate Transmiss...

Страница 166: ...key For Memory Transmission select Off For Immediate Transmission select On or Next Fax Only 6 Press the key to return to the initial screen Basic Operation for Sending a Fax 1 Press the key CTT102 2...

Страница 167: ...ssion you can only send one page at a time If Memory Transmission mode is enabled the machine s memory may become full while scanning the originals If this happens the screen prompts you to cancel the...

Страница 168: ...Features you can delete files waiting to be sent Select Delete File to delete the corresponding file You can also delete a file currently being sent Select Delete All Files to delete all files waitin...

Страница 169: ...in the ADF 3 Press the key CTT105 4 Enter the Speed Dial number using the number keys and then press the OK key 5 Press the key CTT008 When you place original on the exposure glass and Memory Transmi...

Страница 170: ...destination using the redial function This function saves time when you are sending to the same destination repeatedly as you do not have to enter the destination each time 1 Press the key CTT102 2 P...

Страница 171: ...press the OK key 3 Press the OK key To add a manually specified destination 1 Enter the destination fax number using the number keys 2 Press the OK key 4 Go back to Step 3 to add further destinations...

Страница 172: ...you want to ensure that the fax will be received To send faxes using the exposure glass be sure to first remove any originals loaded in the ADF 1 Press the key CTT102 2 Place the original on the expo...

Страница 173: ...s you to send a fax after finishing your conversation without having to disconnect and redial This function is useful when you want to ensure that the fax will be received To send faxes using the expo...

Страница 174: ...nsity level the darker the printout 1 Press the key CTT102 2 Press the or key in the standby mode screen to select Density and then press the OK key 3 Press the or key to select the density level or E...

Страница 175: ...cument with small print Photo Select this when the original contains images such as photographs or shaded drawings 1 Press the key CTT102 2 Press the or key in the standby mode screen to select Resolu...

Страница 176: ...on Windows 7 Using PC FAX you can send up to ten pages including the cover sheet at a time 1 Open the file you want to send 2 On the File menu click Print 3 Select the PC FAX driver as the printer an...

Страница 177: ...uble click the printer icon on the task bar of your computer 2 Select the print job you want to cancel click the Document menu and then click Cancel Canceling a fax using the control panel Cancel the...

Страница 178: ...ess Book Registering destinations This section describes how to register destinations in the PC FAX address book 1 Open the PC FAX address book 2 Enter the destination information You must enter a con...

Страница 179: ...hen click Delete Member 5 Click OK 6 Click OK 7 If you make changes to a destination a confirmation message appears To save the changes click Yes Editing a Fax Cover Sheet This section describes how t...

Страница 180: ...ion modes are as follows When using the machine only as a fax machine Auto mode In this mode the machine automatically answers all incoming calls in fax reception mode When using the machine with an e...

Страница 181: ...select the reception mode and then press the OK key 6 Press the key to return to the initial screen Receiving a fax in Manual mode To receive faxes be sure to first remove any originals loaded in the...

Страница 182: ...he number of times the external phone rings before the machine starts to receive a fax by Number of Rings setting under Fax Features You can answer the call before the machine switches to the fax rece...

Страница 183: ...fax jobs remaining in the machine s memory Power Failure Report Prints a report when the machine s power has been interrupted while sending or receiving a fax or images stored in the machine s memory...

Страница 184: ...6 Sending and Receiving a Fax 98...

Страница 185: ...gs press the key CTT006 2 Press the or key to select the settings you want to use The machine s default settings are grouped into the following eight categories System Settings Printer Features Copier...

Страница 186: ...s Photo Select this when the original contains photographs or images Use this mode for the following types of original Photographs Pages that are entirely or mainly composed of photographs or images s...

Страница 187: ...1 Portrait L to R Portrait T to B Landscape L to R Landscape T to B For details see page 50 Combining Multiple Pages 2 Sided Copy Sets the machine to make 2 sided copies by copying single sided docum...

Страница 188: ...r Settings Paper Size Specifies the paper size Default A4 A4 B5 JIS A5 B6 JIS A6 LG 81 2 14 LT 81 2 11 HLT 51 2 81 2 EXE 71 4 101 2 16K 197 273mm 16K 195 270mm 16K 184 260mm Custom Paper Type Specifie...

Страница 189: ...e resolution to use for scanning originals Default Standard Standard Select this when the original is a printed or typewritten document with normal sized characters Detail Select this when the origina...

Страница 190: ...t On Off On RX Settings Switch RX Mode Specifies the reception mode Default Auto Auto The machine automatically answers all incoming calls in fax reception mode Manual The machine rings when it receiv...

Страница 191: ...his function is only performed when selected Delete File To delete a fax job select the job you want to delete Delete All Files To delete all fax jobs Comm Settings ECM Transmission Sets the machine t...

Страница 192: ...lephone line To configure this setting contact your telephone company and select the setting based on your telephone line Selecting the wrong setting may result in transmission errors Default Push Pho...

Страница 193: ...tomatically after a fax transmission Default Error With Image Error Only Prints a report when a transmission error occurs Error With Image Prints a report with an image of the original when transmissi...

Страница 194: ...Do not Auto Print 7 Configuring the Machine Using the Control Panel 108...

Страница 195: ...y e mail Default No Limit 1 MB 2 MB 3 MB 4 MB 5 MB No Limit Divide Send Email Select whether or not an image exceeding the size specified in Maximum Email Size should be divided and sent using more th...

Страница 196: ...be registered in the speed dial list Up to 100 entries can be registered To register a fax name containing double byte characters use Smart Organizing Monitor For details see page 76 Registering Fax...

Страница 197: ...from Off Low Middle or High Panel Key Sound Specifies the volume of the beep sound when a key is pressed Default Middle Alarm Volume Specifies the volume of the alarm sound when an operation error occ...

Страница 198: ...en a fax transmission error occurs Default Middle Fax RX End Tone Specifies the volume of the beep sound when a fax reception is complete Default Middle Fax RX Error Tone Specifies the volume of the b...

Страница 199: ...prints a received fax receives TWAIN scan directions from the computer or when any key is pressed Energy Saver Mode 1 The machine enters Energy Saver Mode 1 if the machine has been idle for about 30 s...

Страница 200: ...cognized as a new device upon USB connection Print Cartridge Displays information about consumables This information is displayed only if Toner End Option has been set to Stop Printing New Needs repla...

Страница 201: ...on This setting is used to monitor the toner level Default Stop Printing Stop Printing Monitoring the toner level is enabled The remaining toner level can be checked in the control panel and on the Sm...

Страница 202: ...settings to the factory default except for the language date and time and fax Speed Dialing settings Clear Address Book Deletes all fax speed dial entries 7 Configuring the Machine Using the Control...

Страница 203: ...er loaded in the bypass tray When you print the test page set the paper size to A4 or Letter When printing other reports set the paper size to A4 Letter or Legal Configuration Page Prints the machine...

Страница 204: ...ist Prints a list of scan destinations Scanner Journal Prints a scanner journal for the last 100 Scan to E mail Scan to FTP and Scan to Folder transmissions Network Setting List Prints the MAC address...

Страница 205: ...gnore errors on paper size or type and continue printing The printing stops temporarily if an error is detected and resumes automatically after the specified time depending on the settings specified i...

Страница 206: ...et Mask Specifies the machine s subnet mask when DHCP is not used Use this menu to check the current subnet mask when DHCP is used Default 255 255 255 0 Gateway Address Specifies the machine s default...

Страница 207: ...ateful address Manual Config Add Specifies the machine s IPv6 address when DHCP is not used IPv6 Gateway Address Specifies the IPv6 address of the default gateway MAC Address Displays the MAC address...

Страница 208: ...7 Configuring the Machine Using the Control Panel 122...

Страница 209: ...to the factory default Supported Web browsers Internet Explorer 6 or later Firefox 3 0 or later Displaying Top Page When you access the machine using Web Image Monitor the top page appears in your bro...

Страница 210: ...ic information about of the machine If you use an older version of a supported Web browser or the Web browser has JavaScript and cookies disabled display and operation problems may occur If you are us...

Страница 211: ...changed 1 Interface Settings The interface setting appears 2 IPv4 The IPv4 configuration appears 3 IPv6 The IPv6 configuration appears 4 Machine Information The machine information appears Administra...

Страница 212: ...u can change the administrator password 6 Restore Defaults You can reset the administrator password and other network settings 7 Machine Information The machine information appears Changing the Machin...

Страница 213: ...o the machine Settings List This section explains the Web Image Monitor settings Checking the system information On the top page you can check the current system information such as the device informa...

Страница 214: ...whether or not to apply a timeout limit if the machine takes longer than a specified time to process a job Ethernet Speed Ethernet communication speed For normal use select Auto Select This allows the...

Страница 215: ...elected When using DHCP the domain name obtained from the DHCP server is used If the domain name cannot be obtained from the DHCP server the domain name set for the device is used Specify selected The...

Страница 216: ...tained from the DHCP server the default gateway address set for the device is used DNS Server Select whether to use the DNS server obtained from the DHCP server or the DNS server set for the device LP...

Страница 217: ...the active interface board Stateless Address Displays the stateless address for router Stateful Address Displays the stateful address Manual Configuration Address In the left box enter the IPv6 addre...

Страница 218: ...he DNS server obtained from the DHCP server or the DNS server set for the device DHCPv6 Mode Select an operation mode for DHCPv6 DHCPv6 Operates in DHCPv6 mode Obtains the IPv6 address and other param...

Страница 219: ...ich the network interface board belongs using up to 15 characters If the community name is different from that of the hosts requests from the hosts will not be accepted Access Type In the list select...

Страница 220: ...ngs Item Description Current Password Enter the current administrator password The default is admin133 New Password Enter the new administrator password You can enter it using three to eight character...

Страница 221: ...version of firmware installed on the machine Engine FW Version Displays the version of the firmware for the machine engine Machine ID Displays the serial number of the machine Total Memory Displays th...

Страница 222: ...ne Paper Type Displays the paper type configured on the machine Toner The remaining toner level is displayed in ten levels when Toner End Option has been set to Stop Printing If Toner End Option has b...

Страница 223: ...machine s model 5 Click OK 6 On the User Tool tab click Printer Configuration 7 Change the settings if necessary 8 Click OK 9 Click Close Tab Settings This section provides a tab by tab overview of th...

Страница 224: ...able to customers for damages of any kind resulting from use or loss of use of this software The company shall also not be held liable for any disputes between the customer and third parties resulting...

Страница 225: ...machine s model 5 Click OK 6 On the User Tool tab click Printer Configuration 7 On the System tab click Printer Firmware Update 8 Click OK 9 Specify the location of the DWN file and then click Open 1...

Страница 226: ...8 Configuring the Machine Using Utilities 140...

Страница 227: ...and size and environmental conditions such as temperature and humidity Toner quality degrades over time For good print quality the manufacturer recommends that you use genuine toner from the manufactu...

Страница 228: ...nt cartridge in horizontally and then slowly push it in all the way Finally push the cartridge down until it clicks into place CTT048 6 Carefully push up the front cover until it closes 9 Maintaining...

Страница 229: ...dry wipe the area and allow it to dry To avoid deformation discoloration or cracking do not use volatile chemicals such as benzine and thinner or spray insecticide on the machine If there is dust or g...

Страница 230: ...loth to wipe the inside of the machine toward and away from yourself CTT176 Wipe carefully so as not to touch any protrusions inside the machine 4 Slide the print cartridge in horizontally and then sl...

Страница 231: ...t to hold the input tray when lifting the exposure glass cover for the tray might be damaged 2 Clean the parts indicated with arrows with a soft damp cloth and then wipe the same parts with a dry clot...

Страница 232: ...l not to hold the input tray when lifting the ADF for the tray might be damaged 2 Clean the parts indicated with arrows with a soft damp cloth and then wipe the same parts with a dry cloth to remove a...

Страница 233: ...inserted into the wall outlet Make sure that the wall outlet is not defective by connecting another working device Pages are not printed The USB cable or Ethernet cable is not connected correctly Reco...

Страница 234: ...t the paper guides to remove the gaps Avoid printing on both sides of paper when printing images that contain large areas of solid color which consume a lot of toner Use supported types of paper See p...

Страница 235: ...ing Printing Jams Jammed paper may be covered in toner Be careful not to get toner on your hands or clothes Toner on prints made immediately after clearing a paper jam may be insufficiently fused and...

Страница 236: ...y 1 back in until it stops 3 Open the front cover and then carefully lower it CTT054 4 Carefully pull out the print cartridge horizontally holding its center CTT045 Do not shake the removed print cart...

Страница 237: ...and then slowly push it in all the way Finally push the cartridge down until it clicks into place CTT048 7 Carefully push up the front cover until it closes CTT055 If the error display continues to a...

Страница 238: ...arefully CTT034 2 Close the bypass tray 3 Follow Steps 3 to 7 in Removing Jammed Paper from Tray 1 If the error display continues to appear perform the procedure described in Opening the Rear Cover to...

Страница 239: ...cover CTT079 3 Push the levers on the sides down with your thumbs CTT080 4 Remove the jammed paper carefully CTT066 5 Push the levers on the sides up with your thumbs 6 Close the fusing cover Paper F...

Страница 240: ...he rear cover CTT044 Removing Scanning Jams 1 Open the ADF cover CTT038 2 Gently pull the jammed original to remove it Be careful not to pull the original too hard as it may tear CTT040 10 Troubleshoo...

Страница 241: ...the ADF and if there is original remaining in the ADF gently pull the jammed original to remove it Be careful not to hold the input tray when lifting the ADF for the tray might be damaged CTT027 5 Cl...

Страница 242: ...machine See page 21 Supported Paper The paper type setting is incorrect Make sure that the paper type setting of the printer driver matches the type of paper loaded See page 21 Supported Paper A non g...

Страница 243: ...ting Processing time depends on data volume High volume data such as graphics heavy documents take longer to process Wait for a while To speed up printing reduce the printing resolution using the prin...

Страница 244: ...ause may be one of the following Possible Cause Solution Page layout settings are not configured properly Check that the page layout settings are properly configured in the application The paper size...

Страница 245: ...ed areas Switching the setting for image quality between Photo and Text Photo may eliminate the moire pattern Photocopied paper is dirty Image density is too high Adjust the image density Toner on the...

Страница 246: ...out of position The original was moved during scanning Do not move the original during scanning The scanned image is upside down The original was placed upside down Place the original in the correct...

Страница 247: ...the telephone If you cannot make calls this way contact your telephone company If the problem persists contact your sales or service representative Dial tone could not be detected Set Dial Tone Detect...

Страница 248: ...ad paper 00A0 Sending fax was canceled manually Send the fax again 00A1 The original is jammed Remove the jammed original 00FF Redialing failed Make sure the recipient s fax number is correct and chec...

Страница 249: ...placing originals on the exposure glass make sure that ink or correction fluid is dry A fax you sent appears blank when received The original was placed upside down Place the original in the correct...

Страница 250: ...An original has been jammed inside the ADF Remove jammed originals and then place them again See page 148 Paper Feed Problems Check the originals are suitable for scanning See page 35 Placing Original...

Страница 251: ...141 Replacing the Print Cartridge Out of Toner Print Cartridge The machine has run out of the toner Replace the print cartridge See page 141 Replacing the Print Cartridge Toner Almost Empty Print Cart...

Страница 252: ...telephone in its place Check that you can make calls using the telephone If you cannot make calls this way contact your telephone company Dial Failed Confirm that the fax number you dialed is correct...

Страница 253: ...ched during fax reception The received fax was too large Ask the sender to resend the document in parts as several smaller individual faxes or to send at a lower resolution If an error has occurred be...

Страница 254: ...s the key to begin printing or press the key to cancel the job If Auto Continue is set to 0 sec no error message appears Scan Disconnected The USB cable or Ethernet cable was disconnected while scanni...

Страница 255: ...nizing Monitor If the problem involves the SMTP POP3 server check the Server Properties setting in Smart Organizing Monitor File Over The assigned file names range from SIG000101 to SIG999901 If the f...

Страница 256: ...ber manually Scanner Register the scan destination with Smart Organizing Monitor Numbers Do not Match Fax No Confirmation is set to On and the numbers entered for confirmation does not match the initi...

Страница 257: ...e specified on the machine and the size specified in the printer driver do not match For details about specifying the paper size setting on the machine see page 27 Loading Paper For details about chan...

Страница 258: ...ses Solutions Toner Almost Empty The print cartridge is almost empty Prepare a new print cartridge Out of Toner The machine has run out of the toner Replace the print cartridge See page 141 Replacing...

Страница 259: ...ach a Cover Sheet is on and Use Address Book is selected the maximum number of destinations cannot be larger than 5 If Attach a Cover Sheet on the Cover Sheet tab is selected and Use Address Book in t...

Страница 260: ...10 Troubleshooting 174...

Страница 261: ...er is displayed set Toner End Option to Continue Printing However since any trouble caused by using this setup is outside of the scope of the manufacturer s warranty this setup should be used with car...

Страница 262: ...eck the following points The power switch is turned off The power cord is unplugged from the wall outlet All other cables are unplugged from the machine 2 Lift the machine using the inset grips on bot...

Страница 263: ...replacement we recommend you purchase and store extra print cartridges The actual number of printable pages varies depending on the image volume and density number of pages printed at a time paper ty...

Страница 264: ...p time Less than 25 seconds 23 C 71 6 F Paper sizes A4 81 2 11 Letter 81 2 14 Legal B5 51 2 81 2 Half Letter 71 4 101 2 Executive A5 A6 B6 16K 197 273 mm 16K 195 270 mm 16K 184 260 mm Custom Paper Siz...

Страница 265: ...ements 220 240 V 5 A 50 60 Hz Power consumption Maximum power consumption 900 W Energy Saver mode 1 38 7 W or less Energy Saver mode 2 4 5 W or less Machine dimensions Width Depth Height 402 360 291 m...

Страница 266: ...l Standard GB1830 Copier Function Specifications Maximum resolution scanning and printing Exposure glass Scanning 600 600 dpi Printing 600 600 dpi ADF Scanning 600 300 dpi Printing 600 600 dpi First c...

Страница 267: ...white 75 3 mm per second Color 37 6 mm per second Interface Scanning from the control panel Ethernet 10BASE T 100BASE TX USB2 0 Scanning from a computer Ethernet 10BASE T 100BASE TX USB2 0 Fax Functio...

Страница 268: ...system Data compression methods MH MR MMR Memory capacity Transmission Up to 5 jobs up to 10 pages per job Reception Up to 50 jobs up to 100 pages in the total of all jobs Address book Speed dial 100...

Страница 269: ...he Windows operating systems are as follows The product names of Windows XP are as follows Microsoft Windows XP Professional Microsoft Windows XP Home Edition Microsoft Windows XP Professional x64 Edi...

Страница 270: ...osoft Windows Server 2008 Enterprise The product names of Windows Server 2008 R2 are as follows Microsoft Windows Server 2008 R2 Foundation Microsoft Windows Server 2008 R2 Standard Microsoft Windows...

Страница 271: ...ity 67 Differences in Performance Functions between Different Models 8 Disclaimer 7 Driver 13 Duplex 40 E Enlarged or reduced copies 48 Entering characters 75 Error messages 164 171 Exposure glass 145...

Страница 272: ...tion 180 Scanner mode screen 61 62 65 Scanner problems 160 Scanning 69 Sending a fax 79 80 Smart Organizing Monitor 15 16 Software 13 Specifications 178 179 180 181 Specifying a custom paper size 33 S...

Страница 273: ...MEMO 187...

Страница 274: ...MEMO 188 EN CN M135 8698...

Страница 275: ......

Страница 276: ...EN CN M135 8698 2013...

Страница 277: ...Operating Instructions User Guide For safe and correct use be sure to read Safety Information before using the machine...

Страница 278: ......

Страница 279: ...rint Area 12 Loading Paper 13 Loading Paper into Tray 1 13 Loading Paper into Bypass Tray 16 Specifying Paper Type and Paper Size Using Smart Organizing Monitor 17 3 Printing Documents Basic Operation...

Страница 280: ...e 39 Printer Problems 40 Print Positions Do Not Match Display Positions 41 Error and Status Messages Appear on the Smart Organizing Monitor 42 7 Appendix Notes About the Toner 43 Moving and Transporti...

Страница 281: ...ult with your legal advisor Disclaimer Contents of this manual are subject to change without prior notice To the maximum extent permitted by applicable laws in no event will the manufacturer be liable...

Страница 282: ...rint on the back of paper in duplex printing and to execute forced printing 3 Power Indicator This indicator lights up blue when the machine is turned on It flashes when a print job is received and wh...

Страница 283: ...end of the cable into a nearby wall outlet 11 Rear Cover Open this cover to deliver sheets face up or remove jammed paper 12 USB Port Use this port to connect the machine to a computer using a USB cab...

Страница 284: ...all the printer driver and Smart Organizing Monitor from the CD ROM 1 Close all applications except this manual 2 Insert the CD ROM into the CD ROM drive 3 Select a language for the interface and then...

Страница 285: ...o delete and then click Remove device 3 Click Yes 4 Click any printer icon and then click Print server properties 5 Click the Drivers tab 6 Click Change Driver Settings if it is displayed 7 Click Remo...

Страница 286: ...ypes available on this machine Print test and configuration pages Prints List Report to check the list of settings for this machine and other information Modify the system settings Use to change custo...

Страница 287: ...e The following paper sizes are supported as custom paper sizes Width Tray1 Approximately 100 216 mm 3 9 8 5 inches Bypass Tray Approximately 90 216 mm 3 6 8 5 inches Length Approximately 148 356 mm 5...

Страница 288: ...Bypass Tray 1 sheets 70 g m2 19 lb 2 Loading Paper 10...

Страница 289: ...using paper printed on by other than a laser printer e g monochrome and color copiers ink jet printers etc Special paper such as thermal paper and carbon paper Paper weighing heavier or lighter than t...

Страница 290: ...that the machine can print on From the printer driver CHZ904 2 3 3 1 4 4 1 Print area 2 Feed direction 3 Approx 4 2 mm 0 2 inches 4 Approx 4 2 mm 0 2 inches The print area may vary depending on the p...

Страница 291: ...so that the settings configured when paper is loaded can be used for printing If you print test pages when the bypass tray is loaded the paper in the bypass tray is fed first Do not load paper in the...

Страница 292: ...tray 5 Load the new paper stack print side down Make sure paper is not stacked higher than the upper limit marked inside the tray CTT075 6 Carefully push Tray 1 straight into the machine CTT029 To avo...

Страница 293: ...ds 2 Release the extender locks on both sides of the tray and then pull out the extender until it clicks CTT077 Make sure the extender s inner surface and the scale are aligned 3 Lock the extender in...

Страница 294: ...cover CTT095 Loading Paper into Bypass Tray 1 Open the bypass tray CTT063 2 Slide the side guides outward then load paper with the print side up and push in until it stops against the machine CTT032 2...

Страница 295: ...vary depending on the operating system you are using Specifying the paper type and paper size 1 On the Start menu click All Programs 2 Click Smart Organizing Monitor for SP xxx Series 3 Click Smart O...

Страница 296: ...tus 4 If the machine you are using is not selected click Select Device and then select the machine s model 5 Click OK 6 On the User Tool tab click Printer Configuration 7 On the System tab select mm o...

Страница 297: ...n a sheet Splitting a single page across multiple sheets Printing on both sides of sheets Not having blank pages printed Having prints sorted Saving printer driver settings as a file Recalling and del...

Страница 298: ...with the bypass tray 1 After creating a document open the Printing Preferences dialog box in the document s native application 2 On the Setup tab in the Duplex list box select how you want to open th...

Страница 299: ...ntrol panel or your computer depending on the status of the job Canceling a print job before printing has started 1 Double click the printer icon on the task tray of your computer 2 Select the print j...

Страница 300: ...3 Printing Documents 22...

Страница 301: ...o use Smart Organizing Monitor install the printer driver Checking the Status Information CTT016 1 2 3 4 1 Image area Displays the status of this machine with an icon 2 Status area Paper Size Displays...

Страница 302: ...ear on the Smart Organizing Monitor Printing the Configuration Page 1 On the Start menu click All Programs 2 Click Smart Organizing Monitor for SP xxx Series 3 Click Smart Organizing Monitor for SP xx...

Страница 303: ...ides a tab by tab overview of the machine settings that can be modified using Smart Organizing Monitor For more information on each setting item see the Smart Organizing Monitor Help System tab Regist...

Страница 304: ...hat the computer will not enter standby or sleep mode during a firmware update Download the firmware from the manufacturer s Web site To update the firmware use the Smart Organizing Monitor from Windo...

Страница 305: ...nvironmental conditions such as temperature and humidity Toner quality degrades over time For good print quality the manufacturer recommends that you use genuine toner from the manufacturer The manufa...

Страница 306: ...nt cartridge in horizontally and then slowly push it in all the way Finally push the cartridge down until it clicks into place CTT048 6 Carefully push up the front cover until it closes 5 Maintaining...

Страница 307: ...dry wipe the area and allow it to dry To avoid deformation discoloration or cracking do not use volatile chemicals such as benzine and thinner or spray insecticide on the machine If there is dust or g...

Страница 308: ...e horizontally holding its center CTT045 3 Using a cloth wipe the inside of the machine CTT047 4 Slide the print cartridge in horizontally and then slowly push it in all the way Finally push the cartr...

Страница 309: ...er plug is firmly inserted into the wall outlet Make sure that the wall outlet is not defective by connecting another working device Pages are not printed The USB cable is not connected correctly Reco...

Страница 310: ...ust the paper guides to remove the gaps Avoid printing on both sides of paper when printing images that contain large areas of solid color which consume a lot of toner Use supported types of paper See...

Страница 311: ...n the paper and the paper guides adjust the paper guides to remove the gaps Removing Printing Jams Jammed paper may be covered in toner Be careful not to get toner on your hands or clothes Toner on pr...

Страница 312: ...ay 1 back in until it stops 3 Open the front cover and then carefully lower it CTT054 4 Carefully pull out the print cartridge horizontally holding its center CTT045 Do not shake the removed print car...

Страница 313: ...and then slowly push it in all the way Finally push the cartridge down until it clicks into place CTT048 7 Carefully push up the front cover until it closes CTT055 If the error display continues to a...

Страница 314: ...carefully CTT034 2 Close the bypass tray 3 Follow Steps 3 to 7 in Removing Jammed Paper from Tray 1 If the error display continues to appear perform the procedure described in Opening the Rear Cover t...

Страница 315: ...g cover CTT079 3 Push the levers on the sides down with your thumbs CTT080 4 Remove the jammed paper carefully CTT066 5 Push the levers on the sides up with your thumbs 6 Close the fusing cover Paper...

Страница 316: ...7 Close the rear cover CTT044 6 Troubleshooting 38...

Страница 317: ...by the machine See p 9 Supported Paper The paper type setting is incorrect Make sure that the paper type setting of the printer driver matches the type of paper loaded See p 9 Supported Paper A non ge...

Страница 318: ...delay between the print start command and actual printing Processing time depends on data volume High volume data such as graphics heavy documents take longer to process Wait for a while To speed up p...

Страница 319: ...cause may be one of the following Possible Cause Solution Page layout settings are not configured properly Check that the page layout settings are properly configured in the application The paper size...

Страница 320: ...ismatch The paper type specified on the machine and the type specified in the printer driver do not match For details about changing the paper type setting of the machine see p 13 Loading Paper For de...

Страница 321: ...uaranteed if any third party toner is used Depending on printing conditions there are cases where the printer cannot print the number of sheets indicated in the specifications Replace the print cartri...

Страница 322: ...heck the following points The power switch is turned off The power cord is unplugged from the wall outlet All other cables are unplugged from the machine 2 Lift the machine using the inset grips on bo...

Страница 323: ...e replacement we recommend you purchase and store extra print cartridges The actual number of printable pages varies depending on the image volume and density number of pages printed at a time paper t...

Страница 324: ...er 71 4 101 2 Executive A5 A6 B6 JIS 16K 197 273 mm 16K 195 270 mm 16K 184 260 mm Custom Paper Size The following paper sizes are supported as custom paper sizes Width Tray1 Approximately 100 216 mm 3...

Страница 325: ...dimensions Width Depth Height 402 360 165 mm 15 8 14 2 6 5 inches Weight machine body with consumables Approximately 6 8 kg 15 lb or less Printer Function Specifications Printing speed 22 pages per m...

Страница 326: ...Printer language DDST 7 Appendix 48...

Страница 327: ...ta Business Microsoft Windows Vista Home Premium Microsoft Windows Vista Home Basic Microsoft Windows Vista Enterprise The product names of Windows 7 are as follows Microsoft Windows 7 Starter Microso...

Страница 328: ...without Hyper VTM Microsoft Windows Server 2008 Datacenter without Hyper VTM The product names of Windows Server 2008 R2 are as follows Microsoft Windows Server 2008 R2 Foundation Microsoft Windows S...

Страница 329: ...3 Loading paper 13 M Machine settings 25 Moving 44 N Non recommended paper 11 Notes 43 P Paper feed problems 32 Paper jam 33 36 Print area 12 Print cartridge 27 45 Print quality problems 39 Printer f...

Страница 330: ...MEMO 52 EN CN M133 8620...

Страница 331: ......

Страница 332: ...EN CN M133 8620 2012...

Страница 333: ...s on your computer in advance so that the computer will not enter standby or sleep mode during a firmware update Before updating the firmware install Smart Organizing Monitor and the printer driver us...

Страница 334: ...mation before using the machine This manual briefl y describes the procedure for installing this machine For more details about other information see User Guide in the CD ROM Place to Install SP 200SF...

Страница 335: ...lect Comm Settings and then press the OK key Press the or keys to select PSTN PBX and then press the OK key Press the or keys to select PSTN or PBX and then press the OK key Press the key to return to...

Страница 336: ...ting the Type and Method of IP Address Configuration See p 6 3 Connecting the Computer and Machine See p 7 4 Printing a Network Setting List See p 8 5 Quick Install for Network Installing the Software...

Страница 337: ...P 200 200N Install the printer driver and Smart Organizing Monitor SP 200S 201S 202S Install the printer driver TWAIN driver WIA driver and Smart Organ izing Monitor SP 200SF 201SF 202SF Install the p...

Страница 338: ...so CTT136 Do not connect the USB cable to the machine until a message to do so appears 1 Make sure the machine is off 2 Turn on the power of the computer 3 Insert the CD ROM into the CD ROM drive CXP0...

Страница 339: ...the instructions in the installation wizard If a message to turn on the power and connect the USB cable appears do the following Turn the power on CTT061 Connect the machine and computer with a USB ca...

Страница 340: ...click Network Quick Install DHCP or Network Quick Install Fixed IP to install the software CTT178 1 Network Quick Install DHCP 2 Network Quick Install Fixed IP SP 200N Install the printer driver and...

Страница 341: ...address for use on a network There are two types of IP address IPv4 and IPv6 IPv4 address The IPv4 address consists of four fields such as 192 168 0 113 The first three fields 192 168 0 are fixed and...

Страница 342: ...r the machine 1 Configuring the Machine Settings to Obtain an IPv4 Address Automatically 2 Configuring the Machine s IPv4 Address Manually 3 Configuring the Machine Settings to Obtain an IPv6 Address...

Страница 343: ...and then press the OK key 3 Press the or key to select Network Setting List and then press the OK key Checking a network setting list MAC address This is a unique address identifying the hardware IPv...

Страница 344: ...depends on the type and method of IP address configuration selected in Se lecting the Type and Method of IP Address Configuration Install the software according to the following instructions 1 Configu...

Страница 345: ...cally To search for a printer by its IP address select Search for printers by specified IP Ad dress To select a port or specify a new port select Select a port or specify a new port If a dialog box fo...

Страница 346: ...ep 8 CTT191 MAC address Enter the MAC address shown on the network setting list IP address Enter the user s IP address The computer s IP address can be ascertained using Command Prompt To display the...

Страница 347: ...inters automatically select Search for printers automatically To search for a printer by its IP address select Search for printers by specified IP Ad dress To select a port or specify a new port selec...

Страница 348: ...ine IPv4 Address and then press the OK key 4 Press the or key to select DHCP Activated and then press the OK key 5 Make sure DHCP Activated is set to On After a setting has been changed the machine au...

Страница 349: ...keys Press the key to move between fields 8 Enter the values in all fields and then press the OK key Specify the subnet mask and default gateway address as required in accordance with the network envi...

Страница 350: ...ified IPv6 Address Enter the IP address shown in Link local Address in the network setting list Enclose the IP address in square brackets thus http fe80 226 73ff fe47 62e 3 Click Log in 4 Enter the ad...

Страница 351: ...Image Monitor and log in 2 Click IPv4 3 Set DHCP to Disable CTT167 4 Specify the IP address in IPv4 Address Specify the subnet mask and default gateway address as required in accordance with the netwo...

Страница 352: ...nu click All Programs 2 Click Smart Organizing Monitor for SP xxx Series 3 Click Smart Organizing Monitor for SP xxx Series Status 4 On the User Tool tab click IP Address Setting 5 Enter the MAC and I...

Страница 353: ...net cable may not be connected properly Check that the Ethernet cable is connected properly and is undamaged The CD ROM may not be inserted properly Check that the CD ROM is inserted properly Check al...

Страница 354: ...19...

Страница 355: ...2013 EN CN M133 8699 20...

Страница 356: ...or notice To the maximum extent permitted by applicable laws in no event will the manufacturer be liable for any damages whatso ever arising out of failures of this machine losses of the regis tered d...

Страница 357: ...nside this machine risks blindness Some of this machine s internal components get very hot For this reason take care when removing misfed paper Not doing so could result in burns When removing jammed...

Отзывы: