background image

Setting Up the Machine

14

STEP 1


  3

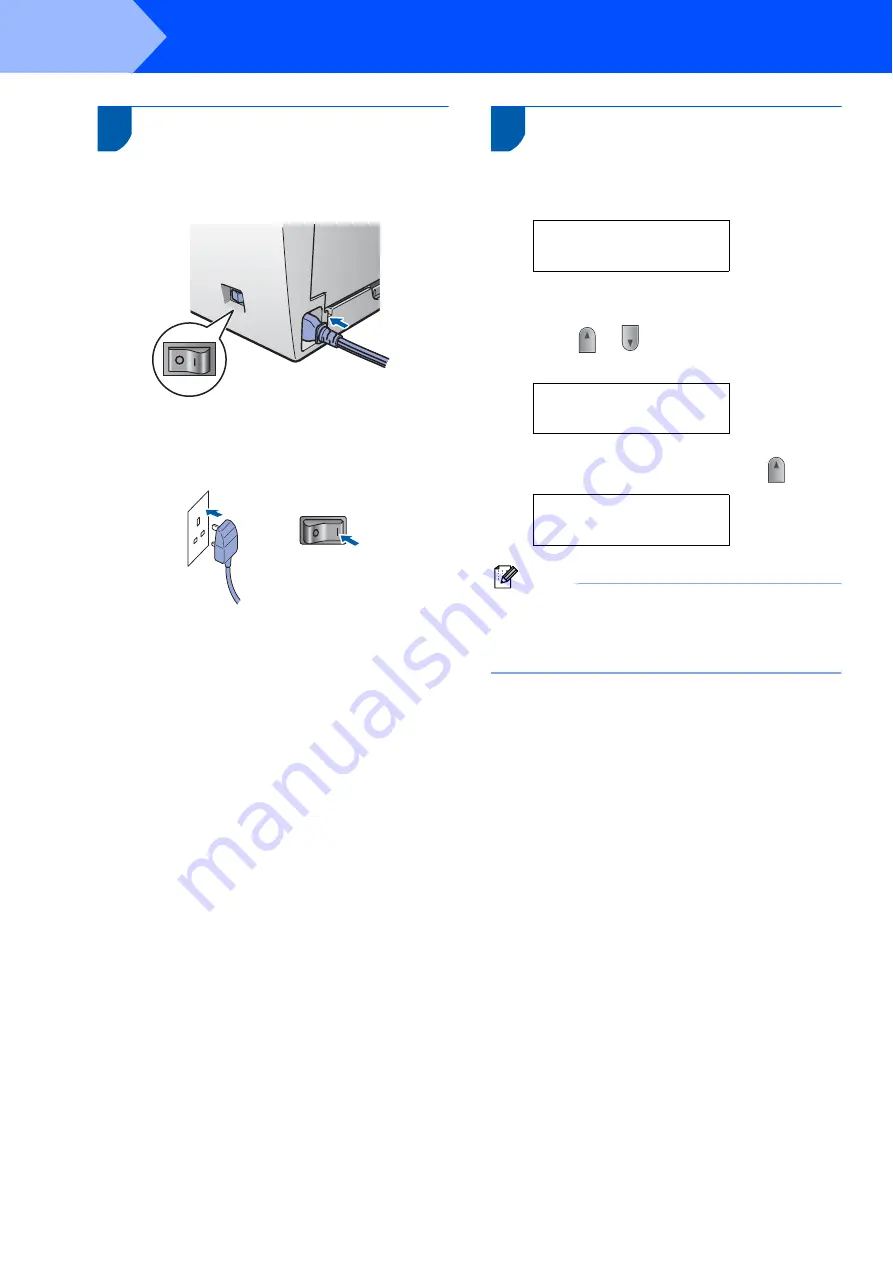
Install the power cord

1

Make sure that the machine’s power switch is 
off. Connect the AC power cord to the machine.


2

Plug the AC power cord into an AC outlet. Turn 
the power switch on.


 4

Selecting your language 

1

After turning the power switch on, the LCD 
shows: 


Select Language
Press OK Key

Press 

OK

.  

2

Press  

or  

to 

select 

your language

 and press 

OK

.  


Select 

ab

 or OK

English

3

If your language is selected, press 

 (Yes).


English?

a

.Yes 

b

. No

Note

If you have set the wrong language, you can 
change the language from the control panel menu 
of the machine.  (For details, see “Changing the 
LCD language” in Appendix of the User’s Guide.)


Содержание SP 1200S

Страница 1: ...oftware SP 1200S Before you can use the machine you must set up the hardware and install the driver Please read this Quick Setup Guide for proper set up and installation instructions Keep this Quick Setup Guide and the supplied CD ROM in a convenient place for quick and easy reference at all times ...

Страница 2: ...e machine or other objects Improper Setup icons alert you to devices and operations that are not compatible with the machine Note User s Guide or Software User s Guide Notes tell you how you should respond to a situation that may arise or give tips about how the current operation works with other features Indicates reference to the User s Guide or Software User s Guide which is on the CD ROM we ha...

Страница 3: ... Oceania model 11 STEP 1 Setting Up the Machine Installing the drum unit and toner cartridge assembly 12 Loading paper in the paper tray 13 Install the power cord 14 Selecting your language 14 Setting the LCD contrast 15 Supplied CD ROM Supplied CD ROMs for SP 1200S 16 Drivers and Utilities for SP 1200S 16 PaperPort 11SE and Documentation for SP 1200S 16 STEP 2 Installing the Driver Software Insta...

Страница 4: ... of the machine Doing this may cause a fire or electrical shock Refer to Routine maintenance for how to clean the machine in the User s Guide DO NOT handle the plug with wet hands Doing this might cause an electrical shock Always make sure the plug is fully inserted After you have just used the machine some internal parts of the machine will be extremely hot When you open the front or back cover o...

Страница 5: ...To prevent injuries DO NOT put your fingers in the area shown in the illustrations DO NOT use a vacuum cleaner to clean up scattered toner Doing this might cause the toner dust to ignite inside the vacuum cleaner potentially starting a fire Please carefully clean the toner dust with a dry lint free cloth and dispose of it according to local regulations If moving your machine use the handholds prov...

Страница 6: ...ecting the machine to a computer ensure that you use the following interface cables A USB cable which must not exceed 2 0 metres in length EU Directive 2002 96 EC and EN50419 Users in the EU Switzerland and Norway Our Products contain high quality components and are designed to facilitate recycling Our products or product packaging are marked with the symbol below The symbol indicates that the pro...

Страница 7: ... be connected to an AC power source within the range indicated on the rating label DO NOT connect it to a DC power source or inverter If you are not sure contact a qualified electrician 9 This product is equipped with a 3 wire grounded plug a plug having a third grounded pin This plug will only fit into a grounded power outlet This is a safety feature If you are unable to insert the plug into the ...

Страница 8: ...ch a document during printing 11 Never push objects of any kind into this product through cabinet slots since they may touch dangerous voltage points or short out parts resulting in a risk of fire or electric shock Never spill liquid of any kind on the product 12 DO NOT attempt to service this product yourself because opening or removing covers may expose you to dangerous voltage points and or oth...

Страница 9: ... power cord to be stepped on 11 If an extension cord is used with this product make sure that the total ampere ratings on the products plugged into the extension cord DO NOT exceed the extension cord ampere rating 12 DO NOT touch a document during printing 13 Never push objects of any kind into this product through cabinet slots since they may touch dangerous voltage points or short out parts resu...

Страница 10: ...tware installation process USB interface cable Please make sure you use a USB 2 0 interface cable that is no longer than 6 feet 2 metres When you use a USB cable make sure you connect it to the USB port of your computer and not to a USB port on a keyboard or non powered USB hub CD ROMs For Drivers For User Guide and Paper Port Quick Install Guide Safety booklet AC Power Cord Drum Unit Assembly inc...

Страница 11: ...the software installation process USB interface cable Please make sure you use a USB 2 0 interface cable that is no longer than 6 feet 2 metres When you use a USB cable make sure you connect it to the USB port of your computer and not to a USB port on a keyboard or non powered USB hub CD ROMs For Drivers For User Guide and Paper Port Quick Setup Guide User Guide AC Power Cord Drum Unit Assembly in...

Страница 12: ...tions You can quickly and easily choose temporary settings for copying Enlarge Reduce Reduces or enlarges copies Contrast You can increase or decrease the contrast of your copies Number of Copies Use this key to make multiple copies 4 LCD Displays messages to help you set up and use your machine 5 Menu keys Clear Back Deletes entered data or lets you cancel the current setting a or b Press to scro...

Страница 13: ...ys Options You can quickly and easily choose temporary settings for copying Enlarge Reduce Reduces or enlarges copies Contrast You can increase or decrease the contrast of your copies Number of Copies Use this key to make multiple copies 4 LCD Displays messages to help you set up and use your machine 5 Menu keys Clear Back Deletes entered data or lets you cancel the current setting a or b Press to...

Страница 14: ...nnecting the interface cable is done when installing the driver 1 Open the front cover 2 Unpack the drum unit and toner cartridge assembly 3 Gently shake it from side to side several times to distribute the toner evenly inside the assembly 4 Put the drum unit and toner cartridge assembly into the machine 5 Close the front cover of the machine ...

Страница 15: ...n the bottom of the paper tray and then pull out the back of the paper tray Legal size paper is not available in some regions 3 Fan the stack of paper well to avoid paper jams and misfeeds 4 Put paper in the paper tray Make sure that the paper is flat in the tray and below the maximum paper mark 1 Caution Make sure the paper guides touch the sides of the paper so it will feed properly If you do no...

Страница 16: ...ecting your language 1 After turning the power switch on the LCD shows Select Language Press OK Key Press OK 2 Press or to select your language and press OK Select ab or OK English 3 If your language is selected press Yes English a Yes b No Note If you have set the wrong language you can change the language from the control panel menu of the machine For details see Changing the LCD language in App...

Страница 17: ...trast You can change the contrast to help the LCD look lighter or darker 1 Press Menu and or to select 1 General Setup Press OK 2 Press or to select 5 LCD Contrast Press OK 3 Press to increase the contrast OR Press to decrease the contrast Press OK ...

Страница 18: ... Suite includes the Printer Driver Scanner Driver ControlCenter3 PaperPort 11SE and Documentation for SP 1200S Install Paperport 11SE You can install ScanSoft PaperPort 11SE ScanSoft PaperPort 11SE ScanSoft PaperPort 11SE is a document management application for scanning and viewing documents Documentation You can view the manuals for SP 1200S in PDF format The Quick Setup Guide the User Guide and...

Страница 19: ...ities 18 Installing ScanSoft PaperPort 11SE for Windows 20 View and Installing the documentation 21 The screens for Windows in this Quick Setup Guide are based on Windows XP For USB Interface Cable Users For Windows 2000 Professional XP 7 XP Professional x64 Edition Windows Vista ...

Страница 20: ...ties for SP 1200S 1 Turn off and unplug the machine from the AC outlet and disconnect it from your computer if you already connected an interface cable 2 Turn on your computer You must be logged on with administrator rights 3 Put the supplied CD ROM for Windows into your CD ROM drive If the model name screen appears choose your machine If the language screen appears choose your language 4 The CD R...

Страница 21: ...utlet Turn the power switch on The installation of the drivers will automatically start The installation screens appear one after another please wait for a while Improper Setup DO NOT try to cancel any of the screens during this installation 9 Click Finish to restart your computer After restarting the computer you must be logged on with Administrator rights Note After restarting the computer the I...

Страница 22: ...pears choose your machine If the language screen appears choose your language 2 The CD ROM Top menu will appear Click Install Paperport TM 11SE Note If this window does not appear use Windows Explorer to run the start exe program from the root folder of the CD ROM For Windows Vista when the User Account Control screen appears click Allow For Windows 7 when the User Account Control Dialog box appea...

Страница 23: ... The CD ROM Top menu will appear Click Documentation 3 You can view the manuals for SP 1200S in PDF format The Quick Setup Guide the User Guide and the Software User s Guide The Software User s Guide includes instructions for features available when connected to a computer eg printing scanning details To save those manuals into your Computor Click Install documentation Note If this window does not...

Страница 24: ...he LCD For more information about the consumables for your printer contact your sales or service representative 1 Approx cartridge yield is declared in accordance with ISO IEC 19752 Toner Cartridge Drum Unit Print Cartridge SP 1200E for Europe Print Cartridge SP 1200S for Asia Drum Unit SP 1200 Approx 12 000 pages A4 Letter pages ...

Страница 25: ...Trademarks All brand and product names mentioned in this manual are registered trademarks of their respective companies Copyright 2011 Ricoh Co Ltd All Rights Reserved ...

Страница 26: ...M086 6140 GB ...

Отзывы: