background image

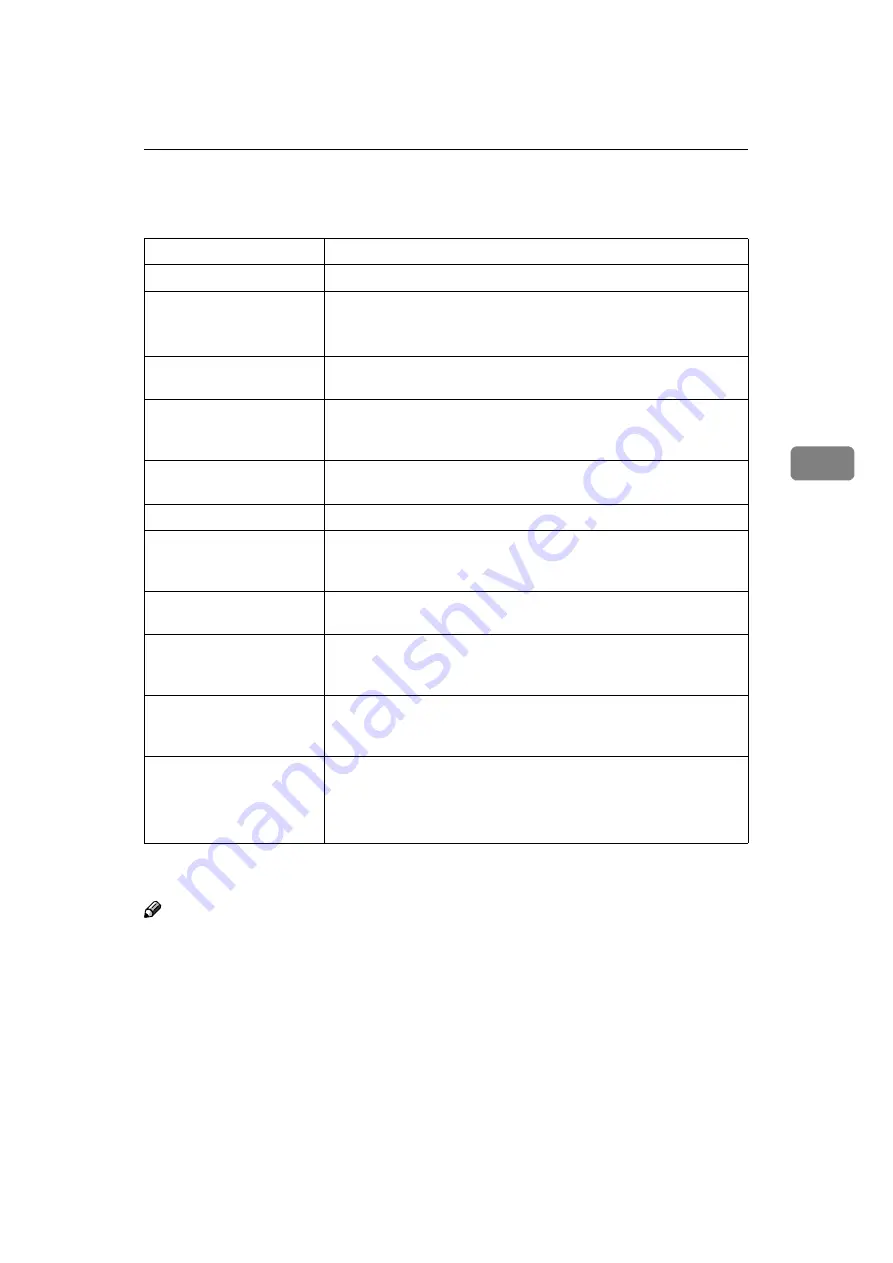
Machine Does Not Print

35

4

Machine Does Not Print

If you cannot solve the problem by taking the preceding actions, contact your
sales or service representative.

Note

If the Data In indicator is not blinking or lit, you can check the computer port
settings using the following procedure:

If the machine is connected to the computer using the interface cable

 Make sure the computer port settings are correct. For a parallel port con-

nection, port LPT1 or LPT2 should be set. 

Windows 95/98/Me


A

Click 

[

Start

]

, point to 

[

Settings

]

, and then click 

[

Printers

]

.

B

Click to select the icon of the machine. Next, on the 

[

File

]

 menu, click

[

Properties

]

.

Possible Cause

Solutions

Is the power on?

Turn on the machine.

Is the interface cable prop-
erly connected?

Connect the interface cable properly.

If there are any connectors or screws, make sure that they are fas-
tened securely.

Are you using the correct 
interface cable?

Be sure to use the correct one. If the cable is damaged or worn, re-
place it with a new one.

Did you connect the inter-
face cable after turning on 
the main switch?

Be sure to connect the interface cable before turning on the main 
switch.

Is the machine Auto On 
Line?

Bring it Auto On Line by pressing the 

{{{{

Auto On Line

}}}}

 key.

Is the specified paper set?

Set the specified paper in the Paper Feed Tray.

Are there any error mes-
sages on the display pan-
el? 

Check the error message, and take the required action.

Does the Error indicator 
stay red?

Check the error message, and take the required action.

Is the Data In indicator 
blinking or lit?

If it is not, the data does not reach the machine. Check the printer 
cable connection. Also confirm that the printer port settings are 
correct.

Can you make a proof 
print?

If you cannot print a system configuration list or a PS Font List 
from the machine, the machine might be out of order. Contact 
your sales or service representative.

Is “Waiting” displayed?

Perform one of the following procedures:

• Wait until the job is finished.
• Cancel by pressing 

[

Job Reset

]

 (When using Type B, press the 

{{{{

Job Reset

}}}}

 key).

Содержание RCP40

Страница 1: ...his machine please be sure to read the Safety Information in the Operating Instructions that comes with the machine before you use it Raster Printer Language Setting Up for Printing Canceling a Print...

Страница 2: ...x Corporation Other product names used herein are for identification purposes only and might be trademarks of their respective companies We disclaim any and all rights in those marks Notes Some illust...

Страница 3: ...s a PDF file on the CD ROM labeled Printer Drivers and Utilities Printer Reference 2 this manual Describes the procedures and provides necessary information about using this machine This manual is inc...

Страница 4: ...is not followed paper might be misfed originals might be damaged or data might be lost Be sure to read this Preparation This symbol indicates the prior knowledge or preparations required before op era...

Страница 5: ...Print Setting Details 20 Various Types of Printing 22 2 Canceling a Print Job Canceling a Print Job by Using the Printer Driver 25 Canceling before the Machine Starts Master Making 25 Canceling after...

Страница 6: ...g Online Parameter Settings 39 Online Parameter Settings Menu 39 Accessing the Online Parameter Settings 40 Online Parameter Settings 42 Machine Condition 44 Printing the System Configuration List 44...

Страница 7: ...n default is applied Making machine settings from an application To make the machine settings for a specific application open the Printer Proper ties dialog box from that application The following exa...

Страница 8: ...Note In this section the setting items peculiar to this machine are explained For other setting items see the documentation that comes with Windows 95 98 Me or Help In this section Windows 98 is used...

Страница 9: ...machine model Dithering The tone of gray shadings or photographs can be adjusted Note Normally set to Coarse None Click None if you don t want any dithering Coarse Click Coarse if your resolution sett...

Страница 10: ...possible to register up to only one custom paper size A A A A Display the data to be printed B B B B On the File menu click Print The Print dialog box appears C C C C Select the machine you want to u...

Страница 11: ...ble size This machine automatically detects the paper size however there are cases where the machine cannot detect the size depending on the paper size In these cases follow the procedure below and ma...

Страница 12: ...et it the Print Size in the Online Paramet s of the machine s Online Parameter Settings A A A A Press the User Tools key on the machine B B B B Select 6 Online Paramet s and then press the OK key C C...

Страница 13: ...licking Start on the taskbar Then click Control Panel Printers and Other Hardware and then Printers and Faxes B B B B Click to select the icon of the machine whose default you want to change C C C C O...

Страница 14: ...chine settings from an application To make the machine settings for a specific application open the Print dialog box from that application The following example describes how to make set tings for the...

Страница 15: ...devices The following item is installable Output Unit When Sorter is attached to Type A select Sorter Print Setting Details The necessary print settings such as paper size or print orientation can be...

Страница 16: ...printed Collated If you select more than 2 in Copy Count Collated will become ena bled Make sure to regularly clear the Collated check box because if Collated is not cleared master making may be done...

Страница 17: ...machine s dis play panel as Auto Cycle Clear Modes When set to On the machine settings return to their defaults before Mas ter Making Auto Print after Master Making When set to On printing starts aut...

Страница 18: ...g examples from Windows 2000 Windows XP Reference As printing can vary depending on the application see the respective docu mentation that comes with the application regarding details on settings Prin...

Страница 19: ...th Note Available paper dimensions are Type A Width 7 00 29 70 cm 2 8 11 7 inches Height 14 80 43 20 cm 5 9 17 0 inches Type B Width 7 00 29 00 cm 2 8 11 5 inches Height 14 80 42 00 cm 5 9 16 6 inches...

Страница 20: ...ne s Online Parameter Settings A A A A Press the Online key on the machine B B B B Press Pnt Size Note Pnt Size is only displayed when the machine is online It will not be dis played when the machine...

Страница 21: ...Select 2 Print Size and then press the OK key D D D D Select the paper size and then press the OK key Important Select a size that is bigger than the contents to be printed If the contents are bigger...

Страница 22: ...function in the printer driver The following chart shows how the image is rotated Note If you want to print on special types of paper such as envelopes select the type of paper in Ppr Type on the mach...

Страница 23: ...s and place them in the Paper Feed Tray as shown Paper feed direction B B B B Set Rotate Image to 180 on Advanced on the Layout tab or the Pa per Quality tab in the printer driver C C C C Click Print...

Страница 24: ...g box appears D D D D Make any settings you require and click OK Note Settings you make here are used as the default for all applications Changing the default machine settings Default Document Propert...

Страница 25: ...The Print dialog box appears B B B B Select the machine you want to use in the Name list box and then click Properties The Document Properties dialog box appears C C C C Make any settings you require...

Страница 26: ...owever do not select paper sizes that cannot be used by this ma chine Paper Source Specify Paper Feed Tray for printing Note Select Paper Feed Tray here Even if you select Automatically Select the mac...

Страница 27: ...optional Output Units can be attached If you select the Output Tray this function is available only when the optional Output Tray is attached to the machine Scan for Rules The printing speed can be i...

Страница 28: ...on the taskbar point to Settings and then click Printer The Printers window appear B B B B On File menu click Server Properties The Printer Server Properties dialog box appears C C C C Make sure that...

Страница 29: ...ting select it in the Printer Properties dialog box Printing on paper with a nondetectable size This machine automatically detects the paper size however there are cases where the machine cannot detec...

Страница 30: ...et it the Print Size in the Online Paramet s of the machine s Online Parameter Settings A A A A Press the User Tools key on the machine B B B B Select 6 Online Paramet s and then press the OK key C C...

Страница 31: ...nt job queue window by double clicking the ma chine icon in the Printer window D D D D Click OK The print job is cleared Note When sending a print job has already begun it may take considerable time t...

Страница 32: ...ey on the machine s control panel The machine returns to the status that a print job can be received Note The number of prints remaining is displayed on the counter after you can cel a print job It wi...

Страница 33: ...s Canceling a waiting print job A A A A Press Job Reset Note You cannot cancel a print job if there are no following jobs Even if you cancel the current print job the following print jobs will ac quir...

Страница 34: ...l a print job if there are no following jobs Even if you cancel the current print job the following print jobs will ac quire waiting status and the three displays above will appear repeated ly Canceli...

Страница 35: ...y if there are no following jobs A A A A Press fin PRNT on the machine s display panel B B B B Press the Clear Stop key on the machine s control panel The machine stops master making or printing Type...

Страница 36: ...Canceling a Print Job 30 2...

Страница 37: ...og box appears E E E E Click Yes to uninstall the printer driver Windows 2000 Windows XP Limitation Uninstalling a printer driver requires Manage Printers permission Members of the Administrators and...

Страница 38: ...ck Re move C Click Yes D Click OK Windows NT 4 0 Limitation Uninstalling a printer driver requires Full Control access permission Mem bers of the Administrators Server Operators Print Operators and Po...

Страница 39: ...Controller Error The ROM is faulty First turn the power switch off and then on If the message ap pears again consult your sales or service representative Making Master The master is being made NVRAM...

Страница 40: ...tting Job The data spooled is dumped Wait until the job is finished ROM Error The ROM inside the machine is abnormal Consult your sales or service representative Type A Selected paper size is una vail...

Страница 41: ...the correct one If the cable is damaged or worn re place it with a new one Did you connect the inter face cable after turning on the main switch Be sure to connect the interface cable before turning o...

Страница 42: ...taskbar Then click Control Panel Printers and Other Hardware and then Printers and Faxes B Click to select the icon of the machine Next on the File menu click Properties C Click the Port tab D Check...

Страница 43: ...he same orientation is set as well as the same paper size set in the application Check the Layout tab If a different size has been set select the correct paper size and orientation Windows 2000 XP onl...

Страница 44: ...Troubleshooting 38 4...

Страница 45: ...ettings you make are retained even when you turn off the machine Reference For more information about settings other than the Online Parameter set tings see Operating Instructions Adjusting Online Par...

Страница 46: ...s OK F F F F Make any settings you require and then press OK Note To change the value entered press the Clear Stop key before pressing the OK key Then enter the new value Press Cancel to return to the...

Страница 47: ...settings you require and then press the OK Note To change the value entered press the Clear Stop key before pressing the OK key Then enter the new value Press the Cancel key to return to the previous...

Страница 48: ...1 for information about the IP Address setting 6 Ethernet Speed Sets the Ethernet communication speed Note Default Auto 7 Network Sets the Network boot Note Default None Reference See Printer Referenc...

Страница 49: ...tings 43 5 9 I O Buffer Sets the capacity of the reception buffer Note Default 512KB 10 Menu Reset You can reset the factory settings However the IP Address Network and the Ethernet Speed settings do...

Страница 50: ...ngs before changing them Printing the System Configuration List Type A A A A A Press the User Tools key The User Tools screen is displayed B B B B Press Next C C C C Select 7 Set O L Paramet s using t...

Страница 51: ...ss the Start key The system configuration list is printed Type B A A A A Press the User Tools key B B B B Select 6 Online Paramet s using the or keys C C C C Press the OK key D D D D Select 3 List Tes...

Страница 52: ...Using the Control Panel 46 5 G G G G Press the Make Master key The system configuration list is printed...

Страница 53: ...r IEEE1284 Note Do not use a parallel cable that is longer than 3 meters 10 feet LAN interface 100BASE TX 10BASE T Printer Language Raster Printer Language Frame type EthernetII IEEE802 2 IEEE802 3 SN...

Страница 54: ...ngs 39 42 P Page Setup tab Windows NT 4 0 20 Paper Quality tab Windows 2000 10 Windows XP 10 Paper tab Windows 95 98 Me 2 Printer Properties Settings Windows 2000 9 Windows 95 98 Me 2 Windows NT 4 0 1...

Страница 55: ...s XP 12 W Windows 2000 printer properties 9 Raster Printer Language uninstalling 31 Windows 95 98 Me printer properties 2 Raster Printer Language uninstalling 31 Windows NT 4 0 printer properties 19 R...

Страница 56: ...50 GB GB C624 8620...

Страница 57: ...Copyright 2003...

Страница 58: ...Printer Unit Type40 RCP40 Operating Instructions Printer Reference 2 GB GB C624 8620...

Отзывы: