


• After the following adjustment, keep the front door of the Ring Binder closed and turn main
power switch OFF and ON.
1. Do SP6504 and enter the number printed on the label attached to the punch unit. (For more details
about SP6504, please refer to Section 5 of the main machine service manual.)
2. Do a run with the ring binder in the punch only mode (no ring binding).
• Use paper in the weight range 70 to 90 g/m
2
.
3. With a punched sheet face-down as shown below, use a micrometer to measure the distances, X,
Y, and X
1
.
Standard Values
A4 (mm)
LT (mm)
Note
X
8.8
12.7
Last hole center to paper edge.
Y
6
6
Last hole center to paper edge.
X
1
5.625
9.525
Last hole edge to paper edge.
• The distance "Y" is determined by the size of the punch unit (A4 or LT) and cannot be
adjusted.
• "Y" is the same distance for both A4 and LT.
• If "Y" is out of adjustment, the punch unit must be replaced.
Hole Position Adjustment
Here is an example of how to adjust X
1
.
1. Replacement and Adjustment
32
Содержание RB5020
Страница 1: ...Ring Binder RB5020 Machine Code D737 SERVICE MANUAL V1 1 May 2015 ...
Страница 11: ...10 ...
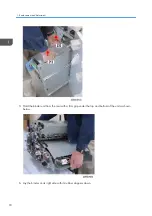
Страница 20: ...Binder Unit Covers Binder Unit Covers Common Procedures 19 ...
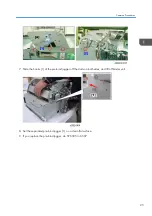
Страница 49: ...4 Remove 1 Spring x1 2 Sensor bracket x2 3 Sensor x1 x1 x3 1 Replacement and Adjustment 48 ...
Страница 72: ...3 Remove the sensor bracket x1 4 Remove the sensor x1 x1 Sensors 71 ...
Страница 76: ...6 Remove the panel 7 Remove the sensor bracket 1 x1 8 Remove the sensor x1 x1 x1 Sensors 75 ...
Страница 78: ...4 Remove the sensor bracket 1 x2 5 Remove the sensor x x1 Sensors 77 ...
Страница 80: ...5 Remove the sensor x1 x1 Sensors 79 ...
Страница 103: ...7 Disconnect the harnesses and remove the motor x2 1 Replacement and Adjustment 102 ...
Страница 107: ...MEMO 106 ...
Страница 108: ...MEMO 107 ...
Страница 109: ...MEMO 108 EN ...