background image

Making Enlarged or Reduced Copies

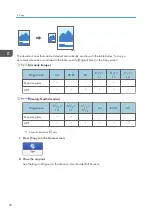
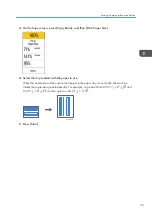
You can enlarge or reduce the original when copying with the following methods:

• Enlarging or reducing at a specified reduction ratio or into a specified size (Zoom/Reduce/

Enlarge/Size Magnification)

• Enlarging or reducing according to the paper size (Auto Reduce/Enlarge)

Specifying a Copy Ratio or Size

1.

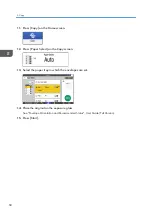
Press [Copy] on the Home screen.

2.

Place the original.

See "Setting an Original on the Scanner", User Guide (Full Version).
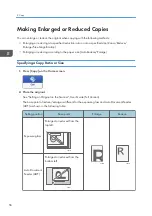
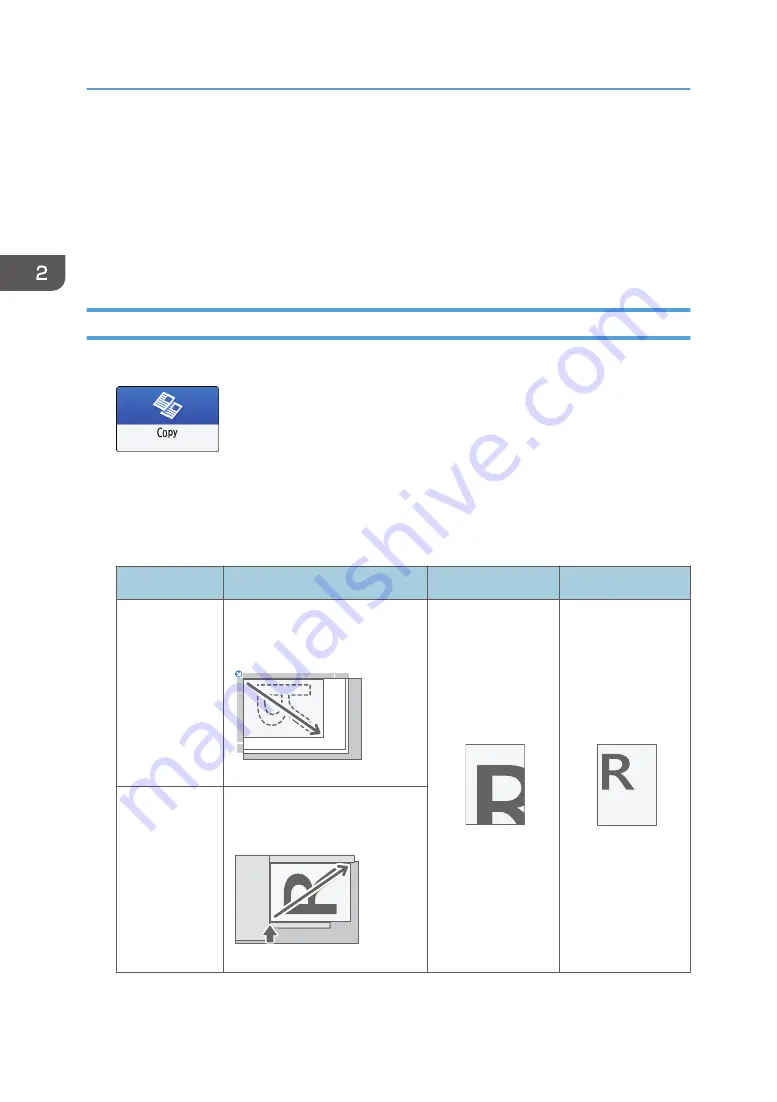
The base point of reduce/enlarge is different for the exposure glass and Auto Document Feeder
(ADF) as shown in the following table:

Setting position

Base point

Enlarge

Reduce

Exposure glass

Enlarged or reduced from the
top left.

DZB222

DZB224

DZB225

Auto Document
Feeder (ADF)

Enlarged or reduced from the
bottom left

DZB223

2. Copy

56

Содержание IM C530 Series

Страница 1: ...r information not found in this manual see the online manuals available on our web site https www ricoh com Legal and Contact Information Specifications for the Machine Troubleshooting Adding Paper and Toner Web Image Monitor Scan Print Fax Copy Getting Started User Guide Selected Version ...

Страница 2: ......

Страница 3: ...symbol indicates points that may result in the product or service becoming unusable or result in the loss of data if the instructions are not obeyed Be sure to read these explanations Indicates supplementary explanations of the machine s functions and instructions on resolving user errors Indicates the names of keys or buttons on the product or display 1 ...

Страница 4: ...sion of RICOH Always Current Technology Implemented on the Machine 26 How to Use the Home Screen 27 Intuitive Screen Operation Using Fingertips 29 How to Use the Copy Screen 32 How to Use the Copy Screen Standard View 33 How to Use the Copy Screen Full View 34 How to Use the Fax Screen 35 How to Use the Scanner Screen 36 Adding a Frequently Used Application or Widget to the Home Screen 37 Adding a...

Страница 5: ...Bypass Tray 65 Copying onto Envelopes in the Tray 1 66 Copying in Page Order or for Each Page Number 69 3 Fax Basic Procedure for Transmitting Faxes 71 Registering Fax Numbers in the Address Book 74 Registering a Fax Number and Send Conditions 74 Changing Deleting the Registered Data Such as Fax Number 75 Viewing the Transmission Result of Sent Faxes 77 Confirming the Information on the Fax Screen...

Страница 6: ...ing 2 sided Print Windows 109 Specifying 2 sided Print macOS 109 Combining and Printing Multiple Pages on a Single Sheet of Paper 111 Specifying the Combine 2 Originals Function Windows 111 Specifying the Combine 2 Originals Function macOS 111 Printing on Envelopes 113 Printing on Envelopes Loaded in the Bypass Tray 113 Printing on Envelopes Loaded in Tray 1 115 Printing a Locked Print File Using ...

Страница 7: ...dding Paper and Toner Loading Paper into the Paper Tray 149 Loading Paper into Tray 1 150 Loading Paper into Tray 2 to 5 153 Loading Paper into the Bypass Tray 156 Loading Paper into the Large Capacity Tray LCT 157 Specifying the Paper Size That Is Not Automatically Detected 159 Specifying Paper Type and Thickness Settings 160 Recommended Paper Sizes and Types 162 Tray 1 162 Paper Tray Unit Trays ...

Страница 8: ... Control Panel 187 When an Icon Is Displayed with a Message 187 When the Check Status Indicator Is Lit or Flashing 189 When the Machine Cannot Be Operated 191 When the Machine Does Not Respond Correctly to an Operation on the Control Panel 191 When the Machine Does Not Respond Correctly to an Operation from a Computer 195 When a Message Appears and the Machine Cannot Be Operated 197 When a Message...

Страница 9: ...cifications for Facsimile 252 Specifications for Printer 253 Specifications for Scanner 255 Specifications for Auto Document Feeder ADF 259 Specifications for Internal Finisher Option 259 Specifications for Mailbox Option 261 Specifications for Paper Tray Unit Trays 2 5 Option 261 Specifications for Large Capacity Tray LCT Option 262 Specifications for Caster Table Option 262 Specifications for Wi...

Страница 10: ...Functions 277 User Information on Electrical and Electronic Equipment mainly Europe 278 Note for the Battery and or Accumulator Symbol For EU countries only mainly Europe 279 Environmental Advice for Users mainly Europe 280 Notes to users in the state of California Notes to Users in USA mainly North America 281 Trademarks User Guide 282 8 ...

Страница 11: ... switch soon after you press the main power of the machine When you turn the power on or off wait at least 10 seconds after confirming that the main power indicator on the control panel has turned on or off 1 Make sure the power cord is firmly plugged into the wall outlet 2 Push the main power switch D0CSIA1201 The main power indicator on the right side of the control panel turns on When the power...

Страница 12: ...erly Energy Saving Mode When the machine is not operated for a specified period of time the machine enters the Energy Saving mode automatically Energy Saving mode has two modes Fusing Unit Off mode and Sleep mode and the machine enters the Fusing Unit Off mode first In the factory default the machine is configured to use both modes Fusing Unit Off Mode In this mode the main power indicator is lit ...

Страница 13: ... energy saving functions are disabled when an error occurs or while an operation is in progress The energy saving functions will not operate in the following cases When fixed warm up is in progress When operations are suspended during printing When a warning message appears The machine enters Fusing Unit Off mode unless the cover is open When paper is jammed The machine enters Fusing Unit Off mode...

Страница 14: ... is waiting to be transmitted within the next minute using the Send Later facsimile function When a recipient is being registered in the address list or group dial list When the locked print screen is displayed When the screen of a document that was stored under the printer function appears When the internal cooling fan is active When accessing the machine using Web Image Monitor 1 Getting Started...

Страница 15: ...esult in fire as the internal components are overheated When moving the machine do not hold the control panel Doing so may damage the control panel and can result in injury or malfunction Front and Left View IM C530FB D0CSIA1202 3 5 9 10 4 1 2 6 7 8 Guide to Names and Functions of Components 13 ...

Страница 16: ...eed the originals one by one 4 Exposure glass Place originals face down here 5 Control panel See page 22 Names and Functions of the Control Panel 6 Paper guides When loading paper in the bypass tray align the paper guides flush against the paper 7 Bypass tray Use to copy or print on label paper adhesive labels 8 Extender Pull this extender out when loading A4 81 2 11 or larger size paper in the by...

Страница 17: ...switch must be on If it is off turn the switch on 3 Auto Document Feeder ADF Lower the ADF over originals placed on the exposure glass If you load a stack of originals in the ADF the ADF will automatically feed the originals one by one 4 Exposure glass Place originals face down here Guide to Names and Functions of Components 15 ...

Страница 18: ...e bypass tray align the paper guides flush against the paper 7 Bypass tray Use to copy or print on label paper adhesive labels 8 Extender Pull this extender out when loading A4 81 2 11 or larger size paper in the bypass tray 9 Paper tray Load paper here 10 Paper feed unit Load paper here 1 Getting Started 16 ...

Страница 19: ...upport large paper 2 Front cover Open to replace the print cartridge 3 ADF s extender Pull this extender out to support large paper 4 Standard tray Copied printed paper and fax messages are delivered here 5 Right cover Open to replace the waste toner bottle Guide to Names and Functions of Components 17 ...

Страница 20: ...rge paper 2 Front cover Open to replace the print cartridge 3 ADF s extenders Pull this extender out to support large paper 4 Finisher staple cover Open to replace the staple cartridge 5 Standard tray Copied printed sorted stapled paper and fax messages are delivered here 1 Getting Started 18 ...

Страница 21: ...he waste toner bottle Rear and Left View IM C530FB 1 2 6 D0CSIA1206 5 4 3 1 Rear cover Open this cover when a paper jam occurs 2 Vents Prevent overheating 3 LINE G3 interface unit connector Connect the line for fax use 4 TEL External telephone connector Connect an external telephone set Guide to Names and Functions of Components 19 ...

Страница 22: ... USB cable 6 Ethernet port Use a network interface cable to connect the machine to a network IM C530F 6 D0CSIA1207 3 4 5 1 2 1 Rear cover Open this cover when a paper jam occurs 2 Vents Prevent overheating 3 LINE G3 interface unit connector Connect the line for fax use 1 Getting Started 20 ...

Страница 23: ...xternal telephone set 5 USB2 0 Interface Type B Use this port to connect the machine and the computer with the USB cable 6 Ethernet port Use a network interface cable to connect the machine to a network Guide to Names and Functions of Components 21 ...

Страница 24: ...Insert an SD card or USB flash memory device You can store the scanned data or print the file stored on the media Use an SD memory card or SDHC memory card with a maximum capacity of 32 GB You cannot use an SDXC memory card Use the media formatted in FAT16 or FAT32 Certain types of USB flash memory devices cannot be used in the machine A USB extension cable hub or card reader cannot be used If the...

Страница 25: ...uitive Screen Operation Using Fingertips 3 NFC tag Used to connect the machine and a smart device with the RICOH Smart Device Connector See Using the Machine Functions from a Mobile Device User Guide Full Version You can adjust the angle of the control panel to improve visibility D0CSIA1208 LED Indicators EBW740 1 5 3 2 4 Names and Functions of the Control Panel 23 ...

Страница 26: ...bought it 2 Fax indicator Indicates the status of the fax function Flashing transmitting and receiving data Lit receiving data Substitute RX File 3 Data In indicator Flashes when the machine is receiving data sent from the printer driver or LAN Fax driver 4 Status indicator Indicates the status of the system Stays lit when an error occurs or toner runs out page 187 Checking the Indicators Icons an...

Страница 27: ...Language You can change the language used on the display English is set as default 1 On the Home screen press the Change Languages Widget 2 Select the language you want to display 3 Press OK Changing the Display Language 25 ...

Страница 28: ...l the latest version of RICOH Always Current Technology access the Application Site from the control panel of the machine EDS004 For details about installing RICOH Always Current Technology see the Operating Instructions for Application Site Confirming the Version of RICOH Always Current Technology Implemented on the Machine 1 Press System Settings Machine Control Panel Information Firmware Versio...

Страница 29: ... Using Fingertips You can add or delete icons and widgets and change their order page 37 Adding a Frequently Used Application or Widget to the Home Screen D0CSPA5301 1 2 3 4 5 6 7 8 9 10 11 12 14 13 6 15 1 Login icon This icon is displayed when users are logged in The names of the users who are currently logged in are displayed 2 System message Displays system and application messages If there are...

Страница 30: ...Home screen has 5 screens EBW196 You can switch between the screens by flicking page 29 Intuitive Screen Operation Using Fingertips You can hide the screen with no icons by setting Home Screen Blank Pages to Do not Display Blank Pages See Display Input User Guide Full Version 7 Application list Press to display applications that are not displayed on the Home screen page 37 Adding a Frequently Used...

Страница 31: ... maintenance information See Checking the Machine Status from the Control Panel User Guide Full Version 15 Icon display area Displays the icons and widgets You can change the screen displayed when the power is turned on under Function Priority See Displaying Frequently Used Functions on the First Screen User Guide Full Version When you press Menu Reset Home Screen with the Embedded Software Archit...

Страница 32: ... blank area on the screen to display the menu screen On the Home screen you can add a folder or change the wallpaper from the menu DZB183 In some applications you can also use the following actions to operate the screen Pinch in for zooming out the screen Touch the screen with your thumb and forefinger and pinch them together This feature is useful when previewing files and images 1 Getting Starte...

Страница 33: ... and forefinger and spread them apart You can also zoom in the screen by tapping the screen twice quickly When you quickly tap the screen twice again the screen returns to full display This feature is useful when previewing files and images DZB184 How to Use the Home Screen 31 ...

Страница 34: ...ng or editing D0CSPA5304 Full View You can see all the function keys on a single screen You do not need to scroll through the screens to select a function To switch the screen type press Menu Screen Settings Switch Screen Type on the Copy screen You can use the same functions on either screen When the administrator has configured user authentication and User s Own Customization is enabled each log...

Страница 35: ...ay of the key changes according to the specified setting 2 Reset Reset the settings configured on the Copy screen 3 Preview of the current setting status Displays an image representing the settings configured on the Copy screen Press the image to display the list of the settings 4 Start Press to perform copying 5 Other keys for Copy function Press to select the functions whose keys are out of the ...

Страница 36: ...ured on the Copy screen 3 Preview of the current setting status Displays an image representing the quantity and the settings configured on the Copy screen Press Qty to display the number keys Press the image to display the list of the settings 4 Start Press to perform copying 5 Other keys for Copy function Press to select the functions whose keys are out of the visible area of the screen The key o...

Страница 37: ...scan settings appropriately for the original to scan You can also check the settings that are currently specified and the remaining amount of memory 3 Destination specification You can select an address registered in the address book through one touch operation Press or to specify a destination by using various other methods such as by entering manually or selecting from the history You can also r...

Страница 38: ...curity settings 3 Transmission settings You can specify the scan settings according to the type of document to scan and the purpose of the scanned data and display a preview before sending the data 4 Destination specification You can select a destination registered in the address book through one touch operation Press to specify a destination by using various other methods such as by entering manu...

Страница 39: ...he screen and programs registered in the Copy Fax or Scanner EBW682 When you have set user authentication log in and customize it Each user can register their own Home screen A shortcut folder or widget cannot be created or moved if there is no space on the Home screen In this case delete one of the registered items and then perform the same operation The names of icons and widgets are displayed u...

Страница 40: ...nd then release it To delete an icon or widget press and hold the icon and move it to the trash icon and then release it When you delete a shortcut icon of a function or program from the Home screen the function or program is not deleted To reset the Home screen perform the following procedure 1 Press Menu on the bottom center of the Home screen 2 Press Reset Home Screen and then press OK Creating...

Страница 41: ...r press and hold its title and then change the folder name You can enter up to 30 characters for a folder name 4 Drag the icon and release it over the folder Adding a Frequently Used Application or Widget to the Home Screen 39 ...

Страница 42: ...s Fax 100 items Scanner 100 items You cannot register the following settings as a program Copy 2 Sided Combine Fax Subject Sender Scanner Sender PDF Security Settings Start Number You can register a destination on the program of the scanner function only when Program Setting for Destination of Scanner Settings is set to Include Destinations See Others Scanner Settings User Guide Full Version When ...

Страница 43: ...Fax or Scanner 2 Specify scan and output settings to be registered as a program 3 Press Menu 4 Press Set Current Settings to Program D0CSPA5322 5 Press a program number to register the settings 6 Enter a program name and select an icon and then press OK 7 Press Place The selected icon is displayed on the Home screen Registering Frequently Used Settings as a Program 41 ...

Страница 44: ... Change the scan and output settings 5 Press Menu and then press Set Current Settings to Program 6 Select a program number to register the changed settings and then press Program To overwrite the program select the number of the loaded program To register the contents as a new program select a number that is not programmed 7 Enter a program name and select an icon 8 Press OK To change the icon or ...

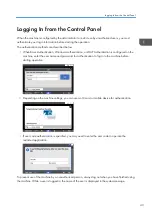
Страница 45: ...ine enter the user name and password for authentication to log in to the machine before starting operation Depending on the machine settings you can use an IC card or mobile device for authentication If user code authentication is specified you may need to enter the user code to operate the restricted application To prevent use of the machine by an unauthorized person always log out when you have ...

Страница 46: ...rsion Ask the administrator for the login user name login password and user code Verifying Users to Operate the Machine User Authentication Security Logging In by Entering the User Name and Password Enter the authentication information using the keyboard displayed on the control panel 1 Press Login at the top right on the screen D0CSPA5311 2 Press User Name DZC191 3 Enter the login user name and t...

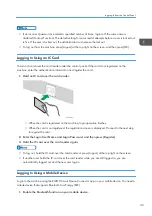
Страница 47: ... the card is registered on the machine login operation finishes When the card is not registered the registration screen is displayed Proceed to the next step to register the card 2 Enter the Login User Name and Login Password and then press Register 3 Hold the IC card over the card reader again To log out hold the IC card over the card reader or press Logout at the top right on the screen If anoth...

Страница 48: ...ay the login screen 3 Press NEXT 4 Display the login screen on the control panel of the machine and hold the mobile device over the Bluetooth label To log out from the machine hold the mobile device over the Bluetooth label on the control panel or press Logout at the top right on the screen 1 Getting Started 46 ...

Страница 49: ...on press Energy Save or press and hold Reset to release the authentication status Changing the Login Password When Basic Authentication Windows Authentication or LDAP Authentication is configured on the machine change the password periodically to prevent use of the machine by an unauthorized person Passwords can contain the following characters Make the password difficult to guess Uppercase letter...

Страница 50: ...d then press Edit D0CSPA5313 4 Press the User Management Others tab User Management 5 Enter the new login password and then press OK twice D0CSPA5314 You can enter up to 128 characters 6 After completing the procedure press Home 1 Getting Started 48 ...

Страница 51: ...injury The ADF or its hinges may also become damaged 1 Lift the ADF 2 Place the original face down and aligned to the mark on the upper left corner of the scan area D0CSIA1209 page 174 Recommended Original Size and Weight 3 Lower the ADF You can set a book or object that is less than 20 mm 0 79 inches thick A book or object that is thicker than 20 mm 0 79 inches cannot be set When you place a thic...

Страница 52: ...D0CSIA1210 Do not open or close the ADF with your hands placed in the space between the ADF and exposure glass D0CSIA1211 1 Getting Started 50 ...

Страница 53: ... as thermal paper art paper aluminum foil carbon paper or conductive paper Originals with perforated lines Originals with indexes tags or other projecting parts Sticky originals such as translucent paper Thin or highly flexible originals Thick originals such as postcards Bound originals such as books Transparent originals such as transparencies or translucent paper page 162 Recommended Paper Sizes...

Страница 54: ...ls with the first page facing up Fan sheets before loading so that multiple papers do not stick to each other and are not fed at once Do not stack the originals beyond the limit mark D0CSIA1213 To scan originals larger than A4 or 81 2 11 size pull out the ADF s extender on the original output tray and then raise the stopper D0CSIA1214 1 Getting Started 52 ...

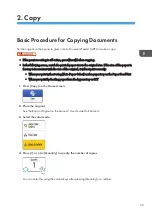
Страница 55: ... is inconsistent with the size of the original it will not print correctly When you print without using Auto Paper Select on the paper tray or the Paper Feed Unit When you print by feeding paper from the bypass tray or LCT 1 Press Copy on the Home screen 2 Place the original See Setting an Original on the Scanner User Guide Full Version 3 Select the color mode 4 Press or in Quantity to specify the...

Страница 56: ... select other trays To prevent the machine from selecting other trays automatically disable auto tray switching See Tray Paper Settings User Guide Full Version 6 Press Start When the Check the orientation of the original every time after pressing Start check box is selected in Select the original s orientation the screen below is displayed Select the original orientation as necessary If you do not...

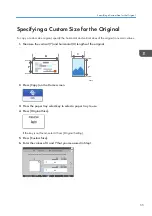
Страница 57: ...ertical Y and horizontal X lengths of the original Y X DZB577 X Y X Y 2 Press Copy on the Home screen 3 Press the paper tray select key to select a paper tray to use 4 Press Original Size If the key is not found select it from Original Setting 5 Press Custom Size 6 Enter the values of X and Y that you measured in Step 1 Specifying a Custom Size for the Original 55 ...

Страница 58: ...uce Enlarge Specifying a Copy Ratio or Size 1 Press Copy on the Home screen 2 Place the original See Setting an Original on the Scanner User Guide Full Version The base point of reduce enlarge is different for the exposure glass and Auto Document Feeder ADF as shown in the following table Setting position Base point Enlarge Reduce Exposure glass Enlarged or reduced from the top left DZB222 DZB224 ...

Страница 59: ... Zoom Reduce Enlarge Enter a value or select the copy ratio D0CSPA5501 Specifying a size Size Magnification Press Specify Copy Size and enter the length of the original and copied image 4 Press Start You can change the options of the copy ratio that is displayed on the Copy screen when pressing Copy Ratio You can also change the enlargement and reduction ratios that appear when Copy Ratio Others i...

Страница 60: ...inal Size on the Copy screen mainly Europe Original size A4 B5 JIS A5 81 2 11 81 2 13 81 2 14 Exposure glass ADF mainly North America Original size 81 2 14 81 2 11 51 2 81 2 A4 B5 JIS A5 Exposure glass ADF 1 1 Portrait orientation only 1 Press Copy on the Home screen 2 Place the original See Setting an Original on the Scanner User Guide Full Version 2 Copy 58 ...

Страница 61: ...the paper to use When the orientations of the original and paper in the paper tray do not match the machine rotates the copied image automatically For example originals of both A5 51 2 81 2 and A5 51 2 81 2 can be copied on A4 81 2 11 D0CSIA1405 5 Press Start Making Enlarged or Reduced Copies 59 ...

Страница 62: ... copied differs from that of the 1 sided copy page 245 List of Specifications 1 Press Copy on the Home screen 2 On the Copy screen press 1 sided 2 sided or 2 sided 2 sided Duplex Copying with the Settings Other Than Those Displayed on the Keys 1 On the Copy screen press 2 Sided Combine 2 Press 2 Sided Combine 3 Specify the original and print side settings 2 Copy 60 ...

Страница 63: ...lass press Finish Scn after scanning all of the originals if necessary according to the setting contents and number of originals You cannot use the duplex copy function when the following paper types are selected Label Paper Envelope Coated Paper You can change the setting contents of the two sided copy key on the Copy screen See Others Copier Settings User Guide Full Version Use the Series functi...

Страница 64: ...angement of copied pages and copy ratio varies depending on the original orientation and combined pages Original Orientation Combine 2 pages Combine 4 pages DZB254 DZB256 2 1 DZB257 4 1 DZB255 DZB259 2 1 DZB260 4 1 1 Press Copy on the Home screen 2 On the Copy screen press 1sided Comb 2orig To combine with the settings other than those displayed on the keys 1 On the Copy screen press 2 Sided Combi...

Страница 65: ...f a sheet 3 Press the paper tray select key and select the paper to use 4 Place an original See Setting an Original on the Scanner User Guide Full Version To position the right page first and then the left page when copying an original written longitudinally place the original upside down in the ADF Example Combining 2 Pages Orientation Results DZB262 3 4 2 1 DZB263 3 4 2 1 5 Press Start When plac...

Страница 66: ...ges the copy ratio becomes less than 25 and parts of the image might not be copied You can configure the following settings in Settings Copier Settings Combine Copy Order in Combine The order of combined images You can change the setting contents of the Combine key on the Copy screen See Others Copier Settings User Guide Full Version 2 Copy 64 ...

Страница 67: ...ed press the key to cancel the setting Copying onto Envelopes in the Bypass Tray 1 Load envelopes in the bypass tray Orientation portrait Flap close Printing surface upper side 2 Press Copy on the Home screen 3 Place the envelope in the bypass tray with the copying side face up See Envelope Orientation and Recommended Status User Guide Full Version The Bypass Tray Paper Settings screen appears 4 P...

Страница 68: ... the size of the envelope with its flap closed D0S9IA1401 7 Confirm the settings in the Bypass Tray Paper Settings screen and then press OK 8 Place the original on the exposure glass See Envelope Orientation and Recommended Status User Guide Full Version 9 Press Start Copying onto Envelopes in the Tray 1 1 Load the envelopes in Tray 1 Orientation portrait Flap close Printing surface upper side 2 C...

Страница 69: ...ngs D0CSPA6104 4 Press Paper Size Paper Type 5 Press Tray 1 6 Press Paper Size 7 Select the size of the loaded envelope from the list and then press OK 8 Press Paper Type Thickness 9 Select Envelope and then press OK twice 10 Press Home Copying onto Envelopes 67 ...

Страница 70: ...2 Press Paper Select on the Copy screen 13 Select the paper tray in which the envelopes are set 14 Place the original on the exposure glass See Envelope Orientation and Recommended Status User Guide Full Version 15 Press Start 2 Copy 68 ...

Страница 71: ... page original You can set the stack function only when you are using IM C530F DZB242 3 2 1 1 2 2 3 3 1 To use the stack function the optional finisher is required page 272 Functions Requiring Optional Configurations 1 Press Copy on the Home screen 2 Place the original See Setting an Original on the Scanner User Guide Full Version 3 Press Sort Stack on the Copy screen If the key is not displayed s...

Страница 72: ...function to specify 5 Press Start When selecting Sort and placing an original on the exposure glass a single set of copies is made After scanning all of the originals press Finish Scn to copy the rest of the sets When you are using IM C530F with the finisher option installed the sets of printouts are shifted as they are output 2 Copy 70 ...

Страница 73: ...Original User Guide Full Version It is recommended that you call the receivers and confirm with them when sending important documents 1 Press Fax on the Home screen 2 Check that Memory Transmission is displayed on the fax screen D0CSPA5701 3 Place the original in the ADF or on the exposure glass See Setting an Original to Send by Fax on the Scanner User Guide Full Version 4 Press Settings and then...

Страница 74: ...ry To specify the destination again press D0CSPA5704 6 Press Start To cancel transmission after scanning the original press Stop and operate in Job Status Transmission Standby File See Confirming and Handling a Document in the Fax Queue User Guide Full Version If the telephone line you are connected to requires time to connect to the public line after you dial the external number enter a Pause aft...

Страница 75: ...er afterward You can perform Immediate Transmission only when the total number of destinations specified for all documents exceeds the maximum value The communication that has been initiated first is displayed on the screen when performing three simultaneous communications Basic Procedure for Transmitting Faxes 73 ...

Страница 76: ...d conditions in the address book you can easily send faxes Registering a Fax Number and Send Conditions 1 Press Address Book on the Home screen 2 Press Register on the Address Book screen D0CSPA5315 3 Enter the information of the destination on the Name tab and then select a title to classify it 4 Press Destinations tab Fax 3 Fax 74 ...

Страница 77: ...which this destination belongs as necessary Register the group in advance See Registering Groups in the Address Book User Guide Full Version Display Priority When the destinations are sorted in the order of priority a destination with higher priority is displayed prior to that with lower priority The destinations with the same priority are displayed in the order of registration Destination Protect...

Страница 78: ...ange or delete on the Address Book screen D0CSPA5319 You can delete multiple destinations at one time 3 Press Edit or Delete to change or delete the destination information 4 When changing or deleting is complete press Home 3 Fax 76 ...

Страница 79: ...he fax transmission results can also be confirmed in Records See Viewing the History of Sent and Received Faxes User Guide Full Version Confirming the Information on the Fax Screen Press Job Status Transmission Result on the fax screen to view the information 1 Press Fax on the Home screen 2 Press Job Status on the fax screen D0CSPA5706 3 Press Transmission Result 4 Check the transmission results ...

Страница 80: ...rint press Fax Settings Others Report Output Settings Report Auto Print Settings and then select Print for Communi Result Rep See Others Fax Settings User Guide Full Version Checking the Result in Communication Failure Report This report is printed if the fax could not be sent to all specified destinations by Memory Transmission when Fax is not set to Auto Print the factory default setting Checkin...

Страница 81: ...history Click the icon to view the details To save the history as a list to a file in the CSV format click Download Transmission List 5 Click Logout and then close the Web browser Viewing the Transmission Result of Sent Faxes 79 ...

Страница 82: ...3 Fax 80 ...

Страница 83: ... on as an Administrators group member Device Software Manager supports Windows OS only To install the printer driver on Mac OS see the following sections page 98 Installing the Printer Driver for Network Connection macOS See Installing the Printer Driver for USB Connection macOS User Guide Full Version Follow the instructions of the installer to connect the USB cable Installing Device Software Man...

Страница 84: ...ill not participate in the Quality Improvement Program and then click Next 6 On the Driver Update Notification Setting screen specify whether to display the message about the driver update and then click Next The process of installing Device Software Manager starts 7 Select the connection between the machine and computer and then click Next DZX730 Network Search for devices connected to the networ...

Страница 85: ...ation continue the installation There is no problem with the started installer that is downloaded from the manufacturer s website When you connect the machine and the computer with a USB cable follow the instructions on the installer screen If the machine is not detected click Cancel Connection Even if the connection is canceled the installation is complete After the installer screen is closed the...

Страница 86: ...nyway Installing Device Software Manager from the Downloaded File 1 Double click the downloaded file 2 On the License Agreement screen click Accept Agreement and Install 3 On the Quality Improvement Program screen select I will participate in the Quality Improvement Program or I will not participate in the Quality Improvement Program and then click Next 4 On the Driver Update Notification Setting ...

Страница 87: ...ne from among the detected devices and then click Next DZC086 The installation of the driver starts Even if the message The publisher could not be verified appears at the beginning of installation continue the installation There is no problem with the started installer that is downloaded from the manufacturer s website When you connect the machine and the computer with a USB cable follow the instr...

Страница 88: ...reen is closed the machine is added automatically when it is connected to the computer with the USB cable 9 When the installation is complete click Finish Double click the Device Software Manager icon created on the desktop screen of the computer to update the printer driver See Updating the Driver Windows User Guide Full Version 4 Print 86 ...

Страница 89: ...group member If the User Account Control dialog box appears during the driver installation procedure click Yes or Continue If the Windows Security dialog box appears during the driver installation procedure click Install this driver software anyway Installing the PCL 6 Printer Driver from the CD ROM 1 Set the CD ROM in the computer If the installer does not start automatically double click Setup e...

Страница 90: ...detects devices connected to the network 7 Select your machine from among the devices and then click Install DZC080 8 If the Set Port screen appears select the setting method of the port This screen appears when the computer cannot access the machine Specify the port to use for the connection between the computer and machine using one of the following methods 4 Print 88 ...

Страница 91: ...nd click Next 3 On the Add Standard TCP IP Printer Port Wizard screen click Next 4 On the Add port screen enter the printer name or IP address of the machine and then click Next The port name is automatically entered You can change the port name 5 When the Additional port information required screen is displayed select RICOH Network Printer C model and then click Next 6 Click Finish 9 Specify the ...

Страница 92: ...river from the CD ROM 1 Set the CD ROM in the computer If the installer does not start automatically double click Setup exe in the root directory of the CD ROM 2 Select a language and then click OK 3 Click PostScript 3 Printer Driver EBW903 4 On the License Agreement screen select I accept the agreement and then click Next DZC081 5 Click Next 4 Print 90 ...

Страница 93: ...To create a new port 1 Select Specify a new port and then click Next 2 On the Add Printer and Utility Wizard screen select Standard TCP IP Port and click Next 3 On the Add Standard TCP IP Printer Port Wizard screen click Next 4 On the Add port screen enter the printer name or IP address of the machine and then click Next The port name is automatically entered You can change the port name 5 When th...

Страница 94: ...uration or authentication settings in each tab and then click OK 11 On the Install Printer Driver screen click Next 12 Click Finish When you are prompted to restart your computer restart it by following the instructions that appear Installing the PCL 6 PostScript 3 Printer Driver from the Downloaded File 1 Unzip the downloaded file and then double click RV_SETUP exe 2 On the End User License Agree...

Страница 95: ...f the Machine Cannot Be Found 4 Select your machine from among the detected devices and then click Next DZC086 Printer driver installation starts 5 When the installation is complete click Finish Installing the Printer Driver Manually 1 Download the driver and then unzip the file Installing the Printer Driver for Network Connection Windows 93 ...

Страница 96: ...Click The printer that I want isn t listed 5 Select Add a local printer or network printer with manual settings and then click Next 6 Select Standard TCP IP Port on Create a new port and then click Next 7 Enter the IP address of your machine in Host Name or IP address 8 Clear the Query the printer and automatically select the driver to use check box and then click Next Searching for the TCP IP por...

Страница 97: ...d specify the IP address or machine name to install the printer driver 1 Click Click if you cannot find the device DZC089 2 Select Specify device IP address or Specify device name and then click Next When specifying the machine IP address 1 Enter the IP address of the machine and click Search Installing the Printer Driver for Network Connection Windows 95 ...

Страница 98: ... Next Printer driver installation starts When specifying the machine name 1 Select the machine to use and then click Next DZC094 2 On the Printer Preference screen select one of the port names from among Port Name and then click Next 4 Print 96 ...

Страница 99: ...the IP address after installing the printer driver see the following section See When You Cannot Print a Document even if the Printer Driver is Installed User Guide Full Version 3 When the installation is complete click Finish Installing the Printer Driver for Network Connection Windows 97 ...

Страница 100: ...es using macOS 10 14 are shown as an example The actual procedure may differ depending on the OS version you are using Installing the PPD file 1 Set the CD ROM in the computer and click macOS brand name to display the macOS PPD Installer folder To install the driver from the downloaded file display the folder that is the location of the downloaded file 2 Double click the package file DZX684 3 On t...

Страница 101: ...nstallation is complete click Close Registering the Machine in Printers Scanners for Network Connection Register the PPD file of the machine in the system preferences to enable printing 1 Select System Preferences from the Apple menu 2 Click Printers Scanners 3 Click DZX689 Installing the Printer Driver for Network Connection macOS 99 ...

Страница 102: ... the Line Printer Daemon LPD protocol change the protocol to HP Jetdirect Socket Use Check that the machine name is displayed If Generic PostScript Printer is displayed the entered IP address may not be correct When Generic PostScript Printer is displayed even though the IP address is correct Perform the following procedure to select the PPD file of the machine 1 Select Select Software on Use 4 Pr...

Страница 103: ...n is displayed If the progress screen does not close after a while click Configure or Settings and configure the option configuration of the printer For the procedure of the option configuration see Specifying the Option Settings User Guide Full Version Installing the Printer Driver for Network Connection macOS 101 ...

Страница 104: ...tion Settings of the Machine for Network Connection If the option configuration of the machine is not automatically reflected select the option installed on the machine in Printers Scanners 1 Select System Preferences from the Apple menu 2 Click Printers Scanners 3 Select the machine from the list and then click Options Supplies D0C9DA8352 4 Print 102 ...

Страница 105: ... 5 Close the system preferences screen If the option you want to select is not displayed PPD files may not be set up correctly To complete the setup check the name of the PPD file displayed in the dialog box Setting procedures using macOS 10 14 are shown as an example The actual procedure may differ depending on the OS version you are using To specify an optional Adobe PostScript when using a Post...

Страница 106: ...e print job is completed In this case check whether the document was printed Printing a Document in Windows 1 Open a document to print on the computer and display the setting screen of the printer driver from the print menu in the application The procedure to display a document varies depending on the applications For example in Microsoft Word Excel click Print on the File menu select the device t...

Страница 107: ...able paper tray is selected automatically according to the settings specified for Print On and Paper Type If you do not want to use particular trays when Auto Tray Select is specified set the machine so it does not automatically select those trays To prevent the machine from selecting other trays automatically disable auto tray switching See Tray Paper Settings User Guide Full Version Paper Type S...

Страница 108: ...e machine and then click Printing preferences to change the default values of the printer settings When you use the driver distributed from the print server Printer Defaults specified in the print server are displayed as the default Printing a Document in macOS In the following example procedure macOS 10 14 is used The procedure may vary for different versions 1 Open a document to print on the com...

Страница 109: ... tray and paper type D0C9DA8201 Paper Feed All Pages From Select the tray loaded with the paper to use When you select Auto Select a suitable paper tray is selected automatically according to the specified paper size and paper type When the paper of the specified size is not loaded on the machine printing is performed following the settings of the machine Printer Features Select a category in Feat...

Страница 110: ...paper to use Job Log Job Type Select Normal Print to execute printing immediately You can store documents in the machine Locked Print See Storing Documents to Print in the Machine User Guide Full Version 5 After completing the configuration click Print to print 4 Print 108 ...

Страница 111: ...n 2 sided on the Basic tab specify the binding side of and way to open the paper Orientation of the original and opening type Orientation Open to left Open to top Portrait Landscape 4 After completing the configuration click OK to print Specifying 2 sided Print macOS Specify 2 sided Print on the Layout menu 1 Open a document to print on the computer and display the setting screen of the printer dr...

Страница 112: ...3 From the Two Sided menu specify the way to open the paper Orientation of the original and opening type Long edge Short edge DZC442 4 After completing the configuration click Print to print 4 Print 110 ...

Страница 113: ...of the printer driver from the print menu in the application 2 Specify Paper Size Paper Type Orientation and other settings page 104 Basic Procedure for Printing Documents 3 In Layout on the Basic tab specify the number of pages to combine Click the detail settings button of Layout to do the following settings Page Order Select the order of the pages Draw Frame Border Select the check box to draw ...

Страница 114: ...ge 104 Basic Procedure for Printing Documents 3 Select Layout and then specify the number of pages to combine and the order of the pages Configure the following settings Pages per Sheet Select the number of pages to combine Layout Direction Select the order of the pages Border Select a type of border line to draw between the pages 4 After completing the configuration click Print to print 4 Print 1...

Страница 115: ...d in the Bypass Tray 1 Load envelopes in the bypass tray Orientation portrait Flap close Printing surface upper side 2 On the Home screen press Settings 3 On the Settings screen press Tray Paper Settings D0CSPA6104 4 Press Paper Size Paper Type 5 Press Bypass Tray Paper Size Printer and then select the size of the envelopes Printing on Envelopes 113 ...

Страница 116: ...owing settings Document Size Select the envelope size If the envelope size is not included among the options enter the value in Custom Paper Size Input Tray Bypass Tray Paper Type Envelope You can specify a custom paper size which is commonly used as the option of the Document Sizes See Printing on Custom sized Paper Loaded on the Bypass Tray User Guide Full Version macOS Configure the following s...

Страница 117: ... On the Home screen press Settings 3 On the Settings screen press Tray Paper Settings D0CSPA6104 4 Press Paper Size Paper Type 5 Press Tray 1 Paper Size and then select the size of the envelopes If the size of the loaded envelope is not included in the list select Custom and enter the value 6 Press OK Printing on Envelopes 115 ...

Страница 118: ...size If the envelope size is not included among the options enter the value in Custom Paper Size Input Tray Tray 1 Paper Type Envelope You can specify a custom paper size which is commonly used as the option of the Document Sizes See Printing on Custom sized Paper Loaded on the Bypass Tray User Guide Full Version macOS Configure the following settings Paper Size Select the envelope size If the env...

Страница 119: ...that matches the entered password is displayed You can also use your smart device for authentication instead of entering the password See Using the Machine Functions from a Mobile Device User Guide Full Version 4 Select a document to print Preview The first page of the document is displayed If you select multiple documents the preview cannot be displayed Print Settings Change the print settings fo...

Страница 120: ... The machine cannot print a document over 1 GB You can select up to 100 files within 1 GB total If the print job of PDF file is canceled execute printing from a PDF viewer such as Acrobat Reader while using the printer driver Printable File Formats File format Details JPEG files Exif version 1 0 or later TIFF files Uncompressed TIFF files TIFF files compressed using the MH MR or MMR method PDF fil...

Страница 121: ...mory Storage Device screen press Print from Storage Device DZX460 3 Insert a memory storage device in the media slot on the side of the control panel DZW178 4 Press USB or SD Card 5 Select the file to print Files in the external media are displayed as icons or thumbnail images Printing from a USB Flash Memory Device or SD Card Directly 119 ...

Страница 122: ... to match the paper size Quantity Enter the print quantity Resolution Select the resolution of the image to print Select Paper Tray Select the paper tray 2 Sided Select the opening direction of the printed sheet Combine Select whether to combine multiple pages into a sheet Sort Stack Select whether to print in ordered sets or in a batch page by page Staple Select the staple position Book Select th...

Страница 123: ...e Full Version Basic Procedure for Sending an E mail This machine supports SMTPS SMTP over SSL This machine supports Web mail sending If you press Preview and then start scanning the Preview screen appears You can use this screen to check how the originals are scanned and the scan setting used for scanning After checking the preview you can specify whether to send the file or not See Displaying a ...

Страница 124: ...he sender When On is specified in System Settings Send Email Folder Email Auto Specify Sender Name you can send an e mail even when the sender is not specified The administrator s e mail address that is registered on the machine is used as the sender Specify the sender to receive an opening confirmation 6 Specify the destination on the scanner screen D0CSPA5902 To enter the e mail address manually...

Страница 125: ...according to the purpose of the scanned data page 138 Scanning an Original with Suitable Quality and Density page 140 Specifying the File Type When Scanning a Document 8 Press Start Registering the E mail Destination Specified When Sending an E mail in the Address Book When specifying an e mail address by entering it manually or selecting it from the scanner records you can register the e mail add...

Страница 126: ...the scan settings according to the purpose of the scanned data page 138 Scanning an Original with Suitable Quality and Density page 140 Specifying the File Type When Scanning a Document 5 Specify the destination 1 Press and then select Enter Using Keyboard D0CSPA5905 2 Enter the e mail address and press D0CSPA5906 3 Specify the e mail address that was entered manually and press Reg to Add Book 5 S...

Страница 127: ...r the name and other additional information 6 Press OK to close the address book screen after registering the information 7 Press Start on the scanner screen Scanning Documents and Sending the Scanned Data by E mail 125 ...

Страница 128: ...ss book easily using Scan to Folder Helper See Specifying the Destination of Send to Folder Using the Scan to Folder Helper App User Guide Full Version Using the SMB 3 0 protocol you can save a file in the folder that was configured individually to apply encryption The scanned file can be also saved to an FTP server See Registering the Destination Folder to Use for Send to Folder User Guide Full V...

Страница 129: ...r information of the computer used to create a shared folder and write down the information on the check list 1 Click Start on the computer and click Windows System Command Prompt 2 Enter ipconfig all and press the Enter key 3 Check the computer name enable disable status of the DHCP server and IP address and write down the information in 1 on the check sheet DZC501 When the screen shown above is ...

Страница 130: ...OMAIN is not displayed when the login user who executed the command is a local user 6 Check the login password on the computer and write down the information in 3 on the check sheet The required information on the computer is confirmed Now create a shared folder on your computer and specify the access permissions of the folder Depending on the operating system or security settings it might be poss...

Страница 131: ...er in Windows Explorer and write down the folder name in 4 on the check sheet 3 Right click the created folder and then click Properties 4 On the Sharing tab click Advanced Sharing DZC318 5 Select the Share this folder check box and then click Permissions After completing the procedure remove Everyone unspecified user and then add a user allowed access the folder The user whose information is writ...

Страница 132: ...ts select the login user name of the computer to be added 2 on the check sheet and then click OK When you cannot find a specific user click Columns or right click the Search results field select Select Column and then add Logon Name or Logon Name pre Windows 2000 from the Available columns list 12 Click OK 13 Select the added user and then select the Allow check box under Permissions DZC320 5 Scan...

Страница 133: ...elect the added user and then select the Allow check box under Permissions 8 Click OK to close all windows Confirming the Computer Information macOS Confirm the name of the computer used to create the shared folder login user name and other settings and write down the information on the check list 1 Log on to macOS as a user with administrative privileges 2 Click the Apple menu 3 Click About This ...

Страница 134: ...on the operating system or security settings you might be able to specify a user name that does not have a password assigned However we recommend that you select a user name that has a password Creating a Shared Folder macOS Create a shared folder and specify the access permissions of the folder 1 Create a new folder and write down the folder name in 4 on the check sheet 2 Click the Apple menu and...

Страница 135: ...played enter the password of the selected account and then click Done 5 Click below Shared Folders on the Sharing screen DZC529 6 Specify the folder created in Step 1 and click Add 7 Select the folder added in Step 6 and confirm that the permission of the user to access the folder is set to Read Write DZC530 Scanning Documents and Sending the Scanned Data to a Folder 133 ...

Страница 136: ...older created in Windows using the information on the check sheet as an example 1 Press Address Book on the Home screen 2 Press Register on the address book screen D0CSPA5712 The items displayed on the screen vary depending on the version of RICOH Always Current Technology that is implemented on the machine 3 Enter the information of the destination in the input boxes displayed on the Name tab and...

Страница 137: ...ge Appears While Using the Scanner Function 8 Press OK 9 Press the User Management Others tab and specify the settings as required DZC131 10 Press OK 11 Press Home after specifying the settings The connection test may take time Even if the connection test was successful the machine may fail to transfer the file if you do not have write privileges for the file or there is not enough free hard disk ...

Страница 138: ... to the purpose of the scanned data page 138 Scanning an Original with Suitable Quality and Density page 140 Specifying the File Type When Scanning a Document 5 Press select Search Address Book or Specify by Reg No and then specify the shared folder that is registered in the address book D0CSPA5909 To enter the information manually press and select Manual Entry Select SMB as the protocol and enter...

Страница 139: ... specify a shared folder on the computer as a folder destination the machine may be able to communicate with the computer by changing the exceptions of the Windows firewall For details see Windows Help After scan files are sent the destination and file name fields will be automatically cleared If you want to preserve the information in these fields contact your local dealer When the specified dest...

Страница 140: ... white Black White Text Photo A document with text and photos in black and white The original is scanned in two tones of black and white Black White Photo A document with figures and photos in black and white The original is scanned in two tones of black and white Gray Scale A document with figures and photos in black and white The original is scanned as an image comprising many shades of gray Ful...

Страница 141: ...n scanning an original with a non white background such as newspaper or a document that has show through You can specify the shading level of Auto Density in Scanner Settings Scan Color Density Background Density of ADS Full Color See Scan Scanner Settings User Guide Full Version When specifying the resolution Select the resolution to use for scanning the original Image quality improves as the res...

Страница 142: ...d while maintaining legibility PDF A A PDF file that conforms to the international standard and is suitable for long term storage is created TIFF A TIFF file is created JPEG A JPEG file is created Except for JPEG you can specify whether to create a separate file for each single page or combine multiple pages into a single file 5 Specify the scan settings according to the purpose of the scanned dat...

Страница 143: ...at must be met when scanning the original to create a file in the High Compression PDF format page 245 List of Specifications The version of the created PDF files is 1 4 1 5 Specifying the File Type When Scanning a Document 141 ...

Страница 144: ...5 Scan 142 ...

Страница 145: ...ified https 192 168 1 10 If SSL is not specified http 192 168 1 10 When you do not know whether SSL is specified on the machine enter the address starting with https When you fail the connection enter the address starting with http When entering the IPv4 address do not enter 0 for each segment If 192 168 001 010 is entered you cannot access the machine 2 Confirming the machine status or settings o...

Страница 146: ...ctive on the computer When using Host Name under Windows Server 2008 or later in the IPv6 environment resolve Host Name in the external DNS server You cannot use the host file When specifying the settings from Web Image Monitor do not log in to the machine from the control panel The setting value may not be reflected If you are using a proxy server change the web browser settings so that no data g...

Страница 147: ...ministrator can change all settings of the machine What you can do Function Not logged in User Administrator Machine status Machine settings 1 1 Machine setting change 1 Job list Job history Access to Address Book Network settings 1 Network settings change 1 Cancel printing Security settings Available Not available 1 Depending on the Administrator settings Using Web Image Monitor 145 ...

Страница 148: ...the Login screen is placed at the top right on the screen The Help Version Information and Keyword Search buttons are also displayed 3 Refresh Help Refresh Update the information in the work area Help View or download Help file contents 4 Main Area The machine status and settings are displayed Specifying Web Image Monitor Help Web Image Monitor has Help to describe the function of setting items Wh...

Страница 149: ...he Help button at the top right on the screen D0CSPA8153 3 Select the operating system and displayed language and then click Download 4 Unzip the downloaded zip file and store it in the Web server 5 Click Configuration on the Device Management menu on Web Image Monitor 6 Click Webpage under the Webpage category 7 Enter the path to the Help file stored in the Web server in URL under Set Help URL Ta...

Страница 150: ...6 Web Image Monitor 148 ...

Страница 151: ...per trays while printing Doing so can cause a paper jam D0CSIA1215 Bypass Tray Tray 1 Large Capacity Tray LCT Tray 2 Tray 3 Tray 4 Tray 5 Before loading paper into a tray check the paper size and type that can be loaded in the tray and confirm the paper size that is automatically detected page 162 Recommended Paper Sizes and Types When loading paper of a size that is not automatically detected spe...

Страница 152: ...heets of paper may be fed at once from the tray Take out all sheets fan the sheets and then load them again You may hear the sound of rubbing paper This is not a malfunction Skew is the phenomenon when images are printed slantwise If the paper skews take out the stack of paper turn it over and then load it again D0CSIA1216 If the paper still skews take out the stack of paper turn it around and the...

Страница 153: ...f loaded 3 While pressing down the release lever of the side fence slide the side fences outward D0CSIA0027 4 While pinching the release lever of the end fence slide the end fence outward D0CSIA0028 5 Square the paper and load it print side up Do not stack paper over the limit mark Loading Paper into the Paper Tray 151 ...

Страница 154: ... between the paper and the side fences or end fence D0CSIA0030 To load large sizes of paper pull out the tray while pressing the release lever near the end fence D0CSIA1223 To protect the paper when the tray is extended place the tray cover over the extended section of the paper tray 7 Adding Paper and Toner 152 ...

Страница 155: ... 2 to 5 The paper size setting is changed in the same way for each paper tray In the following example procedure the paper size setting for tray 2 is changed Slide the side fences until they are aligned with the sides of the paper If there is space between the side fences and the paper it may cause the image to be misaligned 1 Check that paper in the paper tray is not being used and then pull the ...

Страница 156: ... pinching the release lever of the end fence slide the end fence outward D0CSIA0028 5 Square the paper and load it print side up Do not stack paper over the limit mark If you load paper over the limit mark the printed images may become slanted or a paper jam may occur D0CSIA0029 7 Adding Paper and Toner 154 ...

Страница 157: ...nd fence D0CSIA1223 To protect the paper when the tray is extended place the tray cover over the extended section of the paper tray D0CSIA1224 7 Carefully slide the paper tray fully in When loading letterhead paper confirm the orientation face and back or location of flaps page 172 Loading Orientation fixed Paper or Two sided Paper Loading Paper into the Paper Tray 155 ...

Страница 158: ...lanted or the paper may be jammed D0CSIA1220 1 Open the bypass tray D0CSIA1221 When loading paper larger than A4 or 81 2 11 size pull out the extender 2 Load the paper with the print side up and push it in lightly until you hear a beep Fan sheets before loading so that multiple sheets of paper do not stick to each other and are not fed at once When loading envelopes or letterhead paper confirm the...

Страница 159: ...he beeper setting under Touch Notification Sound in Settings System Settings Sound Loading Paper into the Large Capacity Tray LCT 1 Pull the tray out carefully until it stops D0CSIA1225 2 Remove paper if loaded 3 Align the fences to the paper size 1 Press the lever on the top of each fence to take that fence out Loading Paper into the Paper Tray 157 ...

Страница 160: ...o the A4 or LTR protrusions D0CSIA0035 3 Attach the fences so they fit in their own lever s position 4 Load the paper with the print side up Do not stack over the limit mark D0CSIA1226 5 Carefully slide the paper tray fully in 7 Adding Paper and Toner 158 ...

Страница 161: ...Size Paper Type 4 Press the name of the tray on which the paper is loaded 5 Clear the Apply Auto Paper Select Auto Tray Select check box and then press Paper Size D0C9PA5323 For the bypass tray press Paper Size Printer 6 Select the size of the loaded paper from the list and then press OK OK 7 After completing the procedure press Home Loading Paper into the Paper Tray 159 ...

Страница 162: ...onfirm the priority of the paper settings for printing priority to the printer driver or to the control panel On the printer driver Check the settings of paper tray and paper type on the printer driver and make sure the settings match the loaded paper On the control panel 1 Press Settings on the Home screen 2 Press Tray Paper Settings D0CSPA6104 3 Press Paper Size Paper Type Paper Size Paper Type ...

Страница 163: ...Paper Type Thickness D0CSPA5324 6 Choose one paper type and paper thickness from the list shown and then press OK 7 Press OK 8 After completing the configuration press Home Loading Paper into the Paper Tray 161 ...

Страница 164: ...ght Paper size Paper capacity 60 220 g m2 16 lb Bond 80 lb Cover Plain Paper 1 Thick Paper 2 Paper sizes that can be detected automatically A4 A5 B5 ISO International Organization for Standardization 81 2 14 81 2 13 81 2 11 71 4 101 2 Select the paper size using the Tray Paper Settings menu 51 2 81 2 B5 JIS Japanese Industrial Standard 550 sheets up to 59 4 mm 2 3 inches in height 60 220 g m2 16 l...

Страница 165: ...ion of the paper Paper Tray Unit Trays 2 5 Paper type and weight Paper size Paper capacity 60 220 g m2 16 lb Bond 80 lb Cover Plain Paper 1 Thick Paper 2 Paper sizes that can be detected automatically A4 A5 B5 ISO 81 2 14 81 2 13 81 2 11 71 4 101 2 Select the paper size using the Tray Paper Settings menu 51 2 81 2 B5 JIS 550 sheets up to 59 4 mm 2 3 inches in height 60 220 g m2 16 lb Bond 80 lb Co...

Страница 166: ... in height Label paper adhesive labels A4 81 2 11 1 sheets Envelopes Select the paper size 1 41 8 91 2 37 8 71 2 C5 Env C6 Env DL Env 3 1 Select the paper size Using the Copy function page 65 Copying onto Envelopes Using the Printer function page 113 Printing on Envelopes 2 Enter the paper size Using the Copy function page 55 Specifying a Custom Size for the Original Using the Printer function See...

Страница 167: ...wo sided Paper Setting label paper adhesive labels We recommend that you use specified label paper If paper other than the specified one is used normal operation and quality cannot be guaranteed Setting coated paper Specify Paper Type to Coated Paper and an appropriate item for Paper Thickness in paper type thickness setting for each tray under Settings Tray Paper Settings Paper Size Paper Type If...

Страница 168: ... Paper 2 should usually be selected Plain Paper 1 is set when you select Recycled Paper Also select it when you use plain paper distributed in Japan Unusable Paper Do not use stapled sheets of paper aluminum foil carbon paper or any kind of conductive paper Doing so can result in fire Paper causing faults Do not use any of the following kinds of treated paper Doing so may cause faults Paper for in...

Страница 169: ... paper Paper Storage When storing paper the following precautions should always be followed Do not store paper where it will be exposed to direct sunlight Store paper in a dry environment humidity 70 or less Store on a flat surface Do not store paper vertically Once opened store paper in a plastic bag Saving Printouts Prints will fade if exposed to strong light or dampness and humidity for extende...

Страница 170: ...placed on mats made of chlorinated plastic in locations of high temperature for long periods of time When prints are placed in locations of extremely high temperatures such as near a heater 7 Adding Paper and Toner 168 ...

Страница 171: ...per that has been stored in different environments Minimum Number of Sheets 20 sheets or more paper trays of the machine optional paper tray unit used After loading paper position the side fences flush against the paper stack When printing on thick smooth paper be sure to fan the paper thoroughly before loading If you do not fan thick paper jams and misfeeds can occur If paper continues to become ...

Страница 172: ... bent or curled flatten their leading edges the edge going into the machine by running a pencil or ruler across them For information about recommended envelopes contact your local dealer The Duplex function cannot be used with envelopes Copied or printed sheets are delivered to the Standard Tray even if you specified a different tray Set the margins on the top bottom left and right to be 15 mm or ...

Страница 173: ...opes toward the left of the machine Side to be printed face up When loading envelopes specify the envelope size and thickness page 65 Copying onto Envelopes Using the Printer Function Orientation of Envelopes Tray 1 Bypass Tray Side opening envelopes Bottom side of envelopes toward the left of the machine Side to be printed face up Flaps closed Bottom side of envelopes toward the left of the machi...

Страница 174: ...op to bottom or two sided paper correctly Copying onto Letterhead Paper Specify the settings of this machine as described below and then place an original and load the paper Settings Copier Settings Paper Paper Input Letterhead Setting Yes Original Orientation Exposure Glass ADF DZB776 Paper Orientation Copy Side Paper trays LCT Bypass Tray One sided originals Two sided originals 1 1 When printing...

Страница 175: ...r Letterhead Setting Auto Detect Paper Orientation Copy Side Paper trays LCT Bypass Tray One sided originals Two sided originals When you specify Letterhead Setting to On Always you can print onto letterhead paper without specifying the paper type in the printer driver s settings to Letterhead Loading Orientation fixed Paper or Two sided Paper 173 ...

Страница 176: ... can be placed page 245 Specifications for the Main Unit Place originals in the ADF if they are 356 mm 14 0 inches or more along the feed direction If you place them on the exposure glass the machine will scan only within the maximum scanning size On all sides of the original there is a missing image area Even if you place originals on the exposure glass or in the ADF correctly the missing image a...

Страница 177: ...oner horizontal when storing it After removing the print cartridge from the machine do not shake it while its opening is facing downward The remaining toner may spill out Do not pull out and put back the print cartridge repeatedly The remaining toner may leak Follow the procedure displayed on the screen to replenish the toner 1 Press Watch Video D0C9PA8225 To display this screen again press Check ...

Страница 178: ...the following items into a fire Toner will ignite on contact with naked flame and burns can result Toner new or used Toner containers while toner is inside Toner attached parts Do not absorb spilled toner including used toner using a vacuum cleaner Absorbed toner may cause ignition or explosion due to electric contact sparks inside the vacuum cleaner However you can use a toner compatible industri...

Страница 179: ... contact with your clothes wash the stained area with cold water Heating the stained area by applying hot water will set the toner into the fabric and removing the stain may become impossible When replacing a container with toner including used toner or consumables with toner be careful that the toner does not splatter After removing used consumables and shutting the lid of the container if the li...

Страница 180: ... our local company website for information on the recycling of supply products or you can recycle items according to the requirements of your local municipalities or private recyclers 7 Adding Paper and Toner 178 ...

Страница 181: ...is displayed on the control panel Stapling failures or jams may occur if you use a staple cartridge other than that recommended Confirming the supplier of consumables To display this screen again press Check Status and then press Check under Mach Status on the Mach Applic Stat tab See Contact Information User Guide Full Version Replenishing the staples Replenish the staples while watching the vide...

Страница 182: ...staples while watching the video If you cannot raise the upper unit by holding on both ends of the cartridge there are staples still remaining inside Continue using the machine without replenishing the staples 7 Adding Paper and Toner 180 ...

Страница 183: ...en again press Check Status and then press Check under Mach Status on the Mach Applic Stat tab 2 Press the play key 3 Replace the waste toner bottle by following the procedure shown in the video Precautions When Replacing the Waste Toner Bottle Do not store toner new or used or toner containers while toner is inside in a place with an open flame The toner can ignite and result in burns or fire Do ...

Страница 184: ...When the following occurs while toner is handled receive emergency measures first and then consult a doctor if necessary When inhaling toner gargle with a large amount of water and move into a fresh air environment When swallowing toner dilute gastric contents with a large amount of water When getting toner into your eyes flush them with a large amount of water When removing jammed paper replenish...

Страница 185: ...le or other object from the removed waste toner bottle cover these objects with sheets of newspaper Disposing the Used Waste Toner Bottle When disposing the used waste toner bottle place the bottle in a box or plastic bag while paying attention not to spill any toner powder mainly Europe If you want to discard your used toner container please contact your local sales office If you discard it by yo...

Страница 186: ...ress Watch Video D0C9PA8225 To display this screen again press Check Status and then press Check under Mach Status on the Mach Applic Stat tab 2 Press the play key 3 Replace the drum unit by following the procedure shown in the video Disposing of Used Drum Unit Drum unit cannot be re used mainly Europe If you want to discard your used toner container please contact your local sales office If you d...

Страница 187: ...ar this sound when touching an icon or key you do not have permission to use the function or setting Log in to the machine as a user with permission or consult your user administrator A long beep Operation Completed Sound Copy Job Done Sound Fax Printing Ended Sound Fax Transmission Ended Sound Fax Reception Ended Sound Check the operation result Two long beeps Warm up Sound The machine is ready f...

Страница 188: ...table above You cannot pause an alert sound that has started The machine continues to emit the sound until the preset sound pattern is completed You can specify the volume and type of alert sound in Settings System Settings Sound The type of sound can be specified for each condition described in the table above You can also specify the volume of the sound emitted when using On hook or Immediate Tr...

Страница 189: ...age as a list Check Status indicator If there is a problem such as a paper jam the Check Status indicator lights up or flashes along with a message displayed on the screen Press Check Status to check the status of the machine or application and resolve the problem accordingly When an Icon Is Displayed with a Message When you need to resolve a problem such as a paper jam an icon is displayed at the...

Страница 190: ... or has run out Prepare a replacement toner Replace the toner when it runs out If appears when there is a lot of toner pull out the print cartridge by following the toner replacement procedure that is displayed on the screen and then set it back again page 175 Replacing the Toner The waste toner bottle is full or almost full Prepare a replacement waste toner bottle Replace the bottle when it becom...

Страница 191: ...n When the Check Status Indicator Is Lit or Flashing The Check Status indicator notifies the user when the machine requires immediate attention Flashing in red The machine is unavailable for use Press Check Status and resolve the problem as soon as possible Flashing in yellow Maintenance on the machine needs to be performed soon Perform the required procedure accordingly You can display the status...

Страница 192: ...the functions cannot be used or the toner is almost depleted Depending on the machine condition such as a paper jam or open cover the status confirmation screen may be displayed automatically without pressing Check Status 8 Troubleshooting 190 ...

Страница 193: ...and then turn on the main power of the machine page 9 Turning On and Off the Power The power of the machine does not come on The power cable is unplugged from the wall outlet Connect the ground wire and plug the power cable into the wall outlet See Installation Requirements After Moving the Machine User Guide Full Version The machine is connected to an extension cord You cannot use an extension co...

Страница 194: ...thentication is specified Enter the login user name and password and then press Login For the login user name and password consult the user administrator page 43 Logging In from the Control Panel The User Code entry screen is displayed User Code authentication is specified Enter the User Code and press OK Consult the user administrator for the user code A function is not executed or you cannot per...

Страница 195: ...ication is specified and the user who started the copying or scanning operation has logged out Log in to the machine as the user who started the copying or scanning operation or as the machine administrator and press Stop Help is not displayed when you press Help The application that is currently in use does not support the help function or is grayed out because Paper Misfeed or another message is...

Страница 196: ... The screen remains turned on and the machine does not enter the sleep mode when you press Energy Saving The machine is in a condition that does not allow the machine to enter the sleep mode Check the conditions in which the machine does not enter the sleep mode page 9 Turning On and Off the Power The machine does not shut down when more than 105 seconds have passed after you press the main power ...

Страница 197: ...irectly into the outlet or into a power strip that is not shared with other devices When the Machine Does Not Respond Correctly to an Operation from a Computer Condition Cause Solution and reference When using the address book from Device Manager NX an incorrect password error is displayed even when you enter the correct login user name and password A certificate is not installed on the computer w...

Страница 198: ...e Power A proxy server is specified In the proxy setting of the Web browser specify the IP address of the machine as an exception You can check the IP address in Check Status Network There is a problem with this website s security certificate is displayed and you cannot connect to the machine when accessing the machine using Web Image Monitor Permit SSL TLS Communication is set to Ciphertext Only ...

Страница 199: ...ning off the power waiting for 10 seconds or more after confirming that the main power indicator is turned off and then turning on the power page 9 Turning On and Off the Power When Press Cancel to cancel functions is displayed you can continue using the machine except for the function in which the malfunction is occurring after pressing Cancel Please wait The machine is recovering from the sleep ...

Страница 200: ...ed off and then turn on the power page 9 Turning On and Off the Power Please wait A consumable or supply such as the toner has been replenished Wait a while and do not turn off the power of the machine Turn off the power of the machine if the message persists after five minutes wait for 10 seconds or more after confirming that the main power indicator is turned off and then turn on the power page ...

Страница 201: ... On and Off the Power Cover Open Add Toner Add Staples IM C530F Only Replace Waste Toner Bottle Replace Drum Unit Original left on exposure glass No paper When a Message Appears and the Machine Cannot Be Operated 199 ...

Страница 202: ...itation is enabled copying was canceled because the copy volume of the user exceeded the upper limit allotted for the user For details about the copy volume use limitation consult the user administrator The user administrator can change the limit on the copy volume use See Specifying Maximum Print Volume Use of Each User User Guide Full Version Set next original s then press Start Duplex copying i...

Страница 203: ...rm and send the fax again Memory is full Cannot scan more Transmitting only scanned pages The memory is full Press Confirm to return to the stand by state and start sending the pages that are already scanned and stored Check the transmission result report for unsent pages and send those pages later Some invalid destination s contained Do you want to select only valid destination s A folder destina...

Страница 204: ...ng a shared folder on the destination computer To check the folder name select the destination in the address book press Edit and see Path in Destinations tab Folder See Transferring a Received Fax Document to E mail Address or Folder User Guide Full Version The amount of available hard disk space on the destination computer is insufficient to perform Folder Transfer Check that the computer specif...

Страница 205: ... the machine is connected to the network correctly Network communication has failed Failed to connect to POP IMAP server Please check machine settings and the status of server and network The POP3 server could not be found Check the settings in POP3 Settings and Email Communication Port on Settings System Settings Send Email Folder Email The DNS server could not be found Check the DNS Configuratio...

Страница 206: ... the network Check the transfer settings See Transferring a Received Fax Document to E mail Address or Folder User Guide Full Version The destination could not be found when the fax was sent without using the SMTP server Check that the destination is specified correctly Network communication has failed Failed to connect to the destination folder Please check if the destination is correct and desti...

Страница 207: ...n sending an e mail without using the SMTP server Check that free space is available on the SMTP server and the destination computer Network communication has failed Failed to send Please check if the destination is correct The specified destination does not exist Check the destination e mail address and specify again if necessary The destination could not be found when the fax was sent without us...

Страница 208: ... cannot be found in Folder Transfer Creating a shared folder on the destination computer To check the folder name select the destination in the address book press Edit and see Path in Destinations tab Folder See Transferring a Received Fax Document to E mail Address or Folder User Guide Full Version The user name and or password registered in the address book are invalid when performing Folder Tra...

Страница 209: ... Edit and specify Destinations tab Folder Specify Other Authentication Information in Folder Authentication Info again See Registering the Destination Folder to Use for Send to Folder User Guide Full Version Network communication has failed Failed to send The registration of fax email address or administrator email address is required Both the e mail address to use for sending and receiving e mail...

Страница 210: ...ver address is not registered Specify the setting in Settings System Settings Send Email Folder Email POP3 Settings Network communication has failed The certificate of destination is not currently valid Please re issue it The user certificate destination certificate has expired Install a new user certificate Encrypting Network Communication Security Network communication has failed The certificate...

Страница 211: ... that the destination is specified correctly If the destination refuses to receive a fax with no sender information enable notifying of the information and send the fax again Network communication has failed The mail address for authentication does not match with administrator s one Please check the settings When a signature is specified the SMTP authentication e mail address or POP before SMTP au...

Страница 212: ... registration of user information has failed The maximum number of items that can be registered has been exceeded and the authentication information for LDAP authentication Custom authentication or Windows authentication cannot be registered automatically Delete a user that is no longer necessary from the address book Cannot access the Memory Storage Device An SD card or USB flash memory device is...

Страница 213: ...at the machine can communicate with the computer properly Connection with the machine has failed Check the machine structure The machine is malfunctioning and Printer cannot be used Check whether a message is displayed on the control panel Turn off the power of the machine wait for 10 seconds or more after confirming that the main power indicator is turned off and then turn on the power page 9 Tur...

Страница 214: ...n Hardware Problem USB An error has occurred on the USB interface Turn off the power of the machine wait for 10 seconds or more after confirming that the main power indicator is turned off and then turn on the power page 9 Turning On and Off the Power If the message persists even after you have turned the power off and then on consider repairing the machine Hardware Problem Ethernet An error has o...

Страница 215: ...ution in the printer driver See Applying Different Print Settings Depending on the Document Type User Guide Full Version Load following paper in XXX To force print select another tray and press Continue XXX indicates the tray name The paper tray specified in the printer driver has no paper loaded To proceed with printing after changing the paper setting select a tray and press Continue However whe...

Страница 216: ...er Authentication has failed In LDAP or Windows authentication a timeout error occurred while submitting an authentication query to the server Consult the administrator of the authentication server When using the Active Directory of the Windows server for LDAP authentication Custom authentication change Settings System Settings Settings for Administrator Authentication Charge Administrator Authent...

Страница 217: ...hine Contact your service representative Receiving data failed Transmission of data was canceled Send the data again Staple error occurred The job has been cancelled The number of sheets that can be stapled was exceeded and printing was canceled Check the number of sheets that can be stabled on the finisher in use page 245 List of Specifications Staple has been cancelled The Staple function was ca...

Страница 218: ... to use this function This job has been cancelled Authentication information is not registered correctly in the printer driver Specify the authentication information in the printer driver For the authentication information consult the user administrator See Specifying Login Information in the Printer Driver User Guide Full Version The user registered in the printer driver does not have permission ...

Страница 219: ...etting BAJ The job was cancelled because of a functional problem with the optional finisher A peripheral equipment had a problem so printing was canceled by the auto job cancel function Contact your service representative CB The job was cancelled because the password is incorrect The entered password was incorrect so printing was canceled by the auto job cancel function Confirm the correct passwor...

Страница 220: ...PS Menu When Use Machine Setting s is selected set the waiting time longer When Use Driver Command is selected set the waiting time specified by the command longer CN The job was cancelled because the print settings specified by PS3 are not consistent with the machine settings Some of Printer Settings on the print data did not match the machine settings so printing was canceled by the auto job can...

Страница 221: ...on with the destination has failed Check settings To check the current status press Scan Files Status The user name password of SMTP authentication specified when sending the e mail are incorrect Select the destination in the address book press Edit and check the setting in Destinations tab Email Address The user ID password specified on the destination folder in Send to Folder are incorrect Selec...

Страница 222: ...onsult the network administrator The computer name or folder name specified in the path name is incorrect Register the computer name and folder name again The firewall function is enabled on the computer In the firewall function on the computer register the machine IP address and the port to use for sending files as exceptions You can check the IP address in Check Status Network For details about ...

Страница 223: ...les as exceptions You can check the IP address in Check Status Network For details about the ports see the following page 245 List of Specifications Connection with the destination has failed Check the settings Entered path name might be incorrect or firewall and security settings might be blocking network connectivity The firewall function is enabled on the computer Enable file and printer sharin...

Страница 224: ...e correct root certificate is registered to this machine and destination The root certificate check function is not enabled by mistake Email was sent to the destination without an installed certificate of the destination server when Root Certificate Check was set to Active Contact your network administrator Network administrator should install the root certificate of the destination server in Web ...

Страница 225: ...s or more after confirming that the main power indicator is turned off and then turn on the power Programmed Cannot program the destination s that is not programmed in the address book A folder specified by Manual Entry is included among the programmed destinations Register the destination in the address book of the machine and then register it to a program Programmed Cannot program the folder des...

Страница 226: ...his destination cancel the protection code and then register the destination to a program See Using the Protection Function to Prevent the Misuse of Addresses User Guide Full Version Transmission has failed Insufficient memory in the destination hard disk To check the current status press Scan Files Status The amount of available hard disk space on the destination computer SMTP server or FTP serve...

Страница 227: ...dministrator for the SNMPv3 authentication information and change the information registered in Network Connection Tool See Installing the TWAIN WIA Driver User Guide Full Version Authentication succeeded However the access privileges for scanner function has been denied The logged in user does not have access privileges to use the scanner function Consult the user administrator The user administr...

Страница 228: ...er Code consult the user administrator The User Code registered in the TWAIN driver is not assigned with the privileges to use the scanner function Consult the user administrator The user administrator can change the access permissions in the address book See Confirming the Available Functions User Guide Full Version Error has occurred in the scanner The scan condition specified in the application...

Страница 229: ...t of free memory is insufficient Close applications on the computer If the same message is displayed when no other applications are running after starting the computer uninstall the TWAIN driver restart the computer and then install the TWAIN driver again Insufficient memory Reduce the scanning area The memory allocated for the scanner function is insufficient Reduce the scan size or resolution Yo...

Страница 230: ...not be obtained when only IPv6 is enabled on the machine Log in to Web Image Monitor in the administrator mode and select Active in IPv4 LLMNR under Device Management Configuration Network Scanner is not available on the specified device The TWAIN scanner function is disabled on the machine The TWAIN scanner function cannot be used Scanner is not ready Check the scanner and the options The ADF is ...

Страница 231: ...tion of the application used or disable the firewall function The machine or the computer is not connected to the network correctly Check that the machine or the computer is connected to the network correctly User Authentication in SNMPv3 connection has failed The authentication information is registered incorrectly in Network Connection Tool when SNMPv3 encrypted communication is enabled on the m...

Страница 232: ...ct the settings A destination is being registered and devices are being configured using Web Image Monitor Wait until the message disappears and do not turn off the power of the machine You may not be able to perform operations for a while depending on the number of destinations being registered Failed to read the PDF file The user attempted to display a PDF file that is not supported by the Web b...

Страница 233: ...ed Turn off the power of the machine check that the Wireless LAN board is correctly installed in the machine and then turn on the power page 9 Turning On and Off the Power If the message persists even after you have turned the power off and then on consider repairing the machine Updating the destination list Please wait Specified destination s or sender s name has been cleared A destination is bei...

Страница 234: ...strator Before Using the Machine Security Messages that Appear When Machine Login Fails Check the error code displayed with the Authentication has failed message and taken the necessary action The letter at the beginning of the error code indicates the type of authentication specified on the machine B Basic authentication W Windows authentication L LDAP authentication Custom authentication Message...

Страница 235: ... for Administrator Security Extended Security Settings Authentication has failed B W L0206 002 An incorrect login user name or password was entered Enter the correct login user name and password A user has attempted to log in to the functions that can be accessed only by the administrator such as Settings when Application Authentication Management is specified The user needs to log in from the app...

Страница 236: ...ources are insufficient due to too many authentication requests Try again later Authentication has failed W0400 202 sAMAccountName was used as the login user name when a user in the child domain logged in under a parent child domain environment and ldap_bind failed Use UserPrincipalName as the login user name The SSL settings specified on the authentication server and the device do not match Check...

Страница 237: ...n has failed Check whether the realm name registered on the clock at the KDC key distribution center and the clock of the device are synchronized 3 No connection is established to the authentication server Enter the server IP address in Settings System Settings Network Interface Ping Command to check whether a connection can be established to the server The domain name is incorrect or cannot be re...

Страница 238: ... or password is incorrect Enter the correct login user name and password Change the login user name if it exceeds 128 bytes in length or contains a space or other unusable character The simplified authentication mode is incorrectly used Check whether the server name login user name password and information entered into the search filter are correct Note that authentication cannot be performed if o...

Страница 239: ...dress book has reached the upper limit and auto registration failed Ask the user administrator to delete users that are no longer needed from the address book Authentication has failed W L0707 001 Web Image Monitor or another method was used to edit or create a backup of the address book Wait a while 1 When obtaining user groups check the following The user account that can obtain user groups is s...

Страница 240: ...rberos authentication check the following Check that Realm Name KDC Server Name Domain Name are specified correctly in Settings System Settings Settings for Administrator Authentication Charge Administrator Authentication User Authentication App Auth Register Change Delete Realm Enter Realm Name in upper case Configure the setting so that the difference in time between the clocks on KDC and device...

Страница 241: ...Authentication has failed 0154 402 Reading of an IC card has failed Set the IC card on the authentication device correctly and for a longer duration Authentication has failed 0156 401 An incorrect user name or password was entered Enter the correct user name and password The card authentication device is not connected The card authentication device has been removed or is not connected properly Con...

Страница 242: ...rmation is incorrect Check the setting information of Settings System Settings Settings for Administrator Authentication Charge Administrator Authentication User Authentication App Auth Register Change Delete LDAP Server See Programming the LDAP Server User Guide Full Version Follow Referrals on LDAP Server is set to Active when Active Directory of the Windows server is used for LDAP authenticatio...

Страница 243: ... certificate is not currently valid The device certificate used for the digital signature in PDF or PDF A is not currently valid Use a valid device certificate for the digital signature in PDF or PDF A See Scanning an Original as a PDF with Security Setting Specified User Guide Full Version The destination cannot be selected because its encryption certificate is not currently valid The user certif...

Страница 244: ... Cannot connect to server which installs applications Check maintenance information on Information screen or network settings Cannot connect to the installation server Could not update the firmware Failed to download the application Failed to install the application because an error has occurred Could not restore the firmware because the required data does not exist The firmware from Application S...

Страница 245: ...e mainly North America Differences in the functions of Region A and Region B models are indicated by two symbols Read the information indicated by the symbol that corresponds to the region of the model you are using The following information is region specific Read the information under the symbol that corresponds to the region of your machine mainly Europe If the label contains the following your...

Страница 246: ...is manual are given in two units of measure metric and inch If your machine is a Region A model refer to the metric units If your machine is a Region B model refer to the inch units 9 Specifications for The Machine 244 ...

Страница 247: ...figuration Desktop Memory 2 GB Color Full Color Copy process LED alley and electro photographic printing Exposure glass Stationary original exposure type Scan method Main scanning CIS sensor Sub scanning Exposure glass CIS sensor ADF Original feed image scanning by CIS sensor Warm up time 23 C 73 4 F rated voltage Normal mode 50 seconds Quick mode 39 seconds First copy time Full color 8 3 seconds ...

Страница 248: ...sheets minute A4 106 220 g m2 2 sided printing 25 sheets minute 81 2 11 60 105 g m2 One sided printing 55 sheets minute 81 2 11 60 105 g m2 2 sided printing 52 sheets minute 81 2 11 106 220 g m2 One sided printing 8 sheets minute 81 2 11 106 220 g m2 2 sided printing 7 sheets minute Maximum original size mainly Europe A4 mainly North America 81 2 14 9 Specifications for The Machine 246 ...

Страница 249: ...nction 85 to 355 6 mm 3 35 to 14 0 inches Scanner function 85 to 405 6 mm 3 35 to 16 0 inches Facsimile function 85 to 297 mm 3 35 to 11 7 inches 2 Horizontal Copy function 120 to 215 9 mm 4 72 to 8 5 inches Scanner function 120 to 356 mm 4 72 to 14 0 inches Facsimile function 120 to 215 9 mm 4 72 to 8 5 inches Originals Sheet book three dimensional object List of Specifications 247 ...

Страница 250: ... 139 7 215 9 mm 5 50 8 50 inches Paper weight Tray 1 Paper Tray Unit Trays 2 5 Bypass Tray Large Capacity Tray LCT page 162 Recommended Paper Sizes and Types Duplex 60 176 g m2 16 lb Bond 65 lb Index 1 2 Missing image area Copy Ðòéîô áòåá Print area DZX710 1 1 2 2 3 3 4 4 1 Leading edge 4 0 2 7 mm 0 16 0 11 inches 2 Trailing edge 4 0 2 7 mm 0 16 0 11 inches 3 Left edge 4 0 2 3 mm 0 16 0 09 inches ...

Страница 251: ... From 25 400 in increments of 1 Resolution scanning originals 600 600 dpi 600 400 dpi Resolution copying 1200 2400 dpi Tone 256 tones Paper capacity 80 g m2 20 lb Bond page 162 Recommended Paper Sizes and Types Continuous copy run 1 999 sheets Duplex Standard Power requirements mainly Europe IM C530FB 220 240 V 8 A 50 60 Hz IM C530F 220 240 V 8 A 50 60 Hz mainly North America IM C530FB 120 127 V 1...

Страница 252: ...imum 1 600 W or less The power level when the main switch is turned off and the power cord is plugged into an outlet 1 W or less Power consumption Complete system mainly North America Maximum 1 600 W or less The complete system of the IM C530FB consists of the main unit four paper tray units and caster table The complete system of the IM C530F consists of the main unit internal finisher four paper...

Страница 253: ... C530F Stand by 18 7 dB A Copying B W 60 7 dB A Color 60 5 dB A Noise emission Sound pressure level Sound power levels and sound pressure levels are actual values measured in accordance with ISO 7779 Sound pressure levels are measured from the position of the bystander The complete system of the IM C530FB consists of the main unit four paper tray units and caster table The complete system of the I...

Страница 254: ...ansmission time 3 seconds at 28 800 bps Standard resolution Data compression method MH MR MMR Maximum original size Standard A4 or 81 2 14 Custom 216 600 mm 8 5 23 6 inches Maximum scanning size 216 356 mm 8 5 14 0 inches Print process LED alley and electro photographic printing Transmission speed 33 600 31 200 28 800 26 400 24 000 21 600 19 200 16 800 14 400 12 000 9 600 7 200 4 800 2 400 bps aut...

Страница 255: ...o shared folders or FTP server folders 1 When you send documents in TIFF format Specifications for Printer To connect the machine to the network use a LAN cable supporting 1000BASE T 100BASE TX and 10BASE T The length of the usable cable is up to 100 m Item Specifications Printing speed One sided printed paper A4 53 sheets minute 81 2 11 55 sheets minute Two sided printed paper A4 50 sheets minute...

Страница 256: ...ostScript 3 PDF 93 Roman fonts Summary Nimbus Sans 4 fonts HGPAGothic 1 font Store function Total number of documents that can be stored Up to 50 documents Number of pages for each document that can be stored Up to 2 000 pages Total number of pages of all documents that can be stored Up to 2 000 pages The machine can store up to 50 jobs or 10 MB of Locked Print file at a time Sort function Number ...

Страница 257: ...S sensor Scan type Sheet book three dimensional object Original sizes that can be scanned Length 10 216 mm 0 4 8 5 inches Width 10 356 mm 0 4 14 0 inches Scan sizes automatically detectable from the exposure glass mainly Europe A4 81 2 13 mainly North America 81 2 14 81 2 11 Scan sizes automatically detectable from the ADF mainly Europe A4 B5 JIS A5 A5 81 2 51 2 81 2 11 81 2 13 mainly North Americ...

Страница 258: ...ginals full color 81 2 11 55 pages minute When scanning two sided originals full color A4 52 pages minute When using the E mail Scan to Folder WSD Push Type or Scan to Removable device Original size A4 81 2 11 Resolution 200 dpi Black and white Original Type B W two value Compression MH Full Color Original type Text Photo Compression JPEG Standard Scanning speed differs depending on the operating ...

Страница 259: ... High Comp PDF or PDF A for the file format you can attach a digital signature You can also specify the security settings for PDF or High Comp PDF See Scanning an Original as a PDF with Security Setting Specified User Guide Full Version To specify High Compression PDF for the PDF type the following settings are required Selecting Gray Scale or Full Color for Black White under Send Settings Selecti...

Страница 260: ... settings are required Selecting Gray Scale or Full Color for Black White under Send Settings Selecting 200 dpi 300 dpi 400 dpi or 600 dpi for Resolution under Send Settings Selecting other than Preview Specifying PDF File Type PDF A Fixed under Settings System Settings Settings for Administrator File Management to Off Network TWAIN Scanner Item Specifications Scanning resolution When using the ex...

Страница 261: ...s for Auto Document Feeder ADF Item Specifications Mode SADF mode Mixed Sizes mode Custom Size originals mode Original Orientation mode Original Size A4 A6 81 2 14 51 2 81 2 Original weight 60 128 g m2 16 34 lb Bond Number of originals to be set 13 mm or less Power requirements Power is supplied from the main unit Specifications for Internal Finisher Option Item Specifications Paper size A4 B5 ISO...

Страница 262: ...80 lb Cover Staple capacity Staple capacity depends on the paper thickness you are using as shown below When using Plain Paper 1 Plain Paper 2 50 sheets When using Middle Thick 30 sheets When using Thick Paper 1 15 sheets When using Thick Paper 2 10 sheets Stack capacity after stapling 80 g m2 20 lb Bond 2 sheets 60 sets Staple position Slant Power requirements Power is supplied from the main unit...

Страница 263: ...sions W D H 451 411 248 mm 17 8 16 2 9 8 inches when the tray is folded Weight Approx 5 kg 11 7 lb Specifications for Paper Tray Unit Trays 2 5 Option Item Specifications Page size page 162 Recommended Paper Sizes and Types Paper capacity 80 g m2 20 lb Bond page 162 Recommended Paper Sizes and Types Paper weight page 162 Recommended Paper Sizes and Types Power requirements Power is supplied from t...

Страница 264: ...or less Dimensions W D H 724 772 459 mm 28 5 30 4 18 1 inches Weight Approx 6 6 kg 14 6 lb Specifications for Caster Table Option Item Specifications Dimensions W D H 724 772 90 mm 28 5 30 4 3 5 inches except protruding parts and stabilizers Weight Approx 9 kg 19 8 lb Specifications for Wireless LAN Board Option Note that the available channels frequency ranges and locations to use the wireless LA...

Страница 265: ... Direct Connection Group Owner Mode Web Image Monitor is supported The transmission rates of 150 Mbps in the 5 GHz band and 72 2 Mbps in the 2 4 GHz band are the theoretical values of the wireless LAN specification The actual transmission rate may be lower depending on the operating environment The connecting channel is determined by the value specified in Country Region and the channel that is us...

Страница 266: ...rectly as the destination Number of destinations that can be specified at one time 100 Up to 50 items can be specified when entering an item manually including the items specified by LDAP search For the rest select up to 100 items from the registered destinations Size of a document that can be sent Up to 32 300 KB per document Number of pages that can be sent Up to 100 pages per document Send to F...

Страница 267: ... per document Broadcast Transmission Item Value Remarks Total number of destinations that can be specified for Send Email and Send to Folder 132 Number of destinations that can be specified when sending a document by Send Email 100 Up to 50 items can be specified when entering an item manually including the items specified by LDAP search Number of destinations that can be specified when sending a ...

Страница 268: ...rintable area with the settings on the printer driver See Maximizing the Printable Area When Printing User Guide Full Version The printable area may vary due to the paper size or settings of the printer driver The outside of the printable area can be printed due to the settings of the printer driver or printing condition however the print result may be different from the intended one or the paper ...

Страница 269: ...e Options Guide to Functions of the Machine s External Options IM C530FB D0CSIA2817 2 2 1 1 1 Options Mounted Inside of the Left Front Cover in the Bottom of the Control Panel D0C9IA3605 1 Machine Options 267 ...

Страница 270: ... attached to the machine see the instructions supplied with the options No Option Description 1 Paper Feed Unit Paper is loaded here You can load up to 550 sheets of paper 2 Caster Table for Paper Feed Unit To use the paper tray unit attach the caster table Allows you to move the machine easily 3 Large Capacity Tray LCT Paper tray for A4 and 81 2 11 size paper You can load up to 2 000 sheets of pa...

Страница 271: ...ounted Inside of the Left Front Cover in the Bottom of the Control Panel D0C9IA3605 1 No Option Description 1 Card reader Pass an IC card over the card reader to log in to the machine page 43 Logging In from the Control Panel Machine Options 269 ...

Страница 272: ... Options Mounted on the Machine s Bottom D0CSIA2819 1 3 2 For details about how many trays can be attached to the machine see the instructions supplied with the options No Option Description 1 Paper Feed Unit Paper is loaded here You can load up to 550 sheets of paper 2 Caster Table for Paper Feed Unit To use the paper tray unit attach the caster table Allows you to move the machine easily 9 Speci...

Страница 273: ...pacity Tray LCT Paper tray for A4 and 81 2 11 size paper You can load up to 2 000 sheets of paper Guide to Functions of the Machine s Internal Options Wireless LAN board Allows you to communicate over wireless LAN Machine Options 271 ...

Страница 274: ...h Page Number Internal Finisher SR1020 Staple See Stapling Copied Pages IM C530F Only User Guide Full Version Printer Function Reference Option Shift Collate See Sorting Printed Sheets by Individual Copies User Guide Full Version Internal Finisher SR1020 Staple See Stapling Printed Pages IM C530F Only User Guide Full Version Others Function Reference Option Wireless LAN communication See Connectin...

Страница 275: ...Function Reference Option Quick Card Authentication NFC card reader Functions Requiring Optional Configurations 273 ...

Страница 276: ... dz 4 TWAIN Scanning dz dz dz dz 1 dz dz 4 1 Printing and reading speeds may be reduced because only shared resources are being used for operations 2 Operations are allowed while waiting for the next original 3 Operations are allowed when using different protocols or when using a protocol that allows multiple transmissions 4 The machine cannot do TWAIN scanning and printing simultaneously only if TWAIN s...

Страница 277: ...nual Full Color Ǵ Ǵ Ǵ Ǵ Ǵ Two color Ǵ Ǵ Ǵ Ǵ Ǵ Two color Red Black Ǵ Ǵ Ǵ Ǵ Ǵ Single Color Ǵ Ǵ Ǵ Ǵ Ǵ Black White Ǵ Ǵ Ǵ Ǵ Ǵ Auto Color Select Ǵ Ǵ Ǵ Ǵ Ǵ Auto Paper Select Ǵ Ǵ Ǵ Ǵ Ǵ Paper Select Ǵ Ǵ Bypass Tray Ǵ Ǵ ą ą Auto Reduce Enlarge Ǵ Ǵ Ǵ Reduce Enlarge Ǵ 2 Sided Original Ǵ ą 2 Sided Ǵ ą Combine Ǵ Ǵ ą ID Card Copy ą ą ą ą ą Stamp 1 ą Sort Ǵ Stack Ǵ Ǵ Staple ą Ǵ 1 Stamps include Date Stamp Page Nu...

Страница 278: ...9 Specifications for The Machine 276 ...

Страница 279: ...n of products that feature energy saving functions It is an open program in which manufacturers participate voluntarily Energy Star standards and logos are internationally uniform Energy Saving Functions If this machine remains idle for a specified period of time or when Energy Save is pressed it enters Sleep mode to further reduce its electrical consumption This is called Sleep Mode The default d...

Страница 280: ...n change the amount of time that the machine waits before entering Sleep mode under Sleep Mode Timer See Date Time Timer User Guide Full Version It may take longer than the specified time to enter Sleep mode according to the type of Embedded Software Architecture application installed in the machine User Information on Electrical and Electronic Equipment mainly Europe Users in the countries where ...

Страница 281: ...esentatives All Other Users If you wish to discard this product please contact your local authorities the shop where you bought this product your local dealer or sales service representatives For Turkey only Note for the Battery and or Accumulator Symbol For EU countries only mainly Europe In accordance with the Battery Directive 2006 66 EC Article 20 Information for end users Annex II the above s...

Страница 282: ...and ink cartridge return program Toner and ink cartridge for recycling will be accepted free of charge from users in accordance with local regulations For details about the return program please refer to the Web page below or consult your service person https www ricoh return com Energy efficiency The amount of electricity a machine consumes depends as much on its specifications as it does on the ...

Страница 283: ...s to users in the state of California Notes to Users in USA mainly North America Perchlorate Material special handling may apply See www dtsc ca gov hazardouswaste perchlorate Environmental Regulations 281 ...

Страница 284: ...e trademarks of Apple Inc registered in the U S and other countries Microsoft Windows Windows Server Edge and Internet Explorer are either registered trademarks or trademarks of Microsoft Corp in the United States and or other countries QR Code is a registered trademark of DENSO WAVE INCORPORATED in Japan and in other countries The SD and SD logo are trademarks of SD 3C LLC This product includes R...

Страница 285: ...s Server 2012 Foundation Microsoft Windows Server 2012 Essentials Microsoft Windows Server 2012 Standard The product names of Windows Server 2012 R2 are as follows Microsoft Windows Server 2012 R2 Foundation Microsoft Windows Server 2012 R2 Essentials Microsoft Windows Server 2012 R2 Standard The product names of Windows Server 2016 are as follows Microsoft Windows Server 2016 Datacenter Microsoft...

Страница 286: ...purposes only and might be trademarks of their respective companies We disclaim any and all rights to those marks Microsoft product screen shots reprinted with permission from Microsoft Corporation 10 Legal and Contact Information 284 EN GB EN US D0CS 7013 ...

Страница 287: ... 2020 ...

Страница 288: ...D0CS 7013 US EN GB EN ...

Отзывы: