background image

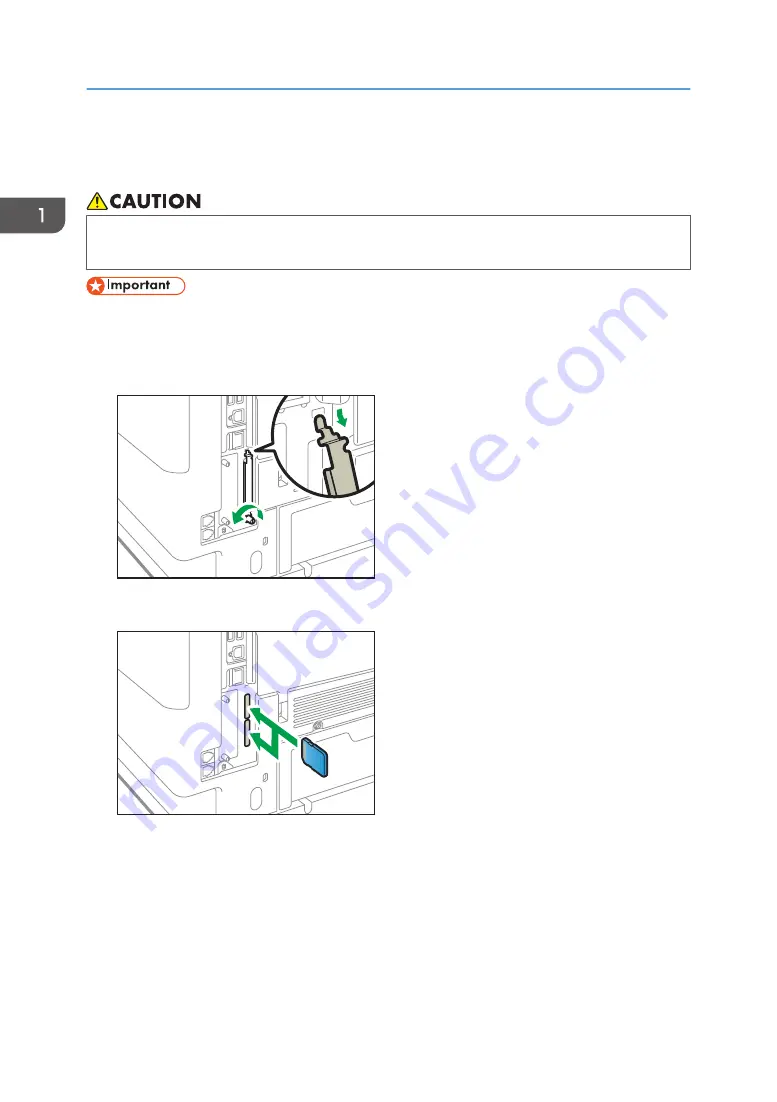
Installing SD Card Options

• Keep SD cards out of reach of children. If a child swallows a SD card, consult a doctor

immediately.

• Do not subject the card to physical shocks.

1.

Turn the machine off and unplug the power cord.

2.

Loosen the screw and remove the SD card slot cover at an angle.

DVL381

3.

Insert the SD card into the slot until it clicks.

DVL382

If you insert only one SD card, use the upper slot. If you insert two SD cards simultaneously, use
both slots. If you insert the optional VM card, use only the lower slot.
If you want to use three or more SD cards simultaneously, contact your service representative.
If you use a commercially available SD card for buck up the address book, insert the SD card to
lower slot.

1. Getting Started

58

Содержание IM 350

Страница 1: ...rmation not found in this manual see the online manuals available on our web site https www ricoh com or via the control panel Information for This Machine Troubleshooting Adding Paper and Toner Web I...

Страница 2: ......

Страница 3: ...merica 33 Selecting the Line Type 34 Settings Needed for Each Function 36 Guide to Functions of the Machine s External Options mainly Europe and Asia 37 Guide to Functions of the Machine s External Op...

Страница 4: ...me Screen 72 Adding Widgets to the Home Screen 72 How to Use Each Application 73 Copy standard Screen 74 Fax standard Screen 76 Scanner standard Screen 82 Registering Frequently Used Functions 88 Turn...

Страница 5: ...Documents 120 Printing the Records Manually 122 4 Print Installing the Printer Driver for Network Connection Windows 123 Installing the PCL 6 Printer Driver from the CD ROM 123 Installing the Printer...

Страница 6: ...mail 156 Registering an E mail Destination 156 Changing or Deleting an E mail Destination 158 Entering an E mail Address Manually 159 Basic Procedure for Storing Scan Files 160 Checking a Stored File...

Страница 7: ...played on the Control Panel When You Use the Scanner Function 237 Messages Displayed on the Client Computer When You Use the Scanner Function 248 When Other Messages Appear 254 Cautions in Removing Ja...

Страница 8: ...87 E mail Transmission and Reception and Folder Transmission 288 Specifications for Printer 290 Specifications for Scanner 292 Specifications for Lower Paper Tray 250 sheets 295 Specifications for Low...

Страница 9: ...ons of the machine s functions and instructions on resolving user errors Indicates where you can find further relevant information Indicates the names of keys or buttons on the product or display main...

Страница 10: ...8...

Страница 11: ...1 Getting Started This chapter describes how to start using this machine Names of Major Features In this manual major features of the machine are referred to as follows Auto Document Feeder ADF 9...

Страница 12: ...Asia If the label contains the following your machine is a region A model CODE XXXX 27 29 220 240 V mainly North America If the label contains the following your machine is a region B model CODE XXXX...

Страница 13: ...ire caused by overheated internal components Do not press or hit the staple unit strongly Doing so may damage it If stapling fails after the stapler has been forcefully hit the staples in the cartridg...

Страница 14: ...d on the exposure glass If you load a stack of originals in the ADF the ADF will automatically feed the originals one by one 2 ADF cover Open this cover to remove originals jammed in the ADF 3 ADF cov...

Страница 15: ...fax messages are delivered here 14 Front cover open button Push this button to open the front cover 15 Lower paper tray Load paper here For details see page 37 Guide to Functions of the Machine s Ext...

Страница 16: ...rica Attach the handset bracket to the slit 2 Vents Prevent overheating 3 Power connector Connect the power cord to the machine Insert the other end into an electrical outlet 4 Rear cover Open to acce...

Страница 17: ...r a new cartridge needs to be prepared For details about the messages that appear on the screen when consumables need to be replaced see Adding Toner Maintenance When you remove jammed paper pull out...

Страница 18: ...the screen when the fusing unit needs to be replaced or a new fusing unit needs to be prepared For details about the messages that appear on the screen when consumables need to be replaced see Replac...

Страница 19: ...le unit 3 Stapling slot 4 Slide switch 5 LED to indicate there are no more staples Staple cartridge 1 2 3 DVL426 1 Staple holder 2 Staple cartridge 3 Faceplate Guide to Names and Functions of Componen...

Страница 20: ...ed Pair Cable STP and Category type 5 or more When using 1000BASE T Unshielded Twisted Pair Cable UTP or Shielded Twisted Pair Cable STP and Category type 5e or more When you use IPv6 set Effective Pr...

Страница 21: ...lit When Energy Saver mode is enabled the LEDs may not light up Obtaining an IP address automatically IPv4 DHCP The machine is set to obtain IP addresses automatically as a factory default 1 Press Ho...

Страница 22: ...ne IPv4 Address and then input the IP address When you complete entering the IP address press 10 Press OK 11 Press Change next to Subnet Mask and then enter the subnet mask When you complete entering...

Страница 23: ...device to a network 1 Yes No 1 SSID is an identifier to distinguish Wireless LAN networks It is also called a Network name or Access point name You can also connect via Ad hoc mode For detailed inform...

Страница 24: ...from the device you want to connect Only devices that are Android 4 0 or later and support Wi Fi Direct can be connected You cannot print data on a network such as a website when a device is connected...

Страница 25: ...n 3 Press Machine Features 4 Press System Settings 5 Press Interface Settings tab 6 Press Network 7 Press LAN Type 8 Press Wireless LAN 9 Press Wireless LAN 10 Press Communication Mode and then press...

Страница 26: ...use Infrastructure mode When you use IPv6 set Effective Protocol to Active in Interface Settings in System Settings IPv6 is inactive as a factory default When you enable IPv6 a link local address is...

Страница 27: ...ess LAN in Interface Settings in System Settings and confirm the signal status Obtaining an IP address automatically IPv4 DHCP The machine is set to obtain IP addresses automatically as a factory defa...

Страница 28: ...the subnet mask When you complete entering the subnet mask press 12 Press OK 13 Press IPv4 Gateway Address and then enter the gateway address 14 Press OK Connecting in Direct Connection Mode To connec...

Страница 29: ...Press Wireless LAN 18 Press Wireless LAN Easy Setup Direct Connection 19 Press Push Button 20 Press Connect The settings are complete Operate the push buttons on the device that you want to connect Se...

Страница 30: ...s Communication Mode and then press Direct Connection Group Owner Mode 11 Press OK 12 Press Direct Connection 13 Press Active Inactive and press Active 14 Press OK 15 Press Direct Connection Settings...

Страница 31: ...erface Settings under System Settings while the machine is set to Wireless Direct Group Owner mode the Non Wireless Direct compliant devices can access to the machine by specifying the SSID and the se...

Страница 32: ...ine s USB Host Interface This section explains how to connect a device to the machine s USB host interface This machine does not come with a USB interface cable Make sure you purchase the appropriate...

Страница 33: ...DVL805 Connecting the USB Interface 31...

Страница 34: ...art Connect the public switched telephone network PSTN to Line Connecting lines other than PSTN to this machine may cause it to malfunction DVL807 2 1 1 LINE G3 interface unit connector Connect a tele...

Страница 35: ...erica To connect the machine to a telephone line use a snap in modular type connector A telephone line cable with a ferrite core must be used for RF interference suppression Make sure the connector is...

Страница 36: ...cap has been inserted in the TEL connector remove it before starting to use this connector Use the supplied modular cable with a ferrite core Connect the end of the cable with the ferrite core to the...

Страница 37: ...Select the line type using Administrator Tools This function is not available in some regions Connecting the Machine to a Telephone Line and Telephone Handset 35...

Страница 38: ...Settings Requirements List and specify the items necessary for the following functions Printer LAN Fax Internet Fax E mail Function Folder Function WSD Scanner Network TWAIN Scanner Document Server Th...

Страница 39: ...ays There are two types of trays each holding up to 250 or 500 sheets of paper These trays can be used in any combination Customer engineer attaches the paper tray depending on the number of the tray...

Страница 40: ...00 sheets of paper These trays can be used in any combination A customer engineer may be required to install this depending on the number of levels being installed Contact your authorized service repr...

Страница 41: ...line stapler 3 Attach the Handset 4 Install the interface board Install in the slot of the controller board Only one interface board can be installed 5 Insert SD card Insert in the SD card slot of the...

Страница 42: ...care that the power cord is not damaged under the machine Failing to take these precautions could result in fire or electric shock Do not place the machine directly on the floor When attaching multipl...

Страница 43: ...them with the holes on the underside of the machine and then carefully lower the machine DVL103 6 Plug in the power cord and then turn on the machine 7 Print the configuration page to confirm that th...

Страница 44: ...e printer and one or two optional paper feed units Use on table printer and three optional paper feed units 1 User Customer engineer 1 A caster table is required to install three paper feed units on a...

Страница 45: ...it Do not hold the offline stapler when you move the machine 1 Turn off the machine s power and then pull the power plug out of the wall outlet 2 By using a coin open the cover on the right side of th...

Страница 46: ...r until Step 7 DVL431 5 Align the hole on the staple unit cradle to the bump that is on the right side of the machine and then insert the screw into the screw hole If the right side of the machine is...

Страница 47: ...move when pulling out the release paper Do not press the staple unit forcibly The release paper may tear Pull the release paper to the sides slowly After removing the release paper press forcibly on t...

Страница 48: ...DVL436 9 Turn the machine s power on The power of the offline stapler also turns on 1 Getting Started 46...

Страница 49: ...the two screws and remove the slot cover DVL370 The removed cover will not be reused 4 Fully insert the interface board DVL371 Confirm that the interface board is firmly connected to the controller b...

Страница 50: ...2 Turn the machine off and unplug the power cord 3 Loosen the two screws and remove the slot cover DVL370 The removed cover will not be reused 4 Fully insert the IEEE 1284 interface board DVL373 Conf...

Страница 51: ...n IEEE 1284 interface cable to the IEEE 1284 port DVL806 You might have to use a conversion adapter to connect the cable to the interface For details about acquiring a conversion adapter consult your...

Страница 52: ...ug the power cord 3 Loosen the two screws and remove the slot cover DVL370 The removed cover will not be reused 4 Fully insert the interface board DVL377 Check that the interface board is firmly conne...

Страница 53: ...ed two Ethernet cables can be connected at the same time using the standard port on the machine and an additional port on the USB device server You can assign different IP addresses to each port so th...

Страница 54: ...rnet cables simultaneously one to the machine s Ethernet port and one to the Ethernet port of USB Device Server Option An IP address can be assigned to each connection and you can use one machine to p...

Страница 55: ...hernet port of the USB Device Server Option You can use either a straight or crossover Ethernet cable for connecting to the USB Device Server Option DVL803 4 Connect the other end of the Ethernet inte...

Страница 56: ...n share the machine among multiple networks by specifying an IP address of a segment different from that of the machine The default network settings of the USB device server are as follows DHCPv4 Disa...

Страница 57: ...ine 2 Press and hold the switch on the interface using a pointed tool such as a pen and turn on the machine DDE015 3 Both the upper and lower LEDs of the Ethernet port light up Be sure to check the up...

Страница 58: ...l and installation using the SmartDeviceMonitor for Client port A port must be set independently when a printer driver is installed To print using Port 9100 or LPR see Driver Installation Guide and ma...

Страница 59: ...e machine off and unplug the power cord 3 Loosen the two screws and remove the slot cover DVL370 The removed cover will not be reused 4 Fully insert the file format converter DVL379 Check that the fil...

Страница 60: ...ver at an angle DVL381 3 Insert the SD card into the slot until it clicks DVL382 If you insert only one SD card use the upper slot If you insert two SD cards simultaneously use both slots If you inser...

Страница 61: ...the opening attach it flat against the controller board and then fasten it using the screw DVL383 5 Plug in the power cord and then turn on the machine 6 Confirm that the SD card was installed correc...

Страница 62: ...e bracket or it may be damaged Maximum force allowable is approx 50N approx 5 kgf N Newton kgf Kilogram force 1 kgf 9 8N When you fix the handset cradle to the handset bracket do not screw it too tigh...

Страница 63: ...3 Attach the bracket to the left side of the machine as shown below DVL392 1 2 4 Remove the inquiry card from the handset cradle The card can be easily removed by pushing it from the back of the hands...

Страница 64: ...cradle DVL395 7 Place the handset on the handset cradle and connect the handset cord to the external telephone connector DVL396 Configuring the handset Selecting a telephone line type for the handset...

Страница 65: ...S H 10 20 D I A L CHP106 Adjusting the handset bell volume With a thin pointed object adjust the bell volume using the volume switch High H Low L No sound OFF H L OFF CHP107 Installing the Handset ma...

Страница 66: ...Connecting the telephone 1 Connect the cord of the telephone to TEL connector DVK532 1 Getting Started 64...

Страница 67: ...r indicator is lit 3 Status indicator Indicates the status of the system Stays lit when an error occurs or the toner runs out 4 Data In indicator facsimile and printer mode Flashes when the machine is...

Страница 68: ...Press Home at the bottom of the screen in the center 2 Flick the screen to the left and then press the Change Langs Widget 3 Select the language you want to display 4 Press OK You can register display...

Страница 69: ...wton kgf Kilogram force 1 kgf 9 8N To switch between screens flick your finger to the right or left on the screen DVL534 6 7 14 1 3 4 5 8 9 10 11 13 2 12 1 Logged in user icon When user authentication...

Страница 70: ...fy whether this key is enabled or not in some applications For details about the settings see Screen Features Settings 12 Media Information Press to remove the inserted SD card or USB flash memory dev...

Страница 71: ...ault screen when the machine is turned on You can change this default setting under Function Priority See Screen Features Settings Possible Operations on the Standard Application Screen Pinch in Place...

Страница 72: ...2 Long tap Place your finger on the screen and hold it there until the next screen appears You can display the menu screen of the application you are using DNE101 Drag Slide your finger while pressing...

Страница 73: ...and hold down the Classic Applications icon to add a shortcut to one of the Classic Applications The image of where the shortcut is to be placed on the Home screen is displayed 5 Drag the icon to wher...

Страница 74: ...the PROGRAM tab 7 To display a program registered to the standard applications or quick applications hold down the application icon To display a program registered to the Classic Applications hold do...

Страница 75: ...Screen page 76 Fax standard Screen and page 82 Scanner standard Screen Classic Application Screen You can select advanced functions and detailed settings according to the functions and settings you us...

Страница 76: ...ssic icon and Printer Classic icon are displayed in the Application list For details about how to register them to the Home screen see Customizing the Home Screen For First time Users Copy standard Sc...

Страница 77: ...nter the number of copies using the keyboard You can also specify the number of copies by pressing or 5 Preview prints change according to the settings you make 6 You can combine two 1 sided originals...

Страница 78: ...s 10 You can divide an original that has many pages and scan it in smaller batches while copying it as a single document To do this place several pages of the original in the ADF 11 You can find other...

Страница 79: ...Settings 4 This function allows you to dial while listening to the dial tone from the internal speaker with the handset of the machine or external telephone on hook The total number of the selected de...

Страница 80: ...ls 8 You can check the settings in Settings 9 Press to open the settings screen For details see page 79 Settings screen 10 Press to scan originals and start sending 11 Press to switch the section of t...

Страница 81: ...the Address Book or on the LDAP server Press to display the Remaining Memory Information You can also add a destinations to the Address Book Settings screen You can switch the three screens described...

Страница 82: ...4 Press to specify the density to scan the original You can also specify the density by touching the icon and dragging it right or left 5 Press to select the scanning size of the original 6 Press to...

Страница 83: ...pecified time 10 Specify the Internet Fax subject 11 Specify the Internet Fax Text DVL545 15 16 17 12 13 14 No Icon Description 12 You can select a standard message to be printed 13 You can send files...

Страница 84: ...standard Screen DVL546 1 4 3 13 5 7 2 10 11 12 6 8 9 No Icon Description 1 Displays the type of scanner destination Press to switch between e mail destinations and folder destinations 2 The specified...

Страница 85: ...list 4 Press to display the transmission results screen In the transmission results screen you can do the following Check sent jobs Check error descriptions Cancel transmission of a document in stand...

Страница 86: ...ctions of the Address Book 13 Press to add a destination Destinations can be added as follows Input destinations manually Select from the transmission history Specify a registration number from the Ad...

Страница 87: ...n the original 4 Press to select the sides of the original to scan such as one side or both sides 5 Press to select the scanning size of the original 6 Press to specify a file name DVL548 7 8 9 10 11...

Страница 88: ...4 15 16 17 No Icon Description 12 Press to specify the magnification ratio for scanning the original 13 Press to erase the image from a specified width around the document and in the center of the doc...

Страница 89: ...ts 17 Press to sign and encrypt the e mail DVL550 18 19 No Icon Description 18 To switch the scan setting for additional originals to 1 Sided Original after scanning one side of the last page of a bat...

Страница 90: ...iginal Type Batch Other Settings Fax Destination Preview Settings Scanner Destination Preview Send Settings Quick Applications Quick Copy Paper Tray Quantity Reduce Enlarge 2 Sided Combine Original Or...

Страница 91: ...ick Scanner 40 characters When a specified program is registered as the default its values become the default settings which are displayed without recalling the program when modes are cleared or reset...

Страница 92: ...verwritten When you are using the Classic Applications program numbers with next to them indicate that the programs have been registered Programs can be registered to the Home screen and can be recall...

Страница 93: ...while For details see Saving Energy For First time Users Turning On Off the Main Power When disconnecting the power cord from the wall outlet always pull the plug not the cord Pulling the cord can da...

Страница 94: ...ush the main power switch The main power indicator goes out The main power turns off automatically when the machine shuts down If the screen on the control panel does not disappear contact your servic...

Страница 95: ...tication see Configuring User Authentication Security User Code to enter on User Code Authentication is the numerical value registered in the Address Book as User Code User Code Authentication If User...

Страница 96: ...n the screen 2 Press User Name 3 Enter a Login User Name and then press Done 4 Press Password 5 Enter a Login Password and then press Done 6 Press Login Logging Out Using the Control Panel 1 Press Log...

Страница 97: ...page to be scanned DVL359 A 3 Lower the ADF Left original beeper The beeper sounds and an error message is displayed when you leave your originals on the exposure glass after scanning The machine rep...

Страница 98: ...e 2 Place the aligned originals squarely face up in the ADF Do not stack originals beyond the limit mark A The first page should be on the top When placing originals that are longer than A4 81 2 11 op...

Страница 99: ...first page is on the top About placing the original on the exposure glass see page 95 Placing Originals on the Exposure Glass About placing the original in the ADF see page 95 Placing Originals in th...

Страница 100: ...g Auto Reduce Enlarge Auto Reduce Enlarge is canceled This is useful to copy different size originals to the same size paper If the orientation in which your original is placed is different from that...

Страница 101: ...age 2 Sided 2 Sided Copies one 2 sided page on one 2 sided page The resulting copy image will differ according to the orientation in which you place your originals or Original orientation and complete...

Страница 102: ...out the sizes orientations and weights of paper that can be used in the Duplex function see Specifications for the Main Unit Specifications When Using the Copy Application About how to use the applica...

Страница 103: ...CKN011 Top to Bottom CKN012 When Using the Copy Application About how to use the application s screen see page 74 Copy standard Screen Duplex Copying 101...

Страница 104: ...or Combine 2 Sides for Copy you can change the orientation For details see page 100 Specifying the Original and Copy Orientation Orientation of the original and image position of Combine The image pos...

Страница 105: ...ided 2 Originals Combine 1 Side Copies two 1 sided originals to one side of a sheet 1 Sided 4 Originals Combine 1 Side Copies four 1 sided originals to one side of a sheet 1 Sided 8 Originals Combine...

Страница 106: ...s pages of originals onto two sides of one sheet CKN074 There are six types of Two Sided Combine 1 Sided 4 Originals Combine 2 Sides Copies four 1 sided originals to one sheet with 2 pages per side 1...

Страница 107: ...to one sheet with 4 pages per side 2 Sided 16 Pages Combine 2 Sides Copies eight 2 sided originals to one sheet with 8 pages per side When Using the Copy Application About how to use the application s...

Страница 108: ...tray paper settings screen is not displayed In this case make sure that the bypass tray is selected and press When Display Automatically is selected in Display Paper Settings in Bypass even if you pre...

Страница 109: ...p between paper weight and paper thickness and the sizes of envelopes that can be used see Recommended Paper Specifications About handling envelopes supported envelope types and how to load envelopes...

Страница 110: ...application s screen see page 74 Copy standard Screen Changing the Number of Sets You can change the number of copy sets during copying This function can be used only when the Sort function is select...

Страница 111: ...ring Data 1 Press Store File 2 Enter a user name file name or password if necessary 3 Specify a folder in which to store the document if necessary 4 Press OK 5 Place the originals 6 Make the scanning...

Страница 112: ...2 Copy 110...

Страница 113: ...is printed to help you check the list of deleted files See When an Error for Fax Function Is Notified via a Report or E Mail Troubleshooting If memory is full 0 appears in Memory at the upper right of...

Страница 114: ...nt to use under Select Title The keys you can select are as follows Frequent Added to the page that is displayed first AB CD EF GH IJK LMN OPQ RST UVW XYZ 1 to 10 Added to the list of items in the sel...

Страница 115: ...er a new password and then press OK 6 Press OK To program the SEP Code for fax number 1 Press Adv Features and then press SEP Code 2 Press Change under RX SEP Code 3 Enter a new SEP Code and then pres...

Страница 116: ...egistered Personal Box for example cannot be delivered Be sure to check the settings in the fax function before deleting any destinations Changing a Fax Destination 1 Press Home at the bottom of the s...

Страница 117: ...er using the number keys You can search by the registered name user code fax number folder name e mail address or IP Fax destination 5 Press Fax Dest 6 Press Change under Fax Destination 7 Press Delet...

Страница 118: ...r IP Fax destinations If you specify Internet Fax e mail folder destinations and group or multiple destinations the transmission mode is automatically switched to Memory Transmission It is recommended...

Страница 119: ...is being scanned If you cancel a transmission using the standard memory transmission function you need to follow a different procedure to cancel the transmission See page 117 Canceling a Transmission...

Страница 120: ...ission or folder transmission is being executed There are cases when a destination may not be selected as the destination appears as depending on the security settings To delete some destinations from...

Страница 121: ...d names such as FAX0001 or FAX0002 Password You can set this function so as not to send to unspecified people A four to eight digit number can be specified as a password You can also change the file i...

Страница 122: ...ter a password using the number keys and then press OK Re enter the password for confirmation and then press OK 5 Press OK 6 If you have selected Send Store specify the receiver 7 Press Start Sending...

Страница 123: ...ess the Thumbnails key to switch the screen to thumbnail display 3 If you select a document with a password enter the password using the number keys and then press OK 4 When you want to add your origi...

Страница 124: ...cations in order made Print per File No Prints only the results of communications specified by file number Print per User Prints the results of communications by individual senders Specified Print Per...

Страница 125: ...e network the installer searches for the machine to install the printer driver If the installer cannot find the machine specify the IP address or machine name to install the printer driver Installing...

Страница 126: ...Connection screen and then click Next The search detects devices connected to the network 7 Select this machine from among the devices and then click Install DZC080 8 If the Set Port screen is display...

Страница 127: ...k Next 2 On the Add Printer and Utility Wizard screen select Standard TCP IP Port and click Next 3 On the Add Standard TCP IP Printer Port Wizard screen click Next 4 On the Add port screen enter the p...

Страница 128: ...10 Click Continue Printer driver installation starts 11 Click Finish When you are prompted to restart your computer restart it by following the instructions that appear 4 Print 126...

Страница 129: ...the instructions of the installer to connect the USB cable Installing the Printer Driver from the CD ROM 1 Set the CD ROM in the computer If the installer does not start automatically double click Set...

Страница 130: ...Next DZC081 6 Select Add a new printer and then click Next 7 Select this machine from among the devices and then click Next DZC092 8 Disconnect the USB cable from the machine and turn off the power of...

Страница 131: ...detects the machine connected by the USB cable If the machine is not detected click Stop Auto detecting Even if the connection is canceled the installation is complete After the installer screen is cl...

Страница 132: ...printer settings Log on as an Administrators group member You cannot change the machine default settings for individual users Settings made in the printer properties dialog box are applied to all user...

Страница 133: ...B 2 0 while the machine is in Sleep mode an error message might appear when the print job is complete In this case check if the document was printed When Using the PCL 6 Printer Driver 1 Click the men...

Страница 134: ...5 In the Job Type list select Normal Print 6 In the Document Size list select the size of the original to be printed 4 Print 132...

Страница 135: ...7 In the Orientation area select Portrait or Landscape as the orientation of the original 8 In the Paper Type list select the type of paper that is loaded in the paper tray Standard Printing 133...

Страница 136: ...select Auto Tray Select in the Input Tray list the paper tray is automatically selected according to the paper size and type specified 10 If you want to print multiple copies specify a number of sets...

Страница 137: ...ver 1 Click the menu button of the application you are using and then click Print 2 Select the printer you want to use 3 Click Preferences 4 Click the Frequently Used Settings tab You can also click t...

Страница 138: ...tings tab You can also click the Detailed Settings tab and then click 2 Sided Layout Booklet in the Menu box 5 Select the combination pattern in the Layout list and then specify the method for combini...

Страница 139: ...a border line around each page select the Draw Frame Border check box in 2 Sided Layout Booklet in the Detailed Settings tab 6 Change any other print settings if necessary 7 Click OK 8 Start printing...

Страница 140: ...g the Printer Driver Printing on Envelopes Using the Printer Driver Before configuring envelope settings in the printer driver configure the control panel settings For details see page 138 Configuring...

Страница 141: ...ceeds 2 000 The total number of stored pages in the machine and the sent data has reached 9 000 It may be fewer depending on the print data The hard disk is full Data stored in the Document Server is...

Страница 142: ...the Shared folder 8 If the folder is protected by a password enter the password in the Folder Password box 9 Click OK 10 Change any other print settings if necessary 11 Click OK 12 Start printing fro...

Страница 143: ...4 If necessary enter the password for the documents The list of both the documents that have not password specified and that matches the entered password is displayed 5 Select documents More than one...

Страница 144: ...or Administrator Authentication Management or Enhance File Protection using an external application such as Web Image Monitor while using the Quick Print Release function this function is terminated a...

Страница 145: ...rinting a file in a memory storage device 1 Press Home at the bottom of the screen in the center 2 Press the Print Scan Memory Storage Device icon 3 Press Print from Storage Device 4 Insert a memory s...

Страница 146: ...nned data 7 Place the original 8 If necessary press Scan Setting to change the settings such as the file type or scan resolution 9 To see the scanned image before saving it to a file press Preview 10...

Страница 147: ...en you send 10 page original in PDF format at 15 30 15 5 on Dec 31 2020 the file name is 20201231153015500 pdf When you save scanned data to a memory storage device use characters which correspond to...

Страница 148: ...4 Print 146...

Страница 149: ...n computer See also Registering Folders For First time Users and register the address of the destination computer to the address book When Using the Scanner Application About how to use the applicatio...

Страница 150: ...ess displayed under IPv4 Address is the IPv4 address of the computer DVL853 4 Enter the command set user and then press the Enter key Be sure to put a space between set and user 5 Confirm the user nam...

Страница 151: ...access to and then click OK 11 In the Select Users Computers Service Accounts or Groups window click OK 12 In the Group or user names list select a group or user and then in the Allow column of the pe...

Страница 152: ...left and then press the Address Book Management icon 3 Check that Program Change is selected 4 Press New Program 5 Press Change under Name The name entry display appears 6 Enter the name and then pre...

Страница 153: ...applied 11 Press Change under Login User Name 12 Enter the login user name of the destination computer and then press OK You can enter up to 64 characters 128 bytes for the user name 13 Press Change...

Страница 154: ...folder using Browse Network 19 Press Connection Test to check the path is set correctly 20 Press Exit If the connection test fails check the settings and then try again 21 Press OK 22 Press User Tool...

Страница 155: ...again Locating the SMB folder using Browse Network 1 Press Browse Network The client computers sharing the same network as the machine appear Network display only lists client computers you are author...

Страница 156: ...creen in the center 2 Flick the screen to the left and then press the Address Book Management icon 3 Check that Program Change is selected 4 Select the name whose folder you want to delete Press the n...

Страница 157: ...tering the Path to the Destination Manually When Using the Scanner Application About how to use the application s screen see page 82 Scanner standard Screen Basic Procedure When Using Scan to Folder 1...

Страница 158: ...ation s screen see page 82 Scanner standard Screen Registering an E mail Destination 1 Press Home at the bottom of the screen in the center 2 Flick the screen to the left and then press the Address Bo...

Страница 159: ...rst AB CD EF GH IJK LMN OPQ RST UVW XYZ 1 to 10 Added to the list of items in the selected title You can select Frequent and one more key for each title 9 Press Email 10 Press Change under Email Addre...

Страница 160: ...of the screen 16 Press Home at the bottom of the screen in the center Changing or Deleting an E mail Destination Changing an E mail Destination 1 Press Home at the bottom of the screen in the center 2...

Страница 161: ...umber keys You can search by the registered name user code fax number folder name e mail address or IP Fax destination 5 Press Email 6 Press Change under Email Address 7 Press Delete All and then pres...

Страница 162: ...eriod For details about specifying the period see Administrator Tools Settings Scan file stored in the machine may be lost if some kind of failure occurs We advise against using the hard disk to store...

Страница 163: ...orage and Sending by E mail and Simultaneous Storage and Sending by Scan to Folder Scan 7 If necessary specify the stored file s information such as User Name File Name Password and Select Folder User...

Страница 164: ...ich to save the stored files and then press OK 8 Press OK 9 If necessary press Scan Settings to specify scanner settings such as resolution and scan size For details see Scan Settings Scan 10 Press St...

Страница 165: ...le you want to check You can select more than one file For details about searching the stored document by user or document name see Searching by user name and Searching by file name Scan 4 Press Previ...

Страница 166: ...ge file type when scanning multiple originals one file is created for each single page and the number of files sent is the same as the number of pages scanned Multi page TIFF PDF If you select a multi...

Страница 167: ...Specifying Scan Settings When Using the Scanner Application About how to use the application s screen see page 82 Scanner standard Screen Specifying Scan Settings 165...

Страница 168: ...5 Scan 166...

Страница 169: ...er make sure that all other operations are ended The Document Server can store up to 9 000 pages File Name A file name such as COPY0001 and COPY0002 is automatically attached to the scanned document Y...

Страница 170: ...en press Manual Entry and then enter a user name 8 Press File Name 9 Enter a file name and then press OK 10 Press Password 11 Enter a password with the number keys and then press OK You can use four t...

Страница 171: ...After scanning a list of folders will be displayed If the list does not appear press Finish Scanning Storing Data 169...

Страница 172: ...gin Adj Stamp 2 Sided Copy Top to Top 2 Sided Copy Top to Bottom Booklet Magazine For details about each function see the each section 1 Select a folder 2 Select a document to be printed If a password...

Страница 173: ...r the number of print copies with the number keys The maximum quantity that can be entered is 999 6 Press Start To stop printing first press Stop and then press Cancel Printing Printing Stored Documen...

Страница 174: ...6 Document Server 172...

Страница 175: ...and password to use Web Image Monitor For Details Logging In Out Using Web Image Monitor For First time Users When entering an IPv4 address do not begin segments with zeros For example If the address...

Страница 176: ...Refresh Help Refresh Click at the upper right in the work area to update the machine information Click the web browser s Refresh button to refresh the entire browser screen Help Use Help to view or d...

Страница 177: ...er stack them with the new sheets of paper and then fan the entire stack before loading it into the tray Straighten curled or warped paper before loading For details about the paper sizes and types th...

Страница 178: ...tray and then pull it out of the machine DVL415 2 Pinch the lever of the back fence and align it with the paper size Next pinch the lever of the right fence and align the right and left fences with th...

Страница 179: ...front side of the tray insert it into the machine and then push it in carefully until it stops DVL405 While you are printing a message informing you that the size of the paper that is loaded and the p...

Страница 180: ...s Select appropriate paper thickness for the loaded paper When printing with Thick Paper 3 remove printed sheets one by one Loading Paper into the Bypass Tray Use the bypass tray to use OHP transparen...

Страница 181: ...nd then try printing again To not change the paper size select Loaded Paper A message informing you that the size of the loaded paper and the print settings are different may appear if multiple sheets...

Страница 182: ...in a specific orientation For details see page 180 Loading Orientation fixed Paper or Two sided Paper You can load envelopes into the bypass tray Envelopes must be loaded in a specific orientation For...

Страница 183: ...ment Server or System Print Original orientation and paper orientation The meanings of the icons are as follows Icon Meaning Place or load paper scanned or printed side face up Place or load paper sca...

Страница 184: ...DF Unreadable orientation The orientation that the words are unreadable when you hold the original Copy Scanner Paper orientation Copier mode Copy side Paper trays Bypass tray One sided Two sided Prin...

Страница 185: ...all paper is output facing the same direction specify different input trays for one sided and two sided printing Note also that two sided printing must be disabled for the tray specified for one sided...

Страница 186: ...1 Press Recall Program on the bypass tray paper settings screen 2 Press Program 3 Press the name area and then enter a name 4 Press OK To apply the registered settings to the currently loaded paper pr...

Страница 187: ...r setting screen not to display specify the setting from Display Bypass Tray Paper Settings Assist under Tray Paper Settings in User Tools Settings remain valid until they are changed For details abou...

Страница 188: ...80 lb Cover Thin Paper Thick Paper 3 Select the paper size using the paper size dial on the tray 1 A4 A5 A6 81 2 14 81 2 11 51 2 81 2 550 sheets When using Plain Paper 1 52 220 g m2 14 lb Bond 80 lb C...

Страница 189: ...number of sheets you can load in the paper tray varies depending on the weight and condition of the paper Lower paper tray 250 sheets Paper type and weight Paper size Paper capacity 52 220 g m2 14 lb...

Страница 190: ...ze Paper capacity 52 220 g m2 14 lb Bond 80 lb Cover Thin Paper Thick Paper 3 Select the paper size using the paper size dial on the tray 1 A4 A5 A6 81 2 14 81 2 11 51 2 81 2 550 sheets When using Pla...

Страница 191: ...14 lb Bond 140 lb Index Thin Paper Thick Paper 3 Select the paper size 1 6 A4 A5 A6 B5 JIS B6 JIS B7 JIS 81 2 14 81 2 13 81 2 11 81 4 14 81 4 13 8 13 8 101 2 8 10 71 4 101 2 51 2 81 2 16K 81 2 132 5...

Страница 192: ...lly smearing may occur near the edges of the printed paper 2 When loading OHP transparencies in the bypass tray do not stack paper over the limit mark 3 When loading thick paper in the bypass tray do...

Страница 193: ...iple sheet feeding occurs fan sheets thoroughly or load sheets one by one from the bypass tray Flatten out curled sheets before loading them Depending on the paper sizes and types the print speed may...

Страница 194: ...s concerning thick paper When loading thick paper of 106 256 g m2 28 lb Bond 68 lb Index in the paper trays or bypass tray follow the recommendations below to prevent misfeeds and loss of image qualit...

Страница 195: ...recommendations concerning envelopes Do not use window envelopes Fan the envelopes before loading them to separate them and prevent the glue on them from causing them to stick together If fanning doe...

Страница 196: ...Bottom side of envelopes toward the left of the machine Side to be printed face up When loading envelopes specify the envelope size and thickness For details see Copying onto Envelopes Copy Document S...

Страница 197: ...and type of envelope at a time The Duplex function cannot be used with envelopes To get better output quality it is recommended that you set the leading edge print margin to at least 15 mm 0 6 inches...

Страница 198: ...n due to electric contact sparks inside the vacuum cleaner However you can use a toner compatible industrial vacuum cleaner When toner is spilled remove the spilled toner using a wet cloth so that the...

Страница 199: ...stained area with cold water Heating the stained area by applying hot water will set the toner into the fabric and removing the stain may become impossible When replacing a container with toner includ...

Страница 200: ...he bottom of the screen in the center 2 Press the Fax icon or the Scanner icon 3 Press Exit and then perform transmission operation The error message disappears Any reports are not printed Disposing o...

Страница 201: ...e see our local company website for information on the recycling of supply products or you can recycle items according to the requirements of your local municipalities or private recyclers Adding Tone...

Страница 202: ...8 Adding Paper and Toner 200...

Страница 203: ...jammed paper see Removing Jammed Paper Troubleshooting Original Misfeed icon Appears when an original misfeed occurs For details about removing jammed paper see Removing Jammed Paper Troubleshooting...

Страница 204: ...ls Pressing Check displays an error message or the corresponding function screen Check the error message displayed on the function screen and take the appropriate action For details about how to resol...

Страница 205: ...ccurred Then read the displayed message and take the appropriate action For details about error messages and their solutions see When Messages Appear Troubleshooting You can use other functions normal...

Страница 206: ...printing or scanning completed successfully 2 long beeps Machine has warmed up When the power is turned on or the machine exits sleep mode the machine has fully warmed up and is ready for use 5 long b...

Страница 207: ...request if the machine s covers are opened and closed repeatedly within a short space of time the sound might continue even after normal status has resumed You can specify the sound pattern and enable...

Страница 208: ...press Help The application that is currently in use does not support the help function or is grayed out because Paper Misfeed or another message is being displayed The help function cannot be used whe...

Страница 209: ...press Energy Saver check that Sleep mode can be enabled For details about enabling Sleep mode see Saving Energy For First time Users The display is turned off The machine is in Sleep mode Touch the d...

Страница 210: ...led paper often causes misfeeds soiled paper edges or slipped positions while stack printing is performed Flatten the paper with your hands to straighten out the curl Load the paper up side down so th...

Страница 211: ...s Misfeeds occur frequently The paper size that is set by the paper size dial on the paper tray differs from the paper size that is loaded in the paper tray Use the recommended paper For details about...

Страница 212: ...ils about setting Apply Duplex see Tray Paper Settings Settings Cannot print in duplex mode You have selected a paper type that cannot be used for duplex printing In Tray Paper Settings select a paper...

Страница 213: ...er Security To view the status of a print job see Print Job History In Web Image Monitor click Job on the Status Information menu And then click Print Job History in Document Server For details about...

Страница 214: ...capacity problems Use the recommended paper For details about recommended paper see Recommended Paper Specifications When Multiple Functions Cannot Be Executed Simultaneously If you cannot carry out y...

Страница 215: ...Press Exit to display the preview screen without a thumbnail If the selected document contains several pages press Switch on the Display Page area to change the page and then a preview of the next pag...

Страница 216: ...Press Continue to scan and copy remaining originals The machine checked if the remaining originals should be copied after the scanned originals were printed Remove all copies and then press Continue...

Страница 217: ...e to resume receiving the Internet Fax if the timeout period has not expired Wait until the mail server s timeout period has expired and then resume receiving the Internet Fax For details about receiv...

Страница 218: ...x Features For details about H 323 Settings see Initial Settings Fax For details about network problems contact your administrator Check whether there are any network problems 13 11 Cannot access gate...

Страница 219: ...P address has been registered Check that IPv4 in Effective Protocol is set to Active in System Settings For details about effective protocol see Interface Settings Connecting the Machine System Settin...

Страница 220: ...NS server Server name and IP address for the SMTP Server For details about these settings see Interface Settings or File Transfer Settings Check that the folder for transfer is correctly specified Che...

Страница 221: ...r ID and password for the computer with the folder for forwarding are correctly specified Check that the folder for forwarding is correctly specified Confirm that the computer with the folder for forw...

Страница 222: ...s 15 02 Cannot log in to the POP3 IMAP4 server Check that the correct User Name and Password are listed in Fax Email Account of System Settings For details about Fax Email Account see File Transfer Se...

Страница 223: ...File Transfer Settings Check that the LAN cable is correctly connected to the machine For details about network problems contact your administrator Check whether there are any network problems 15 12...

Страница 224: ...remote machine s auth settings User authentication on the main machine has failed For details about user authentication see Configuring User Authentication Security Authentication with remote machine...

Страница 225: ...n the main machine s power Connection with the remote machine has failed Check the remote machine status A timeout error occurred while an attempt was made to connect the device via remote fax functio...

Страница 226: ...hine For details about displaying Web Image Monitor see Using a Web Browser Settings For details about using Web Image Monitor see Web Image Monitor Help If the paper tray runs out of paper There is n...

Страница 227: ...If the message appears again contact your service representative Hardware Problem Wireless Card A wireless LAN board is referred to as a wireless card The wireless LAN board has malfunctioned The wir...

Страница 228: ...ncel a print job For details about how to select the tray manually or cancel a print job see If an Error Occurs with the Specified Paper Size and Type Print Paper type of n is mismatched Select anothe...

Страница 229: ...n the size of the selected file exceeds 1 GB print from a memory storage device using a function other than the Direct printing function You cannot select files of different formats at the same time U...

Страница 230: ...iguration Errors Occur Print Error occurred while processing an Unauthorized Copy Prevention job Job cancelled You tried to store a file in the Document Server when the Unauthorized Copy Prevention wa...

Страница 231: ...p transmission from the printer driver Check if the computer is working correctly The selected paper size is not supported This job has been cancelled Job reset is automatically performed if the speci...

Страница 232: ...change the resolution setting see the printer driver Help When documents cannot be stored in the Document Server Message Cause Solution Cannot store data of this size The paper size exceeded the capac...

Страница 233: ...maximum page capacity was exceeded Delete unneeded files stored on the machine Reduce the number of pages to print Job cancelled because capture file could not be stored Exceeded max memory The hard...

Страница 234: ...tion to store Normal Print jobs as Hold Print files Delete unneeded files stored on the machine Alternatively reduce the data size of the Temporary Print file and or the Stored Print file When there i...

Страница 235: ...or details about how to set permissions see Configuring User Authentication Security When a user cannot be registered Message Cause Solution Auto registration of user information has failed Automatic...

Страница 236: ...llowing procedure Check if the communication between the computer and the machine is working correctly Check if the correct printer driver is being used Check if the machine s memory size is set corre...

Страница 237: ...es not print out because the capacity of the file system is full Delete all unnecessary files from the hard disk or decrease the file size sent to the machine I O Buffer Overflow An input buffer overf...

Страница 238: ...e representative The contents of errors may be printed on the Configuration Page Check the Configuration Page in conjunction with the error log For details about how to print the Configuration Page se...

Страница 239: ...d the program to the exclusion list in the application settings For details about how to add programs to the exclusion list see the antivirus software Help To prevent a firewall from blocking the conn...

Страница 240: ...ents which cannot be converted to a specified file format those documents are automatically converted to a convertible format before they are transmitted For details about the file formats used to tra...

Страница 241: ...e currently logged in user does not have permission to view the destination that was registered in the program For details about how to set permissions see Limiting Available Functions Security The pr...

Страница 242: ...maximum data capacity Specify the scan size and resolution again Note that it may not be possible to scan very large originals at a high resolution For details about the settings for the scanner funct...

Страница 243: ...n If displaying the entire image is not necessary press Start to start scanning with the current scaling factor Not all of the image will be scanned Check the ratio and then press the Start key again...

Страница 244: ...the machine for storing in the Document Server only some of the pages could be scanned Specify whether or not to use the data Memory is full Scanning has been cancelled Press Send to send the scanned...

Страница 245: ...nistrator Transmission has failed Insufficient memory in the destination hard disk To check the current status press Scanned Files Status Transmission has failed There was not enough free space on the...

Страница 246: ...lution Exceeded max number of pages per file Do you want to store the scanned pages as 1 file The file being stored has exceeded the maximum number of pages for one file Specify whether to store the d...

Страница 247: ...rties click the Events tab and then select Start this program as the computer s response when it receives scan data For details see your operating system s Help Cannot start scanning Check the setting...

Страница 248: ...protected Unlock the write protection on the memory storage device Cannot write on the memory storage device Check the memory storage device and machine settings The memory storage device is faulty or...

Страница 249: ...ss Cancel to delete The scan could not be completed because there was insufficient hard disk memory when the scanned data was saved to the memory storage device Specify whether or not to save the scan...

Страница 250: ...en denied The logged in user name does not have permissions for scanner function For details about how to set permissions see Limiting Available Functions Security Cannot add any more scanning mode Th...

Страница 251: ...ndows Check whether the client computer can use the TCP IP protocol Error has occurred in the scanner The application specified scan conditions have exceeded the setting range of the machine Check whe...

Страница 252: ...ed occurs you might not scan an original Remove the misfeed and then scan the original again Invalid Winsock version Please use version 1 1 or higher You are using an invalid version of Winsock Instal...

Страница 253: ...ns The ADF cover is open Check whether the ADF cover is closed The name is already in use Check the registered names You tried to register a name that is already in use Use another name When there is...

Страница 254: ...the previous scan Communication error has occurred on the network A communication error has occurred on the network Check whether the client computer can use the TCP IP protocol Scanner is not availab...

Страница 255: ...ot be obtained Check whether the machine s host name is specified in the Network Connection Tool For the WIA driver check the Network Connection tab in the properties Use Web Image Monitor to set LLMN...

Страница 256: ...of the exposure glass cover or the Auto Document Feeder ADF triggers the automatic original size detection process Lift the exposure glass cover or the ADF 30 degrees or more Captured file exceeded m...

Страница 257: ...ils about the procedure for excluding an IP address see your operating system s Help Updating the destination list Please wait Specified destination s or sender s name has been cleared The destination...

Страница 258: ...installed For details about the user certificate destination certificate see Configuring S MIME Security The group destination cannot be selected because it contains a destination with a encryption c...

Страница 259: ...iguring PDFs with Electronic Signatures Security XXX cannot be YYY because there is a problem with the Digital Signature s device certificate Check the device certificate XXX and YYY indicate the user...

Страница 260: ...iled Check the server status A network error has occurred and connection has failed Try the operation again If the message is still displayed the network may be busy Check the settings for LDAP server...

Страница 261: ...although the unit is detected Turn off the power and then check the wireless LAN board is inserted correctly After this turn on the power again If the message appears again contact your service repre...

Страница 262: ...s frequently dust may have accumulated in the ventilation holes of the printer Check the vents and clean the dust off For details see Cleaning the Ventilation Holes Maintenance For people using IM 350...

Страница 263: ...there is a problem with the device certificate or user certificate a new certificate must be installed For details about how to install a new certificate see Configuring S MIME or Protecting Communic...

Страница 264: ...ou remove jammed paper do not touch the sensors connectors or other fragile parts that are shown in this manual Doing so may cause malfunctions For the location of the sensors in the machine and exten...

Страница 265: ...DVL503 2 DVL504 3 DVL506 4 Cautions in Removing Jammed Paper 263...

Страница 266: ...DVL507 5 DVL508 6 DVL509 7 9 Troubleshooting 264...

Страница 267: ...DVL510 8 DVL511 9 DVL512 10 Cautions in Removing Jammed Paper 265...

Страница 268: ...DVL513 Tray 2 Tray 3 Tray 4 1 2 DVL520 1 DVL521 2 9 Troubleshooting 266...

Страница 269: ...DVL522 Cautions in Removing Jammed Paper 267...

Страница 270: ...solve the problem If the actions recommended in this manual cannot resolve the problem contact your service representative If the error message remains displayed even after you remove misfed paper ful...

Страница 271: ...e the jammed paper by following the procedures that are displayed on the screen When Next or Previous is displayed on the screen After each step is complete press Next To go back to the previous step...

Страница 272: ...9 Troubleshooting 270...

Страница 273: ...Program The ENERGY STAR Program Requirements for Imaging Equipment encourage energy conservation by promoting energy efficient computers and other office equipment The program backs the development a...

Страница 274: ...ication Reduced electrical consumption in Sleep mode 1 0 79 W Time of switch into Sleep mode 1 minute Time of switch out from Sleep mode 1 IM 350F IM 350 9 0 seconds IM 430F 9 5 seconds Duplex Functio...

Страница 275: ...hine 2 Achieves ENERGY STAR energy savings product fully qualifies when packaged with or used with a duplex tray and the duplex function is enabled as an option Specifications can vary depending on wh...

Страница 276: ...th which could otherwise result from inappropriate handling Recycling of products helps to conserve natural resources and protect the environment For more detailed information on collection and recycl...

Страница 277: ...For Turkey Only User Information on Electrical and Electronic Equipment mainly Europe 275...

Страница 278: ...es and accumulators This symbol means that in the European Union used batteries and accumulators should be disposed of separately from your household waste In the EU there are separate collection syst...

Страница 279: ...nd ink cartridge for recycling will be accepted free of charge from users in accordance with local regulations For details about the return program please refer to the Web page below or consult your s...

Страница 280: ...users in the state of California Notes to Users in USA mainly North America Perchlorate Material special handling may apply See www dtsc ca gov hazardouswaste perchlorate 10 Information for This Mach...

Страница 281: ...nt magnetic brush development system Fusing Heating roll pressure system Resolution Scanning Exposure glass 600 600 dpi ADF 600 300 dpi front 300 600 dpi back 600 600 dpi Printing 1200 1200dpi Exposur...

Страница 282: ...71 4 101 2 51 2 81 2 16K 81 2 132 5 Duplex custom size Vertical 148 356 mm 5 83 14 01 inches Horizontal 100 216 mm 3 94 8 50 inches If the paper has a horizontal width of more than 297 0 mm feed the...

Страница 283: ...4 5 seconds 4 5 seconds The first print time may differ depending on the operating environment of the machine Copy print speed IM 350F IM 350 A4 35 sheets minute 81 2 11 37 sheets minute IM 430Fb IM...

Страница 284: ...430F Ready 91 5 W 91 5 W During printing 562 W 625 W Maximum 1280 W 1290 W The power level when the main switch is turned off and the power cord is plugged into an outlet 1 W or less Complete system...

Страница 285: ...Data Security unit HDD fax unit memory unit Dimensions W D H up to ADF 476 442 510 mm 18 7 17 4 20 0 inches Space for main unit W D 511 617 mm 20 1 24 3 inches including the bypass tray and output tr...

Страница 286: ...with ISO 7779 Sound pressure level is measured from the position of the bystander The complete system consists of the main unit and three paper tray units Weight Approx 30 kg 67 lb We have obtained ea...

Страница 287: ...8 bits JPEG Approx 9 000 pages Under the printer and scanner modes the number of the pages that can be stored depends on the print image and original Maximum number of stored documents 3 000 document...

Страница 288: ...scanning size 216 600 mm 8 5 23 6 inches Print process LED alley and electro photographic printing Transmission speed 33 600 31 200 28 800 26 400 24 000 21 600 19 200 16 800 14 400 12 000 9 600 7 200...

Страница 289: ...VoIP gateway IP Fax reception function Receive faxes sent from an IP Fax compatible fax through a network Also capable of receiving faxes from a G3 fax connected to a telephone line via a VoIP gatewa...

Страница 290: ...c detection and printing of appended TIFF F MH files and ASCII text Memory reception only 1 Full mode E mail Transmission and Reception and Folder Transmission Network Standard Ethernet interface 1000...

Страница 291: ...rmat for Documents for Fax Transmission Fax Reception Mail to Print JPEG JFIF PDF Authentication methods SMTP AUTH POP before SMTP A POP Encryption method S MIME E mail sending functions Automatically...

Страница 292: ...ace 1000BASE T 100BASE TX 10BASE T The maximum length for the cable is 100 meters USB 2 0 Type A port on the control panel SD card slot on the control panel Option IEEE 1284 parallel interface IEEE 80...

Страница 293: ...12 R2 2016 OS X 10 11 or later Transmission spec USB 2 0 Standard Connectable device Devices corresponding to USB 2 0 Standard When you are using silent mode the print speed may be slower Also silent...

Страница 294: ...1 Resolution 200 dpi 300 dpi Black and white 30 pages minute Original Type B W Text Line Art Compression Black White MH ITU T No1 Chart Full Color 20 pages minute 300 dpi 30 pages minute 200 dpi Origi...

Страница 295: ...e file format you can attach a digital signature You can also specify the security settings for PDF or High Compression PDF For details see Specifying Digital Signature for PDF files Security Settings...

Страница 296: ...compatible mode on a 64 bit operating system so TWAIN scanner is not compatible with 64 bit applications Use it with 32 bit applications Selectable scanning resolutions when using WIA scanner 100 1 2...

Страница 297: ...101 2 51 2 81 2 81 2 132 5 16K custom size Paper weight 52 220 g m2 14 lb Bond 80 lb Index Paper capacity 80 g m2 20 lb Bond 250 sheets 1 tray Power consumption 17 W or less Power is supplied from th...

Страница 298: ...10 71 4 101 2 51 2 81 2 81 2 132 5 16K custom size Paper weight 52 220 g m2 14 lb Bond 80 lb Index Paper capacity 80 g m2 20 lb Bond 500 sheets 1 tray Power consumption 17 W or less Power is supplied...

Страница 299: ...4 Interface Board Do not use an IEEE 1284 cable that is longer than 3 meters Transmission spec IEEE 1284 Required cable Standard IEEE 1284 compliant Micro Centronics 36 pin cable Specifications for IE...

Страница 300: ...100 104 108 112 116 120 124 128 132 136 and 140 channels Ad hoc mode Channel Frequency range Center Frequency 2412 2462 MHz 1 11 channels 5180 5240 MHz 36 40 44 and 48 channels Transmission mode Ad h...

Страница 301: ...than 1 11 and 36 52 cannot be used because of the specifications and the configuration of the access point The channel in use might differ depending on the country Specifications for Wireless LAN Inte...

Страница 302: ...de LT LG Mixed Sizes mode Original Orientation mode and Custom Size originals mode Original size A4 B6 JIS 81 2 14 51 2 81 2 Original weight 52 128 g m2 14 34 lb Bond Number of originals to be set 50...

Страница 303: ...erver interface Operating Systems Windows 7 8 1 10 Windows Server 2008 2008 R2 2012 2012 R2 2016 OS X 10 11 or later Protocols The USB device server supports Port 9100 IPP and LPR only IPP does not su...

Страница 304: ...10 Information for This Machine 302...

Страница 305: ...r 147 Custom size paper 106 D Data In indicator 65 Destination 254 Direct Connection Group Owner Mode 27 Direct Connection Mode 26 Display panel 65 Document Server 109 139 140 167 170 213 285 Drum uni...

Страница 306: ...on 10 N Names of major features 9 Network setting 215 Note for the battery and or accumulator symbol 276 Notes to users in the state of California 278 Number of Sets 108 O Offline Stapler 43 OHP trans...

Страница 307: ...top fence 13 Stop fence for the ADF 13 Stored documents 120 170 Storing a document 119 Storing data 109 167 Storing documents 139 Storing scan files 160 Symbols 7 T Telephone Line 32 33 Thick paper 19...

Страница 308: ...MEMO 306...

Страница 309: ...MEMO 307...

Страница 310: ...MEMO 308 EN GB EN US EN AU D0A4 7641A...

Страница 311: ...2019...

Страница 312: ...D0A4 7641A AU EN US EN GB EN...

Отзывы: