Ricoh Gestetner DSm7110 Скачать руководство пользователя страница 147

Copier Functions

127

2

C

Press 

[

Edit Image

]

.

D

Press 

[

Image Repeat

]

.

E

Press 

[

OK

]

.

F

Place the originals, and then press the 

{

Start

}

 key.

Reference

“Edit”, General Settings Guide
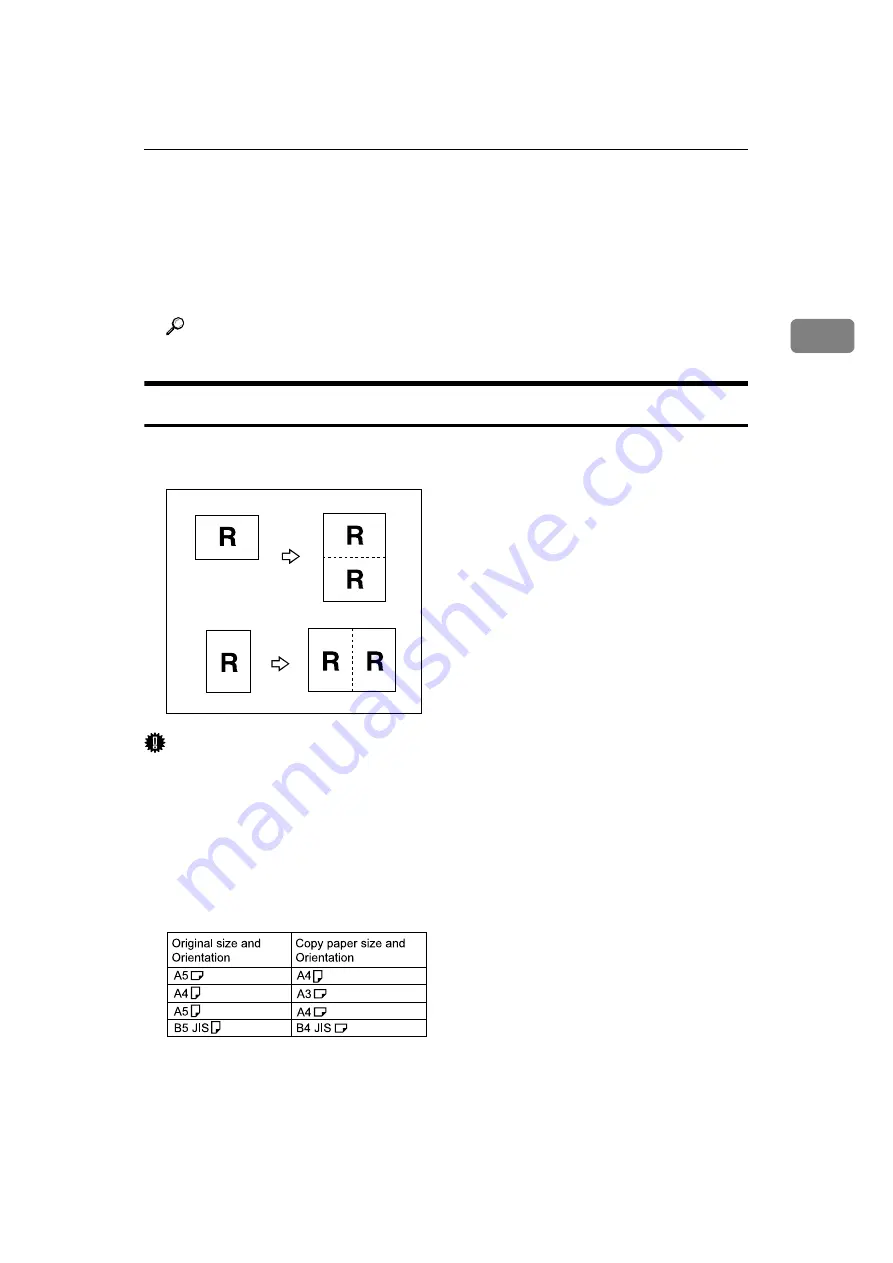
Double Copies

One original image is copied twice onto one sheet, as shown.

Important

Originals with a size of A5

L

, B6 JIS

KL

, 5

1

/

2

×

 8

1

/

2

"

L

 cannot be detected

properly on the exposure glass. Be sure to select the copy paper manually or
place the originals in the ADF.

The following table shows original and copy paper sizes (when copying at a
ratio of 100%).

Metric version

AMG015S

Содержание Gestetner DSm7110

Страница 1: ...nual carefully before you use this machine and keep it handy for future reference For safe and correct use be sure to read the Safety Information in About This Machine before using the machine Placing...

Страница 2: ...ustments or performance of procedures other than those specified in this manual might result in hazardous radiation exposure Notes The model names of the machines do not appear in the following pages...

Страница 3: ...is for administrators of the machine It explains security func tions that the administrators can use to protect data from being tampered or prevent the machine from unauthorized use Also refer to thi...

Страница 4: ...Lite Setup Guide DeskTopBinder Introduction Guide Auto Document Link Guide Note Manuals provided are specific to machine types Adobe Acrobat Reader Adobe Reader must be installed in order to view the...

Страница 5: ...machine type and options Reference p 3 Functions Requiring Optional Configurations Types of Duplex Copies 1 sided 2 Pages 2 sided 1 Page See p 75 Duplex 2 sided 1 Page 2 sided 1 Page See p 75 Duplex...

Страница 6: ...s 2 sided 1 Page See p 82 Two Sided Combine A Front B Back 1 sided 16 Pages 2 sided 1 Page See p 82 Two Sided Combine A Front B Back 2 sided 2 Pages 2 sided 1 Page See p 82 Two Sided Combine ANP020S G...

Страница 7: ...Pages 2 sided 1 Page See p 82 Two Sided Combine A Front B Back 2 sided 8 Pages 2 sided 1 Page See p 82 Two Sided Combine A Front B Back Bound Originals 2 sided Pages See p 87 Booklet Magazine GCSHVY2...

Страница 8: ...ont Back Bound Originals 2 sided Pages See p 87 Booklet Magazine Mix 1 2 Sided See p 93 Mix 1 2 Sided Copying Book Originals 1 sided 4 Pages Booklet See p 87 Booklet Magazine Open to left GCKONZ0J GCB...

Страница 9: ...vii Open to right 2 sided 2 Pages Booklet See p 87 Booklet Magazine Open to left Open to right 1 sided Magazine See p 87 Booklet Magazine Open to left GCBOOK1E GCAH010E GCAH020E GCBOOK3E...

Страница 10: ...viii Open to right 2 sided Magazine See p 87 Booklet Magazine Open to left Open to right GCBOOK4E GCAH030E GCAH040E...

Страница 11: ...ix Combining Multiple Pages onto a Single Page See p 79 One Sided Combine 1 sided 2 Pages 1 sided 1 Page 1 sided 4 Pages 1 sided 1 Page 1 sided 8 Pages 1 sided 1 Page GCSHVY7E GCSHVY8J GCSHVY3J...

Страница 12: ...x 2 sided 1 Page 1 sided 1 Page 2 sided 2 Pages 1 sided 1 Page 2 sided 4 Pages 1 sided 1 Page GCSHVYOJ GCSHVYBJ GCSHVY4J...

Страница 13: ...Originals Such as Books Bound Originals 1 sided Pages See p 85 Series Copies Bound Originals 2 sided Pages See p 87 Booklet Magazine Front Back Bound Originals 2 sided Pages See p 87 Booklet Magazine...

Страница 14: ...xii Copying 2 Sided Pages onto 1 Sided Pages See p 85 Series Copies 2 sided 1 Page 1 sided 2 Pages CP2B0200...

Страница 15: ...riginals 13 Sizes and Weights of Recommended Originals 13 Originals not recommended for the Auto Document Feeder ADF 14 Sizes Detectable by the Auto Paper Select 15 Sizes difficult to detect 16 Missin...

Страница 16: ...ity 48 Manual image density 49 Combined auto and manual image density 49 Selecting the Original Type Setting 50 Selecting Copy Paper 51 Auto Paper Select 52 Manual Paper Select 52 Preset Reduce Enlarg...

Страница 17: ...he format of date 117 To change the date stamp position 118 Page Numbering 118 Changing the stamp position 121 Specifying the first printing page and start number P1 P2 1 2 P 1 P 2 1 2 Page 1 Page 2 1...

Страница 18: ...nals Connect Copy Job Preset 166 4 Document Server Relationship between Document Server and Other Functions 167 Document Server Display 168 Simplified Display 169 Preview Display 170 Using the Documen...

Страница 19: ...Deleting Pages 188 Copying Documents 189 Print Backup 190 Deleting a Document 190 Displaying a Document in Document Server with Web Image Monitor 191 Downloading Stored Documents 192 5 Appendix Funct...

Страница 20: ...xviii...

Страница 21: ...stock certificates bank drafts checks pass ports driver s licenses The preceding list is meant as a guide only and is not inclusive We assume no responsibility for its completeness or accuracy If you...

Страница 22: ...otes could result in moderate or minor injury or damage to the machine or to property Be sure to read these notes They can be found in the Safety Information section of About This Machine Indicates po...

Страница 23: ...sher BK5000 Stack Finisher SR5000 and Booklet Finisher BK5000 Staple Finisher SR5000 and Booklet Finisher BK5000 Staple Centre Finisher SR5000 and Booklet Finisher BK5000 Punch Finisher SR5000 with pu...

Страница 24: ...inal function 2 Operational status and messages 3 You can register up to two fre quently used reduce enlarge ratios other than the fixed reduce enlarge ratios See Reproduction Ratio General Settings G...

Страница 25: ...o the simplified display Letters and keys are displayed at a larger size making operations easier Example of a simplified display 1 Key Colour Press to change the key colour and in crease the brightne...

Страница 26: ...l the display is switched to the reserved first job display after reservation is set If you select Switch use the number keys to enter the time 10 99 seconds The default setting is 15 seconds Max Copy...

Страница 27: ...types shown on the initial display Special Original Display You can set whether to show the original types on the initial display Special Original Display Defaults You can set up to three items for di...

Страница 28: ...specify top and bottom margins on the back side of copies in Margin Adjustment mode 1 Sided 2 Sided Auto Margin TtoT In 1 sided to 2 sided Duplex mode you can specify the margins on the back side The...

Страница 29: ...n priority when Preset Stamp is pressed Stamp Format You can specify how each of stamp is printed User Stamp Program Delete Stamp You can register change or delete these designs as user stamps You can...

Страница 30: ...g an original placed on the exposure glass Memory Full Auto Scan Restart When memory becomes full while scanning originals the machine can make copies of scanned originals first and then automatically...

Страница 31: ...11 Administrator Tools Item Description Menu Protect Using Menu Protect you can limit the settings available to users other than the administrator...

Страница 32: ...12...

Страница 33: ...number of originals that can be placed in the ADF is about 100 paper weight is 80 g m2 20 lb The weight range for originals when using Mixed Size mode is 52 81 g m2 13 8 21 5 lb Original location Ori...

Страница 34: ...als Curled folded or creased originals Pasted originals Originals with any kind of coating such as thermal fax paper art paper alu minum foil carbon paper or conductive paper Originals with perforated...

Страница 35: ...mm 16K 267 mm 195 mm Inch version 1 You can select from 81 2 13 81 4 13 and 8 13 with the User Tools Sys tem Settings See System Settings General Settings Guide Size A3 L B4 JIS L A4 K L B5 JIS K L A5...

Страница 36: ...Reference p 27 Custom sizes System Settings General Settings Guide Sizes difficult to detect It is difficult for the machine to automatically detect the sizes of the following types of originals so s...

Страница 37: ...if you place originals in the ADF or on the exposure glass correctly 3 mm 0 1 margins on all four sides might not be copied A 2 1 5mm 0 08 0 06 B 2 n 2 mm 2 o 1 7mm 0 08 n 0 08 0 08 o 0 07 C 2 1 5 mm...

Страница 38: ...correction fluid and ink has completely dried Not taking this precaution could cause marks on the exposure glass that will be copied onto paper Note For original sizes you can set see Originals Refere...

Страница 39: ...useful for copying large originals using the Staple Duplex Combine or Stamp functions For example to copy A3K or 11 17 K originals with the Staple function selected A Select the original orientation...

Страница 40: ...For example if the left side of the orig inal is damaged and is difficult to set position it as shown below A Press Reverse Orientation Note It is recommended you use this function together with the A...

Страница 41: ...by more than 30 degrees Otherwise the size of the original might not be detected correctly B Place the original face down on the exposure glass The original should be aligned to the rear left corner S...

Страница 42: ...t the guide to the original size B Set the aligned originals face up into the ADF Do not stack originals beyond the limit mark The last page should be on the bottom Be sure not to block the sensor or...

Страница 43: ...he first part of the original has been fed place the next part then press the Start key Note If Batch is not displayed on the screen set Batch with Special Original Dis play Defaults See Copier Docume...

Страница 44: ...C When the machine instructs you to place another original place the next page The second and subsequent pages will be fed automatically without pressing the Start key Note If SADF is not displayed on...

Страница 45: ...ace originals that weigh 52 81 g m2 45 70 kg The sizes of the originals that can be placed in this mode are follows Metric version A3L and A4K B4 JISL and B5 JISK A4L and A5K Inch version 11 17 L and...

Страница 46: ...s Guide Reference Copier Document Server Features General Settings Guide Thin Mode A Press Thin Paper B Place the original and then press the Start key Note If Thin Paper is not displayed on the scree...

Страница 47: ...ize B Press Regular Size C Select the size of original and then press OK D Place the original and then press the Start key Custom sizes When placing custom size originals in the ADF specify the size o...

Страница 48: ...e Start key Note If Original Size is not displayed on the screen set Original Size with Special Original Display Defaults See Copier Document Server Features General Settings Guide If you make a mista...

Страница 49: ...enter your login user name and user password so that the machine accepts copy jobs Ask the user ad ministrator for the login user name and login password For details see When the Authentication Scree...

Страница 50: ...chine to the default condition press the Clear Modes key To clear entered values press the Clear key or Cancel on the screen To confirm settings press Check Modes Reference When the Authentication Scr...

Страница 51: ...e previous copy job settings are restored Simply press the Start key to continue copying from where it left off Left Original Beeper The beeper sounds and an error message is displayed when you leave...

Страница 52: ...n the Large Capacity Tray trays 4 5 Wide Large Capacity Tray trays 4 6 and multi bypass tray tray 7 Set the tab stock in the tray placing the tab side outwards When setting tab stock always use the ta...

Страница 53: ...al Settings Guide Surplus tab stock auto eject When copying onto tab stock but not using all the tab stock for each copy re maining sheets of tab stock are automatically ejected Before using this func...

Страница 54: ...To prevent multiple sheets from being fed at once fan paper before placing it on the tray When copying onto OHP transparencies remove copied sheets one by one A Select the paper tray where OHP transpa...

Страница 55: ...pying appears B Be sure message Ready appears and then set up the next copy job C Place the originals and then press the Start key All originals are scanned After the current copy job the next copy jo...

Страница 56: ...o check B Press Change Job C Check contents D Press OK The copy screen returns To change job contents after checking You can change the contents of preset jobs A Select the job number you want to chan...

Страница 57: ...C Check job contents D Press Delete Job A confirmation message appears E Press Yes You return to the copy screen Deleting a Job A Select the number of you want to delete To interrupt copying press St...

Страница 58: ...when Interrupt Copy is active Job List screen This section explains displays and icons that appear in the Job List screen The Job List screen varies depending on whether Job Order is selected with Pr...

Страница 59: ...sing copy function Job printed using printer function Job printed using Document Server function Job printed using DeskTopBinder Job printed using Web Image Monitor Reference System Settings General S...

Страница 60: ...rder of jobs You can change the order in which print jobs in the job list are served A Press Job List B Select the job whose order you want to change C Press Change Order D Change the order using Top...

Страница 61: ...ing A Press Job List B Select the job s to hold C Press Suspend Printing Deleting jobs You can delete job that is queued or currently printing A Press Job List B Select the job you want to delete C Pr...

Страница 62: ...cking Job History You can view the history contents of printed jobs A Press Job List B Press Job History A list of completed print jobs appears C Press Details to check the contents of the displayed j...

Страница 63: ...B4 JISL A4KL B5 JISK A5KL A6L 11 17 L 81 2 11 K 8 13 L 51 2 81 2 L 12 18 L If you want to use the size of paper oth er than the above be sure to specify the size The maximum number of sheets you can l...

Страница 64: ...he multi bypass tray Tray 7 on the control panel G Press the q key H Select paper size and type I Place originals and then press the Start key J When the copy job is finished press the Clear Modes key...

Страница 65: ...ze Paper Makes copies onto regular size paper from the multi bypass tray A Fit the side fence to the paper size and then place paper in the multi bypass tray Tray 7 B Fit the end fence to the paper an...

Страница 66: ...Tray 7 C Select the multi bypass tray Tray 7 on the control panel D Press the q key E Press Program Custom Size F Enter the horizontal size of the original with the number keys and then press q G Ent...

Страница 67: ...ss the elevator switch on the multi bypass tray Tray 7 C Select the multi bypass tray Tray 7 on the control panel D Press the q key E Select the paper type OHP Transparency Translucent Paper Thick Pap...

Страница 68: ...ill be copied so that background will not be reproduced Manual image density You can adjust the general density of the original in nine increments Combined auto and manual image density Adjusts the de...

Страница 69: ...is selected press Auto Density to cancel it B Press W or V to adjust the image density The density indicator moves Combined auto and manual image density Adjusts the density of an image only for dark...

Страница 70: ...lines are copied with greater clarity Generation Copy When originals are copies generation copies the copy image can be repro duced sharply and clearly Dark Background When you copy originals with dar...

Страница 71: ...ections that can be used with Auto Paper Select when copying at a ratio of 100 Metric version Inch version Note Only the paper trays set to Do not Display or Recycled Paper for Paper Type and also set...

Страница 72: ...Reference Items of Tray Paper Settings General Settings Guide Manual Paper Select Choose the tray containing the paper you wish to copy onto a paper tray multi bypass tray Tray 7 Large Capacity Tray L...

Страница 73: ...or Auto Tray Switching is With Image Rotation You cannot use the Rotated Copy function if this setting is changed to Without Image Rotation or Off See Auto Tray Switching General Settings Guide When u...

Страница 74: ...se point Shown below are the resulting copy images that differ depending on how the original is scanned A Base point when placed on the exposure glass B Base point when placed in the ADF A Press Reduc...

Страница 75: ...rge function you can also provide the Reduce Enlarge copy with a margin A Press Create Margin displayed on the initial display B If you do not wish to combine it with the Reduce Enlarge function place...

Страница 76: ...s of 10 Pressing and holding down the relevant key changes the ratio in increments of 10 D Press OK E Place the originals and then press the Start key Note If you have incorrectly entered the ratio in...

Страница 77: ...th this function When using Auto Reduce Enlarge see the following table for original sizes and orientations you can use Metric version Inch version Original location Original size and orientation Expo...

Страница 78: ...ress the Start key Reference p 14 Originals not recommended for the Auto Document Feeder ADF Size Magnification You can calculate an enlargement or reduction ratio based on the lengths of the original...

Страница 79: ...with the number keys and then press the q key E Press OK twice F Place the originals and then press the Start key Note To change the length after pressing the q key in D select Original or Copy and th...

Страница 80: ...the desired ratio with the number keys and then press the q key E Press Vertical F Enter the desired ratio with the number keys and then press the q key G Press OK twice H Place the originals and then...

Страница 81: ...art key Note If you have incorrectly entered the ratio in steps E or G readjust it with n or o Directional Size Magnification mm A suitable reproduction ratio is automatically selected when you enter...

Страница 82: ...opy with the number keys and then press the q key E Enter the vertical size of the original with the number keys and then press the q key You can enter sizes between 1 to 999 mm 0 1 to 99 9 in 1 mm 0...

Страница 83: ...he first page to be copied When placing an original in the ADF set so that the last page is on the bottom When placing an original on the exposure glass or in the ADF using Batch press the q key after...

Страница 84: ...key One copy set is delivered as a sample C If the sample is acceptable press Continue The number of copies made is the number specified minus one for the proof copy Note If you press Suspend after c...

Страница 85: ...lear key is pressed When memory is full If the amount of data of the scanned originals exceeds the capacity of memory scanning is interrupted A Press the Start key All scanned pages are copied and dat...

Страница 86: ...Start key Reference Input Output General Settings Guide Separation Use this function to have separation sheets inserted between sets Important Before selecting this function set the tray for separatio...

Страница 87: ...ed when delivered so you can separate each job by page A Press Sort Stack B Enter the number of copies with the number keys C Place the originals and then press the Start key Note When placing an orig...

Страница 88: ...Important If you try to select Staple Centre when there is no stapler cartridge installed in Booklet Finisher BK5000 a message telling you there are no staples or a sta ple jam has occurred appears Y...

Страница 89: ...en tation but set the original facing downwards When there is copy paper that is identical in size and orientation to your orig inal the original orientations and staple positions are as follows Finis...

Страница 90: ...e originals and then press the Start key Note When placing an original on the exposure glass start with the first page to be copied When placing an original in the ADF set so that the last page is on...

Страница 91: ...71 2 Punch You can make punch holes in copies 2 holes 4 holes Important The 4 hole punch type is only capable of punching in the 4 hole format You cannot use the multi bypass tray with this function G...

Страница 92: ...ationship between the orientation in which you place the original and the punch hole positions is as follows Orientation in which original is set Punch hole positions Exposure glass ADF Standard 2 hol...

Страница 93: ...of the punch hole positions B Place the originals and then press the Start key Note The punch function is not available for Type 3 3 Edges Full Bleed You can make full image copy by cutting down the...

Страница 94: ...Support Tray When using the Z fold function together with the Staple function attach the Z fold support tray to the upper tray or the shift tray of Finisher SR5000 Note Remove the Z fold support tray...

Страница 95: ...ositions The orientation of the paper does not indicate direction of delivery A Select the folding direction and then press OK B Place the originals and then press the Start key Duplex There are two t...

Страница 96: ...two sided page Original orientation and completed copies Copy images differ according to the orientation in which you place the origi nals K or L The table shows the orientation of images on the front...

Страница 97: ...exposure glass start with the first page to be copied When placing an original in the ADF set so that the last page is on the bottom You can also select 1 Sided 2 Sided or 2 Sided 2 Sided directly by...

Страница 98: ...to Top Top to Bottom A Press Orientation B Select orientation Top to Top or Top to Bottom and then press OK Note The default setting is Top to Top You can change the default orientation with Copier Do...

Страница 99: ...ypes of One Sided Combine 1 Sided 2 Pages Combine 1 Side Copies 2 one sided originals to one side of a sheet 1 Sided 4 Pages Combine 1 Side Copies 4 one sided originals to one side of a sheet 1 Sided...

Страница 100: ...sheet 2 Sided 2 Page Combine 1 Side Copies 2 two sided originals to one side of a sheet 2 Sided 4 Page Combine 1 Side Copies 4 two sided originals to one side of a sheet Orientation of the original a...

Страница 101: ...copying Originals read from left to right Originals read from top to bottom A Press Dup Combine Series B Press Combine C Select 1 Sided or 2 Sided fororiginal andthenpress Combine 1 Side forCopy D Se...

Страница 102: ...e mode Reference p 78 Originals and copy orientation Edit General Settings Guide Two Sided Combine Combine various pages of originals into one sheet with two sides There are six types of Two Sided Com...

Страница 103: ...ne sheet with eight pages per side A Front B Back 2 Sided 4 Pages Combine 2 Sides Copies 2 two sided originals to one sheet with two pages per side 2 Sided 8 Pages Combine 2 Sides Copies 4 two sided o...

Страница 104: ...eet with eight pages per side A Front B Back A Press Dup Combine Series B Press Combine C Select 1 Sided or 2 Sided for Original and then press Combine 2 Sides for Copy D Select the number of original...

Страница 105: ...Guide Series Copies This function copies the front and back of a two sided original separately or the two facing pages of a bound original onto two sheets There are two types of Series Copies Importan...

Страница 106: ...ided originals A Press Dup Combine Series B Press Series C Select 2 Sided 1 Sided or Book 1 Sided and then press OK If you selected 2 Sided 1 Sided you can change the orientation D Press OK E Place th...

Страница 107: ...pes of Booklet Magazine The following table shows the paper sizes of two sided original and two sided copy when copying at a ratio of 100 Metric version Inch version 1 Sided Booklet Make copies in pag...

Страница 108: ...ed originals to copies in page order for a folded booklet as shown Open to left Open to right 1 Sided Magazine Copies two or more originals to make copies in page order when they are folded and stacke...

Страница 109: ...r Functions 89 2 Open to right 2 Sided Magazine Copies two or more originals of two sided to make copies in page order when they are folded and stacked Open to left Open to right GCBOOK4E GCAH030E GCA...

Страница 110: ...ot use the multi bypass tray with Book 2 Sided or Front Back 2 Sided Front Back 2 Sided Copies each two page spread original as it is onto both sides of a sheet How to fold and unfold copies to make a...

Страница 111: ...to Left or Open to Right with Orientation Booklet Magazine in ad vance See Edit General Settings Guide A Press Dup Combine Series B Press Book C Select a book type separately for the original 1 Sided...

Страница 112: ...page select Magazine for copying A Press Dup Combine Series B Press Book C Select 1 Sided or 2 Sided for the original D Press Magazine E Press Creep Adjust F Specify the creep value using o or n G Pr...

Страница 113: ...D Select 1 Sided or 2 Sided for the copy E Place the originals and then press the Start key F If you have selected 1 Sided for the original and 2 Sided for the copy press Change Setting to you specify...

Страница 114: ...nning position upward downward to left and to right up to 30 mm 1 2 in 1 mm 0 1 steps A Top 0 30 mm 0 1 2 B Right 0 30 mm 0 1 2 C Bottom 0 30 mm 0 1 2 D Left 0 30 mm 0 1 2 A Press Edit B Press Scan Po...

Страница 115: ...e left or right position Then press OK E Place the originals and then press the Start key Note If you have incorrectly set the position readjust with or If you don t need to set the scanned position o...

Страница 116: ...right margins and and when setting the top and bot tom margins and then press OK Margin on the back side of the page is valid when 1 Sided 2 Sided or Com bine 2 Sides is selected E Place the originals...

Страница 117: ...ng modes Border Erases the original s edge margin from the copy Centre Erases the original s centre margin from the copy Centre Border Erases both the original s centre and edge margins from the copy...

Страница 118: ...on and the erased part is as follows A Erased part B 2 99 mm 0 1 3 9 The erase width is set to 10 mm 0 4 inch as a default You can change this setting using the Edit menu in Copier Document Server Fea...

Страница 119: ...in increments of 1 mm 0 1 inch Pressing and holding down the relevant key changes the width in increments of 10 mm 0 4 inch If you select to erase the image on the back of the original press 2 Sided...

Страница 120: ...an erase width with n and o Pressing n or o changes the width in increments of 1 mm 0 1 inch Pressing and holding down the relevant key changes the width in increments of 10 mm 0 4 inch If you select...

Страница 121: ...lding down the relevant key changes the width in increments of 10 mm 0 4 inch If you select to erase the image on the back of the original press 2 Sided Set ting and Back Erasing the image on the back...

Страница 122: ...hange and set an erase width with n and o Pressing n or o changes the width in increments of 1 mm 0 1 inch Pressing and holding down the relevant key changes the width in increments of 10 mm 0 4 inch...

Страница 123: ...ss q F Enter the value of Y1 with the number keys and then press q G Enter the value of X2 with the number keys and then press q H Enter the value of Y2 with the number keys and then press q If you se...

Страница 124: ...number keys and then press q F Enter the value of Y1 with the number keys and then press q G Enter the value of X2 with the number keys and then press q H Enter the value of Y2 with the number keys a...

Страница 125: ...n a depart ment basis helping you to keep track of confidential documents A Press Stamp B Press Backgrnd No C Enter the number to start counting from with the number keys and then press the q key D Pl...

Страница 126: ...stamped on copies Important You cannot use the multi bypass tray with this function Only one message can be stamped at a time The following eight messages are available for stamping COPY URGENT PRIOR...

Страница 127: ...and original orientation The stamp positions differ according to the orientation in which you place your originals A Press Stamp B Press Preset Stamp C Select the desired message You can change the p...

Страница 128: ...settings press OK F Place the originals and then press the Start key Reference Stamp General Settings Guide Changing the stamp position size and density Changes the stamp position size and density A P...

Страница 129: ...ser Stamp Prints a registered stamp onto copies Letters or images you use frequently can be registered Important You have to program a user stamp before using this function Only one message can be sta...

Страница 130: ...tion and original orientation The user stamp positions differ according to the orientation in which you place your originals A Press Stamp B Press User Stamp C Select the desired stamp type You can ch...

Страница 131: ...E After you specify all desired settings press OK F Place the originals and then press the Start key Reference Stamp General Settings Guide Changing the user stamp position Changes the stamp position...

Страница 132: ...ide However if the value exceeds the maximum value of thearea 5 000mm2 7 75inch2 itiscorrectedwithintherangeoftheareaautomatically Important Up to four frequently used images can be stored in memory A...

Страница 133: ...n the exposure glass and then press Start Scanning The original will be scanned and the stamp will be registered L Press Exit M Press Exit The display returns to the User Tools menu screen N Press Exi...

Страница 134: ...opy mode B Press User Tools key C Press Copier Document Server Features D Press Stamp E Press User Stamp F Press Program Delete Stamp G Press Delete and then press the stamp number you want to delete...

Страница 135: ...Copier Functions 115 2 Date Stamp You can use this function to print dates onto copies The following five date print styles are available MM DD YYYY MM DD YYYY DD MM YYYY DD MM YYYY YYYY MM DD ANP055S...

Страница 136: ...itions differ according to the orientation in which you place your originals Important You cannot use the multi bypass tray with this function A Press Stamp B Press Date Stamp C Select the stamp forma...

Страница 137: ...er you specify all desired settings press OK F Place the originals and then press the Start key Reference Stamp General Settings Guide To change the format of date Changes the style of date to be stam...

Страница 138: ...ge the date stamp position Changes the stamp position A Press Change under Stamp Position B Select the desired position and then press OK Page Numbering You can use this function to print page numbers...

Страница 139: ...numbering P1 P2 1 5 2 5 1 2 P 1 P 2 1 2 1 1 1 2 Original orientation and stamp position The page stamp positions differ according to the orientation in which you place your originals Important You ca...

Страница 140: ...age Nmbr C Select the format You can specify the stamp position pages to be stamped and numbering D After you specify all desired settings press OK E Place the originals and then press the Start key R...

Страница 141: ...then press OK Specifying the first printing page and start number P1 P2 1 2 P 1 P 2 1 2 Page 1 Page 2 Below explains the example when P1 P2 is selected The steps are the same for other cases A Press C...

Страница 142: ...hich to stop number ing with the number keys and then press the q key If you want to number all pages to the end press to the End E When page designation is complete press OK Specifying the first prin...

Страница 143: ...keys and then press the q key F When page designation is complete press OK Note To change the number entered in step B press the Clear or the Clear key and then enter a new number To change the setti...

Страница 144: ...e To change the number entered in step B press the Clear or the Clear key and then enter a new number To change the settings the first printing page the chapter from which to start numbering or the pa...

Страница 145: ...t Page Only to select the print page F Place originals and then press the Start key Note If the Main Power is turned off the text is cleared To save the typed text you can program them Reference Stamp...

Страница 146: ...roduction ratio For example see the following table Original A5K Copy paper A4K or Original A5L Copy paper A4L Original A5K Copy paper A4L or Original A5L Copy paper A4K A Select the size of copy pape...

Страница 147: ...ble Copies One original image is copied twice onto one sheet as shown Important Originals with a size of A5L B6 JISKL 51 2 81 2 L cannot be detected properly on the exposure glass Be sure to select th...

Страница 148: ...dit Image C Press Double Copies D Press OK E Select the paper F Place the originals and then press the Start key Reference Edit General Settings Guide Centring You can make copies with the image moved...

Страница 149: ...Edit Image D Press Centring E Press OK F Place the originals and then press the Start key Original location Original size and orientation Exposure glass A3L B4 JISL A4KL B5 JISKL 8 13 L ADF A3L B4 JIS...

Страница 150: ...ve Negative If your original is black and white copy images are inverted A Press Edit B Press Edit Image C Press Positive Negative D Press OK E Select the paper F Place the originals and then press th...

Страница 151: ...elect the interposer as the copy paper Covers function includes Front Cover and Front Back Covers Front cover The first page of your originals is copied on specific paper sheet for covers or a cover s...

Страница 152: ...copy and after the last copy Copy Blank A Set the tray for the front cover or back cover sheet You can select the tray for the front or back cover sheet using the Tray Paper Settings The cover sheet...

Страница 153: ...a slip sheet for each page specified Important You can select any tray for slip sheets except the copy paper trays You cannot select the interposer as the copy paper A Set the tray you want to use fo...

Страница 154: ...inals I When you finish specifying pages press OK twice J Place the originals and then press the Start key Reference Tray Paper Settings General Settings Guide Chapters The pages you specify with this...

Страница 155: ...fy another page location repeat steps D to E G Select the paper tray that contains the sheet paper to copy the originals H When you finish specifying page location press OK twice I Place the originals...

Страница 156: ...signate sheet are set and then press the q key I To specify another page location repeat step E to H J Select the tray for main sheets K After all settings press OK twice L Place originals and then pr...

Страница 157: ...ey to select the chapter number F Select the paper tray for slip sheets G Select Before to insert slip sheets before the desired page Select After to insert slip sheets after the desired page Enter th...

Страница 158: ...e an original page changes a slip sheet is inserted This function can be used to automatically insert a slip sheet between OHP transparencies or as a stacking function You can also copy onto slip shee...

Страница 159: ...and then press OK D Select the paper tray that contains the sheet paper to copy the originals When using OHP transparencies open the multi bypass tray E Place the originals and then press the Start k...

Страница 160: ...ion copies are delivered in the reverse order from the originals 1 Sided 1 Sided 2 Sided 2 Sided A Press Output Customize Function Finisher B Press Output Cstmz C Press Reverse Ejection D Place origin...

Страница 161: ...isk of this machine Thus you can print them later ap plying necessary conditions Important Machine failure can result in data loss Important data stored on the hard disk should be backed up The manufa...

Страница 162: ...other period than three days for the automatic deletion For more information about changing settings see Administrator Tools General Settings Guide To check if a document has been stored press the Doc...

Страница 163: ...r tray of the same size the paper tray prioritized with the Copier Docu ment Server Features will be selected first See System Settings General Settings Guide Programs are not cleared by turning the p...

Страница 164: ...Changing a Stored Program Changes program settings A Check the program settings B Set the contents of a program C Press the Program key D Press Program E Press the program number you want to store F P...

Страница 165: ...program is deleted and the screen returns to the copy screen Recalling a Program Recalls a stored program and copies its contents A Press the Program key B Press Recall C Press the program number you...

Страница 166: ...ation Cover Slip Sheet Dup Combine Se ries Reduce Enlarge Finishing A Specify scan settings and any other settings you require in the initial display B Press the Program key C Press Program as Default...

Страница 167: ...d to the other the sub machine so copies can be made on both simultaneously High speed copying for greater productivity Large volume copy runs can be completed in shorter time For instance when two 13...

Страница 168: ...e sub machine Machine Types and Options Both machines need not be of the same type You can still use Connect Copy without an optional finisher or Large Capac ity Tray LCT However to use the Staple and...

Страница 169: ...he same size type and orientation To ensure the same copy results from both machines Copy Quality settings in the User Tools should be the same on each machine Both main and sub machines should be ins...

Страница 170: ...the size type and orientation of the paper set on both machines 3 Numbers of originals Displays the number of originals scanned into memory of the main machine 4 Number of sets Displays the number of...

Страница 171: ...Connect Copy Display Panel 151 3 Display during Connect Copy 1 Sub machine status appears on the second line of main machine s display APG026S...

Страница 172: ...been selected on the main machine the sub machine will still continue to show the initial copy display To switch to the Connect Copy initial display follow the procedure below A Press the Other Functi...

Страница 173: ...achine and then press the q key For details see Administrator Tools General Settings Guide When Basic Authentication Windows Authentication LDAP Authentica tion or Integration Server Authentication is...

Страница 174: ...nch and Z fold functions are automat ically disabled E Enter the required number of copies using the number keys The maximum copy quantity that can be set is 9999 When the number of originals or copie...

Страница 175: ...sible for the other machine to take over the re mainder of that particular set To interrupt ADF scanning press the Stop key on the main machine and then select Stop in response to the message that app...

Страница 176: ...the main and sub machines When using the Sort Staple function the processing of one copy set cannot be divided between the two machines When copying with the Stack function Example Making 2 copies of...

Страница 177: ...ttings Guide Auto Off The machine automatically turns itself after a certain period of time has lapsed after job completion This is called Auto Off In Connect Copy mode the sub machine will not turn o...

Страница 178: ...ected document is highlighted C Repeat step if you want to select more documents The documents will be printed in the order that they have been selected D If you need to change the print settings pres...

Страница 179: ...ss Select File to return to the Select Files to Print display If you have entered a wrong value press the Stop key and enter again When using the Sort function you can check the print results by makin...

Страница 180: ...in machine When the current job finishes the next job be gins automatically A On the main machine confirm that Press New Job to make reserva tion is displayed and then press New Job B Confirm that Rea...

Страница 181: ...ginal has been fed before placing the next Scanning begins As soon as the current job is finished the next job starts au tomatically Note You can preset a maximum of 10 jobs Preset jobs in Connect Cop...

Страница 182: ...Connect Copy 162 3 Connect Copy Job Flow The job flow depends on the status of the two machines When One of the Two Machines is Idle One of the machines is copying Original A APF037S...

Страница 183: ...ain machine Connect Copy A Make Connect Copy settings for Original B on machine 2 the idle machine B Machine 2 begins copying Original B Machine 1 also starts copying Original B when it has finished w...

Страница 184: ...ttings for Original B on machine 1 the machine currently in use B When machine 1 has finished with Original A Connect Copy is activat ed and both machines begin copying Original B A Sub machine B Main...

Страница 185: ...onnect Copy Job Preset A Make Connect Copy settings for Original C on machine 1 B When machine 1 has finished with Original A it begins copying Origi nal C C When machine 2 has finished with Original...

Страница 186: ...y settings for Original C on machine 1 B When machine 1 has finished with Original A it begins copying Origi nal C If machine 1 finishes copying it allotment of Original C before machine 2 finishes wi...

Страница 187: ...nsmission Unavailable Printer Functions Storing method Personal computer List display Available Printing Available Transmission Unavailable Scanner Functions Storing method Scanner List display Unavai...

Страница 188: ...3 The number of the originals being read with the memory as well as the number of paper sets and copied are displayed 4 Keys for the operation are displayed 5 An icon that corresponds to a stored fun...

Страница 189: ...nges from the initial display to the simplified display Letters and keys are displayed at a larger size making operations easier Example of a simplified display 1 Key Colour Press to change the key co...

Страница 190: ...documents Preview Display 1 Used to move the portion to be displayed 2 Zoom Out Zoom In Used to scale up or down the document to be displayed 3 Exit Used to exit the preview display 4 Display File Use...

Страница 191: ...iew is already selected from another function the preview screen function may become unusable The preview display is also not available when the paper size is larger than A3 If the image file is corru...

Страница 192: ...with a correct password remains selected even after op erations are complete and it can be accessed by other users To stop this be sure to press the Clear Modes key to cancel the document selection Th...

Страница 193: ...ve operation sets up the user name document name and password When not changing a document name the name will be automatically set D Set the original E Specify the original scanning conditions F Press...

Страница 194: ...r Stop key To restart a paused scanning job press Continue in the confirmation display To delete saved images and cancel the job press Stop When a password is set the lock icon appears on the left sid...

Страница 195: ...e Address Book Following describes the procedure for registering or changing a user name to be attached to a stored document A Display the original scan screen B Press User Name C Select the user name...

Страница 196: ...l scan screen B Press User Name The user name input screen will appear C Enter the user name and then press OK To change a file name Following describes the procedure for changing a name to be attache...

Страница 197: ...mits are exceeded the list will display up to 15 characters for the document name To set or change a Password Following describes the procedure for setting or changing a password to be at tached to a...

Страница 198: ...e or password is to be changed When a password is set enter it and then press OK C Press Edit File D Press Change User Name Change File Name or Change Password E From the respective change screens ent...

Страница 199: ...the Document Server key B Select the document whose details are to be displayed When a password is set enter it and then press OK C Press Details Details of the document will be displayed Note When y...

Страница 200: ...cument from the user name Note Installing Ridoc Desk Navigator enables search and reordering of stored doc uments from PC For more information about Ridoc Desk Navigator see Instruction Manual and Hel...

Страница 201: ...ct the user name and then press OK When using a not registered user name proceed to the next step D When the user name is not registered press Manual Entry and then enter the user name to be displayed...

Страница 202: ...sword is set enter it and then press OK C When printing two or more documents at a time repeat the operation in B Up to 30 documents can be printed D When specifying printing conditions press To Print...

Страница 203: ...see Copier Functions Book binding style 2 Sided Top to Top 2 Sided Top to Bottom Maga zine Booklet Treatment of front cover Cover Slip Sheet Edit Stamp Finish Sort Rotate Sort Stack Staple Punch When...

Страница 204: ...key E Press Continue Printing will be resumed Note The range of print copies enterable in step C depends on the timing of your pressing the Stop key Sample Print When print copies are massive you can...

Страница 205: ...order to confirm the print results you can print the first page alone of the doc ument selected from the document selection screen When two or more documents are selected the first page of the respec...

Страница 206: ...ote You can search the target document using in step A User Name or File Name situated in the left side of the screen In the display order field of step A you can sort the documents by User Name File...

Страница 207: ...me Date Press the item to be used for the sorting To cancel the selection in step A press the highlighted document again Edit File You can edit documents stored in the Document Server Combining Files...

Страница 208: ...er function A Press the Document Server key B Select the document to be inserted in If a password has been set for the document enter it and then press OK C Press Edit File D Press Insert File E Selec...

Страница 209: ...copy documents that are stored in the Document Server Important You cannot copy a selected document that is currently being used by another function A Press the Document Server key B Select the docume...

Страница 210: ...Name Print Backup Default Format and Print Backup Default Resolution using Ad ministrator Tools for System Settings If you select PDF Single Page or PDF Multi page you can make encoding and privilege...

Страница 211: ...n you could not identify the target document from the document name print the first page alone of the document in order to confirm the print results To cancel your selection press the highlighted docu...

Страница 212: ...feature you must pre pare the extended data conversion board A Start Web browser B Enter http IPv4 address of this machine to the address Top page of Web Image Monitor will be displayed C Click Docum...

Страница 213: ...bination of the copy features may or may not be available depend ing on the order of its setup Blank space Combination available Combination unavailable Precedence is given to the function selected ea...

Страница 214: ...with 2 Sided 1 Sided 4 Combine with Designate Chapter with Document Server 5 Slip Sheets with Book 2 Sided 6 Document Server with Front Back 2 Sided 7 Left of Punch with Right Top Centre of Staple To...

Страница 215: ...ct one of 12 preset ratios 5 enlargement ratios 7 reduction ratios Following shows the relation between the original s size and copied to pa per size at respective scaling factors Metric version 400 A...

Страница 216: ...ettings and other conditions part of the image may not be copied or margins will appear on copies When entering a size in mm if the calculated ratio is over maximum or un der minimum ratio it is autom...

Страница 217: ...en the number of sheets for one set is over stapler capacity When memory reaches 0 during copying When using Double Copies or 1 Sided 1 Sided 1 Sided 2 Sided 2 Sided 1 Sided or 2 Sided 2 Sided in Comb...

Страница 218: ...the stapled sheets is as follows paper weight 80 g m2 20 lb Finisher shift tray without Z folding You cannot change stapling positions during copying When the original image is rotated the staple orie...

Страница 219: ...ion Special paper Translucent paper Letterhead Thick paper Tab stock OHP transparencies Label paper adhesive labels Postcards Paper sizes that can be Z folded are as follows Finisher upper tray shift...

Страница 220: ...r Eject Copy Face up Down in Glass Mode the copies will be delivered face down Duplex Following types of paper sizes and directions allow the double side copy A3L B4 JISL A4KL B5 JISKL A5L 11 17 L 81...

Страница 221: ...er onto the paper The reproduction ratios you can specify are 25 400 If the calculated ratio is under the minimum ratio it is automatically ad justed to within available range However with some ratios...

Страница 222: ...ear to overlap the copied image in some cases Margin Adjustment If you set a binding margin that is too wide part of the image may not be copied When making copies in the Combine mode the binding marg...

Страница 223: ...he Combine function With the Magazine or Booklet function Page Numbering per copy With 1 Sided 2 Sided using the Combine function If you combine this function with the Duplex Top to Top function and s...

Страница 224: ...be copied on the front of copies as in Chapters mode In Tray Paper Settings if you selected At Mode Selected for Display Time the machine refers to the settings in Tray Paper Settings to ascertain wh...

Страница 225: ...on the main machine while you are mak ing settings Connect Copy will be cancelled Even if the sub machine is in Energy Saver mode the main machine can still connect to make copies When an Interrupt j...

Страница 226: ...Magazine vi xi 87 195 Border Erase 97 99 100 101 102 C Centre 101 102 128 Centre Border Erase 97 101 102 Centre Erase 97 Centring 128 195 Changing a Stored Program 144 Changing Number of Print Copies...

Страница 227: ...Sided 87 Front Back Covers 131 Front cover 131 Front Cover Front Back Cover 195 Function Compatibility 193 G General Features 6 Generation Copy 50 H Holding print jobs 41 How to fold 87 How to fold an...

Страница 228: ...Printing a Stored Document 182 Printing the First Page 185 Program 112 146 Programs 143 Punch 71 Punch holes 71 R Ratio 56 Recalling a Program 145 Regular sizes 27 Repeat 126 Reproduction Ratio 6 Reve...

Страница 229: ...e idle machine as the main machine 163 Using the machine currently copying as the main machine 164 Using the Z fold Support Tray 74 V Various sizes 25 W What You Can Do with This Machine iii When both...

Страница 230: ...210 GB GB B235 7600...

Страница 231: ...In accordance with IEC 60417 this machine uses the following symbols for the main power switch a means POWER ON c means STAND BY Trademarks PostScript Acrobat are registered trademark of Adobe Systems...

Страница 232: ...Operating Instructions Copy Document Server Reference GB GB B235 7600...

Отзывы: