background image

5. Inalámbrica

Cómo conectar el módulo táctil

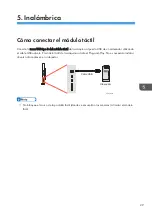
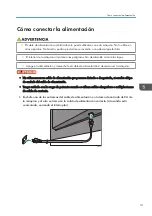
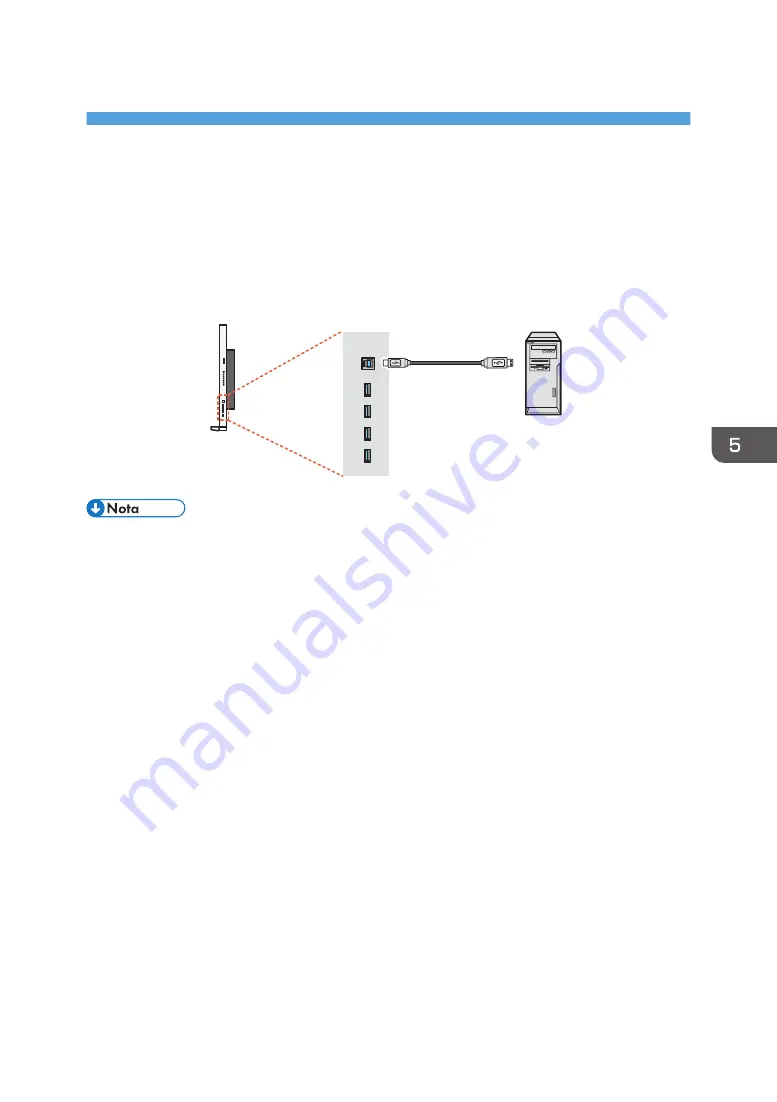
Conecte la toma USB tipo B del módulo táctil de la máquina al puerto USB de un ordenador utilizando
el cable USB adjunto. El módulo táctil de la máquina admite el Plug-and-Play. No es necesario instalar
drivers adicionales en el ordenador.

ES DTW003

Cable USB

Ordenador

• No bloquee el marco de la pantalla táctil (donde se encuentran los sensores) al iniciar el módulo

táctil.

29

Содержание D5520

Страница 1: ...Portugu s Brasil Espa ol Fran ais Deutsch English Leia isto primeiro Leer antes de empezar lire avant de commencer Bitte zuerst lesen Read This First Read This First...

Страница 2: ......

Страница 3: ...read the Safety Information in this manual before using the machine For information not in the printed manual refer to the HTML PDF les on the website Connection Component Names and Functions Installi...

Страница 4: ...English...

Страница 5: ...Network For EU Countries Only 13 Overseas Affiliates and Noise Emission Information 14 User Information on Electrical and Electronic Equipment 14 Note for the Battery and or Accumulator Symbol For EU...

Страница 6: ...4 Component Names and Functions Input Output Terminals 27 5 Connection Connecting the Touch Module 29 Connecting the Bluetooth Adapter 30 Connecting Power 31 2...

Страница 7: ...arising out of failures of this machine losses of the registered data or the use or non use of this product and operation manuals provided with it Make sure that you always copy or have backups of th...

Страница 8: ...ating Instructions explains how to operate and troubleshoot the machine after it is set up It also lists the detailed specifications of the machine You can download Operating Instructions from the RIC...

Страница 9: ...precautions Safety Symbols for This Machine The meanings of the safety symbols for this machine are as follows Caution Prohibition No disassembly Caution risk of electric shock Refer to instruction m...

Страница 10: ...se to this machine Since there are openings on the top and side surfaces of this machine fire or electric shock could result if liquids or foreign substances get into the machine The supplied power co...

Страница 11: ...ll outlet Then contact your service representative and report the problem Do not use the machine Doing so could result in fire or electric shock It is dangerous to handle the power cord plug with wet...

Страница 12: ...ct sun or spot lighting will shine onto the LCD panel as the heat may damage the panel and the external casing of the display and the bright light will make viewing the display more difficult than nec...

Страница 13: ...f used batteries according to the instructions Handling the machine s interior This section explains safety precautions about handling the machine s interior Do not remove any covers or screws that ar...

Страница 14: ...nd CAUTION labels This machine has labels for WARNING and CAUTION For safety please follow the instructions and handle the machine as indicated Symbols for Earth and Power Switch Symbols for earth and...

Страница 15: ...into your outlet consult an electrician for replacement of the obsolete outlet 10 Protect the power cord from being walked on or pinched particularly at plugs convenience receptacles and the point wh...

Страница 16: ...y remain constantly lit in red blue or green or unlit This is a technical limitation of the LCD technology and is not a defect LCD screens like plasma PDP and conventional CRT Cathode Ray Tube screens...

Страница 17: ...was revised in 2013 CE Marking Traceability Information For EU Countries Only Manufacturer Ricoh Co Ltd 3 6 Nakamagome 1 chome Ohta ku Tokyo 143 8555 Japan Importer Ricoh Europe PLC 20 Triton Street...

Страница 18: ...are marked with the symbol below The symbol indicates that the product must not be treated as municipal waste It must be disposed of separately via the appropriate return and collection systems avail...

Страница 19: ...ed on batteries and accumulators This symbol means that in the European Union used batteries and accumulators should be disposed of separately from your household waste In the EU there are separate co...

Страница 20: ...FCC emission limits Installing the ferrite core Ferrite core must be used for RF interference suppression Notes to users in the United States of America This device complies with Part 15 of the FCC Ru...

Страница 21: ...Users in USA Perchlorate Material special handling may apply See www dtsc ca gov hazardouswaste perchlorate Notes for Contractors in Norway D6510 and D5520 are designed for an IT power system with ph...

Страница 22: ...2 Information for This Machine 18...

Страница 23: ...ion Guide included with the dedicated stand For details about how to mount the main unit on the wall see the instructions included with the wall mounting bracket Contact your local dealer for details...

Страница 24: ...es on the plastic bag used in this product s packaging Keep the polythene materials bags etc supplied with this machine away from babies and small children at all times Suffocation can result if polyt...

Страница 25: ...main unit of RICOH Interactive Whiteboard D5520 weighs about 50 kg 110 3 lb Use a mounting bracket that is sufficiently strong enough to support the weight of the main unit When mounting the main unit...

Страница 26: ...not operate properly We recommend that you take the necessary measures to prevent the machine from falling over after it is installed If you install the machine in a location exposed to high temperat...

Страница 27: ...er place some distance between the machines or arrange them so they are parallel to each other When Installing the Machine by Mounting the Main Unit on a Wall 1 2 3 4 1 Left 10 cm 3 9 inches or more 2...

Страница 28: ...consult a professional technician for wall mount installations The manufacturer accepts no liability for installations not performed by a professional technician 3 Installing the Machine Installed by...

Страница 29: ...unt the pen tray on the main unit The pen tray should be positioned on the center of the lower part of the main unit A Phillips screwdriver is required to mount the pen tray Select the proper tool acc...

Страница 30: ...3 Installing the Machine Installed by a Contractor 26...

Страница 31: ...Input Output Terminals 4 10 5 6 7 7 9 11 DTW001 12 8 2 3 1 No Name Description 1 USB 2 0 Tyep A Connect the Bluetooth adapter 2 USB Type B For Touch Connects the USB cable from the display to a compu...

Страница 32: ...ayPort Input DisplayPort Output Connects to a DisplayPort compatible device 8 VGA Input Receives analog RGB signals from an external device such as a computer 9 RS 232C Input RS 232C Output For extern...

Страница 33: ...ort of a computer using the supplied USB cable The touch module of the machine supports easy Plug and Play operation There is no need to install additional drivers on the computer DTW003 USB cable Com...

Страница 34: ...se connect the Bluetooth adapter to the USB 3 0 Type A connector but not to the USB 2 0 Type A If you connect other devices to the USB 3 0 Type A connector the Bluetooth adapter may not work properly...

Страница 35: ...the power and unplug the power cord if you intend to move the machine Never use a power cord which appears damaged or frayed or change the plug type on the power cord Be aware of the power loading wh...

Страница 36: ...MEMO 32...

Страница 37: ...ie unbedingt die Sicherheitshinweise vor der Verwendung dieses Ger ts Nicht im gedruckten Handbuch vorliegende Informationen finden Sie in den HTML PDF Dateien auf der Webseite Verbindung Komponentenn...

Страница 38: ...Deutsch...

Страница 39: ...nder innerhalb der EU 15 Landesgesellschaften und Informationen zu Ger uschemissionen 16 Informationen f r Anwender von elektrischen und elektronischen Einrichtungen 16 Hinweis zum Batterie und oder A...

Страница 40: ...4 Komponentennamen und Funktionen Ein Ausg nge 29 5 Verbindung Anschlie en des Touch Moduls 31 Anschlie en des Bluetooth Adapters 32 Anschlie en der Stromversorgung 33 2...

Страница 41: ...s Verlusten von Dokumenten oder Daten oder der Verwendung bzw Nichtverwendung dieses Produkts und den damit gelieferten Handb chern ergeben Stellen Sie sicher dass Sie stets Kopien oder Sicherungen de...

Страница 42: ...anleitung wird die Bedienung und die Fehlerbehebung nach der Einrichtung des Ger ts erl utert Au erdem werden detaillierte technische Daten zum Ger t aufgelistet Sie k nnen die Bedienungsanleitung von...

Страница 43: ...rheitssymbole f r dieses Ger t Die Sicherheitssymbole f r dieses Ger t haben folgende Bedeutung Vorsicht Verbot Keine Demontage Achtung Risiko elektrischer Schl ge Sehen Sie in der Bedienungsanleitung...

Страница 44: ...ell herausgezogen werden Keine Vasen Blument pfe Tassen Toilettenartikel Medikamente kleine metallische Gegenst nde oder Beh lter mit Wasser oder anderen Fl ssigkeiten auf oder neben dem Ger t aufstel...

Страница 45: ...stikbeuteln Halten Sie die mit diesem Ger t mitgelieferten Polyethylenmaterialien Taschen Handschuhe usw von S uglingen und Kleinkindern fern Kommt das Polyethylen mit Mund oder Nase in Kontakt besteh...

Страница 46: ...Installation des Hauptger ts wenden Sie sich an Ihren H ndler vor Ort F hren Sie die Installation nicht selbst aus Installieren Sie das Ger t nicht in einem engen Raum ohne ausreichende Luftzufuhr un...

Страница 47: ...on alten und neuen Batterien verk rzt die Lebensdauer der Batterien bzw kann auch chemische Lecks aus alten Batterien verursachen Aus Batterien laufende Chemikalien k nnen zu Hautreizungen f hren Wenn...

Страница 48: ...ie das Produkt nicht selbst ndig Dies k nnte zu Verletzungen oder einer Fehlfunktion f hren Wenn das Ger teinnere nicht regelm ig gereinigt wird sammelt sich Staub an Gro e Ansammlungen von Staub im I...

Страница 49: ...HTUNG Etiketten Dieses Ger t weist Etiketten f r WARNUNG und ACHTUNG auf Befolgen Sie aus Sicherheitsgr nden die Anweisungen und handhaben Sie das Ger t wie angezeigt Symbole f r Masse und Hauptschalt...

Страница 50: ...Netzstecker nicht in Ihre Steckdose passt wenden Sie sich f r die Auswechslung der veralteten Steckdose an einen Elektrofachmann 10 Achten Sie insbesondere im Bereich von Steckern Steckdosen und am Ge...

Страница 51: ...t eine technische Einschr nkung der LCD Technologie und kein Defekt Bei LCD Bildschirmen besteht wie bei Plasma PDP und herk mmlichen CRT Bildschirmen Kathodenstrahlr hre die Gefahr des Einbrenn Effek...

Страница 52: ...1 Sicherheitshinweise f r dieses Ger t 14...

Страница 53: ...ungs R ckverfolgbarkeitsinformationen Nur f r EU L nder Hersteller Ricoh Co Ltd 3 6 Nakamagome 1 chome Ohta ku Tokyo 143 8555 Japan Importeur Ricoh Europe PLC 20 Triton Street London NW1 3BF United Ki...

Страница 54: ...wertige Komponenten und sind f r einfaches Recycling konzipiert Unsere Produkte oder Produktverpackungen sind mit folgendem Symbol markiert Das Symbol zeigt an dass das Produkt nicht als Hausm ll beha...

Страница 55: ...rop ischen Union gebrauchte Batterien und Akkus separat vom Hausm ll entsorgt werden sollten In der EU gibt es getrennte Sammelsysteme nicht nur f r gebrauchte elektrische und elektronische Produkte s...

Страница 56: ...ngen zul ssig 1 Dieses Ger t darf keine st renden Interferenzen verursachen und 2 das Ger t muss empfangene Interferenzen akzeptieren auch solche die zu unerw nschtem Betrieb f hren k nnen This transm...

Страница 57: ...Hinweise f r Unternehmer in Norwegen D6510 und D5520 funktionieren auch in einem IT Netzsystem mit Au enleiterspannung von 230 V Gesetze und Rechtsvorschriften 19...

Страница 58: ...2 Informationen zu diesem Ger t 20...

Страница 59: ...t nder Weitere Informationen zum Montieren des Hauptger ts an der Wand finden Sie in der Anleitung die der Befestigungsklammer beiliegt Kontaktieren Sie Ihren H ndler vor Ort f r Informationen ber and...

Страница 60: ...eachten Sie die folgenden Warnhinweise beim Umgang mit den f r das Produkt verwendeten Plastikbeuteln Halten Sie die mit diesem Ger t mitgelieferten Polyethylenmaterialien Taschen Handschuhe usw von S...

Страница 61: ...510 wiegt ca 60 kg 132 3 lb Das Hauptger t des RICOH Interactive Whiteboard D5520 wiegt ca 50 kg 110 3 lb Verwenden Sie eine Befestigungshalterung die stark genug ist um das Gewicht des Hauptger ts zu...

Страница 62: ...e nicht ordnungsgem Sie sollten die erforderlichen Vorsichtsma nahmen ergreifen um zu verhindern dass das Ger t umfallen kann Wenn Sie das Ger t an einem Ort mit hohen Temperaturen aufstellen wird emp...

Страница 63: ...diesem Fall entweder den Abstand zwischen den Ger ten oder richten Sie sie zueinander parallel aus Bei Installation des Ger ts durch Montage der Haupteinheit an einer Wand 1 2 3 4 1 Links Mindestens 1...

Страница 64: ...tte wenden Sie sich an Techniker f r die Wandmontage Der Hersteller bernimmt keine Haftung f r Montagen die nicht von einem Techniker durchgef hrt wurden 3 Installieren des Ger ts Installation vom Auf...

Страница 65: ...iftfach am Hauptger t an Das Stiftfach sollte in der Mitte des unteren Teils des Hauptger ts positioniert werden Zum Montieren des Stiftfachs ben tigen Sie einen Kreuzschlitzschraubendreher W hlen Sie...

Страница 66: ...3 Installieren des Ger ts Installation vom Auftragnehmer 28...

Страница 67: ...usg nge 4 10 5 6 7 7 9 11 DTW001 12 8 2 3 1 Nr Name Beschreibung 1 USB 2 0 Typ A Schlie en Sie den Bluetooth Adapter an 2 USB Typ B Touch Verbindet das USB Kabel von dem Bildschirm mit einem Computer...

Страница 68: ...ayPort Ausgang Stellt die Verbindung mit einem DisplayPort kompatiblen Ger t her 8 VGA Eingang Empf ngt analoge RGB Signale von einem externen Ger t wie einem Computer 9 RS 232C Eingang RS 232C Ausgan...

Страница 69: ...s indem Sie das mitgelieferte USB Kabel verwenden Das Touch Modul untersch tzt die einfache Plug and Play Bedienung Es ist nicht n tig weitere Treiber auf dem Computer zu installieren DE DTW003 USB Ka...

Страница 70: ...in diesem Fall nicht an den Anschluss USB 3 0 Typ A sondern an den Anschluss USB 2 0 Typ A an Falls Sie weitere Ger te an den Anschluss USB 3 0 Typ A anschlie en kann der Bluetooth Adapter nicht korre...

Страница 71: ...r t aus und ziehen Sie das Netzkabel heraus wenn Sie das Ger t bewegen wollen Nutzen Sie niemals ein Netzkabel das besch digt oder ausgefranst ist und ndern Sie niemals den Steckertyp am Netzkabel Ach...

Страница 72: ...MEMO 34...

Страница 73: ...MEMO 35...

Страница 74: ...MEMO 36 DE DE...

Страница 75: ...bien lire les Consignes de s curit avant d utiliser l appareil Pour les informations qui ne se trouvent pas dans le manuel imprim veuillez vous reporter aux fichiers HTML PDF sur le site web Connexion...

Страница 76: ...Fran ais...

Страница 77: ...t 15 Informations relatives aux filiales trang res et aux missions de bruit 16 Informations l attention des utilisateurs de mat riel lectrique et lectronique 16 Avis pour le symbole de la batterie et...

Страница 78: ...orte stylos 27 4 Noms et fonctions des composants Bornes de connexion d entr e et de sortie 29 5 Connexion Connexion du module tactile 31 Connexion de l adaptateur Bluetooth 32 Branchement de l alimen...

Страница 79: ...de pertes de donn es enregistr es ou de l utilisation ou de la non utilisation de ce produit et des manuels utilisateurs fournis avec celui ci Assurez vous d avoir une copie ou une sauvegarde des donn...

Страница 80: ...explique comment faire fonctionner et d panner l appareil apr s son installation Il dresse galement la liste des caract ristiques d taill es de l appareil Vous pouvez t l charger le Manuel utilisateur...

Страница 81: ...ur cet appareil Les significations des symboles de s curit pour cet appareil sont les suivantes Attention Interdiction Pas de d montage Attention risque d lectrocution Reportez vous au manuel d instru...

Страница 82: ...antes en pot de tasses d articles de toilette de m dicaments ou de r cipients contenant de l eau ou tout autre liquide sur l appareil ou proximit Comme il y a des ouvertures sur le dessus et les c t s...

Страница 83: ...ac plastique utilis pour l emballage du produit Ne laissez jamais les mat riaux en poly thyl ne pochettes etc fournis avec cet appareil port e des b b s ou des jeunes enfants Si ces mat riaux entrent...

Страница 84: ...ontacter votre distributeur local N essayez pas de r aliser l installation vous m me N installez pas l appareil dans un espace confin sans ventilation ou circulation d air correcte comme un placard fe...

Страница 85: ...z pas des piles neuves et usag es Un tel m lange diminue l autonomie des piles ou risque d entra ner des fuites de produit chimique des piles usag es Ces produits chimiques peuvent entra ner des irrit...

Страница 86: ...pas le produit Cela pourrait entra ner des blessures ou des dysfonctionnements Si l int rieur de l appareil n est pas r guli rement nettoy la poussi re risque de s accumuler Un incendie et une panne p...

Страница 87: ...ISSEMENT et ATTENTION Cet appareil poss de des tiquettes AVERTISSEMENT et ATTENTION Pour votre s curit suivez les instructions et manipulez l appareil de la mani re indiqu e Symboles pour la terre et...

Страница 88: ...tilisateur Si la prise fournie ne rentre pas dans la prise secteur faites appel un lectricien pour qu il remplace cette derni re qui est obsol te 10 Prot gez le cordon d alimentation de tout pi tineme...

Страница 89: ...ter constamment allum s en rouge bleu ou vert ou teints Il s agit d une limite technique habituelle de la technologie LCD et non pas d un d faut Les crans LCD comme les crans plasma et cathodiques son...

Страница 90: ...1 Consignes de s curit pour cet appareil 14...

Страница 91: ...ations relatives la tra abilit et au marquage CE Pour les pays de l UE uniquement Fabricant Ricoh Co Ltd 3 6 Nakamagome 1 chome Ohta ku Tokyo 143 8555 Japon Importateur Ricoh Europe PLC 20 Triton Stre...

Страница 92: ...nent des composants haute qualit con us pour en faciliter le recyclage Le symbole ci apr s est appos sur nos produits ou leurs emballages Ce symbole indique que le produit ne doit pas tre trait en tan...

Страница 93: ...l Union europ enne les batteries et les accumulateurs usag s doivent tre mis au rebut conform ment la l gislation en vigueur Dans l Union europ enne il existe des syst mes de tri s lectif pour les app...

Страница 94: ...t accepter tout brouillage radio lectrique re u m me si ce brouillage est susceptible de compromettre le fonctionnement du dispositif Cet metteur ne doit pas tre plac pr s de ou tre utilis avec une au...

Страница 95: ...Notes pour les fournisseurs Norv ge D6510 et D5520 ont t con us pour fonctionner avec un syst me d alimentation informatique d une tension de 230 V entre phases Lois et R glementations 19...

Страница 96: ...2 Informations sur cet appareil 20...

Страница 97: ...support d di Pour plus d informations sur la fa on de monter l unit principale sur le mur r f rez vous aux instructions fournies avec le support de fixation murale Contactez votre distributeur local...

Страница 98: ...essages d avertissement du sac plastique utilis pour l emballage du produit Ne laissez jamais les mat riaux en poly thyl ne pochettes etc fournis avec cet appareil port e des b b s ou des jeunes enfan...

Страница 99: ...anc interactif D5520 RICOH p se environ 50 kg 110 3 lb Utilisez un support de fixation suffisamment solide pour supporter le poids de l unit principale Lors du montage de l unit principale sur un mur...

Страница 100: ...possible qu il ne fonctionne pas correctement Nous vous conseillons de prendre toutes les mesures n cessaires pour emp cher l appareil de tomber apr s son installation Si vous installez l appareil dan...

Страница 101: ...es cas l loignez l g rement les appareils en cause ou placez les parall lement les uns aux autres Lors de l installation de l appareil en montant l unit principale sur un mur 1 2 3 4 1 Gauche 10 cm 3...

Страница 102: ...tacter un technicien professionnel pour une installation murale Le fabricant d cline toute responsabilit en cas d installation non r alis e par un technicien professionnel 3 Installation de l appareil...

Страница 103: ...o sur l unit principale Le porte stylo doit tre plac au centre de la partie inf rieure de l unit principale Vous aurez besoin d un tournevis cruciforme pour monter le porte stylos S lectionnez l outil...

Страница 104: ...3 Installation de l appareil par un prestataire 28...

Страница 105: ...connexion d entr e et de sortie 4 10 5 6 7 7 9 11 DTW001 12 8 2 3 1 N Nom Description 1 USB 2 0 type A Connectez l adaptateur Bluetooth 2 USB Type B For Touch Connecte un c ble USB entre le TBI et un...

Страница 106: ...Se connecte un quipement compatible DisplayPort 8 Entr e VGA Re oit les signaux analogiques RGB transmis par un quipement externe comme un ordinateur 9 Entr e RS 232C Sortie RS 232C Pour une commande...

Страница 107: ...nateur Le module tactile de l appareil permet un fonctionnement plug and play en toute simplicit Il est inutile d installer des pilotes suppl mentaires sur l ordinateur FR DTW003 C ble USB Ordinateur...

Страница 108: ...connecteur USB 3 0 type A et non au connecteur USB 2 0 type A Si vous connectez d autres dispositifs au connecteur USB 3 0 type A l adaptateur Bluetooth risque de ne pas fonctionner correctement DTW00...

Страница 109: ...l appareil mettez celui ci hors tension et d branchez le cordon d alimentation N utilisez jamais un cordon d alimentation qui semble endommag ou us ne changez jamais le type de fiche du cordon d alime...

Страница 110: ...MEMO 34...

Страница 111: ...MEMO 35...

Страница 112: ...MEMO 36 FR FR...

Страница 113: ...de seguridad antes de utilizar la m quina Para informaci n no contenida en el manual impreso consulte los archivos HTML PDF en la p gina web Inal mbrica Nombres y funciones de los componentes Instala...

Страница 114: ...Espa ol...

Страница 115: ...solo para pa ses de la UE 15 Filiales en el exterior e Informaci n sobre las emisiones de ruido 16 Informaci n para el usuario acerca de equipos el ctricos y electr nicos 16 Tenga en cuenta el s mbol...

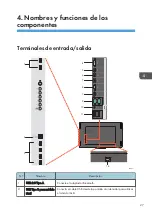
Страница 116: ...4 Nombres y funciones de los componentes Terminales de entrada salida 27 5 Inal mbrica C mo conectar el m dulo t ctil 29 Conexi n del adaptador Bluetooth 30 C mo conectar la alimentaci n 31 2...

Страница 117: ...los de esta m quina p rdida de documentos o datos o el uso o no uso de este producto y los manuales de producto que se proporcionan con el mismo Aseg rese siempre de realizar copias o tener copias de...

Страница 118: ...explican c mo utilizar la m quina y c mo resolver posibles problemas despu s de haberla configurado Tambi n se enumeran las especificaciones detalladas de la m quina Puede descargar las Instrucciones...

Страница 119: ...olos de seguridad de esta m quina El significado de los s mbolos de seguridad para esta m quina es el siguiente Precauci n Prohibici n No desmontar Precauci n riesgo de descarga el ctrica Consultar el...

Страница 120: ...art culos de tocador medicamentos objetos met licos peque os o envases con agua u otros l quidos encima o cerca de esta m quina Debido a que las superficies superiores y laterales de esta m quina con...

Страница 121: ...tenga siempre los materiales de polietileno bolsas etc proporcionados con esta m quina fuera del alcance de los ni os Se podr a producir asfixia si los materiales de polietileno entran en contacto con...

Страница 122: ...alaci n por su cuenta No instale la m quina en un espacio confinado sin la ventilaci n y circulaci n de aire adecuadas como por ejemplo en un armario cerrado Deje espacio suficiente alrededor de la m...

Страница 123: ...nuevas Mezclar bater as viejas y nuevas podr a acortar la vida de las bater as o causar fugas de qu micos en las bater as viejas Los qu micos que se filtran de las bater as podr an causar irritaci n...

Страница 124: ...ni modifique el producto Si lo hace podr a producirse alguna aver a o lesi n Si no se limpia el interior de la m quina con regularidad el polvo se acumular La acumulaci n de polvo en el interior de l...

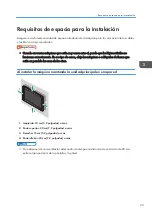
Страница 125: ...sta m quina tiene etiquetas para ADVERTENCIA y PRECAUCI N Por seguridad siga las instrucciones y manipule la m quina como se indica S mbolos del interruptor de toma a tierra y de alimentaci n Los s mb...

Страница 126: ...do no encaja en la toma p ngase en contacto con un electricista para sustituir la toma antigua 10 No pise ni pellizque el cable de alimentaci n especialmente en los enchufes las tomas de corriente y e...

Страница 127: ...mente en rojo azul o verde Se trata de una limitaci n t cnica y no un defecto de la tecnolog a LCD Las pantallas LCD al igual que las pantallas de plasma PDP y las CRT convencionales Tubo de rayos cat...

Страница 128: ...1 Informaci n de seguridad sobre esta m quina 14...

Страница 129: ...de dise o ecol gico aplicables a los productos Informaci n de seguimiento del marcado CE S lo para pa ses de la UE Fabricante Ricoh Co Ltd 3 6 Nakamagome 1 chome Ohta ku Tokio 143 8555 Jap n Importado...

Страница 130: ...los mismos est n marcados con el s mbolo siguiente Este s mbolo indica que el producto no se puede tratar como residuo urbano Se debe desechar por separado a trav s de los sistemas de devoluci n y rec...

Страница 131: ...ductos el ctricos y electr nicos sino tambi n para las bater as y los acumuladores Des chelos correctamente en los puntos de recogida reciclaje locales Notas para los usuarios de EE UU sobre requisito...

Страница 132: ...uncionamiento del dispositivo Este transmisor no debe colocarse ni utilizarse junto con otra antena o transmisor Notas para los usuarios de dispositivos inal mbricos en Canad Este dispositivo cumple l...

Страница 133: ...porte Si desea m s informaci n sobre c mo montar la unidad principal en la pared consulte las instrucciones que se suministran con el soporte de montaje en la pared Contacte con su distribuidor local...

Страница 134: ...el ctrica o un incendio A continuaci n se explican los mensajes de advertencia que se indican en la bolsa de pl stico utilizada para el embalaje de este producto Mantenga siempre los materiales de pol...

Страница 135: ...b La unidad principal de la RICOH Interactive Whiteboard D5520 pesa alrededor de 50 kg 110 3 lb Use un soporte de montaje que sea lo suficientemente resistente para soportar el peso de la unidad princ...

Страница 136: ...que la m quina no funcione adecuadamente Le recomendamos que tome las medidas necesarias para impedir que la m quina vuelque despu s de su instalaci n Si instala la m quina en una ubicaci n expuesta...

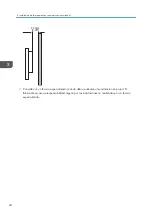
Страница 137: ...casos aleje las m quinas o col quelas de forma que est n en paralelo las unas de las otras Al instalar la m quina montando la unidad principal en una pared 1 2 3 4 1 Izquierda 10 cm 3 9 pulgadas o m...

Страница 138: ...o especializado cuando deba realizarse una instalaci n en pared El fabricante no asume responsabilidad alguna por las instalaciones no realizadas por un t cnico especializado 3 Instalaci n de la m qui...

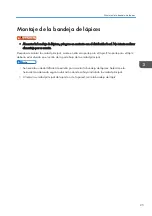
Страница 139: ...orte para el l piz El soporte para el l piz deber a estar situado en el centro de la parte baja de la unidad principal Se necesita un destornillador de estrella para montar la bandeja de l pices Selec...

Страница 140: ...3 Instalaci n de la m quina por una persona autorizada 26...

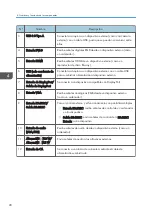
Страница 141: ...nales de entrada salida 4 10 5 6 7 7 9 11 DTW001 12 8 2 3 1 N Nombre Descripci n 1 USB 2 0 Tipo A Conecte el adaptador Bluetooth 2 USB Tipo B para m dulo t ctil Conecta el cable USB desde la pantalla...

Страница 142: ...isplayPort Se conecta a un dispositivo compatible con DisplayPort 8 Entrada VGA Recibe se ales anal gicas RGB desde un dispositivo externo como un ordenador 9 Entrada RS 232C Salida RS 232C Para el co...

Страница 143: ...erto USB de un ordenador utilizando el cable USB adjunto El m dulo t ctil de la m quina admite el Plug and Play No es necesario instalar drivers adicionales en el ordenador ES DTW003 Cable USB Ordenad...

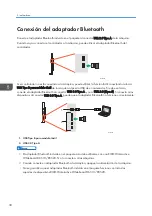
Страница 144: ...tador Bluetooth al conector USB 3 0 Tipo A y no al USB 2 0 Tipo A Si conecta otros dispositivos al conector USB 3 0 Tipo A puede que el adaptador Bluetooth no funcione correctamente DTW006 1 2 1 USB T...

Страница 145: ...le de alimentaci n si desea mover la m quina No utilice nunca un cable de alimentaci n que parezca da ado o desgastado ni cambie el tipo de enchufe del cable de alimentaci n Tenga cuidado con la carga...

Страница 146: ...MEMO 32 ES ES...

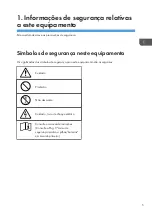
Страница 147: ...nforma es de seguran a neste manual antes de usar o equipamento Para informa es n o contidas neste manual consulte os arquivos HTML PDF no site Conex o Nomes e fun es dos componentes Instalar o equipa...

Страница 148: ...Portugu s Brasil...

Страница 149: ...ios sobre rede sem fio apenas para pa ses da UE 15 Filial no estrangeiro e informa o sobre a emiss o de ru do 16 Informa o para usu rios sobre equipamentos el tricos e eletr nicos 16 Nota para o s mbo...

Страница 150: ...4 Nomes e fun es dos componentes Terminais de entrada sa da 27 5 Conex o Conectar o m dulo de toque 29 Conectar o adaptador Bluetooth 30 Conectar alimenta o 31 2...

Страница 151: ...natureza decorrentes de falhas neste equipamento perdas de dados registrados ou do uso ou n o uso deste produto e dos manuais de opera o fornecidos com ele Certifique se de sempre copiar ou fazer bac...

Страница 152: ...Instru es de opera o explicam como operar e solucionar problemas ap s a instala o do equipamento Tamb m cont m especifica es detalhadas sobre o equipamento Voc pode baixar as Instru es de opera o no s...

Страница 153: ...S mbolos de seguran a neste equipamento Os significados dos s mbolos de seguran a para este equipamento s o os seguintes Cuidado Proibi o N o desmonte Cuidado risco de choque el trico Consulte o manu...

Страница 154: ...Como h aberturas nas superf cies superior e laterais deste equipamento a entrada de l quidos ou subst ncias estranhas no equipamento pode resultar em inc ndio ou choque el trico O cabo de alimenta o...

Страница 155: ...s Os materiais de polietileno podem causar sufocamento se forem colocados na boca ou no nariz Se objetos met licos gua ou outros l quidos entrarem no equipamento desligue o imediatamente Depois de des...

Страница 156: ...ia N o instale o equipamento em um ambiente fechado sem ventila o e circula o de ar adequadas como em um arm rio fechado Deixe espa o suficiente ao redor do equipamento para permitir a dissipa o do ca...

Страница 157: ...Se algum produto qu mico vazar das pilhas baterias seque as imediatamente com um pano seco e substitua as assim que poss vel Tipos diferentes de pilhas baterias t m diferentes caracter sticas N o mist...

Страница 158: ...ac mulo de p no interior do equipamento pode ocorrer inc ndio ou avaria Entre em contato com seu representante comercial ou t cnico para obter informa es sobre a limpeza do interior do equipamento e...

Страница 159: ...DADO Este equipamento possui etiquetas de AVISO e CUIDADO Para sua seguran a siga as instru es e manuseie o equipamento conforme indicado S mbolos de aterramento e do bot o liga desliga Os s mbolos de...

Страница 160: ...consulte um eletricista para substitui o da tomada obsoleta 10 Proteja o cabo de alimenta o para que n o seja pisado ou prensado especialmente nos plugues tomadas m ltiplas e no ponto de onde sai do...

Страница 161: ...te aceso em vermelho azul ou verde ou apagados Essa uma limita o t cnica da tecnologia LCD e n o um defeito Telas de LCD telas de plasma PDP e monitores de tubo de raios cat dicos CRT convencionais ta...

Страница 162: ...1 Informa es de seguran a relativas a este equipamento 14...

Страница 163: ...25 EC que foi revisada em 2013 Informa es de rastreabilidade da marca o CE apenas para pa ses da UE Fabricante Ricoh Co Ltd 3 6 Nakamagome 1 chome Ohta ku Tokyo 143 8555 Japan Importador Ricoh Europe...

Страница 164: ...entam o s mbolo abaixo Este s mbolo indica que o produto n o deve ser tratado como res duo urbano Ele deve ser descartado separadamente por meio dos sistemas adequados de retorno e coleta dispon veis...

Страница 165: ...de sua regi o Notas para usu rios nos EUA sobre os requisitos da FCC Nota Este equipamento foi testado e considerado em conformidade com os limites estabelecidos para um equipamento digital da Classe...

Страница 166: ...s para usu rios canadenses de dispositivos sem fio Este equipamento est em conformidade com os padr es RSS isentos de licen a da ind stria do Canad A opera o est sujeita s duas condi es a seguir 1 Est...

Страница 167: ...que acompanha o suporte Para mais informa es sobre como fixar a unidade principal na parede consulte as instru es que acompanham o equipamento para fixa o na parede Entre em contato com seu fornecedo...

Страница 168: ...lagem pl stica deste produto Mantenha sempre os materiais de polietileno por exemplo sacolas fornecidos com este equipamento longe do alcance de beb s e crian as pequenas Os materiais de polietileno p...

Страница 169: ...tive Whiteboard D5520 pesa cerca de 50 kg Use um suporte de parede que seja resistente o suficiente para suportar o peso da unidade principal Ao fixar a unidade principal a uma parede ou ao teto escol...

Страница 170: ...retamente recomendado seguir as medidas necess rias para evitar que o equipamento caia ap s a instala o Caso o equipamento seja instalado em um local exposto a altas temperaturas recomendada a especif...

Страница 171: ...etamente Nesse caso mantenha uma certa dist ncia entre os equipamentos ou disponha os paralelamente Ao instalar o equipamento fixando a unidade principal em uma parede 1 2 3 4 1 Esquerda 10 cm ou mais...

Страница 172: ...re um t cnico profissional para fazer instala es em parede O fabricante n o se responsabiliza por instala es que n o sejam feitas por um t cnico profissional 3 Instalar o equipamento instala o feita u...

Страница 173: ...ade principal O suporte de caneta deve ser posicionado na parte inferior central da unidade principal necess ria uma chave de fenda Phillips para montar o suporte de caneta Selecione a ferramenta apro...

Страница 174: ...3 Instalar o equipamento instala o feita um fornecedor 26...

Страница 175: ...ntes Terminais de entrada sa da 4 10 5 6 7 7 9 11 DTW001 12 8 2 3 1 N Nome Descri o 1 USB 2 0 Tipo A Conecte o adaptador Bluetooth 2 USB Tipo B para Toque Conecta o cabo USB da tela a um computador pa...

Страница 176: ...utput Conecta se a um dispositivo compat vel com DisplayPort 8 Entrada VGA Recebe sinais RGB anal gicos de um dispositivo externo como um computador 9 RS 232C Input RS 232C Output Para controle extern...

Страница 177: ...dor por meio do cabo USB fornecido O m dulo de toque do equipamento suporta o recurso de opera o f cil Plug and Play N o necess rio instalar drivers adicionais no computador BR DTW003 Cabo USB Computa...

Страница 178: ...adaptador Bluetooth ao conector USB 3 0 Tipo A e n o porta USB 2 0 Tipo A Se voc conectar outros dispositivos ao conector USB 3 0 Tipo A o adaptador Bluetooth talvez n o funcione corretamente DTW006 1...

Страница 179: ...slocar o equipamento desligue o interruptor de alimenta o e desconecte o cabo de alimenta o Nunca use um cabo de alimenta o que pare a estar danificado ou desgastado nem troque o tipo de plugue do cab...

Страница 180: ...MEMO 32...

Страница 181: ...2016 2017...

Страница 182: ...Y305 7501A BR PT ES ES FR FR DE DE AU EN GB EN US EN...

Отзывы: