
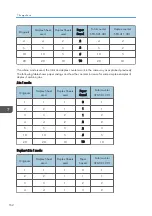


Default: [1 minute]
Ready State After Printing
(Menu > System Settings > Administrator Tools > Ready State After Printing)
The user can specify how the printer operates when it receives print jobs in Sleep mode.
Default: [Cntrl Panel Off (EngySavg)]
• Control Panel On
The printer turns on the control panel and prints received jobs.
• Cntrl Panel Off (EngySavg)
The printer prints received jobs but the control panel remains off.
Slp Tmr after Engy Sv Prt
(Menu > System Settings > Administrator Tools > Slp Tmr after Engy Sv Prt)
When [Ready State After Printing] is set to [Cntrl Panel Off (EngySavg)], the user can specify
whether or not the printer resumes Sleep mode immediately after exiting Energy Saver mode.
Default: [Immediate]
• Immediate
The printer resumes Sleep mode immediately after printing, regardless of the Sleep Mode
Timer settings.
• After Time Set by Tmr Ends
The printer resumes Sleep mode after the time specified in Sleep mode elapses.
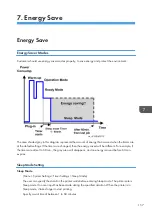
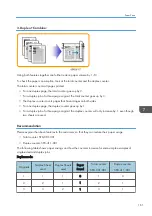
Return to Stand-by Mode
Sleep Mode
Recovery time: 9 sec.
Recommendation
We recommend that the default settings should be kept.
• If the customer requests that these settings should be changed, please explain that their energy
costs could increase, and that they should consider the effects on the environment of extra energy
use.
• If it is necessary to change the settings, please try to make sure that the Sleep Mode timer is not too
long. Try with a shorter setting first, such as 5 min., then go to a longer one (such as 15 min.) if the
customer is not satisfied.
7. Energy Save
158
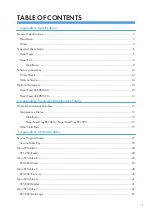
Содержание Aficio MP 171
Страница 1: ...Model Gim P1a Machine Code M171 Field Service Manual September 2014 ...
Страница 2: ......
Страница 14: ...12 ...
Страница 34: ...3 Preventive Maintenance 32 ...
Страница 40: ...2 Press the release button and open the front cover A 3 Open the rear cover A 4 Replacement and Adjustment 38 ...
Страница 42: ...2 Press the release button and open the front cover A 3 Open the rear cover A 4 Replacement and Adjustment 40 ...
Страница 44: ...2 Open the rear cover A 3 Release both side hinges to detach the rear cover A 4 Replacement and Adjustment 42 ...
Страница 48: ...3 OPU Board x 7 4 Replacement and Adjustment 46 ...
Страница 57: ...PCDU PCDU 1 Press the release button and open the front cover A 2 Hold the grip to pull the PCDU A out PCDU 55 ...
Страница 59: ...2 Hold the grip to pull the toner cartridge A out Toner Cartridge 57 ...
Страница 105: ...2 Rear Cover Switch A x 1 Hook Electrical Components 103 ...
Страница 106: ...4 Replacement and Adjustment 104 ...
Страница 120: ...5 System Maintenance 118 ...
Страница 166: ...MEMO 164 EN ...
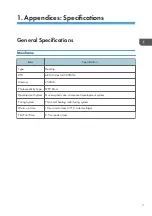
Страница 167: ...Model Gim P1a Machine Code M171 Appendices September 2014 ...
Страница 168: ......
Страница 186: ...2 Appendices Preventive Maintenance Tables 18 ...
Страница 259: ...MEMO 91 ...
Страница 260: ...MEMO 92 EN ...


