background image

5.


Communication Software Guideline 

Software Installation 


                                      VSP 198CVS                              User Manual                                            56


Software Installation 

VSP 198CVS video processor is very easy to be configured with user 

friendly communication software, support drag and drop operation for edit 

and display. Also it can be customized with schedule function. 

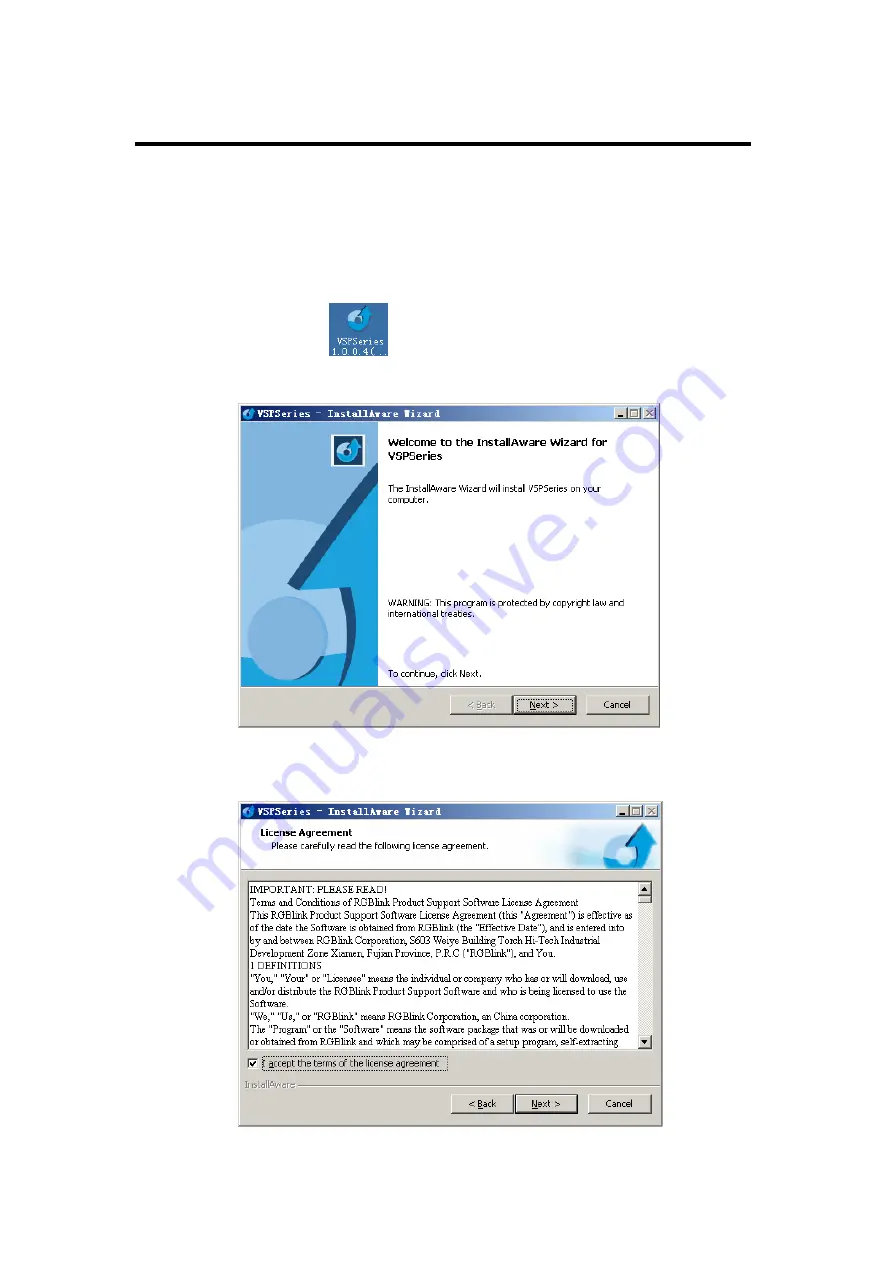
Double click 

to install, English version default for use, click ―select‖ 

to next dialog: 


And in next dialog is the user agreement of the software, click Agree to go 

on: 


Содержание VSP 198CVS

Страница 1: ...VSP 198CVS User Manual 1 VSP 198CVS User Manual Manual RGB RD UM V198CVS E001 Revision V1 1 This User Manual Applies to VSP 198CV and VSP 198CVS ...

Страница 2: ...anges to the product s and or the program s described in this publication at any time without notice This publication could contain technical inaccuracies or typographical errors Changes are periodically made to the information in this publication these changes are incorporated in new editions of this publication Federal Communications Commission FCC Statement This equipment has been tested and fo...

Страница 3: ...or independent service will be deemed invalid provided the damage is not proven to be attributed to the absence of properties guaranteed in writing or due to the intent or gross negligence or part of RGBlink If the purchaser or a third party carries out modifications or repairs on goods delivered by RGBlink or if the goods are handled incorrectly in particular if the systems are commissioned opera...

Страница 4: ... A1 Building Baiwang R D Building Shahe West Road Xili Town Nanshan District Shenzhen Guangdong Province P R C Beijing office Room 602 Building 7 CaiManJie No 67 Chaoyang Road Chaoyang District Beijing P R C Shanghai office Building 3 1358 Nong Tongpu Road Shanghai P R C Tel 86 592 5771197 Fax 86 592 5771202 Customer Hotline 4008 592 315 Websites http www rgblink com http www rgblink cn E mail sal...

Страница 5: ...e power cord is essential for safe operation Grounding the Product This product is grounded through the grounding conductor of the power cord To avoid electrical shock plug the power cord into a properly wired receptacle before connecting to the product input or output terminals A protective ground connection by way of the grounding conductor in the power cord is essential for safe operation Use t...

Страница 6: ...tice condition statement etc which if not strictly observed could result in injury or death of personnel Note CAUTION The exclamation point within an equilateral triangle is intended to alert the user to the presence of important operating and maintenance servicing instructions in the literature accompanying the appliance Highlights an essential operating procedure condition or statement ...

Страница 7: ...al 7 Change History The table below lists the changes to the Video Processor User Manual Format Time ECO Description Principal V1 0 2013 09 22 0000 Release Peter V1 1 2014 07 11 0001 1 Update the Menu 2 Add USB Update Vira ...

Страница 8: ...tions 17 System Overview 23 Application Questions 24 2 Hardware Orientation 25 In This Chapter 25 VSP 198CVS Back Panel 26 CONT Interface 26 7 Dial Switch 26 8 10 100M UDP Interface 26 9 USB Interface 26 10 RS232 Interface 27 INPUT Interface 27 3 CVBS Input 27 4 VGA Input 27 5 SDI Input 27 6 SDI Loop Out 27 13 HDMI Input 28 ...

Страница 9: ... interface 28 Switch and Power 28 12 20 Power Interface and Switch 28 VSP 198CVS Front Panel 29 OLED Panel 30 Menu Button 30 Signal Buttons 30 Function 31 3 Hardware Installation 34 In This Chapter 34 Safety Precautions 35 Unpacking and Inspection 35 Site Preparation 35 4 Menu Orientation 36 In This Chapter 36 MENU 37 OUTPUT FORMAT 38 ...

Страница 10: ... LOCK FRONT PANEL 47 FACTORY RESET 47 QUICK MENU 49 SPECIAL EFFECTS SWITCHING 49 SAVE FUNCTION 51 LOAD FUNCTION 52 PIP FUNCTION 52 SPLIT FUNCTION 53 SCALE FUNCTION 54 5 Communication Software Guideline 55 In This Chapter 55 Software Installation 56 Software Operation 60 Connection 60 Use 63 File Toolbar 63 ...

Страница 11: ...meter Toolbar 70 Image Toolbar 70 Display Toolbar 70 Output Image Setup Toolbar 71 Images Display Toolbar 72 User Mode Toolbar 72 Log Toolbar 72 Information Toolbar 72 Video Processor Options 73 How to Connect Window Control Program by RS232 Interface 76 How to Connect Windows Control Program by USB Interface 79 How to Connect Windows Control Program by LAN Interface 83 6 System Setup and Operatio...

Страница 12: ...d Full Size Switching 97 How to Set up Image Zoom 98 How to Realize the Text Overlay Setting 99 How to Realize Test Pattern Output and Settings 101 How to Set up the Playlist 103 How to Use Black Out 106 How to Realize LAN Remote Control Settings 107 How to Save the Parameter 110 How to Load the Saved Parameter 111 7 Common Questions and Solution 112 In This Chapter 112 No Output in Large Screen 1...

Страница 13: ...l need to scale 114 No Display in the Second Half Part of Large Screen 114 Resolution is inadequate 114 Left of the Screen Appears Two Black Sides 114 Adjust DE deviation 114 All Key Lights Light Simultaneously 115 Check if dial switches are normal 115 A Specification 116 B Contact Information 119 C Software Upgrade 120 ...

Страница 14: ...nual 14 1 Introduction This chapter is designed to introduce you to the VSP 198CVS User Manual Areas to be covered are Chapter Structure How to Use This Manual Terms and Definitions System Overview Application Questions ...

Страница 15: ... VSP 198CVS operations Chapter 1 Introduction Chapter 2 Hardware Orientation Chapter 3 Hardware Installation Chapter 4 Menu Orientation Chapter 5 Communication Software Guideline Chapter 6 System Setup and Operations Chapter 7 Common Questions and Solution Appendix A Specification Appendix B Contact information Appendix C Software Upgrade ...

Страница 16: ...nd Search Index tool to perform comprehensive searches as required Table of Contents and Index Use the Table of Contents bookmarks to navigate a desired topic Click any item to instantly jump to that section of the guide You can also use the Index to jump to specific topics within a chapter Each page number in the Index is a hyperlink General Operations To ensure trouble free operation please foll...

Страница 17: ...deo waveform without the video elements It includes the vertical sync horizontal sync and the chroma burst information Blackburst is used to synchronize video equipment to align the video output One signal is normally used to set up an entire video system or facility Sometimes it is called House sync BNC Bayonet Neill Concelman A cable connector used extensively in television and named for its inv...

Страница 18: ... should yield a practical contrast ratio of 30 1 to 50 1 DVI Digital Visual Interface The digital video connectivity standard that was developed by DDWG Digital Display Work Group This connection standard offers two different connectors one with 24 pins that handles digital video signals only and one with 29 pins that handles both digital and analog video EDID Extended Display Identification Data ...

Страница 19: ...ity JPEG typically achieves 10 1 compression with little perceptible loss in image quality Produces blocking artifacts MPEG Motion image Expect Group A standard committee under the auspices of the International Standards Organization working on algorithm standards that allow digital compression storage and transmission of moving image information such as motion video CD quality audio and control d...

Страница 20: ...trol lines RS 232 is a serial control standard with a set number of conductors data rate word length and type of connector to be used The standard specifies component connection standards with regard to the computer interface It is also called RS 232 C which is the third version of the RS 232 standard and is functionally identical to the CCITT V 24 standard Saturation Chroma chroma gain The intens...

Страница 21: ...ion protocol of the Internet Computers and devices with direct access to the Internet are provided with a copy of the TCP IP program to allow them to send and receive information in an understandable form USB Universal Serial Bus USB was developed by seven PC and telecom industry leaders Compaq DEC IBM Intel Microsoft NEC and Northern Telecom The goal was easy plug and play expansion outside the b...

Страница 22: ...al 22 has a pixel by line resolution of 640 480 with a color palette of 16 bits and 256 000 colors YCrCb Used to describe the color space for interlaced component video YPbPr Used to describe the color space for progressive scan non interlaced component video ...

Страница 23: ... processing multiple cascade mapping different user configurations and controlling Key in and out and other advanced functions for high end show Features Multiple inputs VSP 198CVS provides 2x Composite CVBS 1x DVI compatible with HDMI 1 3 1x HDMI 2xVGA 1 x3G self adaptive SDI input 3G SDI module for the application if different signal inputs Multiple outputs 1 x Preview VGA output 2 X DVI outputs...

Страница 24: ...VS User Manual 24 Application Questions RGBlink offers solutions to demanding technical problems Any application questions or required further information please contact with our Customer Support Engineers Refer to Appendix B for contact details ...

Страница 25: ...VS User Manual 25 2 Hardware Orientation In This Chapter This chapter provides detailed information about the VSP 198CVS hardware The following topics are discussed VSP 198CVS Back Panel VSP 198CVS Front Panel ...

Страница 26: ...14 DVI Input 7 Push button switch 15 DVI Loop Out 8 10 100M Interface 16 17 DVI Output 9 USB Interface 18 VGA Output 10 RJ11 RS232 Interface 20 Power Interface CONT Interface 7 Dial Switch If the two dial switches are upwards the device is in normal work and if they are downwards the device is in upgrade state OLED module light is off when the device is in upgrade state Some of the button lights t...

Страница 27: ...w 5 3G SDI input SDI module and support loop through output for cascade or preview 3 CVBS Input CVBS input input standard video signal from players cameras etc supported resolution 480i and 576i via BNC Supported standards include PAL NTSC and SECAM 4 VGA Input VGA interface input the video signal from HD player and computer etc Compatible with YPbPr via the DB15 interface Note 3 and 4 input inter...

Страница 28: ...out connect to the DVI input of the next level VSP 198CVS or the device with DVI input OUTPUT Interface 16 17 DVI Output DVI output connect to the monitor or LED screen which has DVI interface This DVI connector can not support hot plugging 18 VGA Output VGA output connect to monitor or projector which has VGA interface 11 19 Sending Card interface Sending card module port Power has been already s...

Страница 29: ...ED module on the front panel will show RGBlink and go into its self verification before it load last setting config and send processed image to the target monitor CV1 input is the default source With front panel keyboard user can operate VSP 198CVS through the menus on OLED module VSP 198CVS front panel as shown in figure 亮彩系列 AVDSP Series VSP 198CVS ...

Страница 30: ...ton to confirm current options Signal Buttons CV1 input selection button its LED light turns on output will be switched to this channel CV2 input selection button its LED light turns on output will be switched to this channel VGA1 input selection button its LED light turns on output will be switched to this channel compatible with YPbPr VGA2 input selection button its LED light turns on output wil...

Страница 31: ... LED light turns on default setting of the test pattern Test pattern can be set and selected from OLED menu push the button again to disable pattern Function PIP function button Single image or dual image selection button Push the button its LED light turns on and PIP function is open Push the button again its LED light turns off and close the PIP function change to single image OLED shows as foll...

Страница 32: ...less split effect is by DVI or SDI loop through out put When other input signals to be used for seamless split need a signal distributor support Note SPLIT reuse function PIP mode SPLIT button is select image A or image B Save button push it to enter SAVE mode turn the knob or push the number button which light up to save Currently it supports 10 saving modes from 1 2 3 4 5 6 7 8 9 0 which means S...

Страница 33: ...er Advanced menu button push the button to enter the menu items Turn the knob to select the relevant submenu For details please refer to MENU in menu orientation ESC reuse function button Push the MENU to exit the menu Effect switch function Push the MENU button two times to enter the effect switch function menu For details please refer to Special Effect Switching Scale function button for image s...

Страница 34: ...8CVS User Manual 34 3 Hardware Installation In This Chapter This chapter provides comprehensive installation instruction for VSP 198CVS hardware Following is the mechanic info of VSP 198CVS for your reference ...

Страница 35: ...x inspect it for damage If you find any damage notify the shipping carrier immediately for all claims adjustments As you open the box compare its contents against the packing slip If you find any shortages contact your sales representative Once you have removed all the components from their packaging and checked that all the listed components are present visually inspect the system to ensure there...

Страница 36: ...nctions that are available and descriptions of each menu tree in block diagram format The following topics are discussed MENU OUTPUT FORMAT SCREEN PARAMETERS PICTURE IMAGE QUALITY ADJUST TEXT OVERLAY SYSTEM LANGUAGE LOCK FRONT PANEL FACTORY RESET QUICK MENU SPECIAL EFFECTS SWITCHING SAVE FUNCTION LOAD FUNCTION PIP FUNCTION SPLIT FUNCTION SCALE FUNCTION ...

Страница 37: ...ENU VSP 198CVS User Manual 37 MENU Push the MENU to menu items menu as shown Turn knob buttons to select menu items before the menu means it s in selected state Push the knob to enter corresponding setting or view the menu ...

Страница 38: ...STANDARD Push knob button to select left or right menu item turn the knob to enter corresponding setting or view the menu Users can choose different output formats by turning the knob this option includes 22 common standard output resolutions shown as follows 800 600 60 1024 768 60 1024 768 75 1280 720 50 1280 720 60 1280 768 60 1280 800 60 1280 1024 60 1360 768 60 ...

Страница 39: ...d output resolution SCREEN PARAMETERS Push the MENU button to go into the menu items and turn the knob to select SCREEM PARAMETERS show menus as follows H SIZE Width setting V SIZE Height setting H POS Horizontal phase setting V POS Vertical phase setting Mode Can choose SCREEN SIZE or FULL SIZE RESET If image quality distorts by improper operation it can be recover by factory reset For details pl...

Страница 40: ... improper operation it can be recover by factory reset For details please refer to the instructions in the manual How to Set up the Image Zoom SCALE It can adjust the image scale size and image position settings including as follows H SIZE Width setting V SIZE Height setting H POS Horizontal phase setting V POS Vertical phase setting RESET If image quality distorts by improper operation it can be ...

Страница 41: ...via this setting COLOR BLUE It can change the image color blue via this setting RESET If image quality distorts by improper operation it can be recover by factory reset Note Users can set according to their actual situation this function mainly suitable for these professional operator who knows how to set the image quality correctly Others are not comments to do these operations If image distorted...

Страница 42: ...to adjust to display in full screen image Note Comments customers to use this operation in adjusting the VGA input shiftment SDI VGA2 ADJUST When SDI VGA2 input signal image shift please adjust image s H POS and V POS to display in full screen image Sub menu as follows H POS Image horizontal position V POS Image vertical position ANTI ALIAS If there is sawtooth when input SDI signal user can do an...

Страница 43: ...o setting user can choose 4 3 16 9 and DEFAULT OUTPUT ADJUST Output adjust menus the sub menu as following DVI1 setting as following DVI MODE Can set the protocol as HDMI or DVI default is DVI output HDMI signal output will enable when HDMI option checked BIT DEPTH Can set the image bit depth DATE RANGE DVI1 output range can set as RGB graphic mode or YCbCr video mode RGB output scale range is bet...

Страница 44: ... as follows TEXT OVERLAY Can select ON or OFF OFF is system default PRESET Can preset value of the following functions and total 13 modes User User mode WhOnBk1 White On Black 1 WhOnBk2 White On Black 2 BkOnWh1 Black On White 1 BkOnWh2 Black On White 2 GrnOnBk1 Green On Black 1 GrnOnBk2 Green On Black 2 GrnOnWh1 Green On White 1 GrnOnWh2 Green On White 2 RedOnBk1 Red On Black 1 RedOnBk2 Red On Bla...

Страница 45: ...is lower than the setting value then the image is the graphic content pixel otherwise it is the graphic background pixel It should combined with AND OR conditions when judging KEY IN OUT KEY IN Delete the background and keep the text title KEY OUT Delete the text title and keep the background RED Red limit cut off point condition of ABOVE and BELOW condition in red channel the range is 0 248 GREEN...

Страница 46: ...fer to the instructions in the manual How to Realize the Test Pattern Output and Settings DELAY CALL Delay the output time setting When more than one equipment power on and the processor is the end equipment in order to improve question that can t identify the input signal and phenomenon that LED screen appear messy code and flash screen it need to delay the input time among 1S to 255S TECH SUPPOR...

Страница 47: ...Choose ON to set the backup signal for BACKUP_1 to BACKUP_5 It will switch to the backup signal if interrupt signal USB UPDATE User can update the device by USB LANGUAGE Through this option user can choose Chinese or English according to their needs to operate the interface more quickly LOCK FRONT PANEL Through this setting can choose whether to lock the front panel operation if the front panel op...

Страница 48: ...4 Menu Orientation MENU VSP 198CVS User Manual 48 confirm then VSP 198CVS is reset to its factory settings After 5 seconds it completes factory settings and is ready for more operations ...

Страница 49: ...MENU SPECIAL EFFECTS SWITCHING Push MENU button two times and enter the effect switch function menu effect menu shown as follows DEINTERLACE Force Deinterlace function can choose ON or OFF ON Force deinterlace no effect switching OFF No deinterlace with effect switching IMAGE ENHANCE Image enhancement function used for image edge sharpening color reduction and image scaling MODE Special effects sw...

Страница 50: ...ual 50 WIPE SOUARE IN WIPE SOUARE OUT WIPE TOP LIEFT IN WIPE TOP LIEFT OUT WIPE TOP RIGHT IN WIPE TOP RIGHT OUT WIPE BOTTOM LEFT IN WIPE BOTTOM LEFT OUT WIPE BOTTOM RIGHT IN WIPE BOTTOM LEFT OUT WIPE LEFT IN WIPE LEFT OUT WIPE RIGHT IN WIPE RIGHT OUT ...

Страница 51: ...en FADE TIME Switch time setting Rotate the knob to choose the time and push the knob to confirm The switching time ranges from 0 to1S ALPHA It can set the image transparency the regulating range is among 0 to 16 SAVE FUNCTION Push SAVE button the button led light turn on and enter the save function menu OLED module show as follows According to the OLED module information to save operation For det...

Страница 52: ...in the manual How to Load the Saved Parameter PIP FUNCTION Push PIP button the button led light turn on and enter the PIP function menu OLED module show as follows PIP Choose ON to set PIP mode LAYOUT There are 7 PIP layouts Can choose PIP layouts anyone the corresponding results are as follows PIP L T PBP L R PBP T B SELECT Can choose to set the size or position of IMAGE A or IMAGE B individually...

Страница 53: ...is among 0 to 16 For details please refer to the instructions in the manual How to Set up the PIP SPLIT FUNCTION Push SPLIT button the button led light turn on and enter the SPLIT function menu Push the knob to open the split function OLED module show as follows H TOTAL Horizontal total V TOTAL Vertical total H POS Horizontal phase setting V POS Vertical phase setting H SIZE Width setting SPLIT ON...

Страница 54: ...ton the button led light turn on and enter the SCALE function menu Push the knob to open split function OLED module show as follows H SIZE Width setting V SIZE Height setting H POS Horizontal phase setting V POS Vertical phase setting RESET If image quality distorts by improper operation it can be recover by factory reset For details please refer to the instructions in the manual How to Set up the...

Страница 55: ...tailed information about the control communication software The following topics are discussed Software Installation Software Operation How to Connect Windows Control Program by RS232 Interface How to Connect Windows Control Program by USB Interface How to Connect Windows Control Program LAN Interface ...

Страница 56: ...s very easy to be configured with user friendly communication software support drag and drop operation for edit and display Also it can be customized with schedule function Double click to install English version default for use click select to next dialog And in next dialog is the user agreement of the software click Agree to go on ...

Страница 57: ...5 Communication Software Guideline Software Installation VSP 198CVS User Manual 57 User can select Change to choose the VSP 198CVS install software ...

Страница 58: ...5 Communication Software Guideline Software Installation VSP 198CVS User Manual 58 Click Next to go on Click Next to go on ...

Страница 59: ...5 Communication Software Guideline Software Installation VSP 198CVS User Manual 59 Click Next to go on Click Finish and ready to run VSP 198CVS console ...

Страница 60: ...ection When control video processor through PC software besides the power cord the product default equip with a line that is COM RS 232 9 pin DB9F RJ11 COM crystal head 6 B4C Below are the details about connection of steps First connect 9 pin DB9F to the computer on the corresponding port and connect COM crystal to RS232 port on video processor Open video processor Next operate the computer back t...

Страница 61: ... left record serial interface name that computer provides as following chart the serial port is COM1 Confirm used COM and open control software click communication page enter setup option serial is the default COM click icon to refresh COM number choose available COM default Baud rate is115200 After serial setting click icon the icon becomes when ...

Страница 62: ...to How to Connect Windows Control Program by RS232 Interface User can also connect the computer and VSP 198CVS with USB cable For details please refer to How to Connect Windows Control Program by USB Interface Ethernet user can fill any number less than 1023 in local port the remote port must be 192 168 0 100 and the remote port must be 1000 After setting above click the icon to connect with the n...

Страница 63: ...ser Manual 63 Use File Toolbar Open script User can open saved script and alter its parameters Save script Save current user parameters as script to the prescribed path Import template There are six templates for user Users can setup one of templates as the common one ...

Страница 64: ...oose open device when start and using script saved before or execute schedule edited before when start If user choose open device when start user can use last run use script file or none when user start User can click to choose which script user want to open If user choose execute schedule when start the next dialogue will display when software run ...

Страница 65: ...tware Guideline Software Operation VSP 198CVS User Manual 65 Language The software supports Chinese English and German version Communication Toolbar Open COM Close COM Set COM Device Toolbar Synchronization Save to flash ...

Страница 66: ...ation Software Guideline Software Operation VSP 198CVS User Manual 66 Load form Flash Factory setup Advance Note Schedule Toolbar Customize schedule Advance is only done by engineer Please connect us for password ...

Страница 67: ...5 Communication Software Guideline Software Operation VSP 198CVS User Manual 67 Execute schedule Execute tasks according to schedule Help Toolbar About Display information of software ...

Страница 68: ... selecting from pull down list VSP 198CVS has 22 output resolutions for users selection Note Images Display Mode Toolbar Choose to work in single channel or dual channel Layout Toolbar If in single channel mode the dialog is in grey and it is in limited use If in dual channel mode user can set the device to work in PIP or PBP Same as MENU OUTPUT FORMAT ...

Страница 69: ... on the left The green pane means current selected interface When user selects a dual channel mode select any channel image click on the toolbar interface the ICONS for the channel selection input interface i e SDI Composite1 Composite2 Composite3 S Video DVI YPbPr VGA green toolbar says it has chosen the current interface for channel 1 input interface the default last single channel chosen interf...

Страница 70: ... display image can directly shows on corresponding screen Note Image Toolbar User can scale the images Image 2 can t choose in single channel mode Note Display Toolbar Display toolbar Users can set Alpha value of dynamic Video and static current frame through display toolbar When it is in dynamic Video the video plays properly when it is in static current frame the video stop playing Same as MENU ...

Страница 71: ...ecommended since LED large screen itself has Gamma function For further information users can contact with our customer service team Note Output Image Setup Toolbar User can customize the brightness and the contrast Note Same as MENU SYSTEM DISPLAY MODE FREEZE IMAGE Same as MENU ADJUST GAMMA Same as MENU IMAGE QUALTY ...

Страница 72: ...nd drop image images in this area This process is sync to the parameters in images toolbars User Mode Toolbar Users can recall the saved user mode1 mode2 or mode3 Log Toolbar User can save or delete the operate log file Information Toolbar It is the VSP 198CVS software version core board version firmware version and the serial number in bottom of the software interface ...

Страница 73: ...Communication Software Guideline Software Operation VSP 198CVS User Manual 73 Video Processor Options Layout Through the layout of the user can set a variety of double image mode single image mode is off ...

Страница 74: ...ing operation in the schedule For details please refer to the instructions in the manual How to Set up the Playlist IP Address Users can set equipment IP usually used under the condition of one computer control or remote control several computers It takes effect immediately after users change IP through serial port and when users change IP through network it takes effect after reopen the software ...

Страница 75: ...munication Software Guideline Software Operation VSP 198CVS User Manual 75 Input Config Define VGA1and VGA2 Input source types VGA input compatible with YPbPr Note Same as MENU ADJUST VGA 1 VGA2 SIGNAL TYPE ...

Страница 76: ...e side of the RJ11 download line to the RS232 on the video processor VSP 198CVS and the other side to be connected to the serial port on the PC There is no any serial port on your PC you will need another Serial to USB adapter Connect one end of the RJ11 download line to the RS232 on the video processor Connect the end of USB side to the PC Ensure the cable connection is good Turn on the Video Pro...

Страница 77: ... RS232 Interface VSP 198CVS User Manual 77 Click Device Manager on the left check the COM number as following COM1 is offered Remember the COM you are using and then run the control software find Communication option In default first time user have to click button as following ...

Страница 78: ... manager Set VSP 198CVS Boud Rate to be 115200 Click Confirm after setting Click open serial check if COM icon is on the bottom right corner when there is the prompt green showing on the software it means the communication is ok and you can use the software to control the device now Note If power off during communication should close the port by first and plug in out of the USB and do communicatio...

Страница 79: ...l Program by USB Interface Install the driver Connect the USB cable to the PC and the video processor Turn on the VSP 198CVS for the first time to use USB the PC will remind finding the new hardware and ask to install the driver for this new driver Install from the list or specified location press NEXT Press browser to find the driver and press NEXT ...

Страница 80: ...ware Control Guide How to Connect Window Control Program by USB Interface VSP 198CVS User Manual 80 When the installation finish can go to check the installed COM port inside the device management as following image shows ...

Страница 81: ...ect Window Control Program by USB Interface VSP 198CVS User Manual 81 Install the console software and run after install shows the interface of the console as following Select the COM as installed just now and set the VSP 198CVS Boud Rate to be 115200 ...

Страница 82: ... USB Interface VSP 198CVS User Manual 82 Press to start communication when there is green point in the right down corner showing on the software it means the communication is ok and you can use the software to control the device now the software operation is the same as VSP 198CVS ...

Страница 83: ...rol computer Connect VSP 198CVS and computer with cable the connection diagram is as follow Power on VSP 198CVS and start the network function specific steps as below The first step push MENU button login MENU SYSTEM ETHERNET check the IP address of the equipment the equipment factory default IP address 192 168 0 100 The second step check computer IP address Click start then press button Run Enter...

Страница 84: ...ress 192 168 0 132 The fourth step the two IP address are in the same band i e 192 168 0 XXX the fourth section numbers XXX will not repeat previous If so the communication connection can be built by line CAT5 Note If computer IP address and equipment IP address are not in same band For example the computer IP address is 218 032 010 201 We need to revise the computer IP address to 192 168 0 xxx Op...

Страница 85: ... same band with that of computer 192 168 0 XXX The fifth step Open windows control software click ico Interface display as below Select Enternet Input equipment IP address click OK Click to open the serial port if the Comm button in the lower right corner of the control software interface is green and log outputs information smoothly then you would control the device through PC software ...

Страница 86: ...Switching How to Set up the PIP How to Set up the SPLIT How to Set up the Size and Position of the Single Image How to Do Customized Output Resolution How to Realize the Screen Size and Full Size Switching How to Set up Image Zoom How to Realize the Text Overlay Setting How to Realize Test Pattern Output and Settings How to Set up the Playlist How to Use Black Out How to Realize LAN Remote Control...

Страница 87: ...t Interface 8 10 100M control Interface 16 17 DVI output Interface 9 USB control Interface 18 VGA output Interface 10 RJ11 RS232 control Interface 20 Power input interface 16 17 DVI output default the main image output use for connecting the sending card of LED screen VSP 198CVS support resolution format as following 800x600x60Hz 1024x768x60Hz 1024x768x75Hz 1280x720x60Hz 1280x720x50Hz 1280x768x60H...

Страница 88: ...er interface for video signal input interface CVBS BNC Port Can receive standard video signal from players cameras etc Input supported resolution 480i and 576i via BNC Supported standards include PAL NTSC and SECAM VGA DB15 Port Can support HD player computer video signal Through the DB15 interface input signal DVI DVI I Port Computer graphics interface may receive the DVI output interface can als...

Страница 89: ...nish turn on the power switch user guideline The fist step set up OLED display language The second step set up output format The third step set up LED screen height size The fourth step set up LED screen width size The fifth step set up LED screen horizontal size The sixth step set up LED screen Vertical size The seventh step set up input source The eighth step up save ...

Страница 90: ...uch as DVI push DVI button OLED module show as follows CV1 button light turns off after pushing DVI button DVI button light will be on if the DVI signal is effective and stable And if the DVI signal is invalid or no input DVI button light will flash The same method can switch the signals among CV2 VGA1 VGA2 DVI HDMI SDI Note Only cut is supported among the switch of CV1 CV2 VGA2 HDMI and SDI SOURC...

Страница 91: ...rresponding results are as follows PIP L T PBP L R PBP T B SWAP IMAGE It can set PIP to swap exchange when choose ON it can realize the IMAGE A and IMAGE B exchange ALPHA Can set the image transparency the regulating range is among 0 to 16 SELECT Can choose to set the size or position of IMAGE A or IMAGE B individually Note Use function reuse key SPLIT 6 to select IMAGE A or IMAGE B PIP ON LAYOUT ...

Страница 92: ... menus Turn the knob and choose SPLIT choose ON to enable the split function menus are as follows H TOTAL LED screen Horizontal total size V TOTAL LED screen Vertical total size H POS This device display image Horizontal size V POS This device display image Vertical size H SIZE This device display image Width setting V SIZE This device display image Height setting RESET If image quality distorts b...

Страница 93: ...6 System Setup and Operation How to Set up the SPLIT VSP 198CVS User Manual 93 ...

Страница 94: ...r the scale function menus the OLED module show as follows The lights of number button 0 9 turn on user can adjust the following items by knob or number buttons H SIZE Width setting V SIZE Height setting H POS Horizontal phase setting V POS Vertical phase setting RESET If image quality distorts by improper operation it can be recover by factory reset H SIZE 1920 V SIZE 1080 H POS 0 V POS 0 RESET ...

Страница 95: ...Turn knob on each digital position and change the value of the digital by the digital buttons on the front panel For example input 1536 as following After the digital push Knob will add means before the is the horizontal size Same operation for vertical size for example input1536 as following After the digital push the Knob will add means before the is the vertical size and after the is the refres...

Страница 96: ...to enable VSP 198CVS to output this resolution VSP 198CVS will take 5 10 seconds to enable this output resolution Note All the resolution inside the value 2048 x 1152 x 60 141557760 can support For example 1 1536x1536x60 141557760 is OK 2 2560x1536x60 235929600 is too big can not support 3 2560x1152x50 is OK CUSTOMIZED 1536 1536 60 ...

Страница 97: ...om standard output resolution list or customized the output resolution which is higher than1408 x 832 For this application 1440x900 is an example Push the MENU button to go into the main menu and turn knob goes to SCREEM PARAMETERS push knob and goes into the SCREEN PARAMETERS menus as following H SIZE Horizontal pixels turn knob or use the digital button to input the value1408 V SIZE Vertical pix...

Страница 98: ... Zoom in vertical and the image will be zoom in to the top direction from its bottom V DOWN Zoom in vertical and the image will be zoom in to the down direction from its top V UP DOWN Zoom in vertical but in both top and down direction from its middle H LEFT Zoom in horizontal and the image will be zoom in to the left direction from its right H RIGHT Zoom in horizontal and the image will be zoom i...

Страница 99: ...non transparent background transparency is controlled by double image transparency Mode 2 Graphic content is controlled by double image transparency the background is completely transparent Rotate the knob and choose the mode 4 Push the MENU button return to TEXT OVERLAY turn the knob choose ABOVE BELOW to select the layer position for IMAGE B 5 Push the MENU button return to TEXT OVERLAY turn the...

Страница 100: ... GREEN The value range of color GREEN that to be set regulating range between 0 255 BLUE The value range of color BLUE that to be set regulating range between 0 255 7 At the same time user can view the effect through the screen to get a better setting Note All the above settings are available only for IMAGE B ...

Страница 101: ... and go into the menu items turn the knob and go to SYSTEM menu as following Push the knob and go into the SYSTEM menus Turn knob and go to DISPLAY MODE menu as following Push knob and go into the DISPLAY MODE menu Turn the knob and go to FLAT COLOR or TEST PATTERN option FLAT COLOR Push knob and go into the menu RED color range is from 0 to 255 GREEN is from 0 to 255 and BLUE is from 0 to 255 ADJ...

Страница 102: ...98CVS User Manual 102 TEST PATTERN Push knob and go into the menu items there are 66 kinds of test patterns If choose AUTO SWITCH VSP 198CVS will output all the test patterns one by one and the interval between is 1 to10S MODE TEST PATTERN TEST PATTERN TEST PATTERN 1 AUTO SWITCH OFF ...

Страница 103: ... time and operation of single or dual channels also can set up the ratio and position Users can setup up to 10 timing operation in the schedule 1 First make sure the VSP 198CVS has been connected to the PC software 2 Double click the VSP 198CVS software software interface is shown as follows 3 Click the VP Processor option on the top left then show the drop down menu as follows 4 Choose Device Sch...

Страница 104: ... The time timing play appoint Operating Mode User can choose single or dual channels Scale User can set the image ratio and position for Image 1 and Image 2 Dual channels Automatic play signal source selection 5 Click set icon to save after setting 6 If need to get certain timing content input the timer index and click the get icon to see the specific content For example choose timer index 2 show ...

Страница 105: ...6 System Setup and Operation How to Set Up the Playlist VSP 198CVS User Manual 105 7 The software default Device Schedule function close user should click on icon to realize automatically play ...

Страница 106: ...Out Black out descriptions Black signal realizes one key touch to a black screen Mixing 100 Black provides effect processing on Program output Black use fade in fade out effect Operation is as below Push BLACK button then Program output turns to BLACK with fade in fade out effect As shown below ...

Страница 107: ...without wireless function is available but only realize cable remote control No limitation for router s model and brand such as VPN router model Netcore 255 or 266 Volans VE 760W or 982W One VSP 198CVS processor as long as the router s network ports can connect to user can place multi pieces of VSP 198CVS Step one LAN physical connection Connect VSP 198CVS and router with network cable then connec...

Страница 108: ...t network segment is 192 168 1 1 then user need to change router s default gateway or change processor s IP both methods are available but we suggest to change processor s IP Method one Change processor s IP Push the MENU button and go into items as below image shows Change processor s IP to be 192 168 1 100 confirm and restart the processor then user can directly control on VSP 198CVS via windows...

Страница 109: ...l Settings VSP 198CVS User Manual 109 Go to router setting part and find out LAN port setting change the default value 192 168 1 1 to be 192 168 0 1 Save the setting and restart the router then user can directly control on VSP 198CVS via windows control software ...

Страница 110: ... function 2 Turn the knob and choose the position that will save push the knob to confirm 3 The figure 1 2 3 4 5 6 7 8 9 0 down of the buttons means SAVE1 10 user can push any button on to save For example save to SAVE 2 push button 2 the OLED panel will show as follows after saving 4 Again push the MENU button the button light is off and disable the SAVE function SAVE TO SAVE 1 Button is on can b...

Страница 111: ...t the edit operation inconvenience VSP 198CVS provides ten save preferences 1 Push the LOAD button the button light is on and enable the LOAD function 2 Turn the knob and choose the position that will load push the knob to confirm 3 Again push the LOAD button the button light if off and disable the LOAD function RECALL SAVE SAVE 1 Button on is ready for recall Button flashes means just recall ...

Страница 112: ...uestions and solution for the video processor The following topics are provided No Output in Large Screen Large Screen Output Flash Point Large Screen only Display Part of the Image No Display in the Second Half Part of Large Screen Left of the Screen Appears Two Black Sides All Key Lights Light Simultaneously ...

Страница 113: ...ssor check whether the signal is correct on the monitor If not display properly please check whether there is input signal or if input wire interface is taken tight output wire interface is picked up tightly If display normally check if sending card is normally working or need to replace sending card test Large Screen Output Flash Point Confirm if monitor output is normal Find a belt VGA input bes...

Страница 114: ...points of the screen width and height choose the resolution to be bigger than screen width by button MENU under OUTPUT RES and touch knob to confirm Left of the Screen Appears Two Black Sides Adjust DE deviation This phenomenon needs to adjust the DVI output and DE migration of the processor push the MENU button and choose ADJUST and find the corresponding output name such as DVI1 OUT ADJUST and f...

Страница 115: ...r Manual 115 All Key Lights Light Simultaneously Check if dial switches are normal Shut the power check if the two red dial switches are upward Reboot if they downward and reboot The red dial switches are for upgrade ...

Страница 116: ...r Standard DVI I socket Supported Resolution SMPTE 625 25 50 PAL 525 29 97 59 94 NTSC 1080P50 1080P59 94 60 1080i50 1080i59 94 60 720p50 720p59 94 60 VESA 800 600 60Hz 1024 768 60Hz 1280 768 60Hz 1280 1024 60Hz 1600 1200 60Hz 1920 1080 60Hz Signal Level TMDS pwl single pixel input 165MHz bandwidth Format Standard HDMI 1 3 DVI Loop Output Number of Inputs 1 Connector Standard DVI I socket Supported...

Страница 117: ... UXGA Signal Level R G B Hsync Vsync 0 to1Vpp 3dB 0 7V Video 0 3v Sync 75 ohm black level 300mV Sync tip 0V Supported Resolution VGA UXGA 800 600 60 1024 768 60 1280 1024 60 1440 900 60 1600 1200 60 SDI Input 3G module Number of Inputs 2 Connector Standard BNC Socket Transmission speed 19 4Mbps 3Gbps Supported Standard ITU R BT 656 ITU R BT 601 SMPTE 259M SMPTE 292 SMPTE 297 Balance Belden 1694A 1...

Страница 118: ...ts 2 Connector Standard DVI I Socket Signal Level TMDS pw 165MHz bandwidth Supported Resolution VESA 800 600 60Hz 1024 768 60Hz 1024 768 75Hz 1280 768 60Hz 1280 1024 60Hz 1440 900 60Hz 1400 1200 60Hz 1600 1200 60Hz 1920 1080 60Hz 1920 1200 6 0Hz 2048 1152 60Hz Function Input channel configuration Support each input channel signal programming configuration PIP Support PIP PBP for any two inputs Tra...

Страница 119: ...se owner Warranty related repairs include parts and labor but do not include faults resulting from user negligence special modification lighting strikes abuse drop crush and or other unusual damages The customer shall pay shipping charges when unit is returned for repair Headquarter S603 604 Weiye Building Torch Hi Tech Industrial Development Zone Xiamen Fujian Province P R C Tel 86 592 5771197 Fa...

Страница 120: ...o ON position as below 3 Plug in the power cord and make sure the device is in normal operation 4 Open the programming software and enter Flash Magic interface 5 Choose the corresponding serial port set the baud rate to 115200 choose LPC2368 and load the object files hex file of BOOT update program 6 Click START button 7 Exit the program turn off the power take the two coding switch back as below ...

Страница 121: ...M USB UPDATA SEL 4 Open the USB drive that plug into the computer and delete the firmware bin file in the USB drive then copy the MCU file of VSP198CVS to the USB drive program loading is complete after the file has been copied 5 Restart the device and enter the menu to check if the version is right factory reset is completed Operation steps are MENU SYSTEM SYSTEM INFO COM VERSION 3 CORE Panel Upg...

Страница 122: ... UPDATA SEL 4 Open the USB drive that plug into the computer and delete the firmware bin file in the USB drive then copy the MCU file VIDEO fvb of VSP198CVS to the USB program loading is complete after the file has been copied 5 Restart the device and enter the menu to check if the version is right factory reset is completed Operation steps are MENU SYSTEM SYSTEM INFO FIREWARE VER ...

Отзывы: