background image

- 32 -

S 200  -  Mode d‘emploi

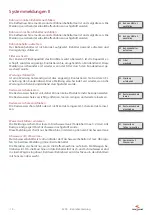
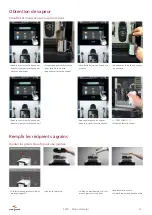
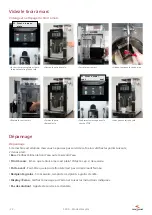
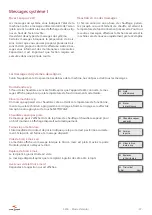
Videz le tiroir à marc

Vidange et nettoyage du tiroir à marc


Le tiroir à marc est plein et la ma-
chine ne fournira plus de café


Ouvrez la porte frontale


Sortir le tiroir à marc


Videz et nettoyez le tiroir à marc


Replace le tiroir à marc


Fermez la porte


Retirez la clé


Confirmez le message avec la 

touche STOP


Vous pouvez faire du café

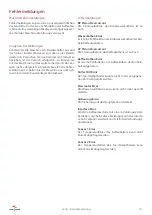
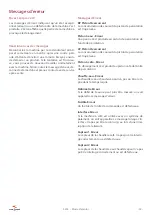
Dépannage

Dépannage


Eau - Vérifiez l'alimentation d'eau ou le réservoir d'eau


Tiroir à marc

 - Est-ce que le tiroir à marc est plein? Videz le s.v.p. si nécessaire.


Porte avant

 - Peut-être que la porte frontale n'est pas correctement fermée.


Récipient à grains

 - Si nécessaire, remplir les récipients à grains de café.


Display / Écran - Verifiez le message sur l'écran et suivez les instructions indiquées.


Pas de solution!

 - Appelez le service à la clientèle.

Si la machine est allumée, mais vous ne pouvez pas servir de café, alors vérifiez les points suivants, 

s'il vous plaît:

01 Tiroir à marc

 plein

01 Tiroir vide?

<oui non>

Содержание S200 CSTI

Страница 1: ...Operating Instructions Mode d emploi Betriebsanleitung ...

Страница 2: ...Anleitung deutsch ab Seite 3 Mode d emploi de page 23 Operating instructions from page 43 Prüfungen Attestation Inspection 63 66 Sprachen langues languages Typenschild Hier einkleben Part No 71955 ...

Страница 3: ... ausschalten 9 Bedienung der Maschine 10 Heiss Teewasser beziehen 10 Dampfprodukte beziehen 11 Kaffeebohnen nachfüllen 11 Satzbehälter leeren 12 Problembehebung 12 Grundsätzliches zur Reinigung 13 Reinigungsintervalle 13 Manuelle Reinigungen 13 Das Reinigungsprogramm 14 Instantmodul reinigen 15 Milchauslauf reinigen 16 Systemmeldungen I 17 Systemmeldungen II 18 Fehlermeldungen 19 Technische Daten ...

Страница 4: ...t Sie ist nicht geeignet für den Betrieb im pri vaten Bereich Die Maschine darf nicht im Freien Outdoor installiert werden Die Raumtemperatur muss zwischen 10 C und 35 C liegen und die Luftfeuchtigkeit darf 80 nicht übersteigen Hinweise zur Installation Die Maschine darf nur von einem instruierten Techni ker installiert werden Das Gerät muss waagrecht auf einem massiven Tisch montiert werden der d...

Страница 5: ... spezifischen Hygienevorschriften für Kaffee Milch und Instantprodukte Verwenden Sie nur gekühlte Milch mit einer Tempe ratur von höchstens 5 C Verwenden Sie nur Kaffee von hoher Qualität Versu chen Sie die Kaffeesorte Ihren Kundenwünschen be züglich Stärke Sorte Röstung usw anzupassen Lagern Sie den Kaffee an einem kühlen trockenen Ort und lassen Sie die Bohnen nie offen liegen Schliessen Sie nac...

Страница 6: ...hälter Füllmenge bei 2 Mühlen Instantbehälter 1 kg Behälter Wassertank max 3 2 Liter optonales Zubehör Wasserdruck 200 600 kPa Wasserhärte optimal 5 8 dH 8 14 fH Wasserhärte maximal 10 dH 17 fH Luftfeuchtigkeit maximal 80 Umgebungstemperatur 10 35 C Hinweis Die Kaffeemaschine darf nicht im Freien Outdoor in stalliert werden Optionale Zusatzgeräte Tassenwärmer W 15 kg Kühlschrank 10 l R 27 kg Kühls...

Страница 7: ... mit Schlüssel 9 Auslauf für Heisswasser Teewasser 10 Getränkeauslauf verstellbar 11 Dampfauslauf 12 Tropfgitter 13 Tropfschale 1 Hauptschalter 2 Tresterbehälter 3 Fronttüre 4 Wassertank optional 5 Instantmodul optinal Ansicht Instantmodul optional 1 Instantbehälter 1 nur für lösliches Getränkepulver 2 Instantbehälter 2 nur für lösliches Getränkepulver 3 Pulverzuführung 4 Mischbecherring 5 Mischbe...

Страница 8: ...etrieben abgestimmt Sie garantiert eine rasche und einfache Auswahl von bis zu zwölf Getränken Das Display lässt sich herausneh men und ist bei Sortimentsanpassungen einfach und schnell an das Angebot angepasst Bedienelement mit 6 Produkten TouchLight Bedienelement mit 12 Produkten TouchLight Bedienelement mit 9 Produkten TouchLight ...

Страница 9: ...nn eine Spülung verlangt wird drücken Sie die REINIGUNGSTASTE Die Spülung läuft automatisch Die Kaffeemaschine heizt auf Die Maschine ist einsatzbereit Bitte wählen Sie ein Produkt Sie können Produkte beziehen Maschine ausschalten Die Kaffeemaschine korrekt ausschalten Fronttüre öffnen Maschine ausschalten Fronttüre schliessen Schlüssel drehen 01 Kalt Bitte warten 01 Bereit ...

Страница 10: ...Tasse positionieren Gewünschte Produktetaste kurz drücken Der Bezug kann mit der Taste STOP abgebrochen werden Die Zubereitung ist nach 20 35 Sekunden abgeschlossen Heiss Teewasser beziehen Getränke mit Heisswasser beziehen Tasse oder Glas unter den Heiss wasserauslauf stellen Heisswasser Taste drücken Der Bezug kann mit der Taste STOP abgebrochen werden ...

Страница 11: ...itzung erreicht ist Dampftaste 1 mal drücken Der Vorgang wird dadurch beendet Kaffeebohnen nachfüllen Bohnen für max 1 Tag einfüllen Wenn ein Bohnenbehälter leer ist erscheint eine Meldung auf dem Touchscreen Deckel der Bohnenbehälter öffnen Füllen Sie Kaffeebohnen für maxi mal einen Tag auf Bohnenbehälter schliessen Die Maschine ist wieder bereit HEISS Dampfdüse mit einem festen Lappen reinigen 2...

Страница 12: ...Wurde die Maschine gerade eingeschaltet so haben Sie Geduld bis die Boiler aufgeheizt sind Wasser Überprüfen Sie die Wasserzufuhr oder den Wassertank Satzbehälter Ist der Satzbehälter voll Leeren Sie den Satzbehälter und bestätigen Sie die Meldung auf dem Display Fronttüre Ist die Fronttüre korrekt geschlossen Bohnenbehälter Sind genügend Kaffeebohnen im Bohnenbehälter und die Bohnenbehälter korre...

Страница 13: ...üften HGZ Produkte verwendet werden Wird die Kaffeemaschine auf einem Mobilwagen betrieben muss der Restwasser bez Abwasserbe hälter immer vor der Reinigung geleert werden Reinigungsintervalle Tägliche Reinigungen Reinigungsprogramm via Touchscreen Gehäuse und Oberflächenreinigung Dampfauslauf reinigen Instantmodul reinigen Milchmodul inkl Getränkeauslauf Wöchentliche Reinigungen Getränkeauslauf v...

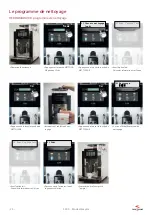
Страница 14: ...te 1x drücken Nach zirka 7 Minuten ist die Kom bi Reinigung abgeschlossen Die Kaffeemaschine ist wieder einsatzbereit 5 sec 01 Reinigung wählen Kombi 1x 01 Mit Milch Option Infos beachten 01 Reinigung Das Display zeigt den aktuellen Reinigungsfortschritt 1x 1x Bei Kaffeemaschinen mit der OPTI ON MILCH befolgen Sie die Infos im zweizeiligen Display 01 Mit Milch Option Infos beachten 01 Bereit S200 ...

Страница 15: ...halten Beide Pulverzuführungen ent fernen Verriegelung öffnen Mischbecher nach vorne abzie hen Alle Teile gründlich reinigen und trocknen Mischbecher einbauen und die Verriegelung schliessen Kaffeemaschine einschalten Fronttüre schliessen Schlüssel drehen und abziehen Beide Teile für die Pulverzufuhr einbauen ...

Страница 16: ...schlussbügel öffnen Milchauslauf entfernen Auslaufhülse und Zwischenstück entfernen und alle Teile reinigen Mit der Spezialbürste alle Düsen reinigen Auslauf von unten nach oben einklicken Verschlussbügel schliessen Zwischenstück und Auslaufhülse in den Milchauslauf legen Abdeckung aufstecken ankli cken Sie können die Kaffeemaschine wieder in Betrieb nehmen ...

Страница 17: ...zbehälter einschieben 01 Satzbehälter geleert Ja Nein Kalt bitte warten Ist das Wasser im Kaffeeboiler beim Einschalten noch kalt wird diese Meldung an gezeigt bis die Betriebstemperatur erreicht ist Bitte Gerät spülen Ist die Kaltstartspülung aktiviert Grundeinstellungen so erscheint diese Meldung nach der Aufheizphase des Kaffeeboilers Durch Drücken der REINIGUNGS Taste wird die Spülung gestarte...

Страница 18: ...setzen Der Bohnenbehälter ist nich korrekt aufgesetzt Behälter passend aufsetzen und Verriegelung schliessen Restwasserschale leeren Die Restwasserschale ist voll daher können keine Produkte mehr bezogen werden Die Restwasserschale vorsichtig entfernen leeren reinigen und wieder einsetzen Restwasserschale einschieben Die Restwasserschale fehlt oder ist nicht korrekt eingesetzt Schale korrekt einse...

Страница 19: ...Die Stromaufnahme des Brühwasserkolbens ist zu hoch Wasserkolben Error Es ist eine Fehlfunktion am Brühwasserkolben der Brü heinheit aufgetreten CP Piston Overcurrent Die Stromaufnahme des Kaffeekolbens ist zu hoch Kaffee Kolben Error Es ist eine Fehlfunktion am Kaffeekolben der Brühein heit aufgetreten Boiler Füll Error Der Tee Dampfboiler konnte nicht in der vorgegebe nen Zeit nachgefüllt werden...

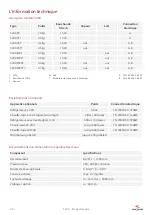
Страница 20: ...30 VAC 2 2 kW B 2N 400 VAC 3 8 kW Zusatzgeräte Optionales Zusatzgerät Kapazität Elektronaschluss Kühlschrank L 200 4 Liter 1N 230VAC 0 070kW Tassenwärmer mit integriertem Kühlschrank Lv 4 Liter 40 Tassen 1N 230VAC 0 150kW Kühlschrank mit Tassenablage Lt Lb 4 Liter 40 Tassen 1N 230VAC 0 070kW Tassenwärmer W 200 80 Tassen 1N 230VAC 0 150kW Tassenwärmer WI 200 bis 80 Tassen 1N 230VAC 0 150kW Becherdi...

Страница 21: ...sichten und Masse für die Installation Achtung Möglicherweise wurde das Installationsschema seit der Drucklegung aktualisiert Vergewissern Sie sich vor der Installation dass Sie das aktuelle Installationsschema verwenden www hgz ch ...

Страница 22: ......

Страница 23: ... machine 29 Manipulation de la machine 30 L eau chaude 30 Obtention de vapeur 31 Remplir les récipients à grains 31 Videz le tiroir à marc 32 Dépannage 32 Généralités nettoyage 33 Intervalle de nettoyage 33 Nettoyage manuel 33 Le programme de nettoyage 34 Nettoyage module instantané 35 Nettoyage la sortie de lait 36 Messages système I 37 Messages système II 38 Messages d erreur 39 L information te...

Страница 24: ...l appareil Les produits exempts de CFC sont souvent inflammables Ni le fournisseur ni le fabricant ne sont responsab les des accidents ou des dommages résultant de la non observation de ces consignes de sécurité Le niveau de bruit est 70dB Condition d utilisation La machine à café a été conçue pour un usage profes sionnel Elle ne peut être utilisée dans le domaine privé qu avec certaines restricti...

Страница 25: ...r les produits à base de café de lait et d instantané Utilisez uniquement du lait réfrigéré à une tempéra ture maximum de 5 C N utilisez que du café de qualité supérieure Essayez d adopter le type de café correspondant aux goûts de votre clientèle notamment en ce qui concerne sa force son type sa torréfaction etc Entreposez le café dans un endroit froid et sec Ne conservez jamais le café dans un e...

Страница 26: ...Quantité avec 2 moulins Récipien à poudre 1 kg récipient Réservoir d eau max 3 2 litres accessoires en option Pression d eau 200 600 kPa Dureté de l eau optimale 5 8 dH 8 14 fH Dureté de l eau minimum 10 dH 17 fH Humidité de l air au maximum 80 Températur ambiante 10 35 C Réglementation La machine ne doit pas être installé à l extérieur Les appareils optionnels Chauffe tasse W 15 kg Réfrigérateur ...

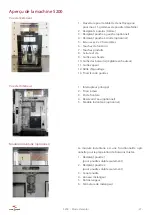
Страница 27: ...e eau chaude 10 Sortie des boissons réglable en hauteur 11 Sortie vapeur 12 Grille d égouttage 13 Tiroir récolte gouttes 1 Interrupteur principal 2 Tiroir à marc 3 Porte frontale 4 Réservoir d eau optionnel 5 Module instantané optionnel Module instantané optionnel 1 Récipient poudre 1 pour poudre soluble seulement 2 Récipient poudre 2 pour poudre soluble seulement 3 Canal poudre 4 Anneau mélangeur...

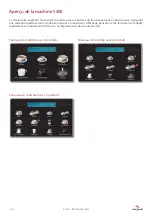
Страница 28: ...ment en libre service Il garantit une sélection rapide et facile de douze boissons au maximum l affichage peut être retiré facilement et adapté rapidement et simplement à l offre en cas d ajustements des produits servis Panneau de contrôle avec 6 produits Panneau de contrôle avec 9 produits Panneau de contrôle avec 12 produits ...

Страница 29: ... clé Appuyez sur la touche OK et le rinçage commence Le rinçage est automatique La machine à café chauffe La machine est prête S v p choisissez votre produit Vous pouvez servir une boisson Eteindre la machine Eteignez la machine correctement Ouvrez la porte Eteignez la machine à café Fermez la porte 01 Froid attendre svp 01 Prêt 1x 1x ...

Страница 30: ...rée La distribution peut être inter rompe avec la touche STOP bouton en bas à droite Après environ 30 secondes la boisson est servie L eau chaude Préparer des boissons avec de l eau chaude Disposez le verre ou la tasse sous la sortie de l eau chaude Appuyez sur la touche de l eau chaude La distribution peut être inter rompe avec la touche STOP bouton en bas à droite 1x 1x ...

Страница 31: ...sse Appuyez sur la touche de vapeur de nouveau Appuyez sur la touche de vapeur deux fois purger la sortie vapeur Remplir les récipients à grains Ajouter les grains de café pour une journée Si le récipient à grains est vide un message apparaît Ouvrez le couvercle Utilisez un marchepied si le réci pient à grains est trop haut Replacez le couvercle La machine est de nouveau prête TRÈS CHAUD Nettoyez ...

Страница 32: ... Eau Vérifiez l alimentation d eau ou le réservoir d eau Tiroir à marc Est ce que le tiroir à marc est plein Videz le s v p si nécessaire Porte avant Peut être que la porte frontale n est pas correctement fermée Récipient à grains Si nécessaire remplir les récipients à grains de café Display Écran Verifiez le message sur l écran et suivez les instructions indiquées Pas de solution Appelez le servi...

Страница 33: ...nfants CH classe de toxicité 5 Pour le nettoyage seuls les produits HGZ testés peu vent être utilisés Si la machine à café est utilisée sur un chariot mo bile l eau résiduelle ou le récipient de déversement d eau doit toujours être vidé avant le nettoyage Intervalle de nettoyage Nettoyage quotidien Programme de nettoyage Surface parois La sortie de vapeur Module instantané Le module de lait Nettoy...

Страница 34: ...r l écran La machine à café est prêt à l emploi L écran affiche l état actuel du nettoyage Appuyez une fois sur la touche de NETTOYAGE Introduisez 1 tablette de net toyage Appuyez une fois sur la touche de NETTOYAGE Avec l option lait Suivez les informations sur l écran Après environ 7 minutes le net toyage est terminé 1x 5 sec 01 Choisir nettoyage Combi 1x 01 Avec l option lait 01 Nettoyage 1x 1x...

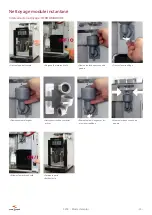
Страница 35: ... porte frontale Eteignez la machine à café Démontez les deux canaux de poudre Ouvrez le verrouillage Démontez le mélangeur Nettoyez et séchez toutes les pièces Remontez le mélangeur et fer mez le verrouillage Allumez la machine à café Fermez la porte Retirez la clé Montez les deux canaux de poudre ...

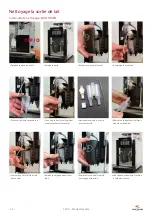
Страница 36: ...Tirez vers le bas la sortie de lait Tirez vers le bas la touille gicleur et nettoyez toutes les pièces Nettoyez les gicleurs avec la brosse spéciale Le montage de la sortie est de bas en haut Fermez la poignée de verrouil lage Remontez la douille et le gicleur dans la sortie de lait Replacez le couvercle puis le nettoyage et terminé Vous pouvez allumer la machine à café de nouveau ...

Страница 37: ...svp 01 Fermez la porte 01 Rincer la machine svp 01 Videz le tiroir à marc svp 01 Replacez le tiroir à marc 01 Tiroir vide Oui Non Froid attendre svp Si l eau de la chaudière es encore froide après que l appareil a été connecté le mes sage s affiche jusqu à ce que la température de fonctionnement soit atteinte Rincer la machine svp Un message apparaît si la chaudière café a atteint sa température d...

Страница 38: ...é Contactez alors le service clientè le Ce message disparaît lorsque l entretien a été effectué par le service clientèle Replacez le récipient Le récipient à grains n est pas installé correctement Placez le récipient et fermez le verrouillage Videz l égouttoir L égouttoir est plein Par conséquent plus de produits ne peuvent être préparés Retirez l égouttoir avec précaution Videz nettoyez et réinst...

Страница 39: ... panne s est produite au piston de percolation de l unité de percolation CP Piston Overcurrent La consommation de courant du piston de percolation est trop élevée Piston à café Erreur Un dérangement s est produit au piston café de l unité de percolation Chauffe eau Erreur La chaudière eau chaude vapeur n a pas pu être rem plie dans le temps requis Débimètre Erreur Si le débit de l eau ne peut plus...

Страница 40: ...hériques optionnels Appareils optionnels Poids Connection électrique Réfrigérateur L 200 4 litre 1N 230VAC 0 070kW Chauffe tasse avec réfrigérateur intégré 4 litre 40 tasses 1N 230VAC 0 150kW Réfrigérateur avec des étagèrs Lt Lb 4 litres 40 tasses 1N 230VAC 0 070kW Chaufe tasse W 200 jusqu à 80 tasses 1N 230VAC 0 150kW Chauffe tasse Wl 200 jusqu à 80 tasses 1N 230VAC 0 150kW Distributeur gobelets ...

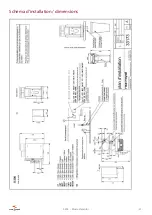
Страница 41: ... Attention Il est possible que le schéma d installation a été mise à jour depuis la publication Avant l installation assurez vous que vous utilisez le schéma d installation actuel www hgz ch Schéma d installation dimensions ...

Страница 42: ......

Страница 43: ...tch off 49 How to use the machine 50 To dispense hot water 50 Dispensing steam products 51 Fill the bean hoppers 51 The coffee grounds drawer is full 52 Troubleshooting 52 Basic points for cleaning 53 Cleaning interval 53 Manual cleanings 53 The cleaning program 54 Cleaning powder module 55 Clean the milk outlet 56 System messages I 57 System messages II 58 Error messages 59 Technical Data 60 View...

Страница 44: ...le Neither the supplier nor the manufacturer can accept liability for accidents or damage caused by failure to comply with these safety instructions Noise level 70dB Conditions of use The coffee machine is designed for commercial use only This machine is not suitable for use in the private sector The machine must not be installed outdoors At the location of the coffee machine the temperature must ...

Страница 45: ...nsure that your coffee is always on the highest quality The optimal quality of beverage Observe the general hygiene rules for milk instant and coffee products Only use refrigerated milk with a maximum tempera ture of 5 C Only use high quality coffee beans Try to match your coffee products to your customers requests under consideration of strength variety roast etc Store your coffee beans in a cool...

Страница 46: ...ntity with 2 grinder Powder hopper 1 kg hopper Water tank max 3 2 litres optional accessoires Water pressure 200 600 kPa Water hardness ideal 5 8 dH 8 14 fH Water hardness maximum 10 dH 17 fH Humidity maximum allowable 80 Ambient temperature 10 35 C Note The machine must not be installed outdoors Add on units Cup warmer W 15 kg Compressor refrigerator 10 litres R 27 kg Under counter refrigerator 1...

Страница 47: ...0 characters 6 Function keys 7 Product buttons 8 Door lock and key 9 Hot water outlet 10 Drinks outlet height adjustable 11 Steam outlet 12 Drip grid 13 Drip tray 1 Main switch 2 Grounds drawer 3 Front door 4 Water tank optional 5 Powder module optional Powder module optional 1 Powder hopper 1 for soluble food only 2 Powder hopper 2 for soluble food only 3 Powder injection 4 Mixer cup ring 5 Mixer...

Страница 48: ...ements of self service operations It guarantees a quick and easy selection of up to twelve drinks The display can be removed and can be adapted quickly and easily to the offer in the case of product range adjustments The operating element with 6 products The operating element with 9 products The operating element with 12 products ...

Страница 49: ... Turn the key and remove them Press the OK button The cleaning will run automati cally The coffee machine heats up The coffe machine is ready Please choose your product You can purchase products Switch off Turn off the coffee machine correctly Open the front door Switch off the machine Close the front door 1x 01 Cold please wait 01 Ready ...

Страница 50: ...appropriate product key Dispensing can be interrupted by pressing the STOP button on the right side The preparation is completed after 20 35 seconds To dispense hot water Prepare drinks with hot water Place the cup or the glass be neath the hot water outlet Press the hot water button Dispensing can be interrupted by pressing the STOP button on the right side 1x 1x ...

Страница 51: ...ink If heating or foaming is finished press the steam button HOT Clean the steam wand Fill the bean hoppers Fill coffee beans for a maximum of one day If a bean hoppers is empty a message appears Open the lid of the bean cont ainer Fill coffee beans for a maximum of one day Replace the lid The machine is ready for use Press the steam button twice rinse the steam wand 2 x 1 x 1 x 2 x Press the stea...

Страница 52: ... purchase products Troubleshooting Check some points befor you call the customer service Water Check the water supply or the water tank Coffee grounds drawer Is the grounds drawer full Empty the grounds drawer Front door Check the door Is it closed correctly Bean hoppers Are there enough coffee beans in the containers Display Check the message on the screen and follow any instructions No solution ...

Страница 53: ...the instructions on the packaging Use only the tested HGZ Cleaning products If the coffee machine is being used on a mobile trol ley enough fresh water must be available and the waste water drip container must always be emptied before cleaning Cleaning interval Daily cleaning Cleaning program Case and surface cleaning Steam outlet Powder module Milk module with the drinks outlet Weekly cleaning La...

Страница 54: ...the tablet slot Press once the CLEANING key The cleaning is completed after about 7 minutes The coffee machine is ready for use again 5 sec 01 Choose cleaning Combi 1x 01 With milk option note informations 01 Cleaning The display shows the current status of the cleaning 1x 1x With a milk module Follow the informations on the display 01 With milk option note informations 01 Ready 1x The cleaning pr...

Страница 55: ... front door Switch off the coffee machine Remove both powder tubes Open the look Remove the mixer cup with the cup ring Clean and dry all parts Install the mixer cup and close the lock Switch on the coffee machine Close the front door Turn the key and remove them Install both powder tubes ...

Страница 56: ...the catch handle Drag down the milk outlet Drag down the spout tube and the connecting piece Clean all parts Clean the nozzles with the brush Reinstall the milk outlet from bottom to top Close the catch handle Place the spout tube and the connecting piece in the milk outlet Plug on the outlet cover You can restart the machine The coffee machine is ready again ...

Страница 57: ...all messages 01 Cold please wait 01 Close the front door 01 Please rinse the machine 01 Coffee grounds drawer full 01 Please insert grounds drawer 01 Drawer empty Yes No 01 Tea boiler not ready Cold please wait When the machine is switched on this message will be displayed until the opera ting temperature is reached Please rinse the machine If the coffee boiler is ready and the cold start rinsing ...

Страница 58: ...e bean container is not properly fitted Reinstall the container and close the both locks The drip tray is full The drip tray is full so no drinks can be prepared Remove the drawer carefully Then empty clean and insert the tray Insert the drip tray The drip tray is missing or not installed correctly Insert the drip tray Fill and insert the fresh water tank The message appears when the fresh water t...

Страница 59: ...vercurrent The current to the piston is too high Water piston error There is a malfunction in the piston unit CP Piston Overcurrent The current to the piston is too high Coffee piston error Fault of coffee piston or the brewing unit Boiler Fill Error The tea steam boiler could not be refilled in the time set Flowmeter Error If the water flow cannot be measured this error mes sage will appear Fuse ...

Страница 60: ...A 1N 230 VAC 2 2 kW B 2N 400 VAC 3 8 kW Add on units Add on unit Capacity Electrical connection Refrigerator L 200 4 liters 1N 230VAC 0 070kW Cup heater with integrated refrigerator Lv 4 liters 40 cups 1N 230VAC 0 150kW Refrigerator with cup rack Lt Lb 4 liters 40 cups 1N 230VAC 0 070kW Cup heater W 200 up to 80 cups 1N 230VAC 0 150kW Cup heater WI 200 up to 80 cups 1N 230VAC 0 150kW Cup dispenser...

Страница 61: ...tructions Views and dimensions for the installation Attention It is possible that the installation scheme has been updated since publication Before installation ensure that you use the current installation scheme www hgz ch ...

Страница 62: ......

Страница 63: ...rating instructions Prüfungen Attestation Inspection deutsch français english Prüfbescheinigung Attestation Inspection certificate 33 123 64 Prüfbescheinigung Attestation Inspection certificate 33 177 65 CE Deklaration CE Déclaration CE Declaration 66 ...

Страница 64: ...ns remarque Pression de service adm 9 5 bar 950 kPa Pression de service max 12 5 bar 1250 kPa Contenace en eau 0 6 litre Coffee boiler 33 123 1 8 kW The machine owner is held responsible for the executi on of the annual inspection The water boiler has been actively and operationally tested at 12 5 bar no remarks Operating pressure 9 5 bar 950 kPa Max pressure 12 5 bar 1250 kPa Capacity 0 6 litre B...

Страница 65: ...nchéité et de fonction sans remarque Pression de service adm 1 2 bar 120 kPa Pression de service max 2 3 bar 200 kPa Contenace en eau 0 6 litre Tea steam boiler 33 177 1 8 kW The machine owner is held responsible for the executi on of the annual inspection The water boiler has been actively and operationally tested at 2 3 bar no remarks Operating pressure 1 2 bar 120 kPa Max pressure 2 3 bar 200 k...

Страница 66: ...uméro de la machine machine number Datum date date Geschäftsleiter Directeur Managing Director Der Handelspartner Der nachfolgend aufgeführte Handelspartner erklärt dass die Kaffeemaschine den geltenden europäischen Richtlinien und Normen entspricht Le partenaire commercial Le partenaire commercial listé ci des sous déclare que la machine à café est conforme aux dispositions et nor mes européennes...

Страница 67: ......
Страница 68: ... coffee machines since 1937 HGZ Germany Rex Royal Kaffeemaschinen GmbH Bahnhofstrasse 104 D 79618 Rheinfelden Tel 49 76 24 74 14 0 Fax 49 76 23 74 14 20 info rex royal de www rex royal de HGZ Asia HGZ Coffee Machines Asia 8 Wilkie Road 03 01 Wilkie Edge 228095 Singapore Phone 0065 9691 6730 info hgz ch www hgz ch Subsidiaries Headquarter Part No 71955 ...

Отзывы: