


175
Intera 5.3
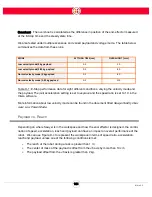
Note: With Intera 3 software, the default Banner Safety Controller configuration supports only the
Emergency Stop Switch. With Intera 5 software and the default wiring and configuration settings,
the Safety Controller will also support common safeguarding devices such as laser scanners, light
curtains, and safety mats.
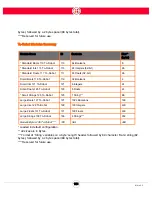
LOW POWER MODE
Sawyer is designed as a power and force limited robot by inherent design, but customers can
choose to further limit the capabilities of the robot by further limiting the power available to the
robot in such a way that limits the maximum speed at which it can run. This is done by operating
Sawyer in Low Power Mode .
The Banner Safety Controller has been customized to monitor the voltage of the power going to
Sawyer's arm. To place Sawyer in Low Power mode, jumper the Low Voltage Enable signal before
powering up the robot. The robot’s maximum speed will be limited to approximately half that of
normal operation.
If, at some point, the Banner Safety Controller senses the robot operating at normal power mode
when the wiring is configured for low power mode, the motor power relay will be opened, cutting
power to the motors in the arm, and a safety violation error will be reported.
WHAT HAPPENS WHEN A SAFETY DEVICE IS TRIGGERED
When there is a category 0 stop signal, for example, the E-stop is pressed or a light curtain is
obstructed, the Banner Safety Controller Interface signals the robot's I/O Controller Interface to
inform the robot controller that it will be losing power, and signals the motor bus relays, opening the
switch, and cutting power to the actuators in the arm.
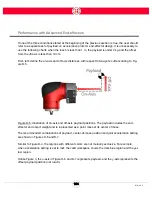
In the meantime, the joint controller boards in the arm receive notification of the category 0 stop,
and decelerate the actuators using regenerative braking, leveraging the residual power generated
from the spinning motors to stop them. The arm rapidly slows to a stop. Brakes in three of the large
joints lock in place to prevent the arm from falling under gravity, while the three small joints at the
end of the arm gently coast to a gravity-neutral position.
EMERGENCY STOP SWITCH
Sawyer ships with an E-stop device (Emergency Stop button), which can be used in the event of an
emergency to remove power from Sawyer's arm. The E-Stop button is a safety-rated safety device
that meets functional safety performance level PLd CAT3.
Содержание Sawyer
Страница 15: ...8 Intera 5 3 Getting to Know Sawyer Hardware Overview of Your Robot ...
Страница 16: ...9 Intera 5 3 Getting to Know Sawyer Dimensions ...
Страница 17: ...10 Intera 5 3 Getting to Know Sawyer Sawyer Reach ...
Страница 21: ...14 Intera 5 3 Getting to Know Sawyer Bottom View Inputs Power Air Input Outputs 4x Air Power and Data Video ...
Страница 93: ...86 Intera 5 3 Train Pick and Place Patterns on the Head 11 Press OK to go to the next step ...
Страница 98: ...91 Intera 5 3 Train Pick and Place Patterns on the Head 16 Press OK to allow modifications to the direction ...
Страница 104: ...97 Intera 5 3 Train Pick and Place Patterns on the Head You may now run the task ...
Страница 134: ...127 Intera 5 3 TCP IP The Set To node in the Behavior Editor is used to output information ...
Страница 138: ...131 Intera 5 3 Fieldbus Devices 3 Using a keyboard navigate to CONFIGURATION and press ENTER ...
Страница 155: ...148 Intera 5 3 ...
Страница 156: ...149 Intera 5 3 ...
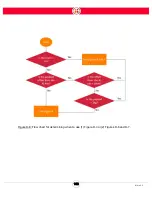
Страница 175: ...168 Intera 5 3 Figure D 8 Flow chart for determining when to use 1 Figure D 4 or 2 Figures D 6 and D 7 ...
Страница 180: ...173 Intera 5 3 ...
Страница 190: ...183 Intera 5 3 Fixed Data 112 From Robot ...
Страница 191: ...184 Intera 5 3 Standard Booleans 113 To Robot 114 From Robot Standard Integers 115 To Robot 116 From Robot ...
Страница 192: ...185 Intera 5 3 Standard Floats 117 To Robot 118 From Robot Small Booleans 119 To Robot 120 From Robot ...
Страница 193: ...186 Intera 5 3 Small Integers 121 To Robot 122 From Robot Small Floats 123 To Robot 124 From Robot ...
Страница 195: ...188 Intera 5 3 Large Floats 131 To Robot 132 From Robot Large Strings 133 To Robot 134 From Robot ...
Страница 206: ...199 Intera 5 3 Small Assembly 114 From Robot 115 To Robot ...
Страница 207: ...200 Intera 5 3 Large Assembly 116 From Robot 117 To Robot ...
Страница 208: ...201 Intera 5 3 Floats 118 From Robot 119 To Robot ...
Страница 209: ...202 Intera 5 3 Strings 120 From Robot 121 To Robot ...
Страница 218: ...Z Zero G button 16 17 Zero G mode 24 Zero Gravity mode 17 zoom reset 42 ...
Страница 219: ......
Страница 220: ...Last updated June 18 2018 Intera 5 3 User Guide Getting Started Rev A ...