Renishaw TONiC diagnostic kit Скачать руководство пользователя страница 10

TONiC diagnostic kit

User guide 

8

TONiC

User guide 

3.3. Using the software

This section explains the functions of software. It should be used in conjunction with the relevant TONiC installation 
guide for details on how to install and set the system up. Only one copy of the software should be opened at a time 
with only a single TONiC system connected to it.

3.3.1. Signal size

The signal size is displayed as a percentage and as a colour bar, the bar changes colour dependant on the signal size.

Signal size is also available as an audible indication.


Ensure the volume on the PC is switched on.


Click on the sliding switch in the top right hand corner to toggle the audible indication, the switch will be 
orange when the audible signal is activated. The tone gets higher as the signal level increases.

 NOTE: 

When the TONiC dongle is connected the diagnostic LED on the dongle interface or Ti interface 

will flash orange, it will not display the signal size. The set-up LED on the readhead will function as 
normal. See the relevant TONiC installation guide for more information on the readhead LED function.
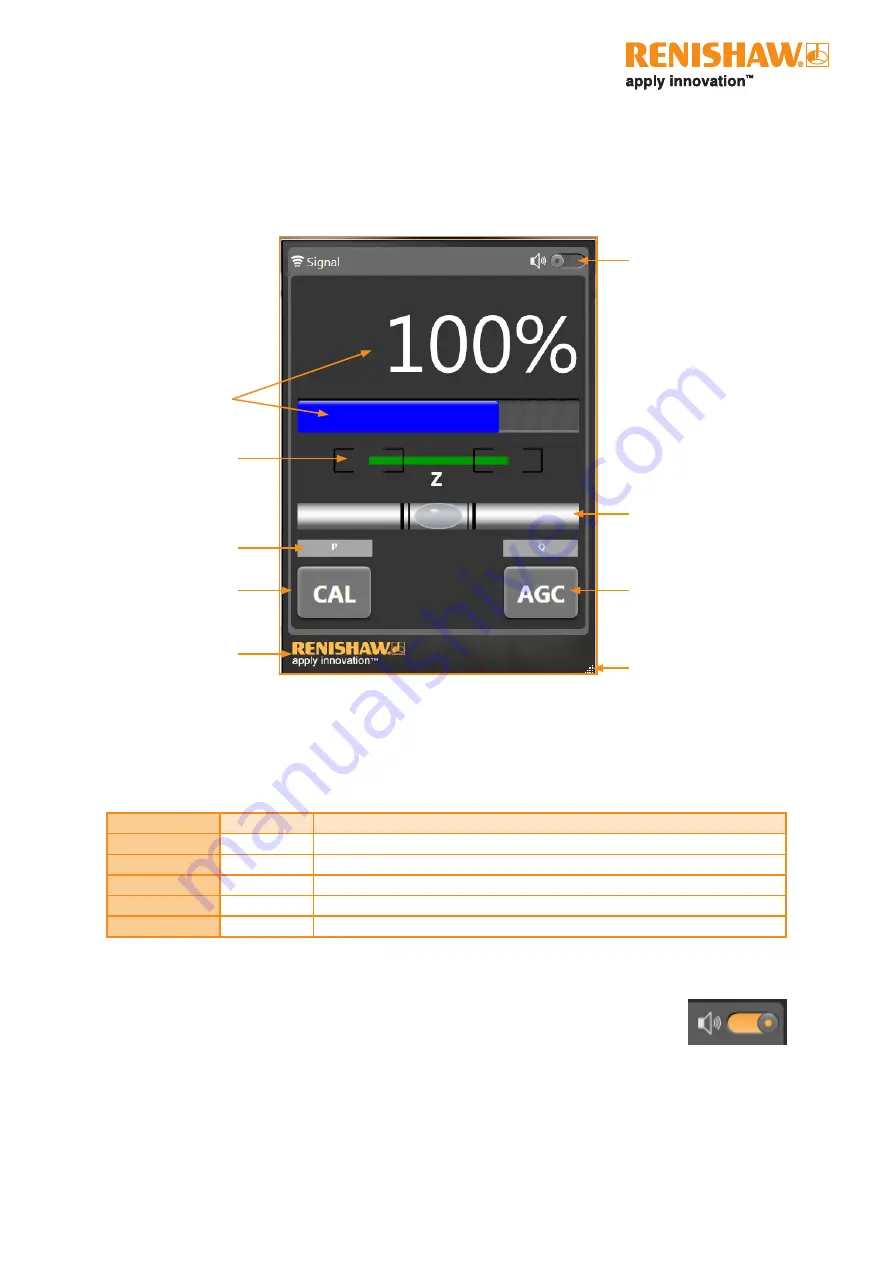
Signal size

Reference mark phasing

CAL button

Clickable link to 

Renishaw website

Resize screen

AGC button

Audible signal strength 
indicator switch

Flashing signal size bar indicates system is in error.

Readhead pitch indicator

P and Q limits

Signal size

Colour

Indicates

> 110%

Purple

Good set-up, no further adjustment required

90% to 110%

Blue

Optimum set-up

70% to 90%

Green

Good set-up, no further adjustment required

50% to 70%

Orange

Acceptable set-up but below the recommended level

< 50%

Red

Poor set-up, signal may be too low for reliable operation; adjust set-up

Содержание TONiC diagnostic kit

Страница 1: ...User guide M 9589 9081 02 A TONiC diagnostic kit...

Страница 2: ...tal Ti interface Ti0004 Ti4000 6 3 1 2 TONiC with digital Ti interface Ti10KD or Ti20KD or analogue Ti interface Ti0000 6 3 2 Starting the software 7 3 3 Using the software 8 3 3 1 Signal size 8 3 3 2...

Страница 3: ...MADE TO VERIFY THE ACCURACY OF THIS DOCUMENT AT PUBLICATION ALL WARRANTIES CONDITIONS REPRESENTATIONS AND LIABILITY HOWSOEVER ARISING ARE EXCLUDED TO THE EXTENT PERMITTED BY LAW RENISHAW RESERVES THE...

Страница 4: ...be used with the unit to ensure compliance Further information Further information relating to the TONiC encoder range can be found in the TONiC system Data sheet and Installation guides These can be...

Страница 5: ...ld be used and replaced when worn or damaged Packs of 10 replacement PCB s are available to order Item 6 A 9411 0016 Item 7 A 9411 0017 Item Description Quantity 1 Dongle 1 2 Dongle interface 1 3 USB...

Страница 6: ...rface dimensions 1 5 Dongle dimensions Dimensions and tolerances in mm 62 33 3 12 5 33 3 39 Communication LED USB port 1 7 Signals Dongle interface Dongle Function Signal Output pin male 15 way D type...

Страница 7: ...the screen and the installation program will automatically run through the installation process NOTE On Windows 8 it will ask Do you want to allow the following program from an unknown publisher to m...

Страница 8: ...6 sacrificial interconnect PCB for TONiC or ATOM cabled readheads Item 5 Interface cable for TONiC or ATOM readheads Item 2 dongle interface Item 1 dongle Item 3 USB cable Do not connect the readhead...

Страница 9: ...USB port to the PC See 3 1 Connecting the system page 6 for details on connecting the TONiC readhead to the dongle The Start page will then become active The PSU voltage will display USB showing it i...

Страница 10: ...nal is activated The tone gets higher as the signal level increases NOTE When the TONiC dongle is connected the diagnostic LED on the dongle interface or Ti interface will flash orange it will not dis...

Страница 11: ...t of bar not within the boxes TONiC User guide 3 3 3 Pitch indicator The pitch of the readhead is displayed as a spirit level To ensure the correct pitch the bubble should be positioned between the tw...

Страница 12: ...he readhead starts double flashing Move the readhead backwards and forwards across the chosen reference mark The CAL button will turn grey and the signal size and reference mark displays will be react...

Страница 13: ...used between the readhead and the dongle interface 3 1 Connecting the system page 6 The dongle must be used with the dongle interface unless using a Ti0004 Ti4000 Check connections between the dongle...

Страница 14: ...pressing and holding the CAL button on the dongle interface whilst cycling the power See the relevant TONiC installation guide for details of the calibration routine and restoring factory defaults 4...

Страница 15: ...eady to use 5 2 Manual hardware driver installation If the drivers have not automatically installed they can be manually installed Browse C Program files x86 Renishaw TONiC diagnostic Depending upon i...

Страница 16: ...0 1453 524901 E uk renishaw com www renishaw com For worldwide contact details visit www renishaw com contact Part no M 9589 9081 02 A Issued 02 2021 M 9589 9081 02 Renishaw plc Registered in England...

Отзывы: