background image

12

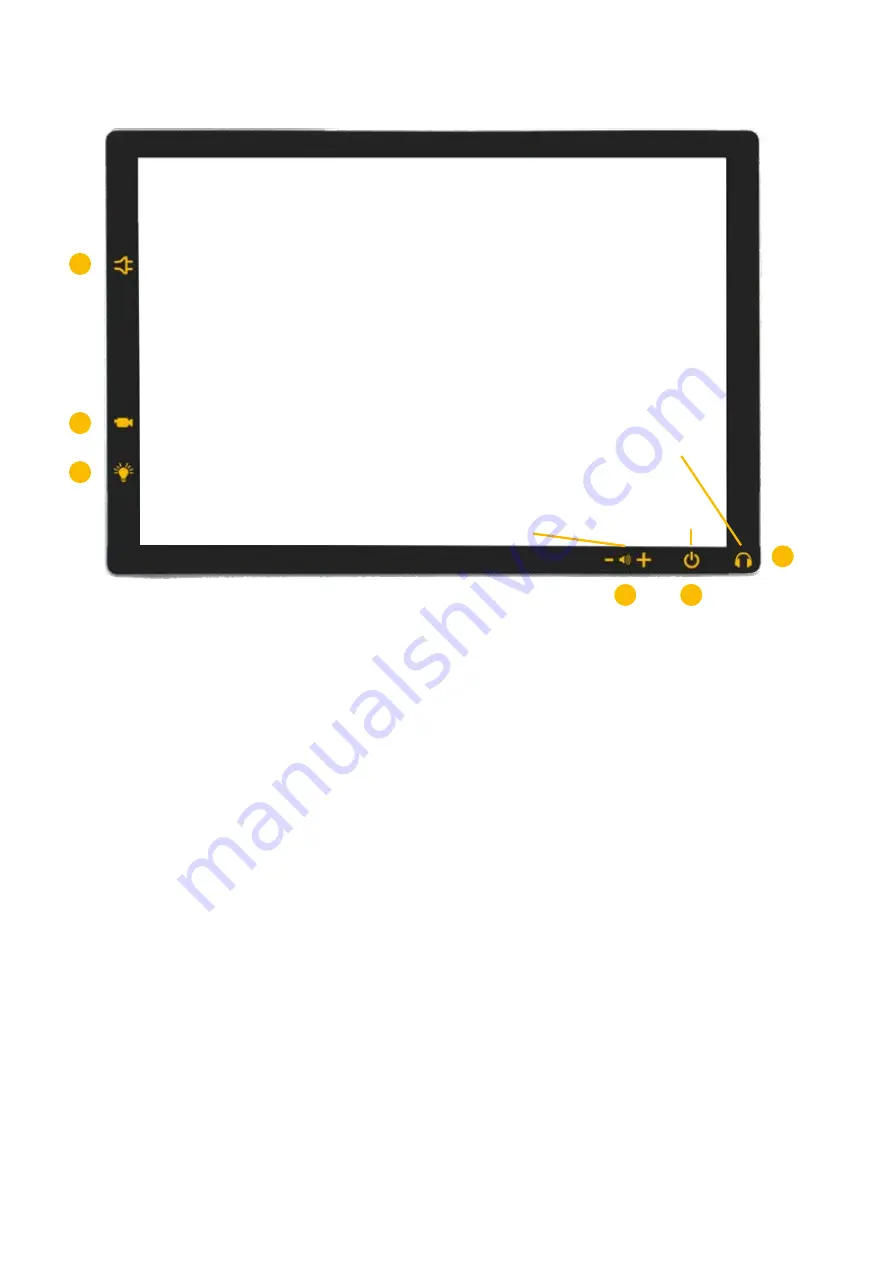
Ports and buttons on the device

1)  

DC input socket 

Connection for the power supply unit (DC plug) 

Note: 

Only use the supplied AC adapter for mains operation or to charge the 

 battery.

2)  

USB 3 port 

For connecting the distance camera (USB 3 plug)

3)  

USB-C port 

For charging the illumination

4)  

Volume button

5)  

Power button 

Briefly press the power button to turn ON the system. When pressing the power 

button for approx. 3 seconds while the system is turned ON, the option to turn 

OFF the system by swiping down, appears. Alternatively, you can also switch off 

the system via the Windows Start menu. 

A short press while the system is on switches the system to sleep or standby 

mode. Pressing it again deactivates the sleep or standby mode and the system is 

ready for operation again. 

Note: 

Please note that the system will not shut down completely in sleep or 

standby mode and will continue to consume battery power. Please make sure that 

the battery is not completely discharged. For more information on deep discharge, 

see page 25. 

Sleep or standby mode can be configured via the Windows system settings.

1

2

3

4

5

6

Power button

Headphone/ 

loudspeaker jack

 USB-C  port

 USB 3 port

 DC input socket

Volume button

Содержание topolino tablet

Страница 1: ...topolino tablet EN User manual Please read this user manual carefully prior to installation use and maintenance for your own safety and in order to avoid damages on your system ...

Страница 2: ...2 ...

Страница 3: ... 62368 1 Einrichtungen für Audio Video Informations und Kommunikationstechnik ROHS III 2011 65 EU geändert durch 2017 2102 EU Directive 2014 35 EU low voltage directive LVD Directive 2014 30 EU electromagnetic compatibility EMC IEC 62368 1 Audio video information and communication technology equipment ROHS III 2011 65 EEC amended by 2017 2102 EEC Die CE Kennzeichnung auf dem Gerät dokumentiert die...

Страница 4: ...y 8 Important note for scanning and reading of medication leaflets 8 II Safety instructions 9 III Instructions for topolino tablet 10 Scope of supply 10 Setting up the system 10 Initial operation 10 Folding up the topolino tablet 10 Ports and buttons on the device 12 Illumination of the reading templates 13 To charge the battery of the illumination 13 Replacing the Illumination 14 Connecting the d...

Страница 5: ...ped mode 19 Save and open images 20 Open saved images 20 Recording videos 20 Settings 21 General 21 Speech 22 Reading 22 Remove the display from the stand not recommended 23 Bluetooth keyboard and mouse optional accessory pack 23 Keyboard shortcuts 24 Handling the battery 25 use of the battery 25 Charging the battery 25 Replacing the battery 25 Battery operating time and charging time 25 Charging ...

Страница 6: ...ty of medi cal measuring devices cannot be avoided the operator of these devices has to be informed that it is necessary to observe the performance of the system to control the conventional use of the system in the chosen set up Electronic devices are sensitive towards electric discharge and towards high fre quency electromagnetic fields Caution In order to avoid high frequency disturbances e g mi...

Страница 7: ...ge Directive 2014 35 EU as well as other relevant and applicable regulatory require ments and standards Precaution by alteration of the performance of the system Should any of the technical features or performances change failure malfunction etc the device must be turned OFF and the battery must be taken out Please do not switch ON the device again Refer directly to your authorized dealer or to Re...

Страница 8: ...or transfer of the device This equipment may retain user settings and stored images if disposed of or trans ferred To reset the system to factory defaults please follow the instructions in the Windows Help on support microsoft com Power supply Only use the original power supply which is included in the delivery by Reinecker Vision GmbH Caution The use of any other power supply besides the original...

Страница 9: ...would harm the picture quality 6 Do not operate this device below 5 C or above 40 C 7 Keep liquids away from the system Only operate the device in a dry environ ment 8 The device should not be operated next to medical devices patients environ ment 9 Do not lean on the screen touch the screen with any object or lay heavy objects on the device This may cause damage to the device 10 Do not try to rep...

Страница 10: ...a stable surface with sufficient space Initial operation Before you use the device for the first time you must fully charge the battery For more information see Handling the battery on page 25 Caution The AC adapter provided is designed to be used with this system only Do not use any other AC adapter Folding up the topolino tablet topolino tablet is supplied with a stand that holds the display in ...

Страница 11: ...nd upwards using the recessed grip Then align the display in the optimal reading position for you Caution If the display is not opened far enough to hold its position it is possible that it will automatically fold down again In this case you must slightly increase the angle of inclination base plate recessed grip cover tablet display ...

Страница 12: ...g down appears Alternatively you can also switch off the system via the Windows Start menu A short press while the system is on switches the system to sleep or standby mode Pressing it again deactivates the sleep or standby mode and the system is ready for operation again Note Please note that the system will not shut down completely in sleep or standby mode and will continue to consume battery po...

Страница 13: ...ont to activate automatic lighting In that mode illu mination remains ON permanently as long as movement can be recognized With no movement for approx 25 sec light turns into energy saving mode and turns OFF automatically Once movement is being detected again light turns ON automatically Note we recommend to set the light to ON position as motion sensor may be influ enced by alternating external l...

Страница 14: ...mera To attach the distance camera insert the spigot of the camera mount into the recess provided on the top right of the tripod Then connect the USB 3 plug of the distance camera with the USB 3 port on the side of the display Turn ON the system Press the power button see page 13 on the front of the display for about 4 sec onds to turn the system ON Please wait until the MS Windows 10 operating sy...

Страница 15: ... the displayed image A white square appears on the display during focusing When focusing is complete the square will change color to green for a short time and a beep will be heard In Distance Mode you can move the already magnified image with your fingers without re adjusting the magnification on the distance camera Start topolino tablet application software After the system was booting the user ...

Страница 16: ...ttings General on page 21 Controls of the toolbar 1 exit topolino software 2 starting text recognition and reading 3 open picture gallery 4 safe picture video 5 take picture 6 record video 7 stop recording and save video 8 zoom in 9 zoom out 10 change color mode 11 distance mode with distance camera connected 12 document mode in distance mode 13 split screen in distance mode 14 settings View magni...

Страница 17: ...f the distance camera Autofocus press the buttons simultaneously to switch the autofocus of the distance camera ON or OFF Zoom The magnification can be continuously adjusted with the buttons Return to document mode To exit Distance Mode and return to Document Mode tap the Document Mode icon Split screen function ON OFF Screen splitting allows both camera images distance camera and docu ment camera...

Страница 18: ...e display After you have recorded the document you can move the display back into a comfortable reading position Use read aloud function for saved images Open the image you want to have read aloud as described in Open saved images on page 20 and make your individual adjustments before you start reading Rotate images If the captured image is turned sideways or upside down you must rotate the image ...

Страница 19: ...e 22 Operation in the original view By default reading aloud starts immediately after the text recognition is completed To stop reading aloud tap anywhere on the screen To continue reading aloud tap on the point at which you want to start reading aloud To save a captured document as a text file tap on the disk icon in the upper right corner The text is saved in the Documents folder topolino tab le...

Страница 20: ...on to access the saved image data In the Image Files menu window all saved images are collected in folders and displayed in chronological order You can also rename folders by tapping the blue fold er icon To delete folders tap the red Trash icon Select an image file and open the folder with a short tap While viewing the images in full screen mode you can set the desired zoom factor or color mode I...

Страница 21: ...gs and return to the previous view General The following settings can be made here set the storage location of image files set the location of text files distance camera orientation original display or rotated by 180 degrees frequency of the distance camera 50hz 60hz select the menu language set the position of the menu bar switch distance camera video stabilization ON or OFF ...

Страница 22: ...eading language select the voice set the speech volume set the speech speed Reading The following settings can be made here select the visualization mode while using the TTS function original or wrapped set the text size in the wrapped mode choose the color theme ...

Страница 23: ...re that the power button and interfaces are on the right so that the camera is in the correct position under the display Attention When removing or inserting the display from or into the display mount make sure that no damage is caused by improper handling Bluetooth keyboard and mouse optional accessory pack The Bluetooth input devices can be added or configured in the Windows settings Bluetooth d...

Страница 24: ... and focus F focus C toggle color mode D toggle active window between distance and near Split screen mode only P Space Bar R Arrows O when in TTS mode take a picture rotate image move image OCR Z start stop video recording TAB Space Bar choose icon confirm S TAB Arrows open settings choose icon tab or setting change and choose tab and or setting ...

Страница 25: ...er to recharge the battery Charging the battery To charge the battery connect the supplied AC adapter to the power supply and connect the DC plug to the DC input socket on the system During charging the power indicator when the system is turned OFF lights up red Replacing the battery The battery may only be replaced by Reinecker Vision GmbH or an authorized dealer Battery operating time and chargi...

Страница 26: ... from persons other than Reinecker Vision GmbH authorised specialists may lead to invalidity of warranty 5 Partial warranty is valid for light sources serving to illuminate the reading object batteries and other parts subject to wear and tear 6 If a warranty claim is necessary the system has to be returned to the manufac turer in Alsbach Hähnlein or to your authorized dealer in the original packag...

Страница 27: ...en 12 3 Touch Display with approx 31 3cm screen diago nal internal camera 8 Megapixels magnification min x1 60 in document mode Operating system Windows 10 home 64 Bit measurements w x h x d approx 30 x 30 x 32cm measurements w x h x d folded approx 30 x 4 5 x 32 cm operating time up to approx 10 5 hours in tablet mode charging time approx 1 5 hours power supply 15V DC approx 4 0 A device 5V DC ap...

Страница 28: ...eine unserer Niederlassungen Bei im Ausland erworbenen Produkten kontaktieren Sie im Servicefall bitte Ihren dort ansässigen Händler Reinecker Vision GmbH International Contact sales department customer relations Sandwiesenstraße 19 DE 64665 Alsbach Hähnlein customer service Erlenweg 3 DE 64665 Alsbach Hähnlein Tel 49 6257 9311 0 Fax 49 6257 9311 8230 Email international reineckervision de www rei...

Отзывы: