background image

Montageanleitung / instruction sheet  / Notice de montage / Istruzioni di montaggio / Instrucciones de montaje 

HKV / HKV-D 


Stand 02/2009 

EDV-Nr. 7002059 

Technische Änderungen vorbehalten / subject to technical modification / sous réserve des 

modifications techniques / Salvo modifiche tecniche / Salvo modificaciones técnicas 

6


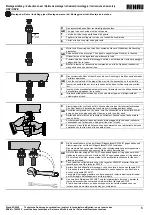
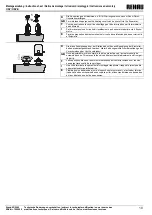
Montage der Rohre / Installing pipes / Montage de raccords / Montaggio dei tubi / Montaje de los tubos: 


D


Das anzuschließende Rohr rechtwinklig abschneiden. 

GB

The pipe to be connected must be cut square. 

Le tube doit être coupé parfaitement d’équerre 

Tagliare il tubo da collegare in modo che l’estremità risulti diritta. 

Cortar el tubo a conectar en ángulo recto. 


D


Mutter und Klemmring über das Rohr schieben. Danach Stützkörper bis Anschlag 

einstecken. 

GB

Slide nut and olive over pipe. Then push in support pipe all the way to the stop.


Glisser l’écrou et la bague fendue par dessus le tube 

Premere il dado e l’anello di bloccaggio sul tubo, quindi inserire il corpo di appoggio 

spingendolo fino in fondo. 

Montar la tuerca y el accesorio de compresión en el tubo. Después, introducir el 

manguito de soporte hasta el tope. 


D


Das vormontierte Rohr mit dem Konus bis zum Anschlag in die Konusaufnahme des 

Verteilers einstecken. 

GB

Push the conical end of the pipe all the way into the connection on the manifold. 

Insérer l’ensemble tube et raccord jusqu’en butée dans l’orifice conique du collec-

teur 

Inserire il tubo precedentemente montato con l’elemento conico nell’apposita sede 

del collettore, spingendo fino in fondo. 

Introducir el tubo premontado, con el cono hasta el tope, en el alojamiento del 

colector para el cono. 


D


Klemmringmutter von Hand auf die Konusaufnahme des Verteilers aufschrauben. 

Das Rohr dabei mit der anderen Hand bis zum Anschlag gedrückt halten. 

GB

Screw the compression nut, by hand, onto the connection on the manifold. Whilst 

doing so, keep the pipe pushed all the way in with the other hand. 

Serrer d’une main l’écrou du raccord au collecteur. Pousser avec l’autre main le 

tube en butée 

Avvitare manualmente il dado dell’anello di bloccaggio sulla conica del collettore, 

continuando con l’altra mano a spingere il tubo fino in fondo. 

Enroscar a mano la tuerca del accesorio de compresión en el alojamiento del cono, 

sujetando con la otra mano el tubo hasta el tope. 


D


Die Konusaufnahme mit einem Gabel-/ Ringschlüssel SW 24/27 gegenhalten und 

Klemmringmutter mit Gabel-/ Ringschlüssel SW 30 festziehen. 

Das maximale Anzugsmoment darf die in der Montageanleitung der eingesetzten 

Klemmringverschraubung genannten Werte nicht überschreiten. 

GB

Hold the receptor using an SW 24/27 open-ended spanner / ring spanner whilst 

tightening the compression nut with an SW 30 open-ended spanner / ring spanner. 

Do not exceed the max. torque stated in the installation instructions for the com-

pression joint used. 

Tenir l’insert du collecteur avec une clé à tuyauter  SW24/27 et serrer l’écrou du 

raccord avec une clé à tuyauter SW 30 

Serrare il dado dell’anello di bloccaggio con una chiave a bocca o poligonale SW 

30, tenendo ferma la sede conica ruotandola in senso opposto con una chiave a 

bocca o poligonale SW 24/27. 

La coppia di serraggio massima non deve superare i valori indicati nelle istruzioni 

per il montaggio del collegamento a vite impiegato. 

Con una llave fija/inglesa SW 24/27, sujetar el alojamiento del cono y apretar la 

tuerca del accesorio de compresión mediante llave fija/inglesa SW 30. 

El par de apriete máximo no debe ser superior a los valores indicados en las 

instrucciones de montaje para la unión por compresión. 


90° 

Содержание HKV

Страница 1: ... Verwendung ist nicht bestimmungsgemäß Für die aus missbräuchlicher Verwendung der Heiz kreisverteiler entstehenden Schäden haftet der Hersteller nicht Umbauten oder Veränderungen sind aus Grün den der Sicherheit und Gewährleistung nicht zu gelassen Eine Gewährleistung bei Verwendung von Ver schraubungen und Zubehörteilen anderer Her steller kann nicht übernommen werden Montage Inbetriebnahme Mont...

Страница 2: ... 20 C Using the manifolds for any purpose other than that set out in these instructions constitutes im proper use The manufacturer accepts no liability for damage resulting from improper use of the manifolds For safety and guarantee reasons no conversion or modification is permitted The manufacturer accepts no liability if connec tions and accessories made by other manufac turers are used Installa...

Страница 3: ...ns que celle décrite dans ce document sont interdites Les désordres en gendrés suite à une mauvaise utilisation du col lecteur ne pourront pas être imputés au fabri cant Transformer ou modifier le collecteur est interdit pour des raisons de sécurité et de bon fonction nement L utilisation d autres raccords ou accessoires d un autre fabricant avec notre collecteur ne sera pas couverte par notre gar...

Страница 4: ...I declina ogni responsabilità per danni di qualsivoglia natura dovuti a uso errato o non conforme del collettore Per motivi di sicurezza è vietato effettuare eventuali trasformazioni e o modifiche di propria iniziativa In caso di utilizzo di collegamenti a vite e o accessori di altra marca decade il diritto alla garanzia Montaggio messa in funzione Montaggio all interno dell armadietto di distribu...

Страница 5: ...rita en estas instrucciones es considerada como no conforme con la finalidad de uso El fabricante no responde de los daños ocasionados por la utilización indebida de los colectores Por motivos de seguridad y de garantía no está permitido transformar o modificar el colector No se asume garantía legal alguna en caso de utilizar racores y accesorios de otros fabricantes Montaje Puesta en marcha Monta...

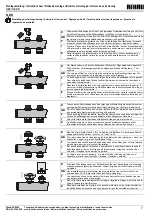
Страница 6: ...me des Verteilers aufschrauben Das Rohr dabei mit der anderen Hand bis zum Anschlag gedrückt halten GB Screw the compression nut by hand onto the connection on the manifold Whilst doing so keep the pipe pushed all the way in with the other hand F Serrer d une main l écrou du raccord au collecteur Pousser avec l autre main le tube en butée I Avvitare manualmente il dado dell anello di bloccaggio su...

Страница 7: ...o el husillo regulador hacia la izquierda abrir Efectuar el número de vueltas de acuerdo con el dimensionamiento o basado en el diagrama_1 D Die schwarze Schutzkappe nach Beendigung der Einstellung wieder aufsetzen da mit ungewollte Fremdeinwirkung oder Verschmutzung der Ventile verhindert wird GB Once the adjustments have been made replace the black protective cap to prevent any accidental adjust...

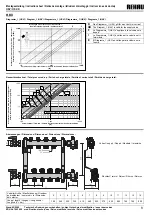
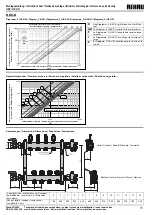
Страница 8: ...ngitud L mm 190 245 300 355 410 465 520 575 630 685 740 795 850 Druckverlust pressure drop Perte de charge total Perdite di carico Pérdida de carga mbar Drehungen offen turns open Ouvertures Numero rotazioni apertura Vueltas abierto Volumenstrom flow rate Volume Portata volumetrica Caudal volumétrico l h Druckverlust pressure drop Perte de charge total Perdite di carico Pérdida de carga mbar Volum...

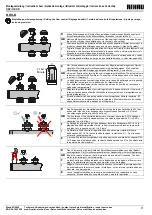
Страница 9: ...gramme 2 I Regolare la portata ruotando la vite di regolazione in senso antiorario Il numero di rotazioni necessarie va stabilito utilizzando la documentazione di progettazione op pure dal diagramma _2 E El caudal volumétrico se ajusta girando el husillo regulador hacia la izquierda El valor real se lee en el caudalímetro de la impulsión Efectuar el número de vueltas según dimensionamiento o basad...

Страница 10: ...os de mantenimiento el circuito de calefacción puede ser cierre vía el flujómetro D Die blaue Schutzkappe bzw der Stellantrieb sollte nach Beendigung der Einstellar beiten wieder aufgeschraubt werden Hiermit wird ungewollte Fremdeinwirkung oder Verschmutzung der Ventile verhindert GB Once adjustment work is complete the blue protective cap actuator should be screwed back on This prevents the valve...

Страница 11: ...Longitud L mm 190 245 300 355 410 465 520 575 630 685 740 795 850 Volumenstrom flow rate Volume Portata volumetrica Caudal volumétrico l h Druckverlust pressure drop Perte de charge total Perdite di carico Pérdida de carga mbar Drehungen offen turns open Ouvertures Numero rotazioni apertura Vueltas abierto 1 10 100 1 000 100 1 000 10 000 2 3 4 5 6 7 12 1 Druckverlust pressure drop Perte de charge ...

Страница 12: ... que l application l utilisation et la mise en œuvre de nos produits s effectuent en dehors de notre contrôle elles n engagent que votre seule responsabilité Si malgré tout notre responsabilité venait à être mise en cause elle serait limité à la valeur de la marchandise que nous avons livrée et que vous avez utilisée No tre garantie porte sur une qualité constante de nos produits conformément à no...

Отзывы: