background image

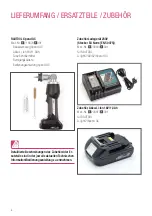
LIEFERUMFANG / ERSATZTEILE / ZUBEHÖR 


RAUTOOL Xpand QC

Mat.-Nr. 

1

216820

1

001

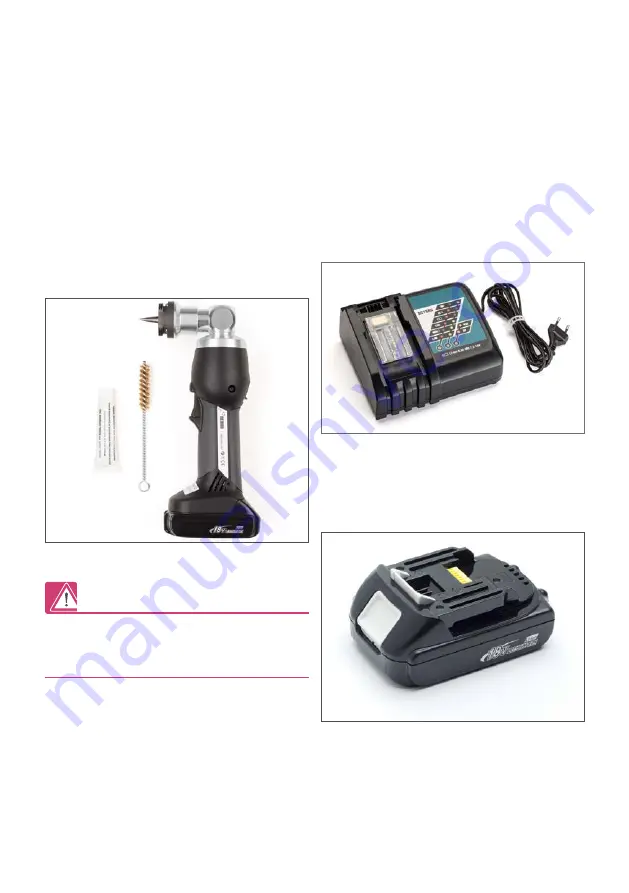
 -Basiswerkzeug Xpand QC
 -Akku Li-Ion 18V/1,3Ah
 -Tube Schmiermittel
 -Reinigungsbürste
 -Bedienungsanleitung Xpand QC

Detaillierte Beschreibungen des Zubehörs/der Er-
satzteile sind in der jeweils aktuellen Technischen 
Information/Bedienungsanleitung zu entnehmen .

Zubehör Ladegerät 230V  
(Stecker EU Norm [EN 50075])

Mat.-Nr. 

1

203609

1

001

für RAUTOOL
A-light2/A3/G2/Xpand QC

Zubehör, Akku-Li-Ion 18V/1,3Ah

Mat.-Nr. 

1

203619

1

001

für RAUTOOL
A-light2/Xpand QC

6

Содержание 12168201001

Страница 1: ...FORMATION EN OPERATING INSTRUCTIONS TECHNICAL INFORMATION FR MODE D EMPLOI INFORMATION TECHNIQUE IT ISTRUZIONI PER L USO INFORMAZIONI TECNICHE Valid from November 2014 856614 DE EN FR IT Des solutions polymères à l infini www rehau com Construction Automotive Industry ...

Страница 2: ...INHALT CONTENT SOMMAIRE INDICE Bedienungsanleitung 4 Operating instructions 21 Mode d emploi 38 Istruzioni per l uso informazioni tecniche 55 2 ...

Страница 3: ...S Sicherheitshinweise 4 Lieferumfang Ersatzteile Zubehör 6 Technische Daten 8 Werkzeugvorbereitung 9 Werkzeugbedienung 13 Montageablauf 14 Wichtige Hinweise 16 Wartungshinweise 18 Behebung von Funktionsstörungen 19 3 DE ...

Страница 4: ...einem trockenen ver schlossenen Raum und für Kinder nicht erreichbar aufbewahrt werden 7 Das Werkzeug ist nur geeignet zum Herstellen von REHAU Schiebehülsenverbindungen Benutzen Sie das Werkzeug nicht für andere Zwecke 8 Betreiben Sie das Gerät nur mit REHAU Originaltei len und Zubehör 9 Lassen Sie Wartungs und Reparaturarbeiten nur in einer von REHAU autorisierten Fachwerkstatt ausführen Für Arb...

Страница 5: ...bkühlen kann 11 Verbrennen Sie das Werkzeug Ladegerät oder die Akkuzellen nicht Akkuzellen können in Flammen explodieren Verbrauchte Akkus stets dem Recyc ling zuführen 12 Bei falscher Anwendung kann Flüssigkeit aus dem Akku austreten Vermeiden Sie den Kontakt Bei zufälligem Kontakt mit Wasser abspülen Wenn die Flüssigkeit in die Augen kommt nehmen Sie zusätzlich ärztliche Hilfe in Anspruch Eine V...

Страница 6: ...ienungsanleitung Xpand QC Detaillierte Beschreibungen des Zubehörs der Er satzteile sind in der jeweils aktuellen Technischen Information Bedienungsanleitung zu entnehmen Zubehör Ladegerät 230V Stecker EU Norm EN 50075 Mat Nr 12036091001 für RAUTOOL A light2 A3 G2 Xpand QC Zubehör Akku Li Ion 18V 1 3Ah Mat Nr 12036191001 für RAUTOOL A light2 Xpand QC 6 ...

Страница 7: ...Zubehör Koffer leer Mat Nr 12089571001 für RAUTOOL Xpand QC 7 DE ...

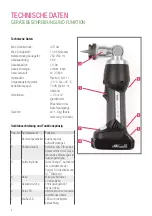
Страница 8: ... Effektivwert der Beschleunigung Gewicht ca 1 6 kg Basis werkzeug mit Akku Gerätebeschreibung und Funktionsprinzip Pos Nr Geräteelement Funktion 1 Bedienungsschalter Auslösung des Aufweitvorganges 2 Rückstellknopf Schieber zum Öffnen des Ablassventils zum Zurück fahren des Werkzeuges in Ausgangsstellung 3 Aufweitzylinder QuickChange Aufnahme für Aufweitköpfe der System RO Gewinde und QC Bajonett 4...

Страница 9: ...degerät nie in brand oder explosionsgefährlicher Umgebung Setzen Sie das Ladegerät weder Regen noch Schnee aus Trennen Sie das Ladegerät nach dem Laden oder vor jedem Versuch einer Reinigung von der Stromquelle Stellen Sie sicher dass die Kontakte des Akkus nicht durch Metallgegenstände wie Schrauben Besteck Nägel etc kurzgeschlossen werden können z B Aufbewahrung in Hosentasche o ä Zum Aufladen d...

Страница 10: ...rbraucht oder beschädigt Kontakte säubern Gelbe LED leuchtet ständig Anpassungsladung des Akkus um schnelle Erschöpfung zu vermeiden Kann auftreten wenn der Akku bei hoher oder niedriger Temperatur oder in vollständig ge oder entladenem Zustand ins Ladegerät gesteckt wird Gelbe LED blinkt Störung des Kühlgebläses Akku kann trotzdem geladen werden Ventilationsöffnungen säubern Bei häufig wiederholt...

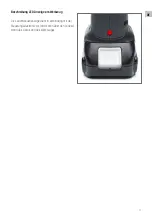
Страница 11: ...Beschreibung LED Anzeige am Werkzeug Die Leuchtdiodenanzeige dient in Verbindung mit der Steuerungselektronik zur Information über den Ladezu stand des Akkus und des Werkzeuges 11 DE ...

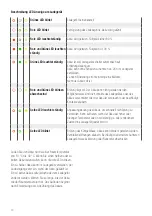
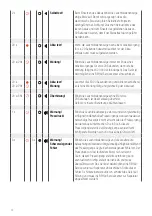
Страница 12: ...nkt die Leuchtdiodenanzeige schnell für etwa 20 Sekunden ist das Werkzeug überhitzt Gerät vor erneuter Benutzung abkühlen lassen 1 x Warnung Pressdruck Blinkt die Leuchtdiodenanzeige einmal und ertönt gleichzeitig einSignaltonwährenddesPressvorgangs wurdeentwederder notwendige Pressdruck nicht erreicht oder der Pressvorgang wurde manuell unterbrochen Die in Die in diesem Pressvorgang erstellte Ver...

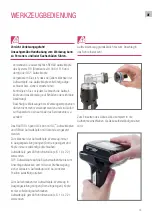
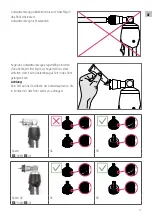
Страница 13: ... zu senden Das RAUTOOL Xpand QC kann mit QC Aufweitköpfen und REHAU Aufweitköpfen mit Gewinde eingesetzt werden Zum Wechsel der Aufweitköpfe Werkzeug immer in Ausgangsstellung bringen Dorn eingezogen und Köpfe immer vollständig aufschrauben Aufweitköpfe gemäß Rohrdimension z B 16 x 2 2 verwenden QC Aufweitköpfe auf die Bajonettaufnahme bis zum Anschlag aufstecken und mit einer Drehbewegung sicher ...

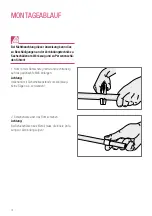
Страница 14: ...kzeug und zu Personenschä den führen 1 Rohr mittels Rohrschere gratfrei und rechtwinklig auf das gewünschte Maß ablängen Achtung Haltehand mit Sicherheitsabstand vom Werkzeug Keine Sägen o ä verwenden 2 Schiebehülse über das Rohr schieben Achtung Bei Schiebehülsen aus Metall muss die innere Anfa sung zur Verbindung zeigen 14 ...

Страница 15: ...sein Bis Memory Effekt voll einsetzt kann der Fitting aus dem Rohr fallen Auf geraden Sitz des Fittings achten 5 Anschließend mit dem RAUTOOL Montagewerkzeug unter Beachtung der Bedienungsanleitung Schiebe hülse bis zum Fittingkragen verpressen Eine Verarbeitung bei Temperaturen unter 10 C und über 45 C kann zu Schäden an den Ver bindungskomponenten am Werkzeug und oder Personenschäden führen Mini...

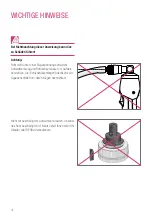
Страница 16: ... Biegespannung aufweiten Aufweitwerkzeug und Rohrachse müssen im Aufweit bereich ca drei Schiebehülsenlängen identisch sein Gegebenenfalls Rohr durch Biegen nachrichten Nicht mit beschädigtem Aufweitkopf arbeiten da sonst das Rohr beschädigt wird Ersatz liefert Ihnen sofort Ihr Händler oder REHAU Verkaufsbüro 16 ...

Страница 17: ...Aufweitwerkzeuges regelmäßig einfetten Tube Schmiermittel liegt bei Kegel nicht zu stark einfetten damit kein überschüssiges Fett in das Rohr gelangen kann Achtung Kein Fett auf die Oberfläche der Aufweitsegmente die in Kontakt mit dem Rohr kommen auftragen Xpand QC RO 12088911001 Xpand QC QC RO 12168201001 17 DE ...

Страница 18: ...vicecenter zu senden Vergewissern Sie sich dass die Aufweitköpfe immer vollständig aufgeschraubt sind und immer bis zum Anschlag in das Rohr eingesteckt sind Kegel des Aufweitwerkzeuges regelmäßig einfetten Kein Fett auf die Oberfläche der Aufweitsegmente auftragen Falls überschüssiges Fett auf die Auf weitsegmente gelangt müssen die Segmente sorg fältig gereinigt z B Waschbenzin und anschließend ...

Страница 19: ...elung nicht entfernen bzw beschädigen Werkzeug an REHAU Servicecenter senden Aufweitvorgang unterbrechen Rückstellknopf siehe S 6 Pos Nr 2 gespannt halten und gleichzeitig Bedienungsschalter siehe S 6 Pos Nr 1 ca 10 sek dauerbetätigen Wird der Fehler dadurch nicht behoben muss das Werkzeug in ein REHAU Servicecenter eingeschickt werden Werkzeug an REHAU Servicecenter senden Akku lädt nicht Ladeger...

Страница 20: ...Safety warnings 21 Items supplied spare parts accessories 23 Technical data 25 Tool preparation 26 Using the tool 30 Assembly procedure 31 Important notes 33 Maintenance notes 35 Notes on troubleshooting 36 20 ...

Страница 21: ...ld be kept in dry closed rooms out of the reach of children 7 The tool is only suitable for making REHAU Everlock joints Do not use the tool for any other purposes 8 Only operate the tool with original REHAU parts and accessories 9 Maintenance and repair work should be done only in a service center authorised by REHAU We will not be responsible for any work performed by an unauthorised person The ...

Страница 22: ...ool 11 Do not overheat the tool charger or rechargeable batteries Rechargeable batteries may explode and flare up Always give used up rechargeable batteries to the recycling system 12 As a result of improper use liquid can leak from the battery Avoid contact with this liquid In the event of inadvertent contact rinse off with water Should the liquid enter the eyes obtain medical assistance as well ...

Страница 23: ...ting instructions Detailed descriptions of the accessories spare parts can be found in the corresponding current Technical Information Operating Instructions Accessories charger 230V plug acc to European Standard En 50075 Mat No 12036091001 for RAUTOOL A light2 A3 G2 Xpand QC Accessories Li ion battery 18V 1 3Ah Mat No 12036191001 for RAUTOOL A light2 Xpand QC 23 EN ...

Страница 24: ...Accessories transport case empty Mat No 12089571001 for RAUTOOL Xpand QC 24 ...

Страница 25: ...brations 2 5 m s2 weighted effective value of acceleration Weight approx 1 6 kg basic tool with battery Equipment description and operating principle Item Tool elements Function 1 Operating switch Actuating the expansion process 2 Reset button Slider for opening the release valve for returning 3 Expansion cylinder QuickChange retainerfor expander heads of the RO thread system and QC bayonet 4 Batt...

Страница 26: ...osion Never operate the charger in an environment presenting the risk of fire or explosion Do not expose the charger to rain or snow After charging or before any cleaning disconnect the charger from the power source Make sure that the battery contacts cannot be shor ted by metal objects such as screws tools nails etc for example by carrying them in the pockets To charge the battery connect the cha...

Страница 27: ...ttery is worn out or damaged Clean contacts Yellow LED displays a steady light Conditioning charge of the battery to prevent the battery from wearing out quickly This can occur when the battery is inserted into the charger at high or low temperatures or when it is completely charged or completely empty Yellow LED flashes Cooling fan malfunction The battery can still be charged Clean vents If malfu...

Страница 28: ...Description of the LED display on the tool The light emitting diode together with the electronic control system serves to provide information about the battery charge levels and the tool 28 ...

Страница 29: ...e is due 20 s 5 Hz Overheating If the diode flashes quickly for about 20 seconds this means that the tool is overheated 1 x Warning Pressing force Ifthelight emittingdiodeflashesonceandemitsasignaltone during the compression process either the necessary pressing force was not reached or the pressing process was manually interrupted The joint made in the compression process may not have been create...

Страница 30: ...er heads and REHAU expander heads with a thread Always return the expander heads to their initial position retracted mandrel and always fully screw on heads when changing the expander heads Use expander heads according to pipe dimension e g 16 x 2 2 Push on the QC expander heads onto the bayonet retainer up to the stop and clip in securely with a rotating movement The expander head is automaticall...

Страница 31: ...in personal injury 1 Using pipe cutters cut pipe to required length at right angles and without leaving burrs Attention Keep your hand at a safe distance from the tool Do not use saws or similar 2 Slide compression sleeve onto pipe Attention With metal compression sleeves the inside taper must point towards the joint EN ...

Страница 32: ...ng ribs must be covered Until the memory effect sets in fully the fitting can fall out of the pipe Make sure to seat the fitting in level position 5 Afterwards use the RAUTOOL assembly tool in accordance with the opera ting instruction to press the compression sleeve up to the fitting collar Processing at temperatures under 10 C and over 45 C may result in damage to jointing components to the tool...

Страница 33: ...e under bending stress Expanding tool and pipe axis must be identical in the expansion area approx three compression sleeve lengths If necessary readjust the pipe by bending Never work with a damaged expander head as this will damage the pipe Replacements are available from your dealer or from the REHAU sales office EN ...

Страница 34: ...he expanding tool Regularly grease the expander taper tube of lubricant included To avoid excess grease entering the pipe do not grease the taper too much Attention Do not grease the expander segments that are in contact with the pipe Xpand QC RO 12088911001 Xpand QC QC RO 12168201001 ...

Страница 35: ... authorised service center for repair Make sure that the expander heads are fully screwed on and always inserted fully into the pipe up to the stop Regularly grease the taper of the expander tool Do not apply grease to the surface of expander segments Should excess grease reach the expander segments the segments must be thoroughly cleaned e g cleaning solvent and then dried Repairs Risk of acciden...

Страница 36: ... remove or damage the tool seal Send tool to REHAU service center Interrupt the expansion process Hold reset knob under tension see page 25 Item No 2 and at the same time continuously actuate the operating switch for about 10 seconds see page 25 Item No 1 If this does not correct the defect the tool must be sent to a REHAU service center Send tool to REHAU service center Battery does not charge Ch...

Страница 37: ...écurité 38 Fourniture pièces rechange accessoires 40 Données techniques 42 Préparation de l outillage 43 Utilisation de l outillage 47 Montage 48 Conseils importants 50 Conseils d entretien 52 Elimination de défauts 53 37 FR ...

Страница 38: ...s doivent être conservés dans une pièce sèche fermant à clé et être non accessibles aux enfants 7 L outillage ne peut être utilisé que pour le ser tissage des tubes REHAU Ne l utilisez pas pour d autres usages 8 Utilisez l appareil uniquement avec les pièces d origine et accessoires REHAU 9 Ne faites réaliser les travaux d entretien et de réparation que dans un centre de service agréé par REHAU No...

Страница 39: ...argeur ou les cellules de l accu Les cellules de l accu peuvent exploser sous l action des flammes Veuillez toujours remettre les accus usés à un système de recyclage 12 En cas de mauvaise utilisation du liquide peut sortir de l accu Evitez tout contact En cas de con tact involontaire rincer avec de l eau Si le liquide parvient dans les yeux adressez vous en plus à un médecin La mise en œuvre d un...

Страница 40: ...emploi Xpand QC Vous trouverez les descriptions détaillées des ac cessoires pièces de rechange dans l Information Technique mode d emploi actuel Accessoires chargeur 230V prise selon norme européenne EN 50075 N mat 12036091001 pour RAUTOOL A light2 A3 G2 Xpand QC Accessoires accu Li ion 18V 1 3Ah N mat 12036191001 pour RAUTOOL A light2 Xpand QC 40 ...

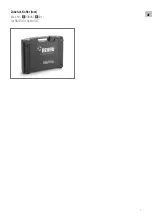
Страница 41: ...Accessoires coffret vide N mat 12089571001 pour RAUTOOL Xpand QC 41 FR ...

Страница 42: ...élération Poids env 1 6 kg outillage de base avec accu Description de l appareil et principe de fonctionnement N pos Eléments d appareil Fonction 1 Interrupteur de commande Déclenchement de l expansion 2 Bouton de réarmement Tirette de débrayage destinée à remettre l outillage en position initiale 3 Cylindre d expansion Unité Quick Change pour recevoir les têtes d expansion des systèmes RO à filet...

Страница 43: ...sion N utilisez jamais le chargeur dans un environnement exposé aux risques d incendie ou d explosion Ne soumettez pas le chargeur à la pluie ou à la neige Débranchez le chargeur après l avoir chargé ou avant chaque opération de nettoyage Veillez à ce qu aucun court circuit entre les bornes de l accu ne soit causé par des objets métalliques tels que vis instruments clous etc par ex range ment dans...

Страница 44: ...u bien l accu est usé ou endommagé Nettoyer les contacts DEL jaune est allumée Charge de compensation de l accu pour éviter un épuisement rapide Peut se produire lorsque l accu est branché au chargeur à température haute ou basse ou dans un état complètement chargé ou déchargé DEL jaune clignote Défaut du ventilateur de refroidissement L accu peut être malgré tout chargé Nettoyer les ouvertures de...

Страница 45: ...Description de l affichage DEL sur l outillage En liaison avec l électronique de commande l affichage à diodes luminescentes sert à informer sur l état de charge de l accu et de l outillage 45 FR ...

Страница 46: ...pendant env 20 secondes l outillage est surchauffé Laisser refroidir l appareil avant de le réutiliser 1 x Avertissement Pression de sertissage Si l affichage à diodes luminescentes clignote une fois et si un signal sonore retentit en même temps pendant l opération de sertissage soit la pression de sertissage nécessaire n a pas été atteinte ou bien l opération de sertissage a été interrompue manue...

Страница 47: ...nd QC peut être utilisé avec des têtes d expansion QC et des têtes d expansion REHAU à filetage Les têtes d expansion se changent toujours en mettant l outillage en position initiale mandrin rétracté toujours visser les têtes entièrement Utiliser toujours les têtes d expansion correspondant au diamètre du tube p ex 16 x 2 2 Placer jusqu en butée les têtes d expansion QC sur le receveur à baïonnett...

Страница 48: ...rporels 1 Couper le tube à la longueur voulue à l angle droit et sans bavure à l aide du coupe tube Attention Tenir le tube en respectant une distance de sécurité avec l outillage Ne pas utiliser de scies ou d outils comparables 2 Glisser la bague sur le tube Attention Pour les bagues à sertir métalliques le chanfrein interne doit être tourné vers le raccordement 48 ...

Страница 49: ...ccord peut tomber du tube jusqu à ce que l effet de mémore soit entièrement entré en action Veiller à ce que le raccord soit bien droit 5 Ensuite comprimer le raccord à sertir jusqu à la collerette du raccord en utilisant l outillage à sertir RAUTOOL en tenant compte du mode d emploi La mise en œuvre d un raccordement à une température inférieure à 10 C ou supérieure à 45 C peut entraîner un endom...

Страница 50: ...e contrainte de flexion L expanseur et le tube doivent être dans le même axe env trois longueurs de raccord le cas échéant redresser le tube par flexion Ne pas expandre avec des têtes endommagées auquel cas le tube serait endommagé à son tour Adressez vous à votre revendeur ou votre agence commerciale REHAU pour le remplacement ...

Страница 51: ...le cône de l expanseur le lubrifiant est compris dans la mallette Ne pas trop lubrifier le cône pour éviter que l excédent de lubrifiant ne puisse passer dans le tube Attention Ne pas appliquer de lubrifiant sur la surface des élé ments d expansion qui entrent en contact avec le tube Xpand QC RO 12088911001 Xpand QC QC RO 12168201001 FR ...

Страница 52: ...re de service agréé pour être réparés Assurez vous que les têtes d expansion sont toujours complètement vissées et insérées dans le tube jusqu à la butée Lubrifier régulièrement les cônes de l expanseur Ne pas appliquer de lubrifiant sur la surface des éléments d expansion Si de l excédent de lubrifiant parvient sur les éléments d expansion ces derniers doivent être nettoyés soigneusement par ex a...

Страница 53: ... enlever ni endommager les joints de l appareil Envoyer l outillage à un centre de service REHAU Interrompre expansion Maintenir le bouton de réarmement cf p 42 pos 2 en position tendue et actionner en même temps l interrupteurdecommande cf p 42 pos 1 pendant env 10 sec Si le problème ne peut pas être résolu de cette manière envoyer l outillage à un centre de service REHAU Envoyer l outillage à un...

Страница 54: ...a 55 Fornitura pezzi di ricambio accessori 57 Dati tecnici 59 Preparazione dell attrezzo 60 Uso dell attrezzo 64 Istruzioni di montaggio 65 Indicazioni importanti 67 Istruzioni di manutenzione 69 Istruzioni per eliminare anomalie 70 54 ...

Страница 55: ...tilizzati vanno riposti in un ambiente asciutto chiuso a chiave e inaccessibile ai bambini 7 L attrezzo è idoneo soltanto per realizzare i collegamenti con manicotto autobloccante REHAU Evitare l uso per qualsiasi altro scopo 8 Utilizzare l apparecchio soltanto con accessori e pezzi originali REHAU 9 Affidare gli interventi di manutenzione e ripara zione esclusivamente ad un centro di assistenza t...

Страница 56: ...sioni successive occorre rispettare una pausa di almeno 15 min per permettere all attrezzo di raffreddarsi 11 Non bruciare l attrezzo o le batterie che potrebbe ro infiammarsi 12 In caso di impiego errato può fuoriuscire del liqui do dall accumulatore Evitare il contatto con tale liquido In caso di contatto accidentale lavare con acqua Se sono gli occhi a venire in contatto con il liquido rivolger...

Страница 57: ...a Istruzioni per l uso Xpand QC Consultare le relative informazioni tecniche istru zioni per l uso per avere maggiori informazioni degli accessori e parti di ricambio Accessori caricabatteria 230 V spina norma EN 50075 Mat nr 12036091001 per RAUTOOL A light2 A3 G2 Xpand QC Accessori batterie agli ioni di litio 18V 1 3Ah Mat nr 12036191001 per RAUTOOL A light2 Xpand QC 57 IT ...

Страница 58: ...Accessori valigia vuota Mat nr 12089571001 per RAUTOOL Xpand QC 58 ...

Страница 59: ...razione ponderata Peso ca 1 6 kg attrezzo base con accumulatore Descrizione attrezzo e funzionamento N Pos Elemento Funzione 1 Interruttore di comando Attivazione del processo di espansione 2 Pulsante di ripristino Cursorediaperturavalvoladi sfiato per riportare l attrezzo nella posizione iniziale 3 Cilindro di espansione Quick Change Possibilità di utilizzo delle teste di espansione del sistema R...

Страница 60: ...n ambienti a rischio d incendo o di esplosione Non esporre mai il caricabatteria alla pioggia o alla neve Dopo il caricamento o prima di ogni tentativo di pulizia staccare il caricabatteria dall alimentazione Assicurarsi che i contatti dell accumulatore non possano andare in cortocircuito per mezzo di oggetti in metallo come viti posate chiodi ecc per es se tenuto nella tasca dei pantaloni o simil...

Страница 61: ... Pulire i contatti LED giallo fisso Carica di condizionamento consente di evitare un esaurimento rapido della batteria Questa condizione può presentarsi quando la carica della batteria viene eseguita ad alte o basse temperature o quando la batteria è completamente carica o scarica LED giallo lampeggiante Guasto della ventola di raffreddamento La batteria può comunque essere caricata Pulire le aper...

Страница 62: ...Descrizione indicatore LED sull attrezzo L indicatore LED combinato con il regolatore elettroni co serve per il monitoraggio dello stato di caricamento dell accumulatore e dell attrezzo 62 ...

Страница 63: ... l indicatore LED lampeggia veloce per 20 secondi circa l attrezzo è surriscaldato Prima di iniziare un procedimento di lavoro lasciare raffreddare l attrezzo 1 x Avviso Pressione Se l indicatore LED lampeggia una volta e si presenta con temporaneamente un segnale acustico durante il procedimento di lavoro non è stato raggiunta la pressione necessaria oppure il procedimento di lavoro è stato inter...

Страница 64: ...teste di espansione QC e con teste di espansione provviste di filettatura Per sostituire le teste di espansione portare l attrezzatura in posizione iniziale mandrino inserito e riavvitare completamente le teste Utilizzare le teste di espansione a seconda della dimensione del tubo es 16 x 2 2 Innestare le teste di espansione QC sulla sede a baionetta e agganciarle saldamente con un movimento rotato...

Страница 65: ...e alle persone 1 Portare il tubo alla misura desiderata operando un taglio perpendicolare all asse mediante una cesoia apposita Attenzione Far presa con la mano a debita distanza dall attrezzo 2 Inserire il manicotto autobloccante sul tubo Attenzione Con manicotti metallici lo smusso interno deve essere rivolto verso il raccordo 65 IT ...

Страница 66: ...enuta devono essere ricoperte Prima dell instaurazione completa dell effetto memory il raccordo può cadere dal tubo Controllare il posizio namento corretto del raccordo 5 In seguito fare pressione sul manicotto autobloccan te fino ad arrivare al collare del raccordo Una lavorazione a temperature inferiori a 10 C e superiori a 45 C può provocare danni ai compo nenti del collegamento all attrezzo e ...

Страница 67: ... L attrezzo espansore e l asse del tubo devono essere identici nella zona di espansione ca tre volte lunghezza del manicotto Eventualmente allineare il tubo Non operare mai con la testa espansore danneggiata in quanto può rovinare il tubo I rivenditori o l Ufficio Vendite REHAU provvederanno immediatamente alla sostituzione 67 IT ...

Страница 68: ...o di espansione tubetto di lubrificante in dotazione senza però eccedere con la dose di grasso in modo da evitare che la quantità in esubero possa infiltrarsi all interno del tubo Attenzione Non applicare grasso sulla superficie dei segmenti espansori che vengono in contatto con il tubo Xpand QC RO 12088911001 Xpand QC QC RO 12168201001 68 ...

Страница 69: ...arazione a un centro di assistenza tecnica autorizzato Assicurarsi che gli espansori siano applicati comple tamente avvitati e innestati fino all arresto Ingrassare regolarmente il mandrino conico degli attrezzi espansori Non applicare grasso sulla super ficie dei segmenti espansori Se il grasso in eccesso finisce sui segmenti espansori questi ultimi devono essere puliti accuratamente per es con b...

Страница 70: ...giare la sigillatura dell attrrezzo Inviare l attrezzo a un centro assistenza REHAU Interrompere il processo di espansione Tirare il pulsante di ripristino vedi pagina 59 pos 2 e contemporaneamente tenere premuto l interruttoredicomando vedipagina59 pos 1 circa 10 secondi Se l errore non si risolve spedire l attrezzo a un centro assistenza REHAU Inviare l attrezzo a un centro assistenza REHAU La b...

Страница 71: ...aux dommages portant sur la valeur de la marchandise que nous aurons livrée et que vous aurez utilisée Les droits reposant sur les déclarations de garantie données expirent pour des applications qui ne sont pas décrites dans les informations techniques Se è previsto un impiego diverso da quelli descritti nell Informazione Tecnica attualmente in vigore l utilizzatore deve contattare la REHAU e prim...

Страница 72: ...thens 30 21 06682500 athens rehau com Thessaloniki 30 2310 633301 thessaloniki rehau com HK Hongkong 8 52 28987080 hongkong rehau com HR Zagreb 385 1 3444711 zagreb rehau com HU Budapest 36 23 530700 budapest rehau com ID Jakarta 62 21 45871030 jakarta rehau com IE Dublin 353 1 8165020 dublin rehau com IN Mumbai 91 22 61485858 mumbai rehau com New Delhi 91 11 45044700 newdelhi rehau com Bangalore ...

Отзывы: