
User Manual
FROG-6
UM-0007-REV.06
Page 42
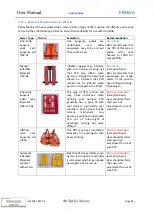
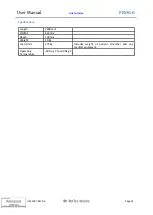
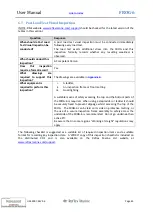
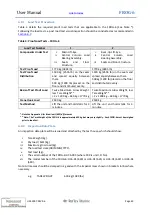
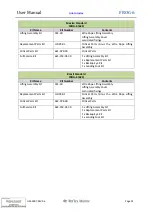
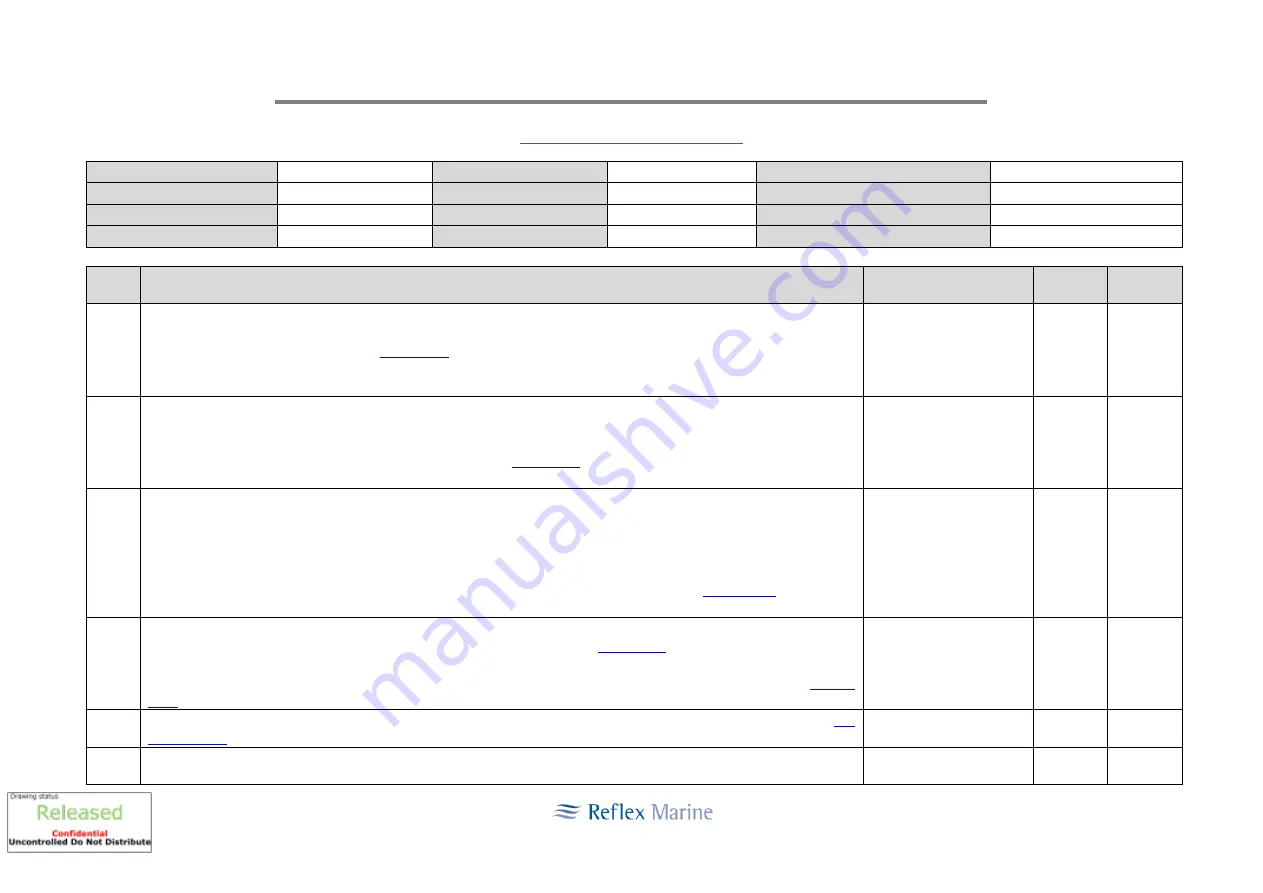
Examination Checklist Form
Unit No
This Examination Date
Examined by
Usage Category
Last Inspection Date
Position/ Company
Installation / Vessel
Last Examination Date
Signature
Avg No of Transfers / Year
Load test Performed Y/N
Original Inspection record filed in
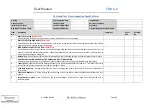
Item
No
Description
Comment
Pass /
Fail
Verified
By
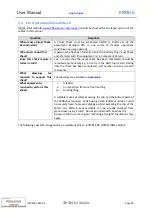
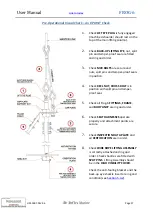
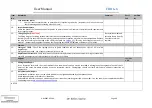
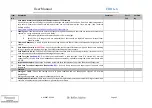
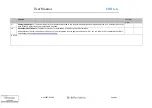
1.
Main Lift-Eye Plug
(Critical Part)
Remove and visually inspect the main Lift-Eye plug for any signs of damage or strain. Replace according to the
usage of the FROG-6 (see Table 3 in
) or on the recommendation of a Competent Person / Inspector.
(Note: Although RML do not require it some operators choose to adopt a dye penetrant crack inspection prior to
any re-installation of a critical part)
2.
Main Lift-Eye Plug M20 Bolts
(Critical Part)
Remove and visually inspect the three M20 main Lift-Eye plug securing bolts for any signs of damage or strain.
Visually inspect the three M20 holes in the central column tube for signs of damage or strain. Replace appropriate
parts according to the usage of the FROG-6 (see Table 3 in
) or on the recommendation of a Competent
Person / Inspector. Bolt torque to 205 Nm.
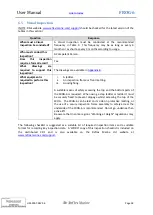
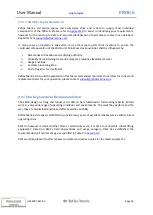
3.
M48 Keel Boss and M10 Cross Bolt
(Critical Parts)
Remove the M48 keel boss nut and visually check that the threads at the bottom of the central column tube are in
good condition. Before replacing the keel nut ensure the threads on both the central column and keel nut are
thoroughly cleaned so they are free of grime and grit. Both threads should then be coated with either Rocol Anti-
Seize Stainless or Swagelok Blue Goop thread lubricant.
Replace appropriate parts according to the usage of the FROG-6 (see Table 3 in
) or on the
recommendation of a Competent Person / Inspector. Do not go underneath an active lift.
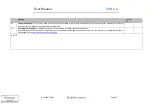
4.
Lifting Sling Set
(Critical Part)
Replace the sling set according to the usage of the FROG (see Table 3 in
). This may be as frequently as
every 3 months. Irrespective of apparent condition the lifting sling set should be replaced at least every 12 months.
Check the main lifting shackle alignment plate and the back-up eye shackle insert are in good condition (see
). Replace as necessary.
Note serial number and
test date stamp (specify
decision to retain or
replace).
5.
Sling Anti-Fouling -
Check the lifting assembly anti-fouling bracket and shackle spacer are in good condition (
). Replace as necessary.
6.
Backup-Eye
–
Inspect the back-up eye in situ, nut, split pin and tamper proof seal. Replace on the recommendation
of a Competent Person / Inspector. Torque to 135 Nm
Содержание FROG-6 HC6-01 620
Страница 62: ...User Manual FROG 6 UM 0007 REV 06 Page 62...
Страница 63: ...User Manual FROG 6 UM 0007 REV 06 Page 63...
Страница 64: ...User Manual FROG 6 UM 0007 REV 06 Page 64...
Страница 65: ...User Manual FROG 6 UM 0007 REV 06 Page 65...
Страница 66: ...User Manual FROG 6 UM 0007 REV 06 Page 66...
Страница 67: ...User Manual FROG 6 UM 0007 REV 06 Page 67...
Страница 68: ...User Manual FROG 6 UM 0007 REV 06 Page 68...
Страница 69: ...User Manual FROG 6 UM 0007 REV 06 Page 69...
Страница 70: ...User Manual FROG 6 UM 0007 REV 06 Page 70...
Страница 71: ...User Manual FROG 6 UM 0007 REV 06 Page 71...
Страница 72: ...User Manual FROG 6 UM 0007 REV 06 Page 72...
Страница 73: ...User Manual FROG 6 UM 0007 REV 06 Page 73...
Страница 74: ...User Manual FROG 6 UM 0007 REV 06 Page 74...
Страница 75: ...User Manual FROG 6 UM 0007 REV 06 Page 75...
Страница 76: ...User Manual FROG 6 UM 0007 REV 06 Page 76...
Страница 77: ...User Manual FROG 6 UM 0007 REV 06 Page 77...
Страница 78: ...User Manual FROG 6 UM 0007 REV 06 Page 78...
Страница 81: ...User Manual FROG 6 UM 0007 REV 06 Page 81 12 2 Decals Vinyl Stickers Located on Buoyancy Units...
Страница 82: ...User Manual FROG 6 UM 0007 REV 06 Page 82...
Страница 83: ...User Manual FROG 6 UM 0007 REV 06 Page 83...
Страница 84: ...User Manual FROG 6 UM 0007 REV 06 Page 84 12 3 Decal Operating Instructions Located on Seat...
Страница 88: ...User Manual FROG 6 UM 0007 REV 06 Page 88 Link to Index Link to Index...
Страница 93: ...User Manual FROG 6 UM 0007 REV 06 Page 93...
Страница 94: ...User Manual FROG 6 UM 0007 REV 06 Page 94...
Страница 95: ...User Manual FROG 6 UM 0007 REV 06 Page 95...
Страница 96: ...User Manual FROG 6 UM 0007 REV 06 Page 96...
Страница 97: ...User Manual FROG 6 UM 0007 REV 06 Page 97...