INSTALLATION GUIDE
GB
PELLET STOVE
LOTO Multiair
PART 2 - OPERATION AND CLEANING
Instructions in English
Страница 1: ...INSTALLATION GUIDE GB PELLET STOVE LOTO Multiair PART 2 OPERATION AND CLEANING Instructions in English...
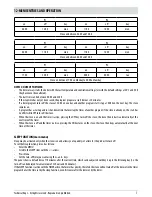
Страница 2: ...I 10 FIRST START UP 3 11 CONTROL PANEL 5 12 MENU ENTRIES AND OPERATION 6 13 SAFETY DEVICES 14 14 ALARMS 15 15 RECOMMENDATIONS FOR SAFE USE 20 16 CLEANING 21 17 FAULTS CAUSES SOLUTIONS 31 18 COMFORT AI...
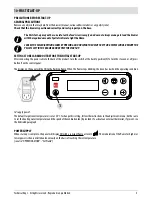
Страница 3: ...After connecting the power cable to the back of the product turn the switch at the back to position I To turn the stove on or off press button 1 on the control panel The display on the panel will be O...
Страница 4: ...eandsmellofpaint Do not stand close to the boiler and ventilate the room as described The smell of paint will disappear after about an hour of operation however it is not harmful in any case The produ...
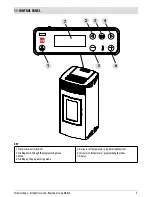
Страница 5: ...served Reproduction prohibited KEY 1 Stove switch on switch off 2 Scrolling down through the programming menu 3 Menu 4 Scrolling up the programming menu 5 Decrease set temperature programming function...
Страница 6: ...dashes Example TIMER 1Timer 1 program active TIMER 1 4Timer 1 and 4 programs active TIMER 1 2 3 4 5 6 All timer programs active EXAMPLE OF PROGRAMMING With the stove on or off access the MENU scroll...
Страница 7: ...another program if the stove is already on the start has no effect while OFF turns off the stove When the stove is on and the timer is active pressing the OFF key turns off the stove the stove then re...
Страница 8: ...to the set values when the room temperature drops below the set threshold PLEASE NOTE The point to the right of the room temperature on the control panel display indicates the half degrees e g 23 C i...
Страница 9: ...scroll through and select Settings Press menu to confirm Use the arrow keys to scroll through and select language Press menu to confirm Use the keys to select the required language IT EN DE FR ES NL...
Страница 10: ...e and time settings see paragraphs 8 f and 8 g respectively ECO stop T can be adjusted to ensure correct operation in the various environments in which the stove can be installed and to avoid constant...
Страница 11: ...ease thesmokeandashextractionspeed Thischangeresolvesallthepotentialproblemsrelatedtopelletsclogginginthebrazieranddeposits forming at the bottom of the brazier itself caused by poor quality fuel or f...
Страница 12: ...eeper function as follows Press the menu key Use the arrow keys to scroll through and select Settings Press menu to confirm Use the arrow keys to scroll through and select Chimney sweeper function Pre...
Страница 13: ...ure it provides Connect the cables coming from the external thermostat to terminal 14 on the board on the stove Enable the external thermostat factory settings OFF as follows Press the menu key Scroll...
Страница 14: ...reached TEMPORARY POWER CUT When a power cut is less than 10 the stove returns to its previous operating state if it is more it executes a cooling re ignition cycle FAILED START UP If during ignition...
Страница 15: ...fuel to minimum SETTINGS menu pellet recipe If the alarm persists contact the service centre Check whether the room fan is working correctly A04 Smoke overtemperature Reduce the load of pellets SETTIN...
Страница 16: ...by activating the smoke extractor at minimum speed for 10 then proceed to the next step 2 Restore the stove to the operating condition prior to the blackout During phase 1 the panel shows ON BLACK OUT...
Страница 17: ...to The flue clogging The presence of a foreign body in the flue birds nests clogged grates etc Wind coming through the flue because it is unprotected or the installation was wall mounted or required...
Страница 18: ...in Active System products RPM 30 50 in NON Active System products The percentage variation affects all the power values 1 to 5 proportionally and as a percentage The percentage variation does not aff...
Страница 19: ...moke temperature PLEASENOTETheindicatednegativepressurereadingsmaydifferby 1Pabasedonfluegastemperature Likewise fluegastemperature may differ by 10 C based on fuel quality or appliance cleanliness Ch...
Страница 20: ...e product is installed in compliance with standards in force Furthermore it is of the utmost importance to respect the following simple rules Every time the brazier is removed for cleaning it must alw...
Страница 21: ...es little maintenance if used with certified good quality pellets DAILY ORWEEKLY CLEANING PERFORMED BYTHE USER Brazier cleaning Before ignition always clean the brazier T and remove any ash or incrust...
Страница 22: ...e holes and the grate on the bottom If good quality pellets are used you will normally only need to use a brush to restore the optimal operating conditions of the component Cleaning the ash box To cle...
Страница 23: ...ng the motor body and the internal sensor It is recommended to check that the filter is clean every 15 20 days If needed remove fluff or the material that has deposited on it Inspection and cleaning a...
Страница 24: ...mandatory in order to facilitate the general removal of all combustion residue before it becomes very difficult to remove it due to moisture compacting it over time ATTENTION Itisobligatorytohaveanau...
Страница 25: ...ur t screws and remove cap H Loosen the four screws y remove the plate n and the gasket o Use the nozzle of a vacuum cleaner to remove any ash and soot that may have built up in the lower exchanger sm...
Страница 26: ...estion The first step is to take out the internal cast iron Open the firebox door lift the T cast irons slightly and tilt them towards you to take them out of their place and remove them Then pull out...
Страница 27: ...use a stiff rod or a bottle brush to scrape the walls of the firebox see arrow to make the ash fall into the lower compartment Use a stiff rod or a bottle brush to scrape the walls of the firebox see...
Страница 28: ...28 16 CLEANING Use a vacuum cleaner nozzle to vacuum up any remaining ash and dust on the exchanger see arrow Then thoroughly clean the lower exchanger replace any gaskets if needed and reassemble...
Страница 29: ...t the operation ATTENTION The frequency with which the smoke outlet system is cleaned depends on the use of the boiler and the type of installation We recommend relying on an authorised service centre...
Страница 30: ...rised and qualified technician CHECKINGTHE INTERNAL COMPONENTS ATTENTION The internal electromechanical components must only be checked by qualified personnel whose technical expertise includescombust...
Страница 31: ...restore the thermostat until the lockout is off and switch the product back on If the problem persists contactTechnical Assistance The door is not closed properly or the gaskets are worn Closethedoora...
Страница 32: ...onvection air fan never stops Faulty or malfunctioning temperature control probe Checktheprobeandreplaceit ifnecessary In the automatic position the stove always runs at full power Thermostat is set t...
Страница 33: ...uction prohibited ANOMALY POSSIBLE CAUSES SOLUTIONS No increase in temperature with stove in operation Incorrect combustion adjustment Check recipe Set flame 1 setting level too low Increase power fro...
Страница 34: ...ROOM FAN FAN 2 12 AUGER 13 SMOKE SENSOR 14 EXTERNALTHERMOSTAT CONNECTION TERMINAL 15 ROOMTEMPERATURE PROBE 16 17 18 SMOKE EXTRACTOR FAN REVOLUTION CONTROL 19 20 21 22 REAR ROOM FAN FAN 3 23 24 25 CON...
Страница 35: ......
Страница 36: ...21 06 2017 REV 0 8901717800 Via La Croce n 8 33074Vigonovo di Fontanafredda PN ITALY T l phone 39 0434 997200 Internet www red365 it e mail info red365 it...