background image

14

NORME DI 

SICUREZZA GENERALI


 La macchina descritta nel presente ma-

nuale è stata costruita in conformità alla Direttiva 
Comunitaria sulle macchine 2006/42/CE (Diret-
tiva Macchine). È obbligo del responsabile della 
gestione della macchina attenersi alle direttive 
comunitarie e alle leggi nazionali vigenti, nei ri-
guardi dell’ambiente di lavoro, ai 

fi

 ni della sicu-

rezza e della salute degli operatori. Prima della 
messa in funzione, effettuare sempre i controlli 
preliminari.

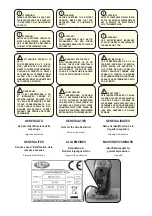
!

 Attenzione!

L’uso della macchina è consentito solo 
all’operatore abilitato. Impedire che la mac-
china venga usata da chi non è autorizzato.

Non effettuare modifi che, trasformazioni o 
applicazioni sulla macchina che potrebbe-
ro pregiudicare la sicurezza.

Prima dell’avviamento della macchina con-
trollare che il funzionamento non metta in 
pericolo nessuno.

Astenersi da qualsiasi modo di lavorare 
che possa pregiudicare la stabilità della 
macchina.

Per il trasporto della macchina, assicurar-
si che la stessa venga saldamente fi ssata 
all’automezzo per mezzo del manubrio e di 
una fascia avvolgente.

Per il sollevamento fare passare una fascia 
sotto al telaio e agganciarsi al manubrio

.

!

 Pericolo!

Oltre alle norme previste dalla legislazio-
ne, il responsabile della gestione della 
macchina deve istruire gli operatori su 
quanto segue:

-   Le protezioni 

fi

 sse e/o mobili devono rima-

nere sempre nella loro sede, correttamen-
te 

fi

 ssate. 

Se, per qualunque motivo, dette protezioni 
vengono rimosse, disinserite o cortocircui-
tate, è obbligo ripristinarle prima di rimette-
re in funzione la macchina.

-  Usare la macchina soltanto in condizioni 

tecnicamente ineccepibili e conformi alla 
sua destinazione.

-  L’uso conforme alla destinazione com-

prende anche l’osservanza delle istruzioni 
d’uso e manutenzione, nonché delle condi-
zioni d’ispezione e manutenzione.

È assolutamente vietato aspirare sostanze 
in

fi

 ammabili e/o tossiche.

-  È assolutamente vietato “toccare” le par-

ti in movimento della macchina; nel caso 
fosse assolutamente necessario, prima 
fermare il funzionamento della macchina.

É vietato usare la macchina in ambienti pe-
ricolosi, in presenza di vapori o fumi tossici 
dal momento che la macchina è priva di 
cabina chiusa.


GENERAL SAFETY 

REGULATIONS


 The machine described in this manual 

has been constructed in accordance with the CE 
Directive on machines no. 2006/42/EC (Machi-
nery Directive).
The person in charge of the machine is respon-
sible for complying with CE directives and local 
regulations with regard to the working environ-
ment to ensure the health and safety of ope-
ratives. Always perform the preliminary checks 
before starting the sweeper.

!

 Warning!

The machine may only be used by the au-
thorized operator. Avoid the use of the ma-
chine by unauthorized persons.

Never carry out modifi cations, transforma-
tions or applications on the machine which 
might impair its safety.
 
Before switching on and starting up the 
machine, check that its operation will not 
put anyone in danger.

Never work in any way which may impair 
the stability of the machine.

When transporting the machine, it neces-
sary fi xing it to the vehicle by means of the 
handlebar and an holding belt.

In order to lift the machine insert the holding 
belt under the chassis and fi x it on the han-
dlebar.

!

 Danger!

Apart from the regulations envisaged, the 
person in charge of the machine must 
inform the operators of the rules which 
follow:

- The 

fi

 xed or moving housings and safety 

devices must always be left in place, cor-
rectly secured.

If the housings are removed, or the safety 
devices either disconnected or short-cir-
cuited, for any reason, they must be re-
stored before the machine is put back into 
operation.

-  Only use the machine in technically cor-

rect conditions which conform to its inten-
ded use. 

 -  Compliance with the intended use also 

requires operation in accordance with the 
instructions for use and maintenance, and 
the speci

fi

 ed inspection and maintenance 

conditions.

Use of the machine to suck up in

fl

 amma-

ble and/or toxic liquids and dusts is abso-
lutely forbidden.

Touching the moving parts of the machine 
is hazardous and absolutely forbidden.  
If access to these parts is absolutely ne-
cessary, 

fi

 rst remove the key from the da-

shboard.

-  The machine is not equipped with cabin, 

therefore it is prohibited to use it in dan- 
gerous areas and with toxic fumes and  
vapours.

.

NORMAS GENERALES 

DE SEGURIDAD


 La máquina descrita en este manual ha 

sido fabricada de acuerdo con la Directiva Co-
munitarioa para máquinas 2006/42/CE (Directi-
va para máquinas).
El responsable del manejo de la máquina de-
berá respetar las directivas comunitarias y las 
leyes nacionales vigentes referentes al lugar de 
trabajo, a 

fi

 n de mantener las condiciones de 

seguridad y de higiene para los trabajadores. 
Efectuar controles previos a la puesta en funcio-
namiento de la máquina.

!

 Atención!

La máquina únicamente deberá ser utiliza-
da por operadores autorizados. Impedir que 
personal no autorizado utilice la máquina.

No efectuar modifi cadciones,  transforma-
ciones o aplicaciones a la máquina que pue-
dan perjudicar la seguridad de ésta. 

Antes de encender la máquina comprobar 
que dicha operación no pone en peligro a 
nadie.

No trabajar de manera que se perjudique la 
estabilidad de la máquina.

Para transportar la máquina, comprobar que 
esté bien fi jada al ’vehículo mediante el ma-
nillar y una faja que la envuelva.

Para la elevación hacer pasar una faja por 
debajo del chasis y utilizar el manillar como 
enganche.

!

 Peligro!

Además de las normas prevista por la le-
gislación, el responsable del manejo de la 
máquina debe informar a los operadores 
de lo siguiente:

- Las 

protecciones 

fi

 jas y/o móviles deben 

permanecer siempre en su sitio, correcta-
mente 

fi

 jadas.

-  Si por cualquier motivo dichas protec-

ciones se quitan, se desconectan o han 
sufrido un cortocircuito, es obligatorio que 
antes de volver a poner la máquina en 
marcha estén bien colocadas.

Utilizar la máquina únicamente cuando se 
den las condiciones técnicamente ade-
cuadas y conformes para su uso.

-  El uso adecuado de la máquina implica 

también el cumplimiento de las instruc-
ciones de uso y mantenimiento, así como 
las condiciones de inspección y manteni-
miento.

-  Está terminantemente prohibido aspirar 

sustancias in

fl

 amables y/o tóxicas.

-  Se prohibe terminantemente tocar las 

piezas en movimineto de la máquina ; en 
caso de que fuera absolutamente necesa-
rio, detener antes al funcionamiento de la 
máquina.

Está prohibido utilizar la máquina en lu-
gares peligroso o con vapopres toxicos 
porque la máquina no tiene cabina

.

Содержание 33.MG.101

Страница 1: ...2R 33 MG 102 Mega I 531 33 MG 103 Mega I 552 33 MG 104 Mega I 611 33 MG 106 Mega I 722 Manuale d uso e manutenzione Instruction and maintenance handbook Manual de uso y mantenimiento Manuel d utilisation et d entretien Handbuch für Gebrauch und Wartung Brugs og vedligeholdelsesvejledning Tecnoklean s a s per info 328 7224422 tecnoklean yahoo it ...

Страница 2: ... CADA TRABAJO O CUANDO LA MÁQUINA DEBA PERMANECER SIN FUNCIONAR DURANTE UN DETERMINADO PERÍO DO DE TIEMPO GENERALITES Donnees pour l identification de la laveuse sécheuse Étiquette d identification ATTENTION AVANT DE CONTRÔLER L EMPLACE MENT DES BATTERIES S ASSURER QUE LE RÉSERVOIR DE RÉCUPÉRA TION EST COMPLÈTEMENT VIDE DANGER GEL AVEC DES TEMPÉRATURES À 0 C ET INFÉRIEURES VÉRIFIER ET ÉVENTUELLEME...

Страница 3: ...y un ahorro ya que se evitan daños mayores DEMANDES D INTERVENTION Les éventuelles demandes d intervention doi vent être adressées après avoir procédé à une analyse pointilleuse du problème technique après en avoir établi si possible la cause il est dans tous les cas nécessaire de communiquer au technicien les données suivantes lors de la demande d intervention Heures de travail Numéro de série Le...

Страница 4: ...ti in materia AVVERTENZA Nonostante le operazioni di pulizia dei del serbatoio soluzione durante il montaggio e i test di collaudo alcuni residui plastici di lavorazione potrebbero essere ancora presenti nelle prime ore di funzionamento della macchina PRELIMINARY INFORMATION The symbols below are intended to attract the reader user s attention in or der to ensure proper safe use of the machine The...

Страница 5: ...sateur afin que soit garantie une utilisation à la fois correcte et sûre de la machine leur signification exacte est la suivante Attention Rappel la nécessité de respecter certaines règles de comporte ment afin de prévenir les risques de dommages de la machine et les situations dangereuses Danger Souligne la présence de dangers relatifs à des risques résiduels auxquels l opérateur doit prêter la p...

Страница 6: ...zen müssen gemäß der diesbezüglich geltenden nationalen Gesetze entsorgt werden VORSICHT Trotz der Reinigung der Lösungsmitteltanks während der Montage und den Abnahmetests könnten in den er sten Betriebsstunden der Maschine noch einige Bearbei tungsrückstände aus Kunststoff vorhanden sein INDLEDENDE OPLYSNINGER Følgende symboler har til opgave at henlede læserens brugerens op mærksomhed med henbl...

Страница 7: ...ZIONE AGLI UTENTI 88 OPTIONAL 90 Configuraz della Macchina con BATTERIEAL PIOMBO e o al GEL 90 Ripristino configurazione standard per BATTERIE al PIOMBOACIDO 91 Table of contents page CALLING IN THE AFTER SALES SERVICE 3 SPARE PARTS 3 PRELIMINARY INFORMATION 4 TECHNICAL DATA SHEET 10 13 GENERAL SAFETY REGULATIONS 14 INSTRUCTIONS FOR PACKING AND UNPACKING 16 Handling the machine in its packing 16 U...

Страница 8: ...FORMACIONES PARA LOS USUARIOS 88 OPCIONAL 90 Configur de la máquina con BATERÍAS DE PLOMO y o GEL 90 Restablecimiento config estándard para BATERÍAS DE PLOMO 91 Table des matières page DEMANDES D INTERVENTION 3 PIÈCES DÉTACHÉES 3 INFORMATIONS PRELIMINAIRES 5 FICHE TECHNIQUE 10 13 NORMES DE SÉCURITÉ 15 INSTRUCTIONS POUR L EMBALLAGE ET LE DÉBALLAGE 17 Deplacement de la machine emballée 17 Déballage ...

Страница 9: ...IEN bzw GEL BATTERIEN 92 Wiederherstellung der Standardkonfiguration für BLEI SÄURE BATTERIEN 93 Indholdsfortegnelse side ANMODNING OM ASSISTANCE 3 RESERVEDELE 3 INDLEDENDE OPLYSNINGER 4 TEKNISKE SPECIFIKATIONER 10 13 GENERELLE SIKERHEDSFORSKRIFTER 15 ANVISNINGER FOR EMBALLERING OG UDPAKNING 17 Håndtering af den emballerede maskine 17 Udpakning af maskinen 17 Udpakning 17 Håndtering af den udpakke...

Страница 10: ... marcha atras Max Rückwärtsgeschwindigkeit Maximale snelheid achteruit Maks hastighed i bakgear Velocità max in lavoro Max working speed Km h 5 Vitesse max en travail Velocidad max en trabajo Max Arbeitsgeschwindigkeit Maximale werksnelheid Maks arbejdshastighed Pendenza max superabile in lavoro Max working gradient 2 Pente max en travail Max pendiente superable durante el trabajo Max Arbeitssteig...

Страница 11: ...m meccanico mechanic mécanique mecánico Mechanische mechanisch mekanisk Soulèvement et abaissement Elevación y bajado Anheben und Senken Heffen en zakken Løft og sænk TERGIPAVIMENTO Squeegee Raclette Boquilla de secado Saugfuß Volerwisser Sugefod Tipo Type Typ flottante floating flottant flotante Schwimmend vlottende flydende Depressione aspirazione tergipavimento mm H2O 1200 Vacuum operated Aspir...

Страница 12: ...rtes Wasser gedestilleerd water destilleret vand Wasserbatterie Batterijvloeistof Batterivand Autonomia h Autonomy h Autonomie h Reichweite std Werktijd u Autonomi t 2 30 2 10 3 2 10 2 50 2 50 L autonomia può variare dal tipo di batteria e dal tipo di utilizzo della macchina Autonomy depends on the type of batteryand the use of the machine L autonomie dépend du type de batterie et de l utilisation...

Страница 13: ...trument panel with display x x x x x x Tableau de bord avec moniteur Tablero de instrumentos con visor Instrumentenbrett mit Display Dashbord met display Instrumentpanel med display ACCESSORIINDOTAZIONE Standardequipment Accessoiresendotation Dotaciónaccesoriosestándar Standartausrüstungs Standaardtoebehoren Standardudstyr Tergipavimento Squeegee Raclette Boquilla de secado Saugfuß Vloerwisser Sug...

Страница 14: ...er to lift the machine insert the holding belt under the chassis and fix it on the han dlebar Danger Apart from the regulations envisaged the person in charge of the machine must inform the operators of the rules which follow The fixed or moving housings and safety devices must always be left in place cor rectly secured If the housings are removed or the safety devices either disconnected or short...

Страница 15: ...nsport der Maschine sicher dass diese am Griff mit einem Gurt fest am Transportfahrzeug befestigt wird Zum Anheben einen Gurt unter dem Rahmen durchziehen und am Gurt befestigen Gefahr Die Maschinenbediener müssen eine ge naue Kenntnis der Sicherheitsvorschriften besitzen und vom leitenden Personal zu dem über Folgendes informiert werden Die festen und oder beweglichen Schut zvorrichtungen einschl...

Страница 16: ...ble fu ture transport Unpacking Unpack the machine taking care to avoid any movements which could damage it Check that all all parts are integral If this is not the case DO NOT use the machine and consult your dealer Contents of the package Machine Use and maintenance handbook Spare parts catalogue Declaration of conformity Garantee coupon If you notice any parts are missing contact your dealer im...

Страница 17: ...ine muss mit tels einer Metall oder Holzrampe auf Erdebene gebracht werden Es wird empfohlen die Bügel für eventuelle Transporte aufzubewahren Auspacken Entfernen Sievorsichtig die Verpackung der Ma schine und vermeiden Sie Handgriffe die diese beschädigen könnten Überprüfen Sie ob alle Teile unbeschädigt sind sollte dies nicht der Fall sein nehmen Sie die Maschine NICHT in Betrieb sondern wenden ...

Страница 18: ...i lity of the machine always keep a safe distance from the edges of pavements or sharp drops in floor level where the machine might tip over Never travel across slopes and do not make turns too quickly especially if the floor is not ho rizontal Never use the machine in dark places Take special care if approaching shelving or sta cked objects risk of falling if knocked Caution Do not use the suctio...

Страница 19: ...lossen sein Während des Betriebs stets auf die Sicherheit beachten Während des Betriebs stets auf die Stabilität der Maschine beachten Sicherheitsabstand von den Fußwegen oder von großen Unebenheiten des Bodens einhalten an denen die Maschine kippen könnte Abhänge nicht quer überfahren und Kurven langsam ausfahren insbesondere wenn der Bo den nicht horizotal ist Die Maschine nicht an dunklen Stell...

Страница 20: ...pcional 12 Botones de regulación de caudal de agua opcional 13 Botón de reciclado de agua opcional 14 Botón de fregado con lanza opcional 15 LED de diagnóstico para el chopper de tracción 16 Botón de mando claxon TABLEAU DE BORD 1 Interrupteur de demarrage 2 Moniteur multi fonction 3 Potentiomètre de réglage de la vitesse d avancement 4 Levier de commande avancement 5 Bouton arrêt d urgence 6 Bout...

Страница 21: ...motore aspirazione o un anomalia In fase normale di lavoro la luce della spia rimane fissa Attenzione Lo spegnimento dell aspirazione ha un ritardo di due secondi per permettere lo svuotamento completo del tubo aspirazione 8 Pulsante comando spazzole Comanda la rotazione delle spazzole su tutte le versioni l abbasamento e la pressione sul pavimento solo nelle versioni Mega I S special Nel le versi...

Страница 22: ...led blinks In normal working conditions the led is on In case of over absortion or any other faults for the vacuum motor the led blinks Caution The switching off the vacuum system is retarded by two seconds to permit the completely emptying of the vacuum hose 8 Brush push button On all the version this button switches on off the brushes rotation In the ver sion MEGA I S special it also lead the li...

Страница 23: ...iene un avisador el parpadeo avisa que la función activada tiene una absorción demasiado elevada para el motor de aspiración o una anomalía En fase normal de trabajo la luz del avisador per manece fija Atención El sistema de aspiración se apagará déspues dos segundos para permettir el vaciado del tubo de aspiración 8 Botón de mando cepillos Controla la rotación de los cepillos en todas las version...

Страница 24: ... tivée ou lorsqu il y a une consommation trop élevée du moteur d aspi ration ou une anomalie En phase normale de travail la lumière de la diode reste fixe Attention L arrêt du moteur d aspiration est retardé de deux secondes pour permettre la vidange du tuyau d aspiration 8 Bouton de commande brosses Commande la rotation des brosses sur toutes les versions l abaisse ment et la pression sur le sol ...

Страница 25: ...rt die Ein und Ausschaltung des Ansaugmotors Der Druckknopf ist mit einer Leuchte versehen die blinkt wenn die Funktion eingeschaltet wird oder wenn eine zu hohe Aufnahme des Ansaugmotors oder eine Störung vorliegt Während der normalen Arbeit leuchtet sie durchgehend Achtung Die Löschung der Saug hat verzögert von zwei zweiten einen um das Leeren des Saugrohr zu erlauben 8 Bürsten Drucktaste Er st...

Страница 26: ...ktionen er tilkoblet hvis sugemotorens effektoptag er for høj eller ved uregelmæssighe der Under normal drift lyser kontrollampen konstant Advarsel Frakobling af sugefunktionen sker med to sekunders forsinkelse for at tillade fuldstændig tømning af sugeslangen 8 Børstebetjeningsknap Styrer børsternes rotation på alle versionerne sænkning og tryk på gul vet kun på versionerne Mega I S special På ve...

Страница 27: ...27 FIG 2 A 6 3 3 6 8 8 4 2 2 7 1 1 5 8 9 9 ...

Страница 28: ...da un cattivo funzionamento dell aspirazione in questo caso pulire perfettamente le tubazioni di aspirazione gli ingressi i filtri ed il tergipavimento stesso controllare il funzionamento del motore aspirazione controllare che tutte le aperture d ispezione del serbatoio siano ben chiuse PREPARAZIONE DELLA MACCHINA FIG 2 A Fitting and adjusting the squeegee To suit packaging requirements the squeeg...

Страница 29: ...ar el funcionamiento de los motores de aspiración comprobar que todas los orificios de inspección del depósito estén bien cerrados PREPARACIÓN DE LA MÁQUINA FIG 2 A Montage et réglage de raclette Pour faciliter l emballage la raclette est éventuellement fournie démontée et dans ce cas elle doit être montée sur la plaque de la laveuse Pour le montage de la raclette procéder comme suit positionner l...

Страница 30: ... schlechte Absaugung beeinflußt wird In diesem Fall muß man Ansaugrohre Eingänge Filter und den Saugfuß selbst gründlichst reinigen Saugmotoren genauestens überprüfen Alle Inspektionsöffnungen des Behälters müssen gut verschlossen sein VORBEREITUNG DER MASCHINE FIG 2 A Montering og justering af sugefoden Af hensyn til emballeringen leveres sugefoden nogle gange frakoblet ma skinen og skal i så til...

Страница 31: ...31 FIG 2 B 1 5 6 7 2 4 3 ...

Страница 32: ...ito de recupera ción en su posición original bloquear el déposito con las palancas de cierre Installation des batteries fig 2 b Le batteries doivent être installées dans le loge ment du réservoir de solution détergente auquel il est possible d accéder en soulevant le réser voir du liquide de récupération Pour installer les batteries procéder comme suit s assurer que le réservoir de récupération 1 ...

Страница 33: ...rt Tampico brushes For floors with low resistance to abrasion mar ble with medium and light dirt Abrasive disc Green For intermediate cleaning Abrasive disc Black For thorough cleaning and for highly abrasion resistant floors Caution This machine was designed for use with the brushes indicated by the manufactu rer Using different brushes can compro mise the user s safety To mount or replace the br...

Страница 34: ...böden Klinkerfuß boden Porphyr Quarzzement sehr stark ver schmutzt Bürsten aus Naturfasern Für wenig reibungsfeste Fußböden Marmor leicht oder durchschnittlich verschmutzt Reibescheibe Grün Für durchschnittliche Reinigung Reibescheibe Schwarz Für Tiefenreinigung und für sehr reibungsfeste Fußböden Achtung Diese Maschine wurde für den Gebrauch mit den vom Hersteller vorgesehenen Bür sten entwickelt...

Страница 35: ...35 FIG 3 5 6 1 7 9 10 8 A A B B A OFF MIN MAX A ON C OFF B ECO 5 1 10 7 6 3 4 MEGA I MEGA I S special 2 11 a a b b c c 12 ...

Страница 36: ...l con trol panel and turn it on pos 1 this will sup ply power to the general control system 6 switch on the vacuum by pressing the button 6 7 switch on the brushes by pushing the button 7 The lowering of the brush base ment is automatic on version MEGA I S special while on version MEGA I it is needed to use the pedal 11 8 lowering the squeegee by lever 8 Pos A squeegee raised Pos B squeegee lowere...

Страница 37: ...nk 4 für das Schmutzwa sser leer ist 2 Den Waschlösungstank 3 auffüllen 3 Prüfen dass die Bürsten und Saugfuß vom Boden abgehoben sind 4 Prüfen dass die Bremse 2 entsperrt ist 5 Den Schlüssel 5 in die Hauptschalttafel stecken und im Position 1 drehen hierdurch wird der Hauptschalttafel Strom zugeführt 6 Die Absaugung mit der Schaltknopf 6 einschalten 7 Setzen Sie die Drehung der Bürsten über den D...

Страница 38: ...e trabajo LAVAGE Sur les sols trés sales efectuer un premier passage en distribuiant la solution détergente avec les brosses pour dissoudre la saleté Procéder avec un deuxième passage en employant les brosses pour ôter la sssaleté du sol et la raclette pour sécher Danger Ce type d opération doit être effectué sur une zone dont l accès est interdit aux personnes étrangères au travail cette zone doi...

Страница 39: ...39 FIG 4 B 3 7 6 8 8 8 8 7 6 3 1 2 12 12 13 15 14 4 5 9 A OFF MIN MAX A ON C OFF B ECO 10 10 11 MEGA I MEGA I S special ...

Страница 40: ... e la vaschetta rimontare il coperchio e fermarlo con i suoi pomelli Scarico acqua dal serbatoio soluzione fig 4 b É Consigliato lo scarico dell acqua dal serbatoio soluzione quando la mac china non viene utilizzata frequentemente Per scaricare l acqua aprire il rubinetto 14 Pulizia filtro acqua serbatoio soluzione fig 4 b chiudere il rubinetto acqua mediante la leva 4 ed asta 5 rimuovere la vasch...

Страница 41: ...itar la cubeta del filtro 15 y limpiarlo con agua a presión Remplissage d eau fig 4 b Avant chaque lavage remplir le réservoir de solution à travers l ouverture 1 ou le tuyau 2 en veillant à respecter le dosage eau et détergent Le réservoir est en polyéthylène aussi résiste t il aux acides et aux bases de même qu à la plupart des solvants Choix du détergent fig 4 b Pour assurer un bon nettoyage du...

Страница 42: ...e Maschine nicht häufig benutzt wird Um Wasser abzulassen öffnen Sie den Hahn 14 Säubern Sie Wasserfilter Frischwassertank fig 4 b Schließen Hahn durch den Hebel 4 und Stange 5 Entfernen Sie Abdeckung für Filter 15 und säubern durch einen Wa sserstrahl Påfyldning af vand fig 4 b Inden hver vask fyldes rentvandstanken med den rette mængde vand og rengøringsmiddel ved at åbne dækslet 1 eller anvende...

Страница 43: ...e desechos puesta en lado derecho como es mostrado en la foto Limpiar cuidadosamente la bandeja con agua Restablecer la bandeja en su caja Nettoyage du bac a déchées Mega 512R RS Fig 4 C Pour nettoyer le bac le bac a déchées 1 procédez comme suite Enlever le bac a déchées situé sur le côte droit comme indiquée sur la photo Nettoyer a fond le bac avec eau Retourner le bac dans son emplacement Reini...

Страница 44: ... MEGA 562 FIG 5 C D MEGA 722 722 S MEGA 501 611 611 S 11 11 16 16 10 9 15 15 18 19 20 21 22 23 MEGA 512 R 512 RS 17 18 19 E E 4 4 14 3 2 3 2 12 13 12 13 5 14 F G H H I I F G L MEGA 552 A B 5 O N N P O M M ...

Страница 45: ... sono usurati sostituirle procedere come segue rimuovere i pomelli 20 e il relativo premigomma 21 rimuovere le viti 22 e il relativo premigomma 23 togliere la gomma posteriore 19 e gomma anteriore 18 montare le nuove gomme rimontare i premigomma 21 e 23 riavvitare le viti e i relativi pomelli Provvedere alla regolazione del tergipavimento come descritto al capitolo Montaggio e regolazione del terg...

Страница 46: ...a regulación como se describe en el capítulo Montaje y regula ción de la boquilla de secado fig 2 a ENTRETIEN FIG 5 Attention Toutes les opérations de manutention s effec tuent à machine éteinte et clef de contact enlevée Nettoyage des brosses et raclette Pour procéder à un bon nettoyage avec les brosses et un bon lavage avec la raclette proceder comme suit verifiér que la machine ne fonctionne pa...

Страница 47: ...en Sie die Knöpfe 20 und den dazugehörigen Druckgummi 21 entfernen Sie die Knöpfe 22 und den dazugehörigen Druckgummi 23 entfernen Sie den hinteren Gummi 19 und den vordern Gummi 18 bauen Sie die neuen Gummis ein montieren Sie wieder die Druckgum mis 21 und 23 drehen Sie die Schrauben und die entsprechenden Knöpfe wieder auf Einstellen Sie die Saugfuß wie im Abschnitt Montage und Einstel lung Saug...

Страница 48: ...48 FIG 6 3 3 4 1 2 2 ...

Страница 49: ... velocidad operativa o de desplazamiento vea fig 1 pos 3 SYSTÈME DE DÉPLACEMENT FIG 6 L auto laveuse se déplace grâce à un système électrique composé d un moto réducteur 1 placé sur les roues et d une unité de contrôle électro nique 2 qui commande l avancement voir le châpitre INSTALLATION ÉLECTRIQUE unité de contrôle électronique Les leviers 3 permettent la marche de la machine voir aussi fig 1 p...

Страница 50: ...50 FIG 7 1 2 3 4 ...

Страница 51: ...bar y regular el freno como míni mo cada tres meses FREINS FIG 7 option Les freins permettent d arrêter l auto laveuse alors que celle ci est en mouvement et de la maintenir à l arrêt lorsqu elle se trouve sur un plan incliné 1 le système de freinage agit sur les roues par l intermédiaire de patins 1 2 la commande de frein est de type mécani que par levier 3 pour bloquer le frein en position de st...

Страница 52: ...52 FIG 8 5 4 2 3 1 6 7 8 9 ...

Страница 53: ...o billas comprobarlos y si es necesario sustituirlos Para volver a montarlos de nuevo proceder en sentido inverso MOTEUR D ASPIRATION FIG 8 Le moteur d aspiration sert à aspirer l eau recueil lie par la raclette Le moteur d aspiration 1 est mis en marche par l intermédiaire du bouton 2 Attention Toutes les six mois contrôler le moteur d aspiration ou les balais du moteur et les changer s ils sont ...

Страница 54: ...ing day has not dropped below 1 24 28 Bè Overcharging is the most common error in the use of drive batteries If the batteries are conti nuously overcharged their lifetime may be dra stically shortened The maximum recommended temperature is 45 C If the electrolyte temperature rises more than 10 12 C over the ambient temperature overcharging may occur regardless of the actual temperature reached If ...

Страница 55: ... 6 mm über den Plat ten erreicht Anfangs ist dieser Vorgang bei jeder Aufladung durchzuführen später erfahrungsgemäß weniger häufig Zwischen zwei Nachfüllungen darf jedoch nie mehr als eine Woche vergehen Ladegrenzen Ein Nachladen der Batterie ist nicht notwendig wenn die Dichte am Ende des Arbeitstages nicht unter 1 24 28 Bè gesunken ist Der häufigste Fe hler bei Traktionsbatterien ist Überladung...

Страница 56: ...56 FIG 9 3 4 A 3 4 A 1 8 9 10 11 12 7 6 MEGA I MEGA I S special 2 2 5a 5b ...

Страница 57: ...e Maxi 40Ade aspiración 9 Fusible Maxi 80A de tracción 10 Fusible Maxi 80A de los cepillos 11 Fusible 5A del salpicadero 12 Claxon INSTALLATION ÉLECTRIQUE FIG 9 Unité électronique et Moniteur L auto laveuse est dotée d une unité électroni que 1 qui assure le contrôle du déplacement et d une carte électrique 2 avec moniteur multi fonctions pour les programmes de lavage et les réglages Ces appareils...

Страница 58: ...azz Motore spazz Motore asp chiave Pot 220K 7CFG0000 1 2 3 4 5 6 7 8 9 10 11 12 13 14 15 16 Elettrovalvola Acqua Bobina Teleruttore Spazzole Bobina Teleruttore Aspiratore Motore Trazione Marcia Indietro Marcia Avanti 12Vdc 12Vdc F4 5A Carica Batterie 11 10 9 8 4 5 2 3 7 1 6 12 SCHEMA ELETTRICO WIRING SCHEME DIAGRAMA ELÉCTRICO SCHÉMA ÉLECTRIQUE SCHALTPLAN EL DIAGRAM ...

Страница 59: ...A Maxi de tracción F3 Fusible 40A Maxi de aspiración F4 Fusible 5A del sapilcadero F5 Fusible 3A de la tarjeta eléctrica Description schéma électrique fig 10A 1 Interrupteur de demarrage à clé 2 Unité électronique 3 Moteur de traction 4 Relais aspiration 5 Telerupteur des brosses 6 Électrovalve 7 Carte électrique Moniteur et Boutons 8 Moteur aspiration 9 Moteur brosse 10 Moteur brosse 11 Batteries...

Страница 60: ... 5 6 7 8 1 2 3 4 5 6 7 8 9 10 1 2 3 4 5 6 7 8 9 10 11 12 Motore spazz Motore spazz Motore asp J1 J3 J6 Relè Aspiratore Tel Spazzole Termico Elettrovalvola Claxon 7CFM0000 Pompa Acqua Pompa Detergente Attuatore Spazzole Pot 220K 12Vdc 1 2 12Vdc 1 2 7CH4Q47A F5 20A 16 8 6 13 14 15 12 10 6 7 9 8 4 5 11 3 1 2 17 SCHEMA ELETTRICO WIRING SCHEME DIAGRAMA ELÉCTRICO SCHÉMA ÉLECTRIQUE SCHALTPLAN EL DIAGRAM ...

Страница 61: ... Fusible 80A Maxi de tracción F3 Fusible 40A Maxi de aspiración F4 Fusible 5A del salpicadero F5 Fusible 20A de la tarjeta eléctrica Description schéma électrique fig 10B 1 Interrupteur de demarrage à clé 2 Unité électronique 3 Moteur de traction 4 Pompe à eau option 5 Avertisseur 6 Relais aspiration 7 Protection thermique 8 Telerupteur des brosses 9 Électrovalve 10 Actionneur des brosses 11 Carte...

Страница 62: ...heck the motor s wires if ok and the controller repeats this alarm change it 8 Power fuse or on board contactor damaged Controller detects a failure on the external power fuse or power connections If the controller repeats this alarm and the power connec tions are ok change it 9 Undervoltage Check battery s charge 10 Overvoltage Battery voltage upper than 45V check the battery 11 Overload protecti...

Страница 63: ...d überprüfen Sie den Motorstrom 6 Stufe Leistung beschädigt Ersetzen Sie die elektronische Steuereinheit 7 Überstromschutz Kurzschluss Überprüfen Sie die Anschlüsse des Motors wenn die Verbindungen sind regelmäßige und der Alarm wird wiederholt Ersatz der elektronischen Steuereinheit 8 Leistungsicherung oder Relais an Bord beschädigt Batterie Extern Sicherungsausfallüberwachung oder Verbindungen E...

Страница 64: ...actuator Final stroke position not reached on time MAX 10 seconds E5 E6 Brushes actuator Start stroke position not reached on time MAX 10 seconds Diagnostics DISPLAY 4 Fig 9 MEGA I Call the Authorized Service Staff Alarm Alarm description A1 The flashing of the indicator light indicates that the 3A fuse on electric board is blown and all the functions have been disabled Switch off the machine disc...

Страница 65: ...rechtzeitig erreicht Max 10 Sekunden E5 E6 Bürsten Stellmotor Start Hubposition nicht rechtzeitig erreicht Max 10 Sekunden Diagnostik DISPLAY 4 Fig 9 MEGA I Rufen Sie den autorisierten Kundendienst an Alarm Fehlerbeschreibung A1 Die blinkende Leuchte auf dem Display zeigt an dass die Sicherung von 3A auf der Platine durchgebrannt ist hierdurch werden alle von der Platine durchgeführten Funktionen ...

Страница 66: ... 2 sulla presa 5 di corrente a 220V Se il Led rosso lappeggia indica che e batterie sono scariche Pertanto ricaricare le batterie ON BOARD BATTERY CHARGER FIG 11 OPTIONAL Warning Read carefully the instructions handbook 2 fig 11 a supplied with the battery charger The electrical system operates at 24 V and is powered by two 12V bat teries 24 V Max 118 Ah Never continue operating the machine until ...

Страница 67: ...e 5 de courant à 220V Si le led rouge sur l échelle graduée clignote la batterie est déchargée Recharger la batterie EINGEBAUT BATTERIELADEGERÄT FIG 11 OPTION Achtung Lesen sie soigfältig die Anweisungen aus dem mit gelieferten Han dbuch 2 fig 11 a dem Ladegerätes Die Elektroanlage besitzt eine Spannung von 24V die durch eine Gruppe von zwei Batterien zu 12V 24V MAX 118Ah gespeist wird Die Maschin...

Страница 68: ... por medio de los interruptores dipswitch 1 en el cargador de batería vease la foto y con sultar la tablas cargador CBHF1 SM 24V 12A configuración dip switch Recharge des Batteries au Plomb Acide ou Gel Le Chargeur est predisposé pour la recharge des batteries au plomb ou Gel Les étalonnages pour le type de batterie doivent être effectués en utili sant les interrupteurs dipswitch 1 placés sur le c...

Страница 69: ...P 8 per la selezione del votaggio batteria DIP 1 DIP 2 DIP 3 DIP 4 per la selezione della CURVA DI CARICA DIP 1 DIP 2 DIP 3 DIP 4 CHARGING CURVE ON ON ON ON 0 OFF ON ON ON 1 Curve for LEAD ACID Wet traction batteries ON OFF ON ON 2 OFF OFF ON ON 3 ON ON OFF ON 4 OFF ON OFF ON 5 ON OFF OFF ON 6 Curve for AGM and GEL batteries and other manufacturers OFF OFF OFF ON 7 ON ON ON OFF 8 OFF ON ON OFF 9 O...

Страница 70: ...selección del voltaje de la batería DIP 1 DIP 2 DIP 3 DIP 4 para la selección de la CURVA DE CARGA DIP 1 DIP 2 DIP 3 DIP 4 COURBE DE CHARGE ON ON ON ON 0 OFF ON ON ON 1 Courbe pour batteries de traction type PLOMB ACIDE avec liquide ON OFF ON ON 2 OFF OFF ON ON 3 ON ON OFF ON 4 OFF ON OFF ON 5 ON OFF OFF ON 6 Courbe pour batteries AGM et GEL et d autres fabricants OFF OFF OFF ON 7 ON ON ON OFF 8 O...

Страница 71: ...DEKURVE 11 geselecteerde DIP 8 für die Auswahl der Batteriespannung DIP 1 DIP 2 DIP 3 DIP 4 für die Auswahl der LADEKURVE DIP 1 DIP 2 DIP 3 DIP 4 OPLADNINGSKURVE ON ON ON ON 0 OFF ON ON ON 1 Kurve for BLY SYRE batterier med væske ON OFF ON ON 2 OFF OFF ON ON 3 ON ON OFF ON 4 OFF ON OFF ON 5 ON OFF OFF ON 6 Kurve for AGM OG GELE batterier forseglede og andre fabrikanter OFF OFF OFF ON 7 ON ON ON OF...

Страница 72: ...WATER SYSTEM See Fig 1 Pos 13 Optional SISTEMA DE RECICLADO DE AGUA Véase Fig 1 Pos 13 Opcional SYSTÈME DE RECYCLAGE D EAU Voir Fig 1 Pos 13 Option WIEDERVERWERTUNGSY STEME DES WASSERS Siehe Fig 1 Pos 13 Option RECIRKULATION AF VAND Se Fig 1 Pos 13 Ekstraudstyr ...

Страница 73: ...Opzionale SPRAY AND SUCTION DEVICE KIT See Fig 1 Pos 14 Optional FREGADO CON LANZA Véase Fig 1 Pos 14 Opcional LANCE JET D EAU Voir Fig 1 Pos 14 Option SPRUEHUNDSAUGLANZEKIT Siehe Fig 1 Pos 14 Option VASK MED LANSE Se Fig 1 Pos 14 Ekstraudstyr ...

Страница 74: ...74 FIG 12 4 3 1 2 ON OFF ON OFF KIT A KIT B 7 7 6 5 8 8 MEGA I S special ...

Страница 75: ...TA DI QUESTA POMPA IN TERVENIRE ANCHE SUL PULSANTE 1 IMPOSTANDO IL PROGRAMMA DILUIZIONE DETERGENTE SU DET0 VI SUALIZZATO SUL DISPLAY 4 INFINE ESCLUDERE LA E POMPA E PORTANDO IL RUBINET TO 8 SU POSIZIONE OFF WASHING PROGRAMS BY PUMP WITH DETERGENT BY PUMP WITHOUT DETERGENT FIG 12 OPTIONAL Pump washing program WITH detergent RCM 02 See KIT A Display 4 will show the programm RCM 02 in case that the e...

Страница 76: ... PULSADOR 1 Y ESTABLECER EL PROGRA MA DET0 DE DOSIFICACIÓN DEL DETERGENTE VISUALIZA DO EN LA PANTALLA 4 FINALMENTE EXCLUIR LAS BOMBAS REGULANDO LA LLAVE DE PASO 8 EN LA POSICIÓN OFF PROGRAMME DE LAVAGE AVEC POMPE ET DÉTERGENT AVEC POMPE SANS DÉTERGENT FIG 12 OPTION Programme avec pompe ET détergent RCM 02 Voir KIT A Quand l installation électrique est activée et que l autolaveuse est predispo sée ...

Страница 77: ... SIE DAS PROGRAMM DET0 EIN FÜR DAS VERDÜNNUNGSWASSER DES WASCHMITTELS AUF DEM DISPLAY 4 ANGEZEIGT SCHLIESSLICH STELLEN SIE DEN WASSERHAHN 8 AUF POSI TION OFF UM DIE PUMPEN AUSZUSCHLIESSEN VASKEPROGRAM VED HJÆLP AF PUMPE MED RENGØRINGSMIDDEL OG PUMPE UDEN RENGØRINGSMIDDEL FIG 12 EKSTRAUDSTYR Program med pumpe og rengøringsmiddel RCM 02 Se KIT A Hvis gulvvaskemaskinen er indstillet på dette program ...

Страница 78: ...vez realizada dicha revisión deberá colocar en la máquina una etiqueta indicando que ha sido comprobada OPÉRATIONS PÉRIODIQUES DE CONTRÔLE ET ENTRETIEN ET CONTRÔLES DE SÉCURITÉ 1 La machine doit être révisée par un technicien spécialisé qui de vra contrôler les conditions de sécurité ou la présence de dom mages ou de défauts éventuels dans les cas suivants avant la mise en marche après des modific...

Страница 79: ...Check the clean water tank filter x 3 Clean the clean water tank filter x 4 Check cleanliness of vacuum pipelines and squeegee x 5 Check state of brushes x 6 Check state of squeegee rubber blades x 7 Check the motors carbon elements x 8 Check safety devices microswitch emergency stop button etc x Operaciones periódicas de comprobación y mantenimiento efectuarse cada horas 8 40 125 200 500 1500 1 L...

Страница 80: ...0 1 Schmutzwasserbehälter reinigen x 2 Filter Frischwasserbehälter prüfen x 3 Filter des Reinwassertanks reinigen x 4 Ansaug und Saugfußleitungen reinigen x 5 Bürstenzustand prüfen x 6 Zustand der Gummikante am Saugfuß prüfen x 7 Den Zustand der Kohlebürsten von jedem Motor prüfen x 8 Die Sicherheitsvorrichtungen kontrollieren Mikroschalter Notschalter usw x Periodiske eftersyn og vedligeholdelse ...

Страница 81: ...chiave dell interruttore generale 1 fig 1 non è inserita Inserire chiave e ruotare su pos 1 Le batterie sono scariche Controllare o ricaricare Le batterie sono scollegate Collegare batterie Fusibile del quadro avviamento bruciato F4 Fig 10 Leggere NOTA Fusibili bruciati fig 10 Leggere NOTA Pulsante arresto d emergenza inserito Disinserire ripetere procedura di avviamento vedi USO DELLA LAVASCIUGA ...

Страница 82: ...t inserted Insert and turn the key on pos 1 The batteries are flat Check batteries or recharge Batteries disconnected Connect batteries Fuse F4 Fig 10 for dashboard blown Read NOTE Fuses blown fig 10 Read NOTE Emergency stop button engaged Release the button and repe at the start up procedure see USING THE SCRUBBER DRIER fig 3 The machine does not start or it stops suddenly Led on the dahsboard li...

Страница 83: ... ha introducido la llave 1 fig 1 de encendido general IIntroducir y girar la llave en pos 1 Las baterías están descargadas Comprobar o recargar Las baterías están desconectadas Conectar Fusible del salpicadero está quemado F4 Fig 10 Leer ADVERTENCIA Fusibles quemados fig 10 Leer ADVERTENCIA Pulsador de emergencia está activado Desacople el pulsador y repita el procedimiento de arranque vèa se USO ...

Страница 84: ...lenchée Introduire et tourner la clé sur pos 1 Les batteries sont déchargées Contrôler ou recharger Batteries débranchées Brancher les batteries Fusible du tableau de bord grillé F4 Fig 10 Lire la NOTES Fusibles grillés fig 10 Lire la NOTES Bouton d arrêt d urgence enclenché Débloquer le bouton d arrêt d urgen ce et répéter la procédure de mise en marche voir UTILISATION DE L AUTOLAVEUSE fig 3 La ...

Страница 85: ...erien abgetrennt Batterien anschließen Armaturenbrett Sicherung verbrannt F4 Fig 10 Lesen Sie ANMERKUNG Sicherungen durchgebrannt fig 10 Lesen Sie ANMERKUNG Notstoptaste gedrückt Drucktaste ausschalten und die Startprozedur wiederholen siehe GEBRAUCH DERBODENREINI GUNGSMASCHINE Fig 3 Die Maschine startet nicht oder stopt plötzlich Das Led auf dem Armaturenbrett Blinken sehen DIAGNOSTIK LED3 seite6...

Страница 86: ...ned Maskinen starter ikke Tændingsnøglen 1 fig 1 er ikke sat i Sæt nøglen i og drej den i pos 1 Batterierne er afladede Kontrollér eller oplad Batterierne er frakoblede Tilkobl batterierne Tændingspanelets sikring er brændt F4 Fig 10 Se BEMÆRKNING Sikringerne er brændte fig 10 Se BEMÆRKNING Nødstopknap er trykket ind Udløs den og gentag startproce duren se BRUG AF GULVVASKE MASKINEN fig 3 Maskinen...

Страница 87: ...como baterías aceite del motor etc atenerse a las leyes vigentes en la materia de eliminación y depuración INFORMATIONS DE SÉCURITÉ 1 Nettoyage Pour les opérations de nettoyage et de la vage de la machine utiliser avec précau tion les détergents agressifs les acides etc S en tenir aux instructions du produc teur des détergents et au besoin utiliser des vêtements de protection tels que sur vêtement...

Страница 88: ... away this equipment must therefore contact the manufacturer and follow the system adopted by the latter in order to allow separa te collection of the equipment at the end of its lifetime Suitable separate collection for subsequent sending of the equipment cast off for recycling treatment and environmentally compatible di sposal contributes to preventing possible nega tive effects on the environme...

Страница 89: ...steller organisiert und verwaltet Der Nutzer der dieses Gerät entsorgen möchte muss sich demnach an den Hersteller wenden und das System be folgen das dieser anwendet um die getrennte Sammlung des Geräts am Ende seiner Leben sdauer zu ermöglichen Die angemessene getrennte Sammlung für die nachfolgende Zuführung des Altgeräts zum Recycling zur Behandlung und zur umweltge rechten Entsorgung trägt da...

Страница 90: ...nd B as shown in the photo 2 Keep the keys pressed A and B until the message Pb 24 starts to flash on the display At this point press key B to switch to and set to a machine with GEL BATTERIES The di splay will show a message GE 24 which will continue to flash for a few seconds As soon as the flashing stops the machine will be rea dy for a new configuration 3 Switch the machine off and back on aga...

Страница 91: ...lash for a few seconds As soon as the flashing stops stan dard configuration will be reset 3 Switch the machine off and back on again When the machine starts back up the standard configuration will be displayed in the second piece of information namely Pb 24 The machine is now configured with the parameters for LEAD ACID BAT TERIES Versions MEGA I 1 switch on the machine and wait the infor mation ...

Страница 92: ...erscheint Pb 24 müssen die Tasten A und B siehe Foto gleichzei tig gedrückt werden 2 Die Tasten A und B gedrückt halten bis auf Display die Aufschrift Pb 24 au fzublinken beginnt Die Taste B drücken um die Maschine für den Betrieb mit GEL BATTERIEN einzustellen Auf Display er scheint die Aufschrift GE 24 die einige Sekunden lang aufblinkt Sobald die Au fschrift nicht mehr aufblinkt ist die Maschi ...

Страница 93: ...24 aufzublin ken beginnt Die TasteAdrücken um die Ma schine für den Betrieb mit BLEI SÄURE BAT TERIEN einzustellen Auf Display erscheint die Aufschrift Pb 24 die einige Sekunden langaufblinkt SobalddieAufschriftnichtmehr aufblinkt ist die Standardkonfiguration wieder hergestellt 3 Die Maschine aus und wieder einschalten Bei Wiedereinschalten der Maschine wird als zweite Display Information die Sta...

Страница 94: ... manija del freno y bloquearla con palanca apropiada opcional fijar la máquina al vehiculo de transporte con correas apropiadas TRANSPORT DE LA MACHINE Lorsque la machine doit être transportée il est important de s assurer que les réservoirs soient vides réservoir d eau propre et réservoir d eau sale souveler les brosses et la raclette bloquer la machine au moyen de la poignée de frein option fixe...

Отзывы: